As described by the Autopsy Committee of the College of American Pathologists, the autopsy is “a medical-surgical procedure by a physician for the welfare of the living through the study of those patients for whom all our current knowledge and technology were inadequate” (
1). The use of the autopsy in medicine as a tool of discovery and education has declined frighteningly in the past 25 years, with some newer hospitals not even including an autopsy suite in their design. In many hospitals, including university hospitals, the autopsy incidence (autopsies compared to number of deaths) has dropped well below 20%, often reaching as low as 2% to 5%. Pediatric hospitals have historically had a higher incidence, often as high as 75% or more, but in recent years, this incidence has declined as well. In a survey in 2005 (by the author) of 15 children’s hospitals, the autopsy rate for in-hospital deaths varied from 15% to 48% with an average of 32%, and that figure represented a 5% to 10% drop from the rate in 2000 at these same children’s hospitals.
Many excellent textbooks and protocols have been written describing methods for performing an autopsy. The following is a technique the author has developed over the past 40 years, often incorporating many techniques from these textbooks and colleagues’ experience. This type of autopsy has proven useful to the author, but is by no means the only procedure that might be used.
THE STANDARD PEDIATRIC AUTOPSY
Autopsy Permit
The first step with any autopsy is examination of the autopsy permit for its completeness. This includes a determination of the nature of the death of the patient and whether it may be under medical examiner jurisdiction (i.e., a coroner’s case). It is imperative that the pathologist performing the autopsy be intimately familiar with the criteria for medical examiner jurisdiction in the community in which the patient died. The College of American Pathology maintains a state-by-state file of these criteria (www.CAP.org).
Following examination of the autopsy permit, the clinical chart of the patient should be reviewed and a call placed (if possible) to the attending physician or other members of the medical team responsible for the patient. In addition to a review of the clinical or hospital course of the patient, the medical team should be asked what questions they might have that the autopsy should address.
A variety of forms and protocols are available for the pediatric autopsy, and one of these might be used or one designed specifically to address the types of patients in a particular hospital.
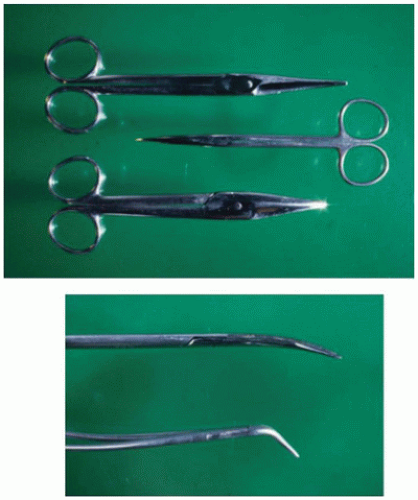
Instrumentation
The instruments used in performing the pediatric autopsy are often quite different than those used in adult autopsies, both in type and size (
Figure 1A-1). Pediatric autopsies, particularly those done on fetuses and neonates, require smaller and more delicate instruments than the “full-sized” instruments used on larger children or adults (
Table 1A-1). In morgues where adult autopsies are also done, it is often wise to keep the instruments used for the pediatric autopsy in a separate area, even under lock and key, if necessary, to assure they are not used (and abused) doing autopsies on adults.
FACE, EYES, EARS, MOUTH (EXTERNAL AND INTERNAL)
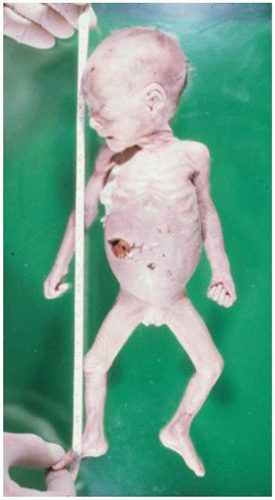
Examination of the
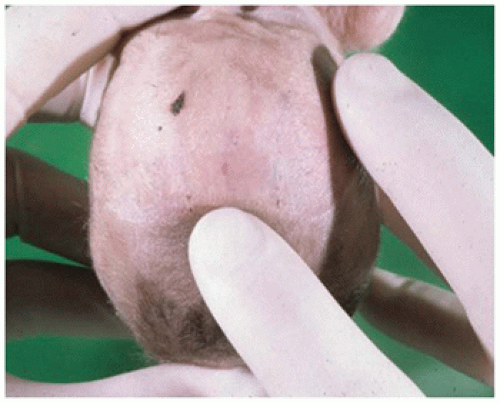
face begins with an overall view to determine symmetry and gross abnormalities. As facial abnormalities often predict brain abnormalities, special attention should be paid to midfacial development (hypertelorism/hypotelorism, nasal bridge deformities) and hair patterns. The hair growth pattern usually consists of one or two whorls in the upper occipital/parietal area. More than two whorls or actual defects in the scalp (eFigure 1A-2) are often associated with underlying CNS abnormalities. The anterior and posterior fontanelles should be examined for their size (maximum length and width), shape, and “fullness”
(i.e., bulging, depressed) (
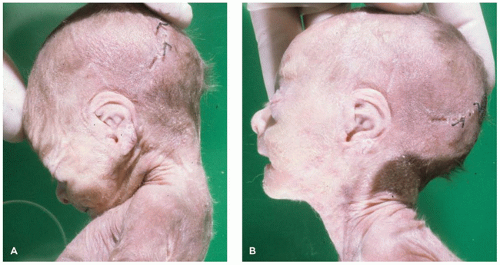
Figure 1A-4). The
neck should be flexed and extended as far as possible to determine its range of motion (
Figure 1A-5A, B).
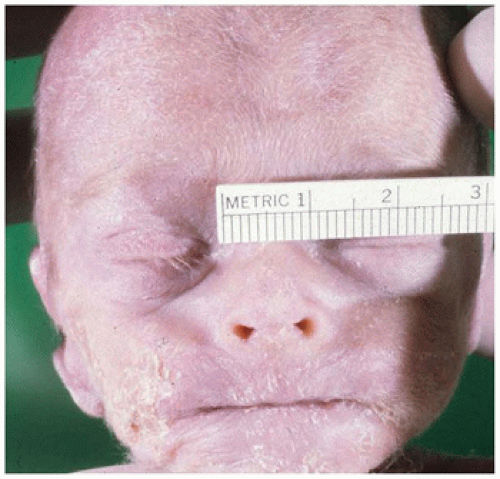
The
eyes are examined for both size and location. The measurement of each palpebral fissure should, in a normal infant, equal the intercanthal distance (
Figure 1A-6) effectively dividing the face at the level of the eyes into three equal expanses. If the fissure length exceeds the intercanthal distance, the eyes are closer together than normal (hypotelorism), and conversely, if the intercanthal distance exceeds the palpebral fissure length, the eyes are too far apart (hypertelorism).
Examination of the eye itself includes the diameter of each pupil and comparison with each other to determine if the eyes are of equal size (eFigure 1A-3). If one is smaller than the other, microphthalmia may be present. If there is a question, the eyeballs may be removed from within the cranium after the brain is removed (see CNS examination). The pupils are also examined for their symmetry and completeness (vs. aniridia) and their color (which may be difficult to determine in a premature infant).
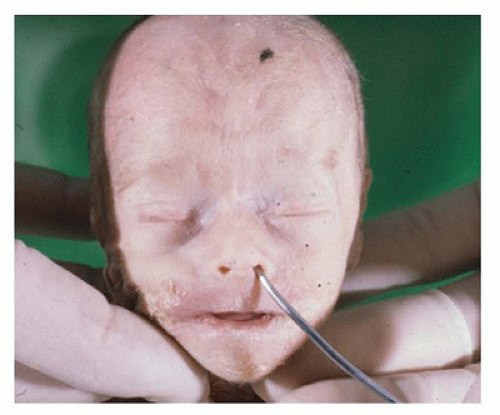
The
nose examination includes its position and shape (e.g., upturned, flat) with evaluation of cartilage development. A curved probe can be used to determine the patency of the choanae (posterior nasal apertures) (
Figure 1A-7). The lip beneath the nose (the prolabium) should be observed and determined if longer than usual (associated with the fetal alcohol syndrome).
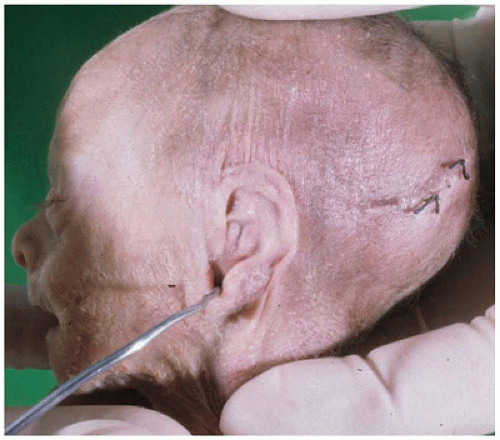
Examination of the ears begins with determining their position on the side of the head relative to the level of the palpebral fissures. In near-term and term infants, the tip of the ears should be above the level of the palpebral fissures, or they are considered to be “low set.” As the ears develop in utero, they “move” upward as the lower face and jaw develop and expand, reaching and then rising above the palpebral fissure level in late third trimester.
The ears are also examined for patency of the external auditory canal (via small caliber probe) by pulling down
on the earlobe as the probe is inserted (
Figure 1A-8). The external ear (pinna or auricle) should be evaluated for its shape and completeness and for the presence of cartilage.
The mouth should be inspected both externally and internally. A finger can be inserted into the mouth to examine the alveolar ridges of the jaw for the presence (or absence) of teeth and for determination of the shape and completeness of the palate (eFigure 1A-4). The tongue can be palpated as well but may also be removed intact after the thoracic organs have been removed (see below).
ARMS, HANDS, FINGERS
The upper extremities are examined for symmetry, mobility, and the presence of skin lesions. The axilla should be palpated for the presence of lymph nodes or other masses. The positioning and mobility of the fingers should be noted along with their length. Some chromosomal anomalies (e.g., trisomies 13 and 18) may produce an overlapping of the little finger over the fourth finger and the index finger over the third finger (eFigure 1A-5). Children with Down syndrome (trisomy 21) often display short metacarpals and phalanges and hypoplasia of the midphalanx of the fifth finger (eFigure 1A-6). Nails should be examined for the presence of hypoplasia or dysplasia. Radiographs of the extremities may be helpful in identifying skeletal abnormalities (e.g., radial hypoplasia of the VATER association) or recent or old fractures. In fact, in cases of suspected nonaccidental trauma (NAT), a full skeletal survey would be important.
The palms of the hands should be examined for aberrant patterning, most notably for the presence of a simian crease or a malpositioned axial triradius, common findings in Down syndrome but also seen in a wide variety of other syndromes.
CHEST: FRONT AND BACK
Examination of the chest begins with the determination of its symmetry, position of the nipples, and length and positioning of the sternum (e.g., pectus excavatum or carinatum). The junction of the neck with the chest should be examined to note the shape and the length of the neck (short neck or webbed skin). The clavicles should be palpated for degree of development (e.g., hypoplasia) and the presence of fractures. Breast development should be determined using a system such as the Tanner stage I to V system (
2).
Turning the body over or rolling it on its side allows examination of the back for symmetry (e.g., scoliosis, lordosis) and the presence of lesions. Particularly important in infants is the presence of spinal and vertebral column defects indicative of meningomyelocele and spina bifida, remembering that one form, spinal bifida occulta, may not be visible as a skin defect.
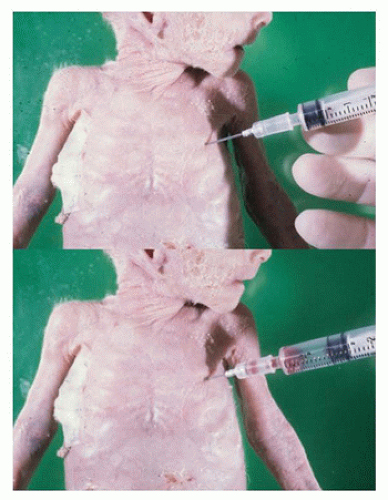
At this point, prior to the opening of the chest and abdomen, aspiration of the thorax for air, blood, and/or fluid can be performed. In young children, in particular, the presence of air or fluid in each hemithorax can be determined as well as its amount. With the body in the supine position, a 12- to 14-gauge needle on a 5- to 25-mL syringe (depending on the size of the child), can be inserted parallel to the autopsy table at the rib-sternal junction between the 4th and 5th or 5th and 6th ribs, being careful to avoid the heart (
Figure 1A-9). When inserted through the parietal pleura, aspiration of air or fluid within the free space of the hemithorax can be attempted. If nothing is present as the syringe plunger is pulled back, the plunger when released will move back toward the needle. If air or fluid is present, it will be withdrawn as the plunger is pulled back until it can no longer be done. At this point, the amount of fluid/air in the syringe can be measured and, if a sterile draw has been done, the fluid may be sent for culture. If the plunger is pulled back to its maximum length, the needle and/or syringe can be removed, the amount of air/fluid can be measured and expelled from the syringe, and then the needle and/or syringe can be reinserted into the same needle hole for aspiration of as much air/fluid as is left (repeating as many times as needed). The same procedure can then be performed on the other hemithorax. This allows for an accurate measurement of the amount of pneumothorax, hemithorax, or transudate/exudate present on each side.
ABDOMEN: FRONT AND BACK INCLUDING ANUS/VAGINA, URETHRA
The shape of the abdomen should be evaluated looking for distension (e.g., ascites or abdominal air), depression (e.g., secondary to dehydration), and wall thickness (edema, muscular atrophy, etc.). Sterile aspiration of abdominal fluid may be performed for culture prior to incising the abdominal wall. Signs of premortem medical intervention such as needle marks or incisions should be recorded. In newborn infants, the umbilicus should be examined for evidence of inflammation or necrosis and, if present, the stump of the umbilical cord may be examined for the presence of two umbilical arteries and one umbilical vein. Discoloration of the abdominal wall may indicate underlying hemorrhage, infection, or gastrointestinal necrosis as in neonatal necrotizing enterocolitis (eFigure 1A-7).
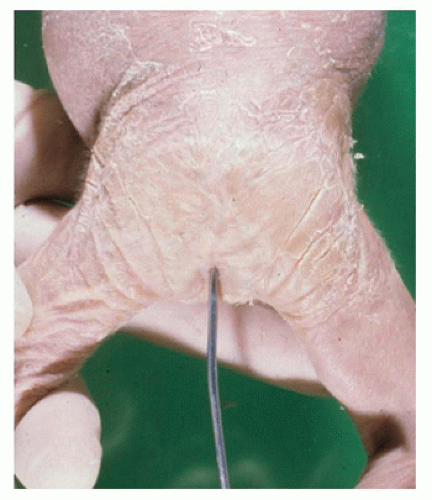
The external genitalia can be examined for anatomic development and, in infant boys, the presence or absence of
testes in the scrotum should be noted along with the size and development of the penis. A staging system can be used to describe pubic hair growth in male and females. In females, the patency of the vaginal opening may be determined with a probe (eFigure 1A-8). Similarly, the anus should be probed for patency in neonates, recognizing that anal atresia may be higher than the anal opening (
Figure 1A-10). The presence of meconium is a clear sign of anal patency.
LEGS, FEET, TOES
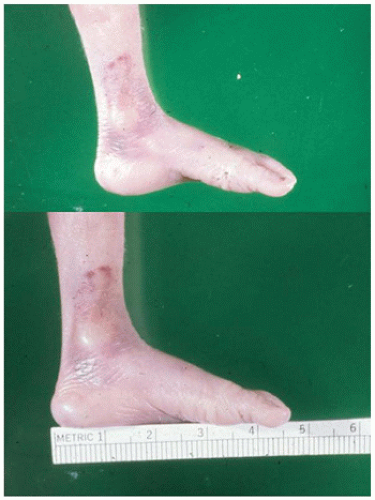
The lower extremities should be examined for symmetry and length (i.e., in proportion to trunk and arm length). In infants, the hips can be rotated to determine laxity. Feet should be examined for the presence of an arch to the sole (
Figure 1A-11), versus a “rocker-bottom” configuration as may be seen with certain trisomies (eFigure 1A-9). Five toes should be present on each foot, and the spaces between toes should be of equal depth.
Special Techniques and Studies
Photography
Photography is an integral and highly important part of any autopsy, particularly images of abnormalities or gross pathology for which microscopic sections may be inadequate documentation. And with the availability of digital technology, many photographs can be taken with the “excess or unnecessary” images easily removed at no cost. While fixed photography equipment is useful, a handheld camera is more easily utilized and encourages the taking of images throughout the performance of the autopsy.
Basic images should include the external surface of the body (front and back) and anterior and lateral views of the face. Incisions and other surface marks on the face trunk and extremities may be photographed and documented particularly in cases of suspected NAT. A ruler placed at the edge of the picture helps define the dimensions of a lesion. Images of internal organs are taken as needed to document anatomic abnormalities or specific pathologic changes (e.g., necrosis, hemorrhage).
Radiography
Imaging via x-rays, MRI, or CT can be important in diagnosing and documenting skeletal abnormalities from chondrodysplasias to fractures. They may also be helpful in recording the presence of such things as pneumothorax, pneumopericardium, and pneumoperitoneum, along with documenting the extent of tumor involvement in metastatic diseases.