Structural analysis
Can we usefully compare postural and structural relationships in terms of these myofascial meridians? Can this information be developed into unambiguous treatment strategies for unwinding and resolving body-wide patterns of compensation? Attempts at objective and inter-operator reliable visual analysis of overall postural patterns are fraught with difficulty, with few norms having been established scientifically.1,2 Yet, useful clinical information can be gleaned from an analysis of the standing client. This chapter puts forward one method for obtaining such information and putting it to use. In this chapter, we refer only to still photos of standing posture; in practice, such information would and should be corroborated with a carefully taken history, palpation, and gait or other movement assessment.
The Anatomy Trains map was first developed as a visual assessment tool for Structural Integration clients (see Appendix 2 on our Structural Integration method). This chapter describes the language and method of ‘bodyreading’ that we employ in our training seminars, where we systematically expand this introductory overview to standing assessment. Although this process is most easily assimilated when taught in person, attentive readers will be able to utilize this tool with their own clients, patients, or students, to apply various therapeutic protocols in a global and progressive manner. A ‘Visual Assessment’ DVD course based on these same principles is also available (DVD ref: BodyReading, 101). 
This assessment tool rests on the concept of ‘tensegrity’ put forth at the end of Chapter 1. Practitioners seeking bio-mechanical alignment and other forms of movement efficiency, as well as kinesthetic literacy (an accurate sensing of where our body is in space and how it moves), or even psychosomatic ease, will do well to consider the unique properties tensegrity geometry shares with the human body. These include tensegrity’s unique ability to ‘relax into length’ as well as its distributive properties, accommodating local strain or trauma by dispersing it via small adjustments over the entire system (see Fig. 1.50, p. 47).
The process of modeling the human frame in this way is just getting underway, but already a certain sophistication is available in the tensegrity models of Tom Flemons (www.intensiondesigns.com – Fig. 11.1). The relationship between the bones, myofasciae, and ligaments is more closely approximated when the common tensegrity icosahedron is modified to approach that of Figure 11.2, which is the same set of relationships, just shifted in their attachments: a process we can see happening to the connective tissue network in vivo in the films of Dr J-C. Guimberteau (Figs 1.70–1.72, pp. 58–60) (DVD ref: Interior Architectures). 
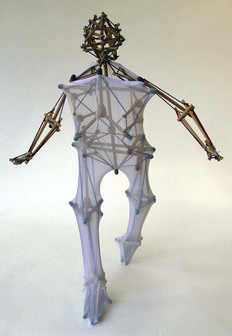
Fig. 11.1 The wonderful and varying models of Tom Flemons (www.intensiondesigns.com) demonstrate clear similarities to human postural response and compensation patterns. With each iteration, these models get more sophisticated; more complex models appear on the website as they are developed.
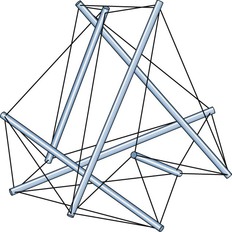
Fig. 11.2 The tensegrity icosahedron shown in Figure 1.50A (p. 47) is commonly used by advocates of tensegrity as a simple demonstration model. Here we picture the same model, only with the end points of the dowels slid closer to each other so that the same construction shifts into a truncated tetrahedron. Our body works more like this still very simplified model. This results in (1) a more stable, less deformable structure, (2) the long part of the elastics parallel the dowels, just as most of our myofasciae parallel the bones, especially in the limbs, and (3) the short elastics that are tying the end of the bones together resemble the joint ligaments. Jolt one of the bones, as in an accident, and the strain is transferred strongly to these ligaments.
Global postural assessment method
Many forms of structurally oriented manipulation use an analysis of standing posture as a guide in forming a treatment strategy. Osteopaths, chiropractors, physiotherapists, soft-tissue practitioners, and movement educators such as Alexander and yoga teachers have used various grids, plumb lines, and charts to help assess the symmetry and alignment of the client.3–6 Our own approach and vocabulary emphasize the interrelationships within the person’s body, rather than their relation to anyone else or to a platonic ideal. For this reason, the photographs herein are devoid of such outside reference – except of course the line of gravity as represented in the orientation of the picture.
1. Describe the skeletal geometry (where is the skeleton in space, and what are the intra-skeletal relationships?);
2. Assess the soft-tissue pattern creating or maintaining that position (individual muscles, fasciae, or myofascial meridians);
3. Synthesize an integrating story that accounts for as much of the overall pattern as possible;
4. Strategize a short- or long-term strategy to resolve undesirable elements of the pattern;
5. Evaluate and revise the strategy in the light of observed results and palpatory findings.
Step 1: a positional vocabulary
Terminology
To describe the geometry of the skeleton – the position of the skeleton in space – we have developed a simple, intuitive but unambiguous language that can be used to describe any position in space, but which we use here to describe interosseous relationships in standing posture. The vocabulary derives from our former colleague Michael Morrison.7 This language has the dual advantage of making sense to (and thus empowering) clients, students, and patients, while also being capable of bearing the load of sufficient detail to satisfy the most exacting practitioner-to-practitioner or practitioner-to-mentor dialogue. It has the disadvantage of not conforming to standard medical terminology (e.g. ‘varus’ and ‘valgus’, or a ‘pronated’ foot). Because these terms are often used in contradictory or imprecise ways, this disadvantage may prove an advantage in the long run.
As examples, in a left lateral tilt of the head, the top of the head would lean to the left, and the left ear would approach the left shoulder. A posterior shift of the rib cage relative to the pelvis means that the center of gravity of the rib cage is located behind the center of gravity of the pelvis – a common posture for fashion models. In a left rotation of the rib cage relative to the pelvis, the sternum would face more left than the pubic symphysis (while the thoracic spinous processes might have moved to the right in back). Medial rotation of the femur means the front of the femur is turned toward the midline. This use of modifiers is, of course, an arbitrary convention, but one that makes intuitive sense to most listeners (Fig. 11.3).

Fig. 11.3 These deliberately exaggerated postures show (A) a left shift of the pelvis relative to the feet, right shift of the ribs relative to the pelvis, and left shift of the head relative to the ribs. Notice that the head is not shifted relative to the pelvis. Although we cannot directly see them, we can presume multiple bends in the spine. The pelvis has a right tilt, and the head and shoulders have a left tilt. In (B), we see an anterior shift of the head relative to the ribs, and an anterior shift of the ribs relative to the pelvis. This involves posterior bends in both cervical and lumbar curves, as well as lateral rotations in all four limbs. The pelvis appears to have an anterior tilt, but neither the ribs nor the head are tilted relative to the ground. In (C), we can see a left tilt of the pelvis, a right tilt of the rib cage and shoulder girdle, and a left tilt of the head, with a concurrent left bend of the lumbars and right bend in the thoracics. The right femur shows a lateral rotation while the left demonstrates a medial rotation relative to the tibia.
Compared to what?
Imagining that we share a common understanding of what constitutes an anterior tilt pelvis, we are still open to confusion unless the question, ‘Compared to what?’ is answered. If we consistently compare the tilt of the pelvis to the horizontal line of the floor, for instance, this reading will not lead us to useful treatment protocols of femur-to-pelvis myofascia since these tissues relate the pelvis to the femur, not the pelvis-to-floor (Fig. 11.4). Since the femur can also be commonly anteriorly tilted, the pelvis can easily be (and often enough is) anteriorly tilted compared to the ground while at the same time being posteriorly tilted compared to the femur (Fig. 11.4C). Both descriptions are accurate as long as the point of reference is agreed – but in practice, confusion often reigns on this point.
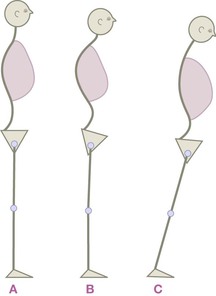
Fig. 11.4 In (A), ‘neutral’ posture, more or less, is depicted diagrammatically. If for a few pages we accept the convention of these diagrams, we can see that in (B), the pelvis is anteriorly tilted – the top of the pelvis tilts toward the front – relative to both the femur and the ground. In (C), we see the common but commonly mis-assessed situation of the pelvis being anteriorly tilted relative to the ground but posteriorly tilted relative to the femur. ‘Compared to what?’ is a meaningful question.
Definitions: Tilt, Bend, Shift, and Rotation
• Tilt. ‘Tilt’ describes simple deviations from the vertical or horizontal, in other words, a body part or skeletal element that is higher on one side than on another. Although tilt could be described as a rotation of a body part around a horizontal axis (left–right or A–P), ‘tilt’ has a readily understood common meaning, as in the Tower of Pisa.
‘Tilt’ is modified by the direction to which the top of the structure is tilted. Thus, in a left side tilt of the pelvic girdle, the client’s right hip bone would be higher than the left, and the top of the pelvis would point toward the client’s left (Fig. 11.5A). An anterior tilt of the pelvic girdle would involve the pubic bone going inferior relative to the posterior iliac spines, and a posterior tilt would imply the opposite (Fig. 11.5B). In a right side tilt of the head, the left ear would be higher than the right, and the planes of the face would tilt to the right (Fig. 11.5A). In a posterior tilt of the head, the eyes would look up, the back of the head approaches the spinous processes of the neck, and the top of the head moves posteriorly (Fig. 11.5B). In Figure 11.4C, the leg as a whole is anteriorly tilted, and the pelvis is posteriorly tilted relative to it. The head in this diagram is anteriorly tilted – looking down – which is an equivalent position to the pelvis in Figure 11.4B. Our terminology is thus applied consistently throughout the entire body.
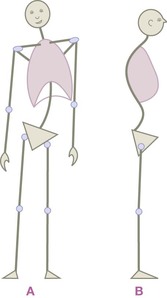
Fig. 11.5 In (A), the pelvis is tilted left, due to a short left leg. This has resulted in a compensatory right bend of the spine, right tilt of the shoulder girdle, and left shift of the rib cage relative to the pelvis. In (B), we see an anterior tilt of the pelvis, with a posterior bend of the lumbars and an anterior shift of the head due to an anterior bend in the upper thoracic spine. The neck is thus anteriorly tilted, and only by a sharp posterior bend in the upper cervicals can this fellow keep his eyes looking forward horizontally – compare to Figure 11.3B.
• Bend. A ‘bend’ is a series of tilts resulting in a curve, usually applied to the spine. If the lumbar spine is side bent, this could be described as a series of tilts between each of the lumbar vertebrae, which we usually summarize as a bend – either side, forward or back. In the right bend in Fig. 11.5A, the top of L1 faces more the client’s right than the top of L5.
In the spine, the essential difference between a tilt and a bend is whether the deviation from ‘normal’ is a single-segment or multi-segment event. If the rib cage is tilted off to the right, we can presume that either the pelvis is likewise right tilted so the lumbars run straight, or more likely, as in Figure 11.5A, the lumbar spine has a right side bend. Further, spinal mechanics dictates that the left bend in the lumbars very likely involves the tendency toward a right rotation of some of those vertebrae. The spine can have one uncompensated bend, but commonly has two bends that compensate each other, and more complex spinal patterns, e.g. scoliosis, can have three or even four bends over the two dozen vertebral segments.
• Rotation. In standing posture, rotations usually occur around a vertical axis in the horizontal plane, and thus often apply to, for example, the femur, tibia, pelvis, spine, head, humerus, or rib cage. Rotations are named for the direction in which the front of the named structure is pointing. For instance, in a left rotation of the head (relative to the pelvis), the nose or chin would face to the left of the pubic bone (Fig. 11.6A). In Figure 11.6A, both the head and rib cage are right rotated relative to the pelvis. The head and the rib cage are neutral to each other, relative to rotation. Making this observation is crucial to strategy: attempting to de-rotate the head of this person via the neck muscles would fail; it is the structures between the ribs and pelvis that govern this rotational pattern.

Fig. 11.6 Rotations all take place in the horizontal plane around a vertical axis, and are therefore modified only with left or right (for axial structures – (A)) or medial and lateral (for paired structures – (C)). Rotations frequently counter each other from the ground up (A). One rotation in the middle, as in (B) (or mocked up in Fig. 11.3A), is not as simple as it looks to unwind.
Notice that, if the rib cage were left rotated relative to the pelvis, the head could be right rotated relative to the rib cage and still be neutral relative to the pelvis or feet (Fig. 11.6B). In this case, therapeutic strategy would need to consider the twist/rotational imbalance in both the cervical and lumbar tissues (as well as shoulder-to-axial structures) to resolve this more complex pattern.
In paired structures, we use medial or lateral rotation (Fig. 11.6C). While this is in common use as regards femoral or humeral rotation, we extend this vocabulary to all structures. What is commonly called a ‘protracted’ scapula would, in our vocabulary, be a ‘medially rotated’ scapula, since the anterior surface of the scapula turns to face the midline. A medially rotated calcaneus often accompanies what is commonly called a ‘pronated’ foot (which we would call, and not just to be confusing, a ‘medially tilted’ foot).
• Shift. ‘Shift’ is a broader but still useful term for displacements of the center of gravity of a part (right–left, anterior–posterior, or superior–inferior). Balinese and Thai dance involves a lot of head shifting – side-to-side movement while the eyes stay horizontal. The rib cage likewise can shift to the back or side while still staying relatively vertical relative to the ground (Fig. 11.7A and B). Such shifts, of course, commonly involve tilts and bends, and often accompany rotations as well. We can use the terminology to specify these particular relationships when called for, but we have found that phrases such as ‘left lateral shift of the rib cage’ or ‘the head is shifted to the right relative to the pelvis’ are a useful shorthand when making an initial evaluation.
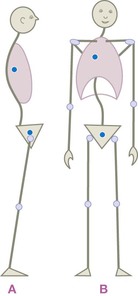
Fig. 11.7 In (A), there is an anterior tilt of the legs that results in the pelvis being anteriorly shifted relative to the feet, but the pelvis has a posterior tilt relative to the femurs. The rib cage in this diagram is posteriorly shifted relative to the pelvis, and the head is anteriorly shifted relative to the rib cage, in a pattern that is sadly commonplace in the Westernized world. Notice that the ribs are fairly neutral relative to the feet, and the head is fairly neutral relative to the pelvis. Undoing this pattern involves soft-tissue release in nearly every segment of the body. In (B), we see the pelvis neutral relative to the feet, but the ribs are right shifted relative to the pelvis, and the head left shifted relative to the ribs. The pelvis and head are thus relatively neutral, but as you begin to shift the rib cage on the pelvis via manipulation or training, the head will generally shift left relative to the pelvis, requiring work between the ribs and head.
The mobile scapula is commonly shifted in any of the six modifying directions. The pelvis is commonly described as being anteriorly (as in Fig. 11.7A) or posteriorly shifted relative to the malleoli, with the understanding that some tilts must occur along the way in the upper or lower leg for that to happen. A protracted shoulder involves a lateral shift of the scapula on the ribs, adding in a medial rotation as it slides around the rib cage. A wide stance could be described as a lateral shift of the feet relative to the hips. Genu varus involves a lateral shift (and probably a medial rotation as well) of the knees.
Yet more detail
This simple yet comprehensive vocabulary allows for a quick sketch or can be used to describe a series of relationships in minute detail. What might initially present as the easily seen ‘right tilted shoulder girdle’ in our quick sketch (as in Fig. 11.5A) could parse out, with more detailed examination, as ‘a right tilted shoulder girdle with an anterior tilt and a medial rotation in the right scapula, and a medially shifted left scapula’. This allows the practitioner to be as detailed or as general as necessary. The description can be noted down quickly, and accurately conveyed to another practitioner or mentor in a phone call or e-mail when seeking assistance or describing a successful strategy for others to follow.
Shoulders
Scapulae are particularly interesting because of their great mobility. To simply describe a shoulder as ‘protracted’ or ‘retracted’ can easily, even necessarily, miss much of the detail that lies at the heart of soft-tissue specificity. Imagine a scapula described as follows: ‘the right scapula is medially rotated, anteriorly tilted, and posteriorly shifted’ (Fig. 11.8). The term ‘protracted’ might be applied to these scapulae, but would not distinguish the degree of medial rotation, or specify the anterior tilt, or how the shoulder was positioned in the A–P axis on the rib cage. All these characteristics, however, have significant implications for how the person’s use pattern is understood and thus for our working strategy. A laterally shifted shoulder would lead us directly to the serratus anterior or the subscapularis fascia or the upper slips of pectoralis minor. The anterior tilt element would send us to the lower pectoralis minor and the clavipectoral fascia. The posterior shift would lead us to strategize about the middle trapezius and to add work in the axilla. With this level of description, we approach our work with greatly increased precision. It also allows a discourse in the bodywork field where logical thinking can displace magical thinking.
Fig. 11.8 Here we see shoulders that are posteriorly shifted – relative to the rib cage – but then medially rotated to bring the glenum anterior to the vertebral border, thus bringing the anterior face of the scapula to face the midline more; hence, a ‘medial rotation’ of the scapula is an essential part of protraction.
Feet
If the top of the foot is farther lateral than the sole and the weight shifts to the outside (a supinated foot), we would say the foot is ‘laterally tilted’. Conversely, falling onto the inside of the foot would be ‘medially tilted’ (see Fig. 9.49, p. 207). In the extremes of these patterns, one can also have a ‘rotation’ within the foot, meaning that the metatarsals are pointing more lateral or medial than the heel. The person with bunions could be pedantically described as having a ‘laterally rotated hallux’ or ‘laterally rotated big toe’ (in other words, use the midline of the body, rather than the midline of the foot, as the reference).
Since the calcaneus is often the key to support of the back body and sacroiliac joint, a few examples of calcaneal description are also offered. For the person who has the top of the calcaneus more toward the body midline than the bottom we would say, ‘medially tilted calcaneus’. If a calcaneus has the lateral side farther forward than the medial side, so that the front of the bone faces more medially, it would be termed – consistently but a bit counter-intuitively – a ‘medially rotated calcaneus (relative to the tibia or the forefoot)’. Such medial rotation and/or medial tilt often accompany a so-called pronated foot, fallen arch pattern, but how much of each will guide your strategy. Shifting the Superficial Back Line ‘bridle’ around the calcaneus is vital to arch restoration, as well as lengthening the outside of the foot, along the lateral band of the plantar fascia.
This language requires only a few hours of practice to manage, and only a couple of weeks of regular use of the notation for reasonable facility with the process. Of course, more usual language such as ‘low arches’ or ‘pronated feet’ can be used when it meets the needs of the moment, but reversion to this terminology can be used for argument, or for simplicity and accuracy in the resolution of ambiguity. It also has a pleasing neutrality: ‘medially shifted knees with laterally rotated femurs’ may be a mouthful, but for the client it is less demeaning than ‘knock knees’ and less distancing than ‘genu valgus’ (see Fig. 11.6C).
Once the skeletal geometry of the client’s standing resting posture has been described to the satisfaction of the practitioner, and noted down, either verbally or pictorially on such a form can be found in Appendix 2 for the reader’s use, we proceed to the second stage.
Step 2: an assessment of the soft tissues
The second step is to apply a model to the soft tissues to see how the client’s skeletal relationships, as described, might have been created or are maintained. The Anatomy Trains myofascial meridians is one such model, the one we will apply here, but single-muscle strategies or other available models could be employed as well.8–12
For example, if it is determined that the pelvis has an anterior tilt (as in Fig. 11.4B), then we could look at the hip flexors for the soft-tissue holding – for example, the iliacus, pectineus, psoas, rectus femoris, or tensor fasciae latae myofasciae. Limitation in any of the first three would lead us toward the Deep Front Line; the rectus femoris might guide us to look at the Superficial Front Line; the sartorius (unlikely; it is too small and thin for postural maintenance) might lead us to the Ipsilateral Functional Line; and the tensor would suggest Spiral or Lateral Line involvement. Alternatively, the pelvis is being pulled up from behind by the erectors (Superficial Back Line) or the quadratus lumborum (Deep Front Line or Lateral Line).
If the shoulder on the right side lives farther away from the spinous processes than the one on the left, we could look to see whether the serratus anterior is locked short. If treatment of that single muscle results in a stable repositioning of the scapula, all well and good, but if not, we are guided toward assessment of the rest of the left Spiral Line: Are the right ribs closer to the left ASIS than vice versa, as in Figure 11.5A? Perhaps lengthening of the left internal and right external obliques and their accompanying fascia will allow the work on the serratus to hold and integrate.
Stay updated, free articles. Join our Telegram channel

Full access? Get Clinical Tree


