The Spiral Line
Overview
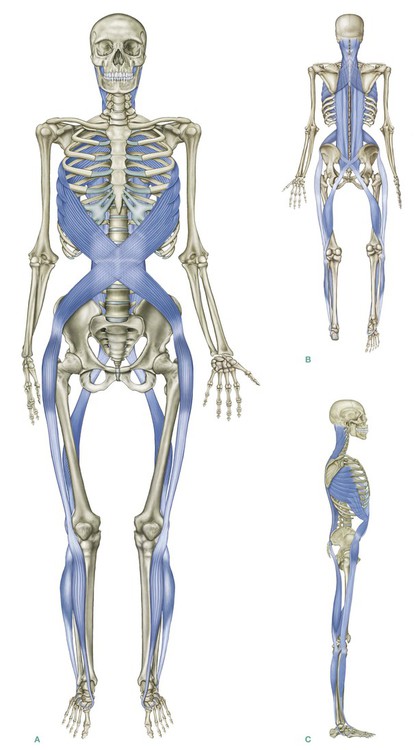
The Spiral Line (SPL) (Fig. 6.1) loops around the body in two opposing helices, right and left, joining each side of the skull across the upper back to the opposite shoulder, and then around the ribs to the front to cross again at the level of the navel to the hip. From the hip, the Spiral Line passes like a ‘jump rope’ along the anterolateral thigh and across the shin to the medial longitudinal arch, passing under the foot and running up the posterolateral side of the leg to the ischium and into the erector spinae myofascia (of either side, depending on posture or position) to end very close to where it started on the skull.
Postural function
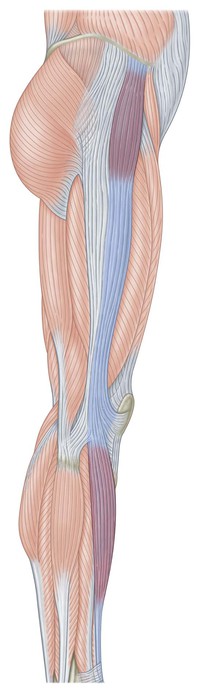
The SPL functions posturally to wrap the body in a double spiral that helps to maintain balance across all planes (Fig. 6.2A–C/Table 6.1). The SPL connects the foot arches with the pelvic angle, and helps to determine efficient knee-tracking in walking. In imbalance, the SPL participates in creating, compensating for, and maintaining twists, rotations, and lateral shifts in the body. Depending on the posture and movement pattern, especially which leg is characteristically more weighted, forces from the legs can travel up the same side or cross to the opposite side of the body at the sacrum, especially in the contralateral motion of walking (see Ch. 10).
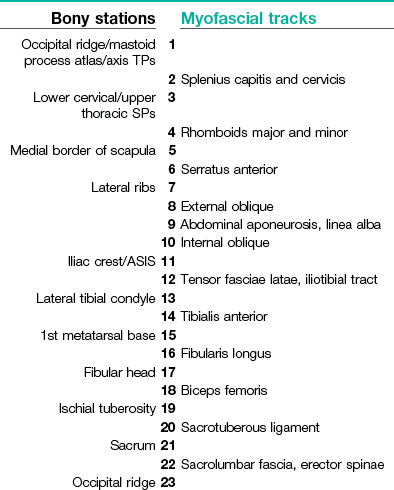
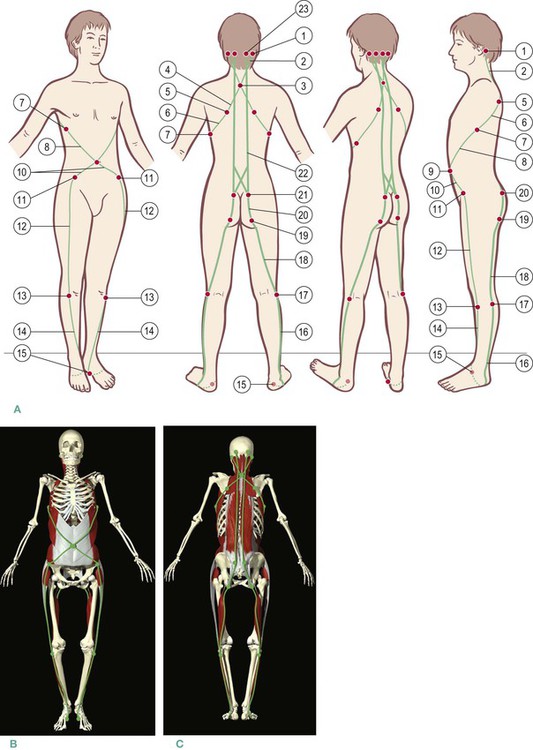
Fig. 6.2 (A) Spiral Line tracks and stations. (B) and (C) Spiral Line tracks and stations as seen by Primal Pictures. (B and C images provided courtesy of Primal Pictures, www.primalpictures.com.) (DVD ref: Primal Pictures Anatomy Trains) 
Much of the myofascia in the SPL also participates in the other cardinal meridians (SBL, SFL, LL) as well as the Deep Back Arm Line (see Ch. 7). The SPL is involved in a multiplicity of functions, so that dysfunction in the Spiral Line can affect the easy functioning of these other lines. Because most people worldwide have a dominant and recessive hand, leg, and eye, the Spiral Line is rarely perfectly balanced side-to-side, but is functionally adaptable within fairly wide tolerances.
The Spiral Line in detail
The SPL begins on the side of the skull, at or above the lateral part of the nuchal line, at the junction between the occiput and temporal bone, sweeping down and in on the splenius capitis muscle. On its way, it picks up the splenius cervicis, meeting the spinous processes from C6 to T5 (Fig. 6.3A).
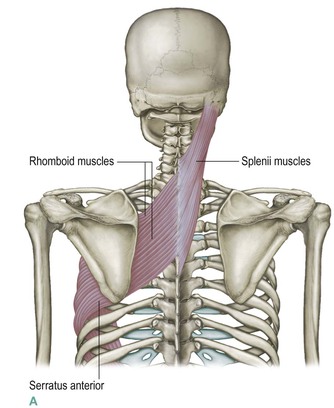
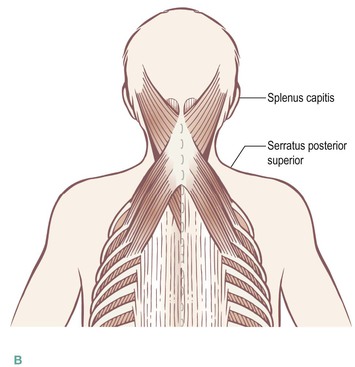
Fig. 6.3 The opening myofascial continuity of the Spiral Line is a fascial connection from the splenii over the spinous processes (A) to the rhomboids that pass to the contralateral scapula. A ‘branch line’ connection could also be made (B) to the serratus posterior superior muscle, which goes underneath the rhomboids but over the erector fascia to attach to the ribs.
Crossing over the tips of the spinous processes with a continuous fascial sheet, we pick up the rhomboids major and minor on the other side as part of the same fabric (see Figs In. 10 and 2.6, pp. 5 and 69). (A smaller mechanical link runs from the splenius to the thinner serratus posterior superior which underlies the rhomboids and attaches to the ribs just lateral to the erectors – Fig. 6.3B). The rhomboids carry us along the same line of pull over to the medial border of the scapula, thus connecting the left side of the skull to the right scapula and vice versa (Fig. 6.4).
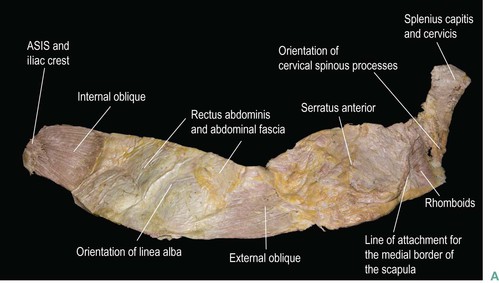
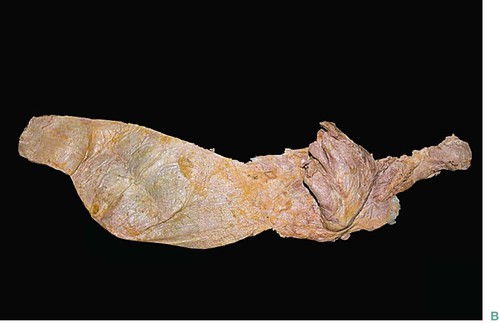
Fig. 6.4 (A) A dissection of the upper Spiral Line, showing the clear fascial continuities wrapped from the skull to the hip, by way of the splenii, rhomboids, serratus anterior, and abdominal fasciae containing the oblique muscles. The scapula has been removed from this specimen, leaving a visible line, but no break in the rhombo-serratus part of the sheet. The longer and heavier indicator lines indicate the median sagittal midline, front (left) and back (right). (B) The same dissection with the scapula (and rotator cuff muscles) still attached to the ‘rhombo-serratus’ sling. (DVD ref: Anatomy Trains Revealed) 
From the medial border of the scapula, there is a direct fascial connection to the infraspinatus and subscapularis of the rotator cuff, which we will explore with the Arm Lines in the next chapter. The SPL, however, continues on a less obvious but nevertheless very strong fascial connection with the serratus anterior, deep to the scapula (Fig. 6.5). In dissection, the connection of the rhomboids to the serratus anterior is stronger and more ‘meaty’ than the connection of either muscle to the scapula itself.
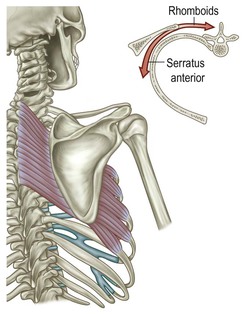
Fig. 6.5 Taken together, the rhomboids and serratus anterior, the next continuity in the Spiral Line, form a myofascial sling for the scapula. Thus the scapula is suspended between them, and its position will depend on the relative myofascial tone of these two. (Adapted from Calais-Germain 1993.)
The rhomboids connect to a goodly portion of the serratus, which is a complex muscle with many internal fiber directions. The SPL track as described above passes primarily through the lower part of the serratus anterior muscle. The serratus originates on the profound side of the medial border of the scapula and passes to attachments on the first nine ribs, but the part that attaches to ribs 5 through 9 provides the spiral continuity we are following (see Discussion 2, the Upper Spiral Line and Forward Head Posture, p. 146, to follow another of the directions within the serratus). In dissection, the fascial continuity with the rhomboids is very clear. If we could fold the glenoid section of the scapula back to expose the serratus, we would see clearly that there is one muscle – the rhombo-serratus muscle, so to speak – with the medial border of the scapula glued into its fascia about halfway in its journey from the upper thoracic spinous processes to the lateral ribs (Fig. 6.6). If the scapula is cut away from the underlying tissues, the connection between the rhomboids and serratus remains very strong (Fig. 6.7).
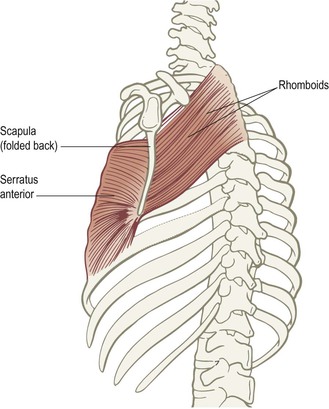
Fig. 6.6 If we fold the scapula back, we can see how there is really a ‘rhombo-serratus’ muscle with the medial border of the scapula essentially ‘glued’ into the middle of this myofascial sheet.
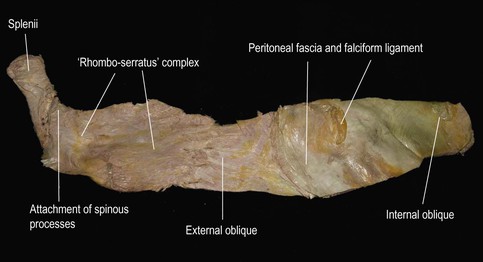
Fig. 6.7 The same specimen as Figure 6.4, viewed from the profound side. The peritoneum and transversalis fascia, as well as the remnants of the falciform ligament, can be seen in the lower (right) part of the specimen. The attachments of the serratus and external obliques to the ribs can be seen, as well as the stark fact of the stronger attachment that both muscles have for each other than either has for the ribs.


 General manual therapy considerations
The SPL cuts across many of the other lines as a ‘parasite’, meaning that most of the structures involved in the SPL also take part in other lines as well. Techniques for the splenius capitis, tensor fasciae latae, and fibularii (peroneals) can be found in Chapter 5 (or the Lateral Line DVD).  There is more on the rhomboids with the Deep Back Arm Line in Chapter 7, on the biceps femoris and erector spinae in Chapter 3 (or the Superficial Back Line DVD),
  and on the tibialis anterior and abdominal muscles in Chapter 4 (or the Superficial Front Line DVD).
  Here in this chapter we focus on additional techniques aimed at areas exclusive to the Spiral Line.
The rhombo-serratus muscle
 The rhombo-serratus muscle (the rhomboid-serratus anterior sling) often shows medial to lateral or side-to-side imbalance that can be corrected manually. Taking the medial to lateral differences first: a common pattern is that the rhomboids are locked long (overstretched, eccentrically loaded) with the serrati locked short (concentrically loaded), pulling the scapula away from the spine. This pattern will show up commonly in body-builders, and those with a tendency to the kyphotic spine (anterior thoracic bend). In these cases, the therapist wants to lengthen the serrati while the client engages the rhomboids.
Seat your client on a low table or a bench with his feet on the floor and the knees lower than the hips. Have him bend slightly forward at the mid-chest. Move in behind him so that your chest is close to his back. (Use a pillow between you if this is uncomfortable, but you must be close for this technique to be supportable for the practitioner and to work for the client.) Put your open fists out on the lateral rib cage, just outside of or just on the lateral border of the scapula and the lateral edge of the latissimus dorsi. Your proximal phalanges are resting on, and parallel to, the client’s ribs, and your elbows are as wide and forward as you can comfortably position them. Peel the tissue around the rib cage toward your chest and his back, bringing the latissimus and scapula with you toward the posterior midline. Do not dig into the rib cage, but rather bring the entire shoulder structure around the ribs. At the same time have the client lift his chest in front with a big, proud inhale. With a little practice this will stretch the myofasciae of the serratus anterior, and encourage the rhomboids to assume proper tone (DVD ref: Spiral Line, 16:00–20:28). 
To address this pattern in the SPL, have your seated client bend forward a little (not so far that he can rest his elbows on his knees) to expose the area between the thoracic spine and the vertebral border of the scapula. Standing behind, work out from the center line toward the scapula using your knuckles or elbows, lengthening in both directions away from the spine. The client can help in two ways: by pushing up from the feet into your pressure, the client will help keep the back sturdy and create more of a roundness (flexion). To get extra stretch out of the rhomboids, have the client reach out in front and bring the arms across each other as if giving someone a big slow hug (DVD ref: Spiral Line, 20:28–25:53). 

 The internal and external oblique complex
From the lower attachments of the serratus, our way forward is clear: the serratus anterior has strong fascial continuity with the external oblique (Figs 6.7 and 6.8). The fibers of the external oblique blend into the lamina of the superficial abdominal aponeurosis, which carries over to the linea alba, where they mesh with the opposing fibers of the internal oblique on the opposite side (Fig. 6.7). This carries us to our next ‘station’, the ASIS (anterior superior iliac spine) and an opportunity for a brief sidetrack, or, in this case, a roundhouse (see ‘Roundhouse: the anterior superior iliac spine’ below).
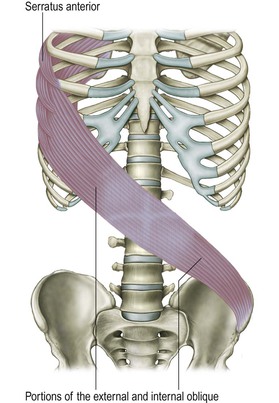
Fig. 6.8 The next set of continuities in the Spiral Line carries it from the serratus anterior onto the external oblique, on through the linea alba, and over to the anterior superior iliac spine via the internal oblique.
In the abdomen, one set of external/internal oblique (abdominal ribs to opposite pelvis) complex may be visibly shorter than the other (Fig. 6.9). Position the fingertips into the superficial layers of abdominal fascia and lift them diagonally and superiorly toward the opposite ribs (DVD ref: Spiral Line, 12:28–16:00).  This will usually serve to correct this imbalance, although more complex counterbalancing patterns often involve the psoas as well (see Ch. 9).
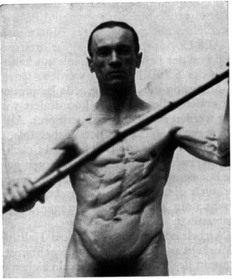
Fig. 6.9 The Spiral Line connections in the abdomen in action. Note that it is the left Spiral Line (running from the fellow’s right ribs to left pelvis) that is being contracted, while the other side is being stretched. Consistent postural positioning of one set of ribs closer to the opposite hip is a red flag for Spiral Line treatment. (Reproduced with kind permission from Hoepke 1936.)

 Roundhouse: the anterior superior iliac spine
The SPL passes over the anterior superior iliac spine (ASIS), touching there as a station before passing down the leg. The ASIS is of such central importance to structural analysis in general, and myofascial continuity theory in particular, that we must pause here to note the various mechanical pulls from this point. It could be compared to a clock or a compass, but since we are mired in train images for this book, we will call it a roundhouse (Fig. 2.11B, p. 71).
The internal oblique pulls the ASIS in a superior and medial direction (Fig. 2.11A). Other internal oblique fibers, as well as fibers from the transversus abdominis, pull directly medially. Still other fibers of the internal oblique fan, plus the restraining cord of the inguinal ligament, pull medial and inferior. The sartorius, attaching to the ASIS on its way to the inner knee, pulls mostly down and slightly in. The iliacus, clinging to the inside edge of the ASIS, pulls straight down toward the inner part of the femur.
The lower Spiral Line
 The lower SPL is a complex sling from hip to arch and back to the hip again.
Continuing on from the ASIS, we must keep going in the same direction to obey our rules. Rather than sharply switching our course onto any of these other lines of pull, we pass directly across, connecting from the internal oblique fibers to the tensor fasciae latae (TFL) from the underside of the ASIS and lip of the iliac crest. Figure 6.10 shows how the TFL blends with the anterior edge of the iliotibial tract (ITT), which, as we noted when discussing the Lateral Line, passes down to the lateral condyle of the tibia (Fig. 6.11).
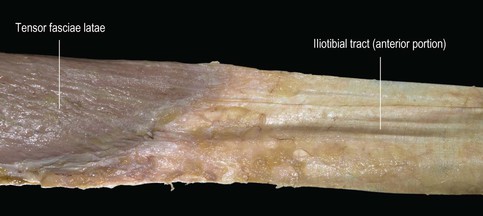
Fig. 6.10 The myofascial blend we call the tensor fasciae latae muscle becomes the iliotibial tract as the muscle attenuates to nothing – but it is all one fascial sheet. (DVD ref: Anatomy Trains Revealed) 
Stay updated, free articles. Join our Telegram channel

Full access? Get Clinical Tree


