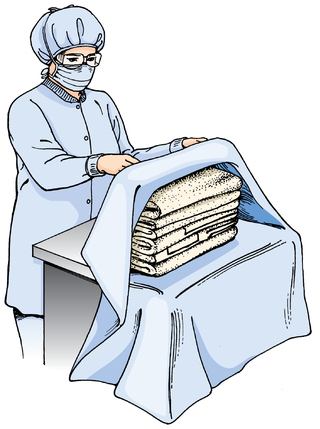
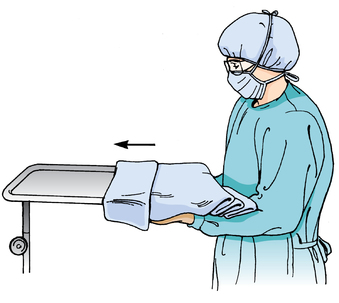
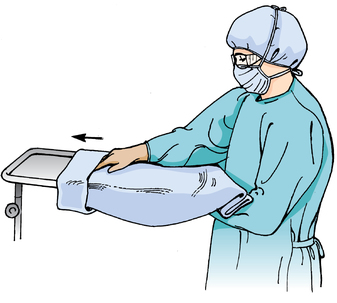
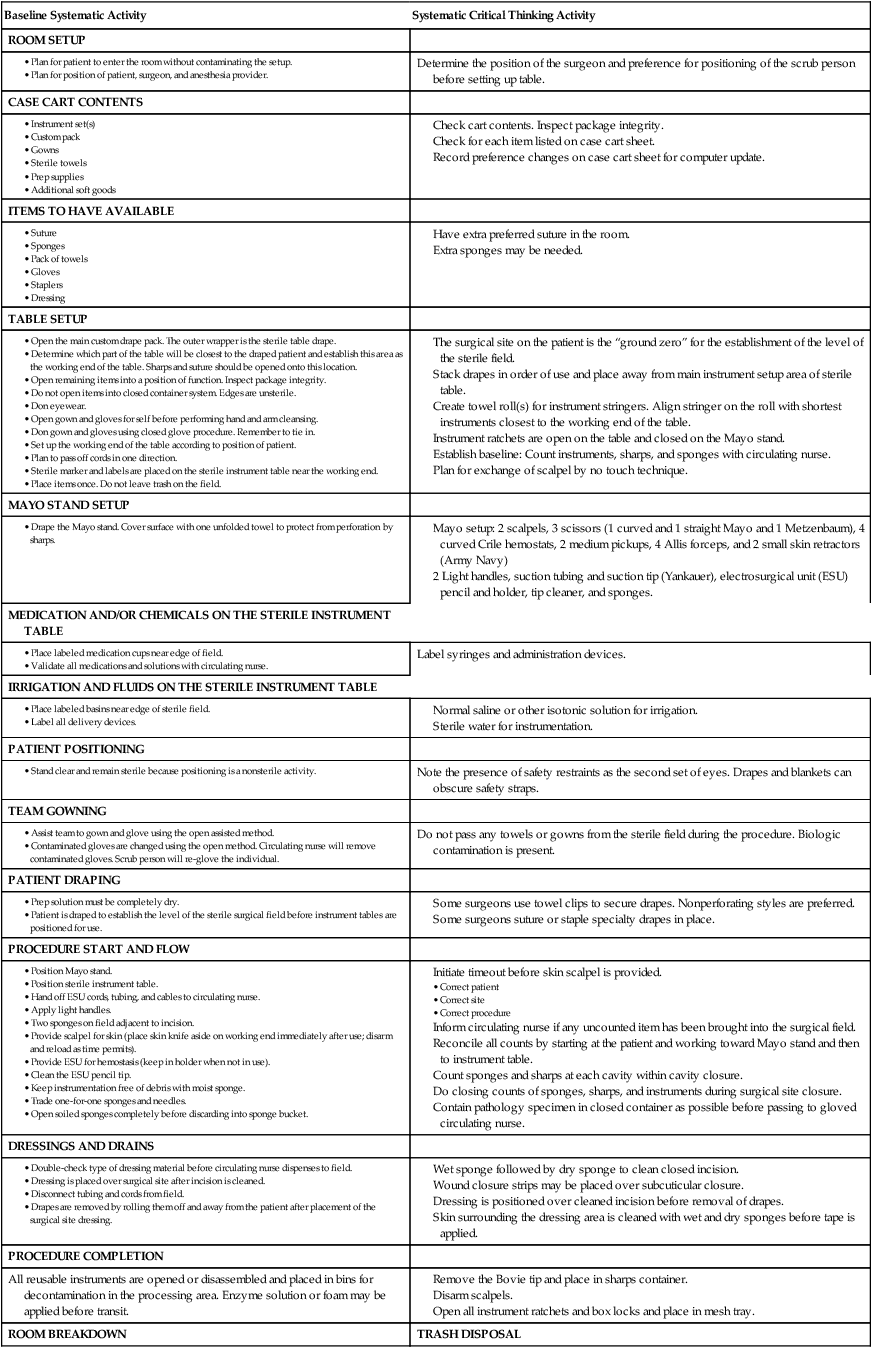
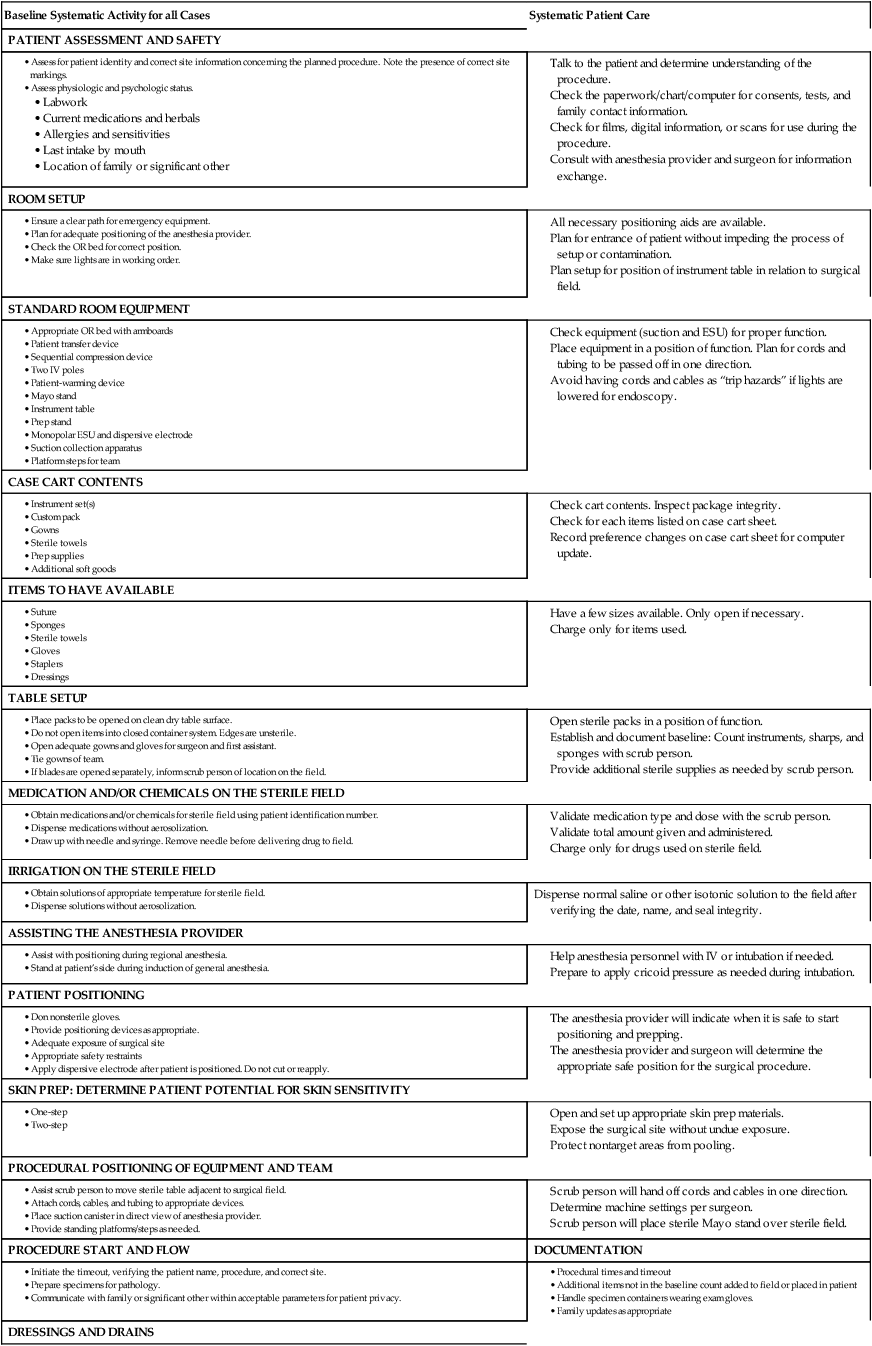
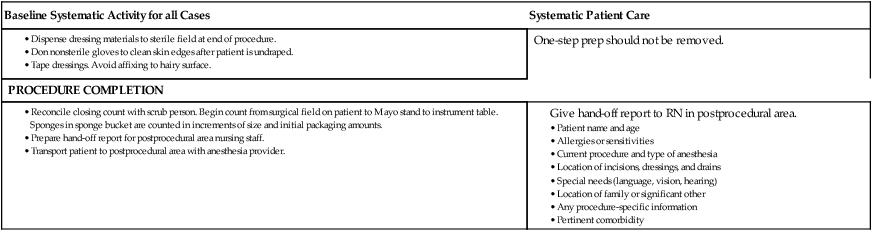
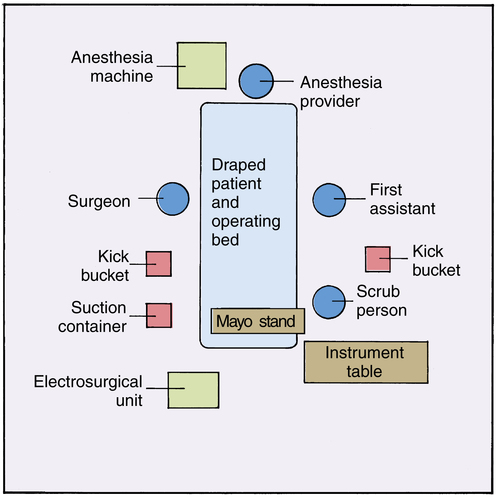
Chapter 25 After studying this chapter, the learner will be able to: • Describe the activities of the scrub person. • Describe the activities of the circulating nurse. • Discuss the preliminary care of the patient by the circulating nurse. • Differentiate between counting and being accountable for items used in patient care. The circulating nurse and the scrub person should plan their duties so that through coordination of their efforts, the sterile and unsterile parts of the surgical procedure move along simultaneously. From the time the scrub person starts the surgical scrub until the surgical procedure is completed and dressings are applied, an invisible line separates the duties of the scrub person (Box 25-1) and the circulating nurse (Box 25-2), which neither person may cross. In this chapter, the duties of the two positions are listed separately, but a spirit of mutual cooperation is essential to move the schedule of surgical procedures efficiently and to serve the best interests of the patient. BOX 25-1 Role of the Scrub Person as Part of the Sterile Team • Sterile instruments and supplies • Works in concert with the circulating nurse to set up the OR • Surgeon’s specific procedural needs • Establishes baseline counts with circulating nurse • Informs the circulating nurse of items placed inside patient • Double-checks items dispensed to the sterile field • Labels all medication containers and delivery devices • Reports volume of drug administered to patient for documentation by circulating nurse BOX 25-2 Role of the Circulating Nurse as Part of the Nonsterile Team • Prepares medication for use in OR • Maintains patient confidentiality • Communication with surgical services personnel As a coordinated, systematic effort, the scrub person and the circulating nurse should complete the preparation of the environment as described in Chapter 12, whether it is for the first case of the day or for a subsequent case performed during the course of the day. Establishing a system for performance of roles helps to minimize the risk for human error.6 Both caregivers should double-check the needs for the procedure before the patient arrives at the room.6 Table 25-1 contains a systematic checklist of the case flow and case-related activities for the scrub person. Table 25-2 contains a systematic checklist of the case-flow and patient care activities for the circulating nurse. TABLE 25-1 Systematic Activities for the Scrub Person TABLE 25-2 Systematic Activities for the Circulating Nurse Talk to the patient and determine understanding of the procedure. Check the paperwork/chart/computer for consents, tests, and family contact information. Check for films, digital information, or scans for use during the procedure. Consult with anesthesia provider and surgeon for information exchange. • Reconcile closing count with scrub person. Begin count from surgical field on patient to Mayo stand to instrument table. Sponges in sponge bucket are counted in increments of size and initial packaging amounts. • Prepare hand-off report for postprocedural area nursing staff. • Transport patient to postprocedural area with anesthesia provider. Both the circulating nurse and the scrub person set up the room and position equipment. One suggested room arrangement is illustrated in Figure 25-1. The case cart and the room furniture are checked by both people as a team. The duties and activities change when the patient arrives at the room. The circulating nurse begins working with the patient, and the scrub person continues readying the room. The following activities are performed together before the patient arrives: 1. Place a clean sheet, lift sheet, armboard covers, and safety straps on the operating bed (OR bed). Put a pressure-reducing mattress or gel pads on the OR bed if needed to relieve pressure during a long procedure. A warming or cooling blanket or air conduction system may be needed to heat or cool the patient during a long procedure. Obtain special equipment, such as OR bed attachments, pillows, or padding, needed to position and protect the patient. 2. Obtain appropriate patient monitoring equipment. Sequential compression devices may be indicated. 3. Obtain any specialized equipment that will be needed, such as an electrosurgical unit (ESU), smoke evacuator, pneumatic tourniquet, laser, or operating microscope, and check/test for proper function. Have the appropriate attachments and adjunctive supplies in the room. 4. Gather protective devices such as x-ray–protective gowns and/or lead screens and laser eyewear of the correct optical density as needed. If the C-arm will be used, place gonadal shielding under the bed sheet in the area of the patient’s pelvis. The x-ray tube will be positioned under the OR bed and emanate upward. 5. Position the OR bed under the overhead spotlight fixture. Orient the head of the bed for anesthetic access according to the type of procedure to be performed. Patient positioning for some procedures requires the anesthesia provider to be located at the patient’s side instead of at the head of the bed. Anesthesia personnel should be responsible for moving the anesthesia equipment to the proper position. The hoses and connections should be checked each time the anesthesia machine is moved. The circulating nurse and scrub person are not trained in this checking procedure. 6. Test the overhead spotlights to check focus and intensity, and preposition as much as possible. Do not leave the light turned on. The light should be positioned in relationship to the location of the surgeon at the OR bed and to that part of the patient’s anatomy that will be encountered during the surgical procedure. The circulating nurse should know how to change the light bulb in case a bulb burns out during a procedure. Newer lights have replacement bulbs in place that activate if one bulb burns out. 7. Connect and check the suction between the receptacle canisters and the wall outlet to be certain suction functions at maximum vacuum. Some facilities use inline filters for specialized equipment. The filters are changed between cases. Gloves and personal protective equipment (PPE) are worn to prevent contact with harmful microorganisms when changing these filters. 8. Place a waterproof laundry bag or antistatic plastic bag in the laundry hamper frame for disposal of reusable woven fabric items. 9. Place appropriately marked receptacles in the room for safe disposal of biohazardous items, such as sharps, disposable drapes, or other biologically contaminated materials. Clean trash containers should be available for noncontaminated trash. Many hospitals do not have in-house incinerators and pay per the pound to have biohazard trash hauled away. Mixed clean and biohazard trash disposal is an unnecessary expense. 10. Line each kick bucket and wastebasket with an impervious plastic liner with a cuff turned over the edge. 11. Arrange furniture with those pieces that will be draped to become part of the sterile field at least 18 inches (45 cm) away from walls or cabinets. They should be kept side by side, away from the laundry hamper, trash container, anesthesia equipment, doors, and paths of traffic. Take emergencies into consideration. A clear path for the crash cart should be maintained at all times. If the patient will be positioned prone, a clear pathway for the transport cart will be needed. A transport cart should be immediately available outside the room to reposition the patient supine if an emergency arises. 12. If a case cart system is used, all or most of the needed supplies should be on the cart. Check to ascertain that everything is there and that the wrappings are intact. Position the case cart near the instrument table. Collect additional instruments and supplies according to the preference card or case cart sheet and from cabinets in the room or from another supply area within the OR suite. 13. Obtain an appropriate set of sterile, wrapped instruments from one of the cart shelves and place on top of the case cart. 14. Place the sterile, wrapped drape pack (or custom pack) on the instrument table so that when opened, the wrapper will adequately drape the table and the drapes will be in their proper place. Open the drape pack first to establish a sterile place to open other sterile items. A splash basin can be opened onto the field as a catch basin for opening small packages. 15. Select the correct-size gloves and gowns for each member of the sterile team. A prep table can be opened as a sterile gown table. The extra gloves can be opened into the basin on the sterile table. 16. Select the initial sutures to have ready for the surgeon. Open only those needed to begin the case, such as free ties. These can be opened into the sterile basin on the main field near the working end of the table. Place unopened but probably needed sutures on top of the case cart for opening as the case progresses. 17. Open the instrument set. If it is a wrapped set, open the wrapper on top of the case cart or ring stand. If the instrument set is in a closed container, open the container by lifting the lid straight up and tilted back toward your body. Place the opened lid on the bottom shelf of the case cart. Do not open any supplies into a rigid instrument container, because the edges are not considered sterile. 1. Remove tape from packages wrapped in woven fabric wrappers. Laundry machinery can be damaged by wads of tape becoming lodged in the mechanisms. Few facilities use woven wrappers. The tape should be opened by breaking the seal on paper or nonwoven material. Removing tape strips from paper-wrapped items increases the risk of tearing the wrapper and exposing the contents to contamination. Check the external chemical indicator tape to be certain the item has been exposed to a sterilization process. 2. Open the drape pack, instrument set, and gown pack on their own individual surfaces so that the inside of each inner wrapper becomes a sterile table cover. For an envelope-folded wrapper, open the first flap of the wrapper away from yourself. The area touched falls below table level, and the inside of the wrapper remains sterile. Each flap will look triangular. Do not reach over the inside of the sterile table cover or contents of the pack. Pull open each side by pulling the side flaps open, one at a time. Lift the final edge of the wrapper toward you to complete the opening of the sterile field. For a square side-folded wrapper, open one side, followed by the other side, in a sideways motion so both sides are over the edge of the table. The front and back flaps can be difficult. Both team members should do this step together—one person stands on one side of the table, and the second person stands on the opposite side. Each (simultaneously) grasps a lower edge of both the front and back flaps and opens both flaps together to complete the opening of the pack. For a square front-back–folded wrapper, the steps for the envelope fold are followed in the same sequences. Each flap will look square. The final square flap will be brought toward your body to create the field (Fig. 25-2). a. If packs or sets have sequential double wrappers, both layers are opened by the person opening supplies by following the same sequences twice. The outer wrapper is considered the dust cover, and the inner wrapper the sterile barrier. The person opening the inner wrapper need not be sterile. b. Open other packages, such as sponges, gloves, and sutures, maintaining a sterile transfer to the appropriate sterile table. Touch only the outside of the outer wrapper. Avoid reaching over sterile contents and the sterile table. Enclose your hand in the wrapper to the extent possible. Do not slide the inner package over the edge of the peel-pack pouch. Sutures and blades should be opened onto the working edge of the table. Always open blades to the same spot for safety and consistency. c. If small peel packages are sequentially double-wrapped (i.e., a peel package inside a peel package), only the outer wrapper is removed. Usually the inner wrapper contains several smaller parts that may accidentally fall off the table when dispensed. d. Instruments processed in rigid, closed container systems are opened by breaking the seal on the sides of the lid and raising it up and away from the tray. The inner basket of instruments is considered sterile, but the container itself is not. Sterile soft goods, sutures, and other individually wrapped items should not be opened into this pan, because the edges are not considered sterile. e. If a sterile package is dropped, the item may be considered safe for immediate use only if it is enclosed in an impervious material and the integrity of the package is maintained. f. Mechanical items such as staplers and endoscopic trocars should not be flipped onto the field. The mechanisms can be damaged and may malfunction when used in patient care. Do not open these items until a sterile team member can take them directly from the inner aspect of the package. These items should be opened last and extracted from the packaging by the scrub person. g. Blades should be opened on the working end of the sterile field. The scrub person should be aware of exactly where these are opened. Do not open other items near the blades. Do not open blades into metal basins. This dulls the cutting surface. This location should be standardized for systematic safety for the scrub person. 3. The gown and gloves for the scrub person are opened on the Mayo stand or small table separate from the main sterile field. The person establishing the sterile field should not gown and glove from the main field because the risk of contamination is higher than gowning and gloving from a separate surface. 4. The circulating nurse assists the anesthesia provider with patient care preparations as the scrub person sets up the sterile field after scrubbing, gowning, and gloving. When draping the Mayo stand, drape both the frame and the tray. The Mayo stand cover is like a long plastic pillowcase with a single sheet of nonwoven fabric that will lie on the flat surface that will hold instruments. It is fan-folded with a wide cuff to protect gloved hands. With hands in the cuff, support the folds of the drape on the arms, in the bend of the elbows, to prevent it from falling below waist level (Fig. 25-3). While sliding the cover on the Mayo stand, place a foot on the base of the stand to stabilize it (Fig. 25-4). Some sterile custom packs contain an impervious plastic disposable Mayo tray as the bottom layer of the pack. At some facilities, a stainless steel Mayo tray is wrapped snugly and sterilized separately. The tray can be set into the draped Mayo stand or placed on the working end of a Mayfield over-bed table. Arrange other instruments and items on the instrument table (Fig. 25-5). Table 25-3 describes the “Eight P’s” of table and room organization, which can help the scrub person and circulating nurse improve the efficiency of the setup procedure and the case flow. Table 25-3 The “Eight P’s” of Operating Room and Sterile Field Setup and Management *The examples used for each “P” will vary according to the type of procedure and equipment, the position of the patient, and the surgeon’s preference. The Eight P’s apply to both the scrub person and the circulating nurse.
Coordinated roles of the scrub person and the circulating nurse
Division of duties

Baseline Systematic Activity for all Cases
Systematic Patient Care
PATIENT ASSESSMENT AND SAFETY
ROOM SETUP
STANDARD ROOM EQUIPMENT
CASE CART CONTENTS
ITEMS TO HAVE AVAILABLE
TABLE SETUP
MEDICATION AND/OR CHEMICALS ON THE STERILE FIELD
IRRIGATION ON THE STERILE FIELD
Dispense normal saline or other isotonic solution to the field after verifying the date, name, and seal integrity.
ASSISTING THE ANESTHESIA PROVIDER
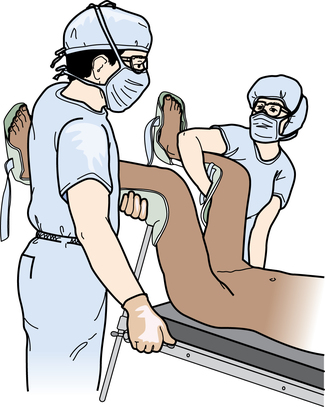
PATIENT POSITIONING
SKIN PREP: DETERMINE PATIENT POTENTIAL FOR SKIN SENSITIVITY
PROCEDURAL POSITIONING OF EQUIPMENT AND TEAM
PROCEDURE START AND FLOW
DOCUMENTATION
DRESSINGS AND DRAINS
One-step prep should not be removed.
PROCEDURE COMPLETION
Setting up the room
Opening sterile supplies
Scrub person duties
Preparation of the sterile field
Draping the mayo stand.
Arranging the instrument table.
The Eight “P’s” to Consider When Preparing for a Surgical Procedure*
Environment Considerations for the Circulating Nurse
Sterile Field Considerations for the Scrub Person
PROPER PLACEMENT
Items should be placed so they will not need to be moved during the procedure.
Suction canisters, tourniquet, and the electrosurgical unit (ESU) need to be stationary. The OR lights should be directed toward the field.
The Mayo stand and instrument table should not be moved during the procedure. Drapes may not be moved on the patient’s skin.
PROPER FUNCTION
Items should be tested for safety and usefulness before they are needed, to prevent delay in the case.
Test the ESU, tourniquet, laser, and other equipment before the patient enters the room.
Test the efficiency of instruments (e.g., scissors, needle holders, clamps) as they are needed.
PLACE IT ONCE
Items should not be manipulated during the procedure. Energy and attention should not be diverted to resetting the field.
The OR bed should be in the right place for the procedure. The dispersive electrode should not be moved or displaced.
When setting up the field, each item (e.g., a basin) should be placed where it will be used during the procedure with minimal handling.
POINT OF CONTACT
Items used within the field could cause harm or be rendered useless if they do not reach the intended point of contact.
The circulating nurse should evaluate the delivery of items to the sterile field. Some items (e.g., staplers) should be handed; others can be transferred in other ways.
The scrub person should be aware of the passing of instruments and how they are securely placed in the waiting hand of the surgeon or first assistant.
POSITION OF FUNCTION
Items should be positioned so they will be usable during the procedure.
The use of a C-arm, laser with articulating arm, or microscope should be preplanned so they may be positioned while the procedure is in progress.
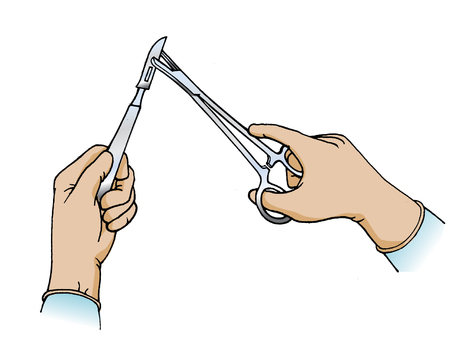
When passing instruments, they should be placed in the surgeon’s hand in a usable way. For example, the curve of the instrument should match the curve of the hand.
POINT OF USE
Items should be as close to the area of use as possible.
Pour solutions directly into the basins; open and hand sponges or sutures directly to the scrub person as they are needed.
Basins should be placed close to the edge of the table so the circulating nurse can pour without requiring the basin to be repositioned. The ESU pencil holder should be close to the field for safe containment of the tip.
PROTECTED PARTS
Items and surfaces should be rendered safe for the patient and the team.
Cords, cables, and tubing should be secured and appropriately directed away from the field. Pad the OR bed and patient as appropriate. Use safety belts.
Apply jaw liners to instruments during setup. Hand instruments with care to avoid causing injury with the tip or sharp surface. Do not lay items on or against the patient’s body.
PERFECT PICTURE
Items within and around the field should not be at risk for causing harm or becoming damaged. The environment should not be cluttered.
The entire room should appear neat and tidy. The door should be closed, and the temperature and humidity should be appropriate. Forethought to having a clear path for the crash cart or setup emergency equipment is essential.
The sterile field should remain neat and orderly, with instruments and supplies within easy sight and reach. Consistency fosters a sense of comfort and confidence in the scrub role.
![]()
Stay updated, free articles. Join our Telegram channel

Full access? Get Clinical Tree


 Website