The Arm Lines
Overview
In this chapter we identify four distinct myofascial meridians that run from the axial skeleton through four layers of the shoulder, to the four quadrants of the arm and four ‘sides’ of the hand, namely the thumb, little finger, palm, and back of the hand (DVD ref: Shoulders and Arm Lines, 13:05–14:35).  Despite this apparently neat symmetry, the Arm Lines (Fig. 7.1) display more ‘crossover’ myofascial linkages among these longitudinal continuities than do the corresponding lines in the legs. Because human shoulders and arms are specialized for mobility (compared to our more stable legs), these multiple degrees of freedom require more variable lines of control and stabilization and thus more inter-line links. Nevertheless, the arms are quite logically arranged with a deep and superficial line along the front of the arm, and a deep and superficial line along the back of the arm (Fig. 7.2/Table 7.1). The lines in the arm are named for their placement as they cross the shoulder (Fig. 7.3). (In Ch. 8 we look at the extensions of these lines that connect from the shoulder contralaterally to the opposite pelvic girdle.)
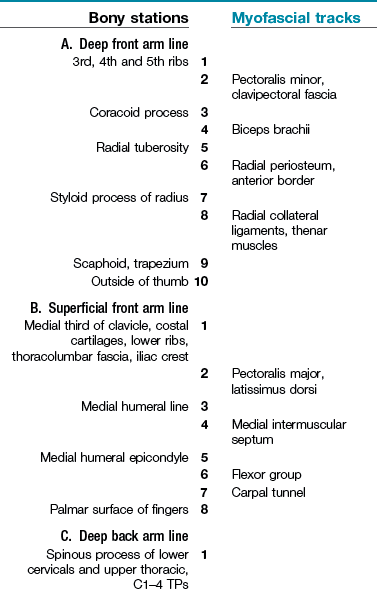
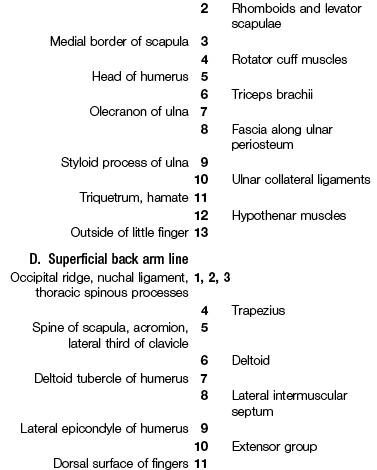
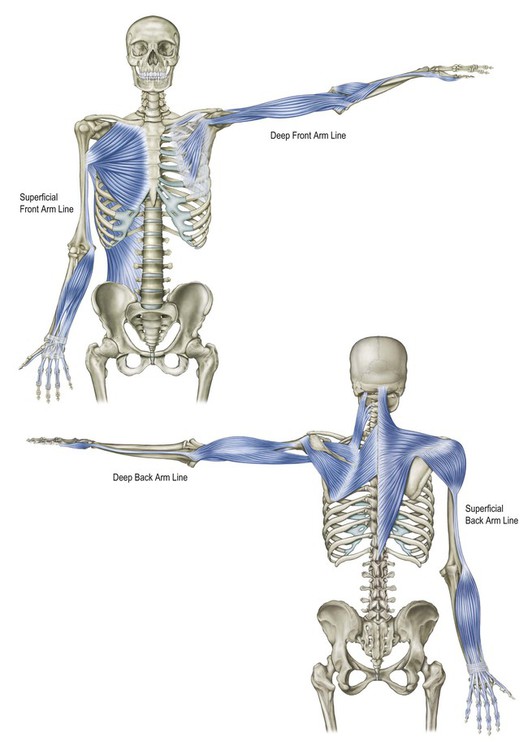
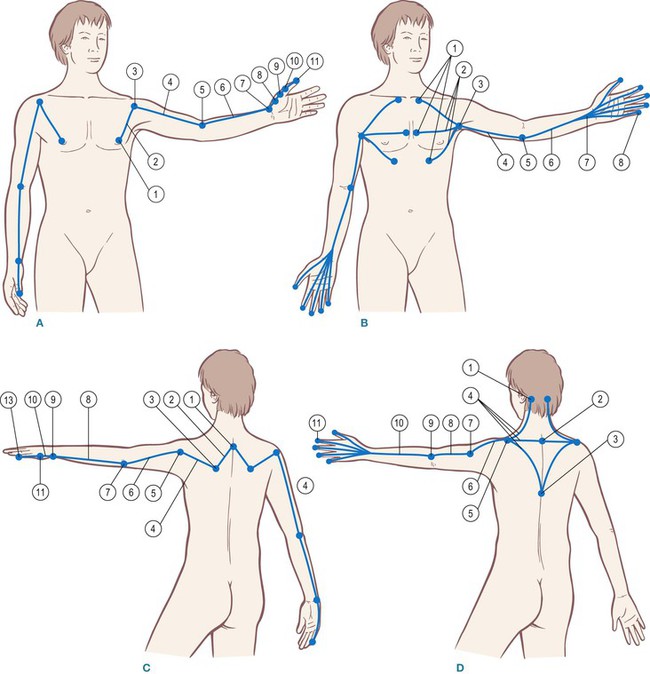
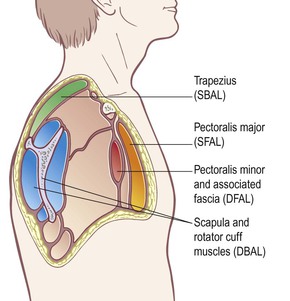
Fig. 7.3 The Arm Lines are named for their relative positions at the level of the shoulder. The four parallel planes that start the arm lines are clearly visible and divisible.

Movement function
In myriad daily manual activities of examining, manipulating, responding to, and moving through the environment, our arms and hands, in close connection with our eyes, perform through these tensile continuities. The Arm Lines act across the 10 or so levels of joints in the arm to bring things toward us, push them away, pull, push or stabilize our own body, or simply hold some part of the world still for our perusal and modification. These lines connect seamlessly into the other lines, particularly the helical lines – the Lateral, Spiral, and Functional Lines (Chs 5, 6, and 8 respectively).
The Arm Lines in detail
Orientation to the Arm Lines

 The Arm Line anatomy presented in Table 7.1 is sufficiently complex to merit a simple way to orient to these lines and organize them in the reader’s mind before setting off on this intricate journey. You can see the following for yourself in a mirror, or by observing a model (DVD ref: Shoulders and Arm Lines, 16:01–17:19).
Position the arm out to the side, as in Figure 7.2A, and arrange it so that the palm faces forward and the olecranon of the elbow points down to the floor. The Superficial Front Arm Line (SFAL – Fig. 7.2B) is now arrayed along the front of your arm – palmar muscles, lower arm flexors, intermuscular septum, and pectoralis major. The Superficial Back Arm Line (SBAL – Fig. 7.2D) is arrayed along the back side of the arm – trapezius, deltoid, lateral intermuscular septum, and extensors.
Rotate your arm medially at the shoulder (no pronation allowed), so that the palm faces the floor and the olecranon of the elbow points back, as in Figure 7.2C. In this position, the Deep Front Arm Line (DFAL – Fig. 7.2A) is arrayed along the front – thenar muscles, radius, biceps, and (under the major) pectoralis minor. The Deep Back Arm Line (DBAL – Fig. 7.2C) is arrayed along the back side of the arm – the hypothenar muscles, the ulna, the triceps, the rotator cuff, and (under the trapezius) the rhomboids and levator scapulae.
The Deep Front Arm Line
 The DFAL (Fig. 7.4) begins muscularly on anterior aspects of the 3rd, 4th and 5th ribs with the pectoralis minor muscle (Fig. 7.5). This muscle is actually embedded in the clavipectoral fascia (Fig. 7.6A) that runs underneath the pectoralis major from clavicle to armpit, and includes both the pectoralis minor and the subclavius muscles, with connections to the neurovascular bundle and lymphatic tissues in this area (Fig. 7.6B and DVD ref: Shoulders and Arm Lines, 29:56–32:28).
  The entire clavipectoral fascia, nearly as large as the pectoralis major, constitutes the initial track of this line; the pectoralis minor, however, provides the chief contractile structural support to the scapula from this complex, while the smaller subclavius tethers the clavicle.1
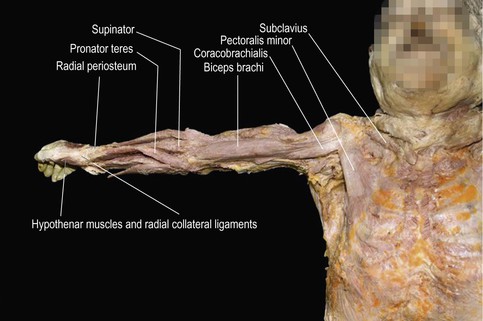
Fig. 7.4 The Deep Front Arm Line in dissection, in situ. The pectoralis major has been removed to show the connections between the pectoralis minor and the thumb.
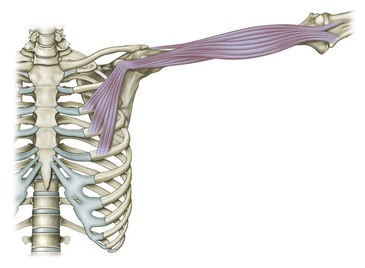
Fig. 7.5 The pectoralis minor clearly connects fascially to the short head of the biceps and coracobrachialis at the coracoid process, but they only function in an Anatomy Train fashion when the arm is nearly horizontal or above.
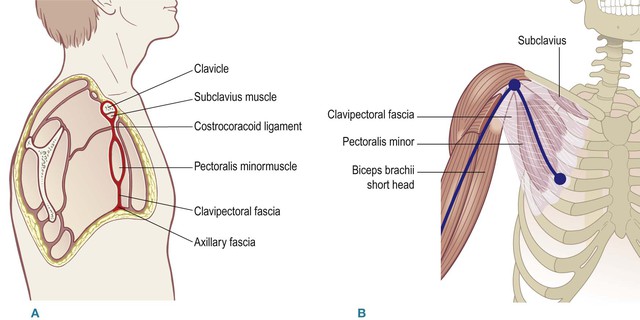
Fig. 7.6 (A) The beginnings of the Deep Front Arm Line include not only the pectoralis minor muscle, but also other structures in the same fascial plane from the clavicle down to the lower edge of the armpit. (B) This clavipectoral fascia which forms the proximal section of the DFAL is nearly as large as the overlying pectoralis major.
The distal station for the pectoralis minor muscle is the coracoid process, a nub of the scapula which projects forward under the clavicle like a thumb or a ‘crow’s beak’ (from whence it gets its name). Two other muscles proceed out to the arm from here, the short head of the biceps brachii and the coracobrachialis (Fig. 7.5). There is clearly a myofascial continuity between the pectoralis minor and both these more distal muscles (Fig. 7.7), but by our Anatomy Trains rules, this connection would seem to be out of the running, at least in a relaxed standing posture, due to the radical change of direction from the pectoralis minor in this position (Fig. 7.2A). When the arms are outstretched, however, at the horizontal or anywhere above (as in a tennis forehand), and especially in any hanging position (as in a swinging monkey or in a chin-up), these myofascial units link into a connected line (see Fig. 2.2). In normal ‘arms down’ posture, shortness in the proximal DFAL simply pulls the coracoid process down to create anterior tilt in the scapula, creating the rounded shoulders commonly commented upon by your mother.
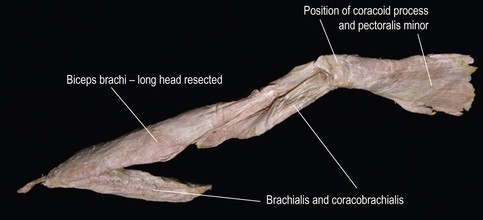
Fig. 7.7 The fascial ‘fabric’ connection between the pectoralis minor and the biceps is clear, even when the coracoid process is removed from underneath.
The pectoralis minor


 The pectoralis minor and the clavipectoral fascia are difficult to find and stretch in isolation from the over-lying pectoralis major. Excessive shortness in this myofascial unit can negatively affect breathing, neck and head posture, and, of course, the easy functioning of the shoulder and arm, especially in reaching upward. Hanging from a branch, or even putting the arm into hyperflexion (as in a deep ‘Downward Dog’ posture or kneeling before a wall and sliding the hands as far as possible up the surface), may result in creating a stretch in these tissues, but it is difficult for the practitioner to tell from the outside, as lifting the upper ribs by tilting the rib cage (and thus avoiding the pectoralis minor stretch) is a common compensation. The following is a reliable way to manually contact this vital and often restricted structure at the proximal end of the DFAL.
Put your fingertips on her ribs in the armpit between the pectoralis and latissimus tendons. Kneeling beside the table facilitates the proper angle of entry. Starting with the heel of your hand on the table to get the proper angle of approach, slide up slowly under the pectoralis major in the direction of the sternoclavicular joint, keeping your finger pads in contact with the front of the rib cage. It is vitally important to slide along the ribs, not into them or away from them. Pushing into the tissues overlying the ribs is a common error when first attempting this approach. Since the rib periostea are highly innervated, this pressure creates strong and useless pain. With the open client, the correct angle, and soft fingers, however, it is possible to go quite far underneath the pectoralis major, so a little practice is required to figure out how much skin to take with you – skin stretch is not the object (DVD ref: Shoulders and Arm Lines, 30:12–36:00). 
Draw an imaginary line down and slightly medial from the coracoid process to the outer and upper attachment of the rectus abdominis. You must go far enough under the pectoralis major to meet this line before you would have any expectation of encountering the outer edge of the pectoralis minor. When you do, it varies from a few skinny slips of muscle plastered to the wall of the ribs to a full, free, distinctly palpable muscle (the desired condition – though even in this condition it can still be muscularly or fascially short). In most cases no harm will come (and much benefit to shoulder mobility will arise) from going under the leading edge of the pectoralis minor, lifting the muscle away from the rib cage and stretching it toward its insertion at the coracoid. The client can help with a long slow inhale, or by lifting his arm toward the top of his head (Fig. 7.8). Be sure the arm is supported, not hanging free in the air.
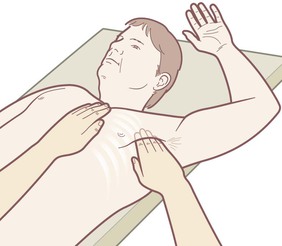
Fig. 7.8 The hand approaches the pectoralis minor from the axilla, under the pectoralis major, with the fingers heading in the direction of the sternoclavicular joint.
This is generally a little-used area in our culture, so stay within the limits of your client’s tolerance for sensation; return at another time if necessary. When working with women, be aware that lymphoid tissue connects the breast around the edge of the pectoralis to the armpit. By ‘swimming’ your fingers gently under the pectoralis major along the ribs you can avoid any problem with overstretching this tissue. It is also possible to contact this area with the client side-lying, so that gravity takes the breast away from you, although the instability of the shoulder in this position as well as the resulting malposition of the opposite shoulder can present a disadvantage in some clients (DVD ref: Shoulder and Arm Lines, 36:07–38:16). 
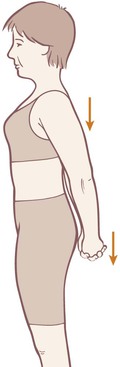
In terms of movement homework, have the client link his fingers behind the lower back and slide them down toward his legs. His scapulae will then drop down the rib cage and come together toward the spine. (Fig. 7.9). This will stretch the pectoralis minor and surrounding tissues (and strengthen the antagonistic lower trapezius), but the client should beware of arching his low back as he does it, as this will change the angle of the rib cage and negate the stretch (see discussion of scapular position at the end of this chapter, p. 166).
The biceps express
 The short head of the biceps runs down from the coracoid to the radial tuberosity, thus affecting three joints: the gleno-humeral joint, the humero-ulnar joint, and the radio-ulnar joint (the shoulder, elbow, and the spin of the lower arm) (Fig. 7.10 and DVD ref: Shoulders and Arm Lines, 42:25–43:47).
  Contracting it can thus have the effect of supinating the forearm, flexing the elbow, and diagonally flexing the upper arm (any or all of these movements, depending on the physics of the situation and the contraction of surrounding, assisting, or antagonistic muscles).

Fig. 7.10 The biceps brachii forms an express muscle (A), which covers three joints. Deep to the biceps lie three local muscles (B), each of which duplicates the biceps action on the individual joints. (Compare to the 4th hamstring, Fig. 6.20.)
This biceps ‘express’ (see Ch. 2, p. 70, for a definition) has a series of ‘locals’ beneath it to help sort out its multiple functions. The coracobrachialis runs under the biceps from the coracoid process to the humerus, thus adducting the humerus (DVD ref: Shoulders and Arm Lines, 38:17–42:25).  The brachialis runs from the humerus, next to the coracobrachialis attachment, down to the ulna, clearly flexing the elbow (DVD ref: Shoulders and Arm Lines, 43:48–45:47).
  Finally, the supinator runs from ulna to radius, supinating the forearm.
The lower arm

 Both the short head of the biceps and the supinator attach to the radius. In the lower arm, we are inclined to include the pronator teres in this line because with the supinator it clearly controls the degree of rotation of the radius, and thus the thumb (see Fig. 7.4 or 7.11 – pronator and supinator form a ‘V’ converging on the radius), even though strictly speaking pronator teres is a crossover from the Superficial Back Arm Line. From all these radial attachments, we pass along the periosteum to the styloid process at the distal end of the radius on the thumb side of the wrist (DVD ref: Shoulders and Arm Lines, 45:48–47:34).
  The fascial fabric below the distal ends of the two rotators is adherent to the periosteum of the radius, which is very reluctant to separate from the bone in dissection (see Fig. 7.4 distal to the ‘V’). This long ‘station’ violates the spirit of the Anatomy Trains idea of longitudinal fascial continuities separable from their underlying bones (see the discussion of the ‘inner and outer bags’ in Ch. 1). Spirit or not, such a fastening is a practical necessity when we consider the stabilizing function of this line and its corresponding Deep Back Arm Line. The periosteum of the radius and ulna is of course continuous with the interosseous membrane spanning between them. The bones are nevertheless capable of sliding on one another (to reassure yourself of this, put the thumb and forefinger of your left hand on the radial and ulnar styloid processes at the wrist of your right hand. Ad- and abduct the wrist (radially and ulnarly deviate if you prefer) to feel the limited slide of the radius on the ulna. In order to stabilize this movement, both of these lines must fasten to the periostea of these bones and (by implication) to the interosseous membrane.

Fig. 7.11 The DFAL runs down the periosteum of the radius and crosses over the inside of the wrist to join the thumb and its associated intrinsic thenar muscles.
Stay updated, free articles. Join our Telegram channel

Full access? Get Clinical Tree


