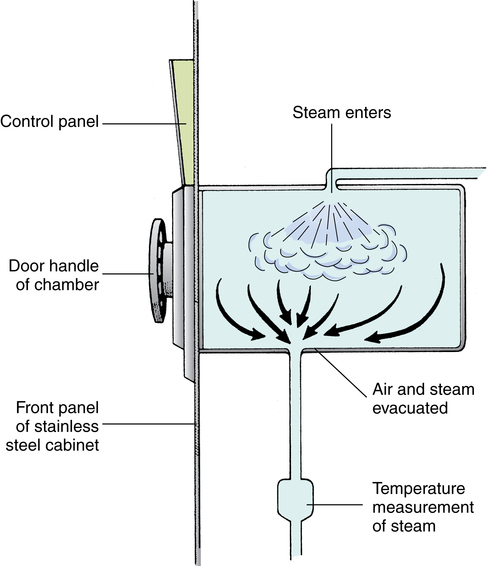
Chapter 18 After studying this chapter, the learner will be able to: • Define the term sterilization. • List three methods of sterilization. • Describe the process for preparing an item for sterilization. • Identify the primary hazards associated with each type of sterilization. • Discuss sterilization process monitors. Warm circulating air is used to remove ethylene oxide sterilant gas from packages in a special chamber. Class 2 chemical indicator used in a prevacuum sterilizer to test the efficacy of the air removal cycle. System of gathering and delivering instruments and supplies to the perioperative environment. Some models include provision for the return of instruments and contaminated items to the appropriate decontamination area after the surgical or interventional procedure. Prepackaged collections of disposable supplies, drapes, sponges, and containers prepared by the manufacturer or the distributor according to specific instructions and requests by a particular service at a facility. A rapid method of steam sterilizing properly prepared instruments for immediate use. These instruments are not wrapped. Flash sterilization is not the preferred method of sterilization. Gravity displacement sterilizer A steam sterilizer that uses steam in a downward motion to remove air from the sterilizing chamber. Air exits near front lower drain. Can be high speed or pulsing. Devices inserted into a packed set and attached to the outside of the wrapper/container used by health care personnel to monitor sterilization exposure conditions. Biologic indicators are the best indicators that parameters are adequate to kill microorganisms. Chemical indicators are not proof of sterility, but they signify that the item was exposed to the parameters necessary for sterilization. Autoclave tape is a class 1 type indicator. A chemical device inserted into a packed set that changes in response the time, temperature, and steam penetration to demonstrate visually that parameters necessary for sterilization have been met. An integrator mimics the conditions required of a biologic monitor. A faster steam sterilizer that removes air by a vacuum before filling the chamber with steam. Also known as dynamic air removal steam sterilization. A prepackaged unit consisting of dense materials and sterilization indicators or integrators used to test the effectiveness of the steam sterilizer. An instrument case that seals and locks. Instruments are placed in a rigid container for sterilization. Microorganisms are at an irreducible minimum. Processes by which all pathogenic and nonpathogenic microorganisms, including endospores, are killed. This term refers only to a process capable of destroying all forms of microbial life, including endospores. The sterilizer is a piece of equipment used to attain either physical or chemical sterilization. The agent used must be capable of killing all forms of microorganisms. Moisture or other substance penetrates through a sterile drape or wrapper to an unsterile surface. Thorough cleaning and disinfection of the perioperative environment at the end of use. Procedures carried out for the destruction of pathogens at the end of the surgical procedure in the OR or in other areas of patient contact (e.g., postanesthesia care unit [PACU], intensive care unit [ICU], patient care unit). Activity geared toward cleaning and preparation of the OR between cases for the next patient’s arrival. Internal aspect of the sterile package remains moist or damp after passing through all sterilization parameters. Indicates a nonsterile item. Passage of fluids through a material by passive action. Also referred to as capillary action or strike-through. Pathogenic microorganisms, as well as those that do not normally invade healthy tissue, are capable of causing infection if introduced mechanically into the body. Standardized procedures that are based on accepted principles and practices are necessary for the sterilization or disinfection of all supplies and equipment used for patient care in the perioperative environment. Following established protocols for instrument processing helps minimize the patient’s risk for infection of the surgical site. A sterile item has been exposed to a sterilization process to render it free of all living microorganisms, including endospores. As long as sterility is maintained, this process renders items safe for contact with nonintact tissue and for exposure to the vascular system without transmitting infection. The sterilization process should provide assurance that an item can be expected to be free of known viable pathogenic and nonpathogenic microorganisms, including endospores. For items and materials that cannot be sterilized, disinfectants are used to kill as many microorganisms in the environment as possible. (Decontamination and disinfection are described in Chapter 17.) • Bioburden. The degree of contamination with microorganisms and organic debris • Bioresistance. Factors such as heat and/or moisture sensitivities and product stability • Biostate. The nutritional, physical, and/or reproductive phase of microorganisms • Bioshielding. Characteristics of the packaging materials • Density. Factors affecting penetration and evacuation of the agent To ensure that instruments and supplies are sterile when used, it is essential that the sterilization process be monitored. Care is taken to assure that testing products such as chemical and biologic indicator strips and packs have not expired before use. The accuracy of monitoring depends on the systems in place for the task.9 Appropriate care and maintenance of mechanical equipment plays a large part in accurate read-outs and documentation of processing cycles performed. The general considerations are mentioned in the following sections. Specific tests are discussed later in this chapter with each method of sterilization. • Decontaminating, terminally sterilizing, and cleaning all reusable items; disposing of disposable items in the appropriate manner • Packaging and labeling items • Loading and unloading the sterilizer • Operating the sterilizer and checking its efficacy • Monitoring and maintaining the records of each cycle • Adhering to safety precautions and preventive maintenance protocol • Transporting sterile packages to the sterile storage room. Cart should be enclosed and have a solid bottom • Handling sterile items ready for use • Making a sterile transfer to a sterile field at the point of use • Tracking and recalling items if an item in a particular load is not safe for use • Routine maintenance that consists of daily inspections and scheduled cleanings per the manufacturer’s recommendation. All gaskets, gauges, graph pens, drain screens, paper rolls, ink cartridges, and charting devices should be repaired or replaced by qualified personnel as needed. • Preventive maintenance (PM) that includes periodic calibration, lubrication, and function checks by qualified personnel on a scheduled basis. Each PM should be documented. • Class 1. Immediate visual indicator on the exterior of the processed pack, such as striped tape or a tab that changes color in response to the sterilizer. • Class 2. Autoclave test packs used to test for air removal during the cycle. • Class 3. Single-variable indicator of one of the parameters of sterilization. • Class 4. Multi variable monitor strip that displays two or more changes in response to sterilization. Commonly used in a dry heat cycle. • Class 5. Chemical integrator strip that reacts in the same way as a biologic indicator in the presence of time, temperature, and steam penetration. • Class 6. Emulator responds to all critical variables in the sterilization process. Still under investigation by the FDA.2 • Geobacillus stearothermophilus at 131° F to 140° F (55° C-60° C) tests steam under pressure daily and with each load of implants. • Bacillus atrophaeus at 95° F to 98.6° F (35° C-37° C) tests dry heat and ethylene oxide with every load. B. atrophaeus was reclassified according to its DNA and ribosome typing profile. • B. atrophaeus testing is performed daily for low-temperature hydrogen peroxide plasma. • Peracetic acid sterilizers are tested according to the manufacturer’s recommendations. The user can employ commercial endospore strips for use during the cycle but may want to test rinse water as a secondary measure. Biologic indicators need to conform to the testing standards of the United States Pharmacopeia (USP). A control test is performed at least weekly in each sterilizer (Table 18-1). Many hospitals monitor on a daily basis; others test each cycle. Every load of implantable devices is monitored, and the implant should not be used until negative test results are known. All test results are filed in a permanent record for each sterilizer. TABLE 18-1 Guidelines for the Use of Chemical and Biologic Indicators* *All organizations require that indicators and integrators be used routinely. 1. Make sure the instruments are thoroughly dry. All instruments belonging to each set must have passed through terminal cleaning and terminal sterilization before they are safe to handle. 2. Unless contraindicated, place an absorbent towel or foam in the bottom of the tray to absorb condensate, as for a rigid container with vacuum valves. Include a biologic indicator or chemical integrator in the tray. 3. Count instruments as they are placed in the tray, and record the number of each type. A preprinted form is often used for this purpose. This form might be placed in the tray before wrapping and sterilization so the circulating nurse and scrub person can verify the baseline count. The form can be folded in half and placed in a paper peel pouch without a plastic coating to prevent printer toner from transferring to the instruments during processing. Concerns for toner particulate transfer to the instruments during the cycle are under study. The best choice may be to affix the tray inventory count sheet to the outside of the package. 4. Arrange the instruments in a definite pattern to protect them from damage and to facilitate their removal for counting and use. Follow the instrument book or other listing of instruments to be included. 5. Place heavy instruments, such as retractors, in the bottom of the tray. 6. Open the hinges and box locks on all hinged instruments. 7. Place ring-handled instruments on stringers or holders designed for this purpose. The curved jaws of hemostatic forceps and clamps should point in the same direction from smallest to largest. Instruments should be grouped by style and classification (e.g., six straight hemostats, six curved hemostats). Do not band with rubber bands. The metal under the band will not sterilize adequately. 8. Place sharp and delicate instruments on top of other instruments. They can be separated with an absorbent material or left in a sterilizing rack with the blades and tips suspended. The blades of scissors, other cutting edges, and delicate tips should not touch other instruments. If the instrument has a protective guard, leave it on. Tip-protecting covers or instrument-protecting plastic sleeves should be made of material that is steam-permeable and does not melt or deform with heat. 9. Place concave or cupped instruments with the cupped surfaces down so that water condensate does not collect in them during sterilization and drying. 10. Disassemble all detachable parts. Some parts, such as screws and springs, can be put in a peel pouch that is left open. Sealed pouches may not process correctly during the sterilization process. 11. Separate dissimilar metals. For example, brass knife handles and malleable retractors should be separated from stainless steel instruments. Preferably, put each metal in a separate tray, or separate metals with absorbent material. 12. Place instruments with a lumen, such as a suction tip, in as near a horizontal position as possible. These instruments should be tilted as little as possible to prevent trapped air or the pooling of water condensate. 13. Distribute weight as evenly as possible in the tray. Some trays have dividers, clips, and pins that attach to the bottom, which help prevent instruments from shifting and keep them in alignment. 14. Wrap the tray, or place it in a rigid container. Check woven textile wrappers for holes or abrasion. Sequentially double-wrap in a woven or nonwoven material, or use a double-thickness wrap in a single-fold configuration. 15. Place a chemical indicator tab or tape on the outside wrapper or container for proof that the package has been through the parameters necessary for sterilization. 16. Label the sets appropriately with their intended use (e.g., basic set), the date sterilized, and the process lot control number. The packaging materials for all methods of sterilization should do the following: • Permit penetration of the sterilizing agent to achieve sterilization of all items in the package. • Allow the release of the sterilizing agent at the end of the exposure period and allow adequate drying or aerating. • Withstand the physical conditions of the sterilizing process. • Maintain integrity of the package at varying atmospheric and humidity levels. In dry climates or at high altitudes, some packaging materials are susceptible to rupture during sterilization or dry out and crack in storage. • Provide an impermeable barrier to microorganisms, dust particles, and moisture after sterilization. Items must remain sterile from the time they are removed from the sterilizer until they are used. • Cover items completely and easily and fasten securely with tape or a heat seal that cannot be resealed after opening. Seal integrity should be tamperproof. A margin of at least 1 inch (2.5 cm) is considered a standard for safety on all sealed packages. • Resist tears and punctures in handling. If accidental tears and holes do occur, they must be visible. • Identification label of the contents and chemical indicator evidence of exposure to a sterilizing agent should be visible on the outside of the package. • Be free of toxic ingredients and nonfast dyes. • Be lint-free or low-linting. • Protect the contents from physical damage. • Permit easy removal of the contents with transfer to the sterile field without contamination or delamination (separation into layers). Items are enclosed with all corners of the wrapper folded in. Either a square or an envelope fold may be used (Figs. 18-1 and 18-2). • Sequential wrapping with two wrappers. An item is wrapped in one wrapper, the package is wrapped in a second wrapper. A cuff turned back on the first fold of each wrapper provides a margin of safety to prevent contamination when opening after sterilization. Packages can be fastened securely with chemical indicator tape. • Single wrap. An item is wrapped in a single wrap that is of double thickness. The package is sealed with chemical indicator tape. Prions (pronounced pree-ons) such as those that cause Creutzfeldt-Jakob disease (CJD) are not a living plant, animal, or virus.8 They are infectious protein material and the instruments used must be steam sterilized for a minimum of 1 hour at 270° F (132° C) after soaking in sodium hydroxide (bleach) or sodium hypochlorite at room temperature for 1 hour. This solution should be solidified and incinerated after use. Prion material becomes resistant to removal methods if left to dry. Instruments should be kept moist until they can be decontaminated and processed. Drapes and gowns should be incinerated because prions are not deactivated by laundry procedures. The use of disposable instruments and supplies is highly recommended.8 Eye instrumentation that is improperly cleaned and processed can subject the patient to toxic anterior segment syndrome (TASS). An inflammatory response in the anterior chamber of the eye causes permanent damage to intraocular tissues and predisposes the patient to secondary glaucoma.7 Eye instruments should be cleaned separately from other instruments. • Steam sterilization is the easiest, safest, and surest method of onsite sterilization. Heat- and moisture-stable items that can be steam sterilized without damage should be processed with this method. • Steam is the fastest method; its total time cycle is the shortest. • Steam is the least expensive and most easily supplied agent. It is piped in from the facility’s boiler room. An automatic, electrically powered steam generator can be mounted beneath the sterilizer for emergency standby when steam pressure is low. • Most sterilizers have automatic controls and recording devices that eliminate the human factor from the sterilization process as much as possible when operated and cared for according to the recommendations of the manufacturer. • Steam leaves no harmful residue. Many items such as stainless steel instruments withstand repeated processing without damage. • Precautions must be used in preparing and packaging items, loading and operating the sterilizer, and drying the load. • Items need to be clean, free of grease and oil, and not sensitive to heat. • Steam must have direct contact with all areas of an item. It must be able to penetrate packaging material, but the material must be able to maintain sterility. • The timing of the cycle is adjusted for differences in materials and sizes of loads; these variables are subject to human error. • Steam may not be pure. Steam purity refers to the amount of solid, liquid, or vapor contamination in steam. Impurities can cause wet or stained packs and stained instruments. A thermometer located at this outlet below the screen measures the temperature in the chamber. When steam has filled the chamber, it begins to flow past the thermometer (Fig. 18-3). The timing of the sterilizing period starts only when the thermometer reaches the desired temperature.
Sterilization
Sterilization versus disinfection
Sterilization
Reliability parameters for sterilization
Product-associated parameters
Monitoring the sterilization cycle
Administrative monitoring
Mechanical indicators
Chemical indicators
Biologic indicators
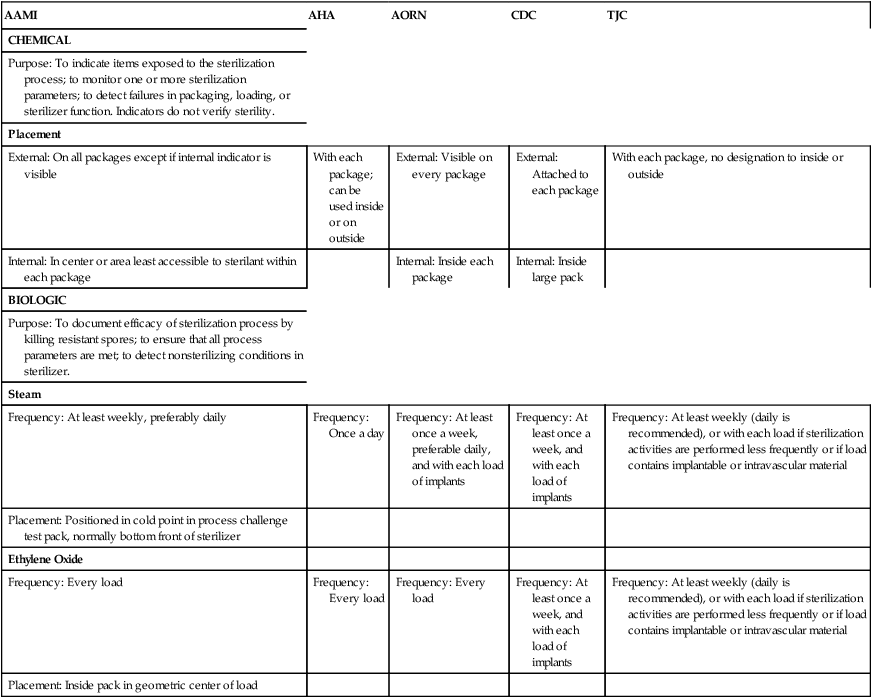
AAMI
AHA
AORN
CDC
TJC
CHEMICAL
Purpose: To indicate items exposed to the sterilization process; to monitor one or more sterilization parameters; to detect failures in packaging, loading, or sterilizer function. Indicators do not verify sterility.
Placement
External: On all packages except if internal indicator is visible
With each package; can be used inside or on outside
External: Visible on every package
External: Attached to each package
With each package, no designation to inside or outside
Internal: In center or area least accessible to sterilant within each package
Internal: Inside each package
Internal: Inside large pack
BIOLOGIC
Purpose: To document efficacy of sterilization process by killing resistant spores; to ensure that all process parameters are met; to detect nonsterilizing conditions in sterilizer.
Steam
Frequency: At least weekly, preferably daily
Frequency: Once a day
Frequency: At least once a week, preferable daily, and with each load of implants
Frequency: At least once a week, and with each load of implants
Frequency: At least weekly (daily is recommended), or with each load if sterilization activities are performed less frequently or if load contains implantable or intravascular material
Placement: Positioned in cold point in process challenge test pack, normally bottom front of sterilizer
Ethylene Oxide
Frequency: Every load
Frequency: Every load
Frequency: Every load
Frequency: At least once a week, and with each load of implants
Frequency: At least weekly (daily is recommended), or with each load if sterilization activities are performed less frequently or if load contains implantable or intravascular material
Placement: Inside pack in geometric center of load
Assembly of instrument sets
Packaging instruments and other items for sterilization
Instrument packaging
Packaging considerations
Thermal sterilization
Steam under pressure (moist heat sterilization)
Special circumstances
Advantages of steam sterilization
Disadvantages of steam sterilization
Types of steam sterilizers
Gravity displacement sterilizer.
![]()
Stay updated, free articles. Join our Telegram channel

Full access? Get Clinical Tree


Sterilization
 Website