Fig. 7.1
Schematic of specimen setup to measure the bond strength and the ideal position of fracture
7.2 Materials and Specimens
Ti-6Al-4V is used as the substrate metal. Solid bar specimens of four types in different diameters (φ4.0, φ7.0, φ10.0, and φ15.0) are used. HAp layer is coated by plasma spraying on end the bar specimen’s surface after blast treatment (Fig. 7.2) [11, 12]. Figure 7.3 shows a SEM micrograph of the surface after plasma spraying. The thickness of the HAp film is about 50 μm (HAp thin film). The spraying is repeated 20 times under the following conditions: supply voltage 68 V, spraying distance 140 mm, and HAp particles 15 g/min. To measure the interface strength between the HAp thin film and blast surface, a tensile test piece is made using an adhesive. A Ti-6Al-4V piece is bonded on the top of the HAp-coated specimen with two types of bond (EP-138 and Super Bond) by using a jig shown in Fig. 7.4. Holes of jig are made with severe tolerance to ensure the alignment of specimen. A spring is attached to the top of the jig for applying constant contact force. Also, the surfactant is used to peel off the excessive adhesive agent leaked to the side of the specimen easily after testing. This procedure is important because overflowing adhesive will cover interface between Ti-alloy and HAp film and, therefore, prevent interfacial fracture. A constant stress of 0.138 MPa was applied to the specimen. After applying the adhesive EP-138, the specimen is heat treated at 120 °C for 30 min. Super Bond is hardened within 10 min at room temperature. Figure 7.5 shows the appearance of the interface after bonding. Adhesive layers can be observed at the center of the photograph. The specimens without surfactant show overflow of adhesives from the interface, while those with surfactant do not. Therefore, surfactant protects the interface that is subjected to the examination. However, in removing the surfactant after adhesion, care should be taken.
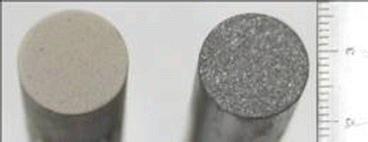
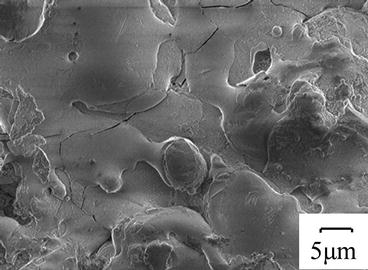
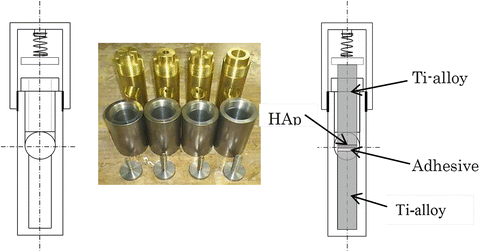
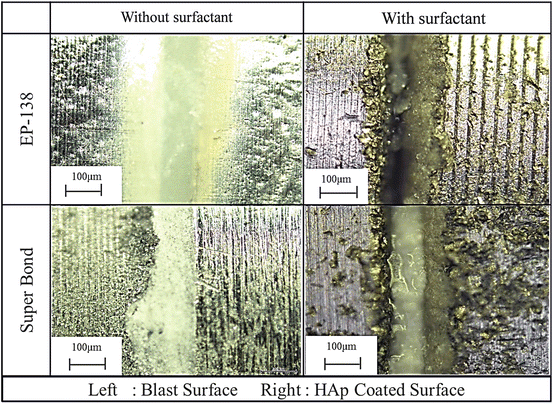

Fig. 7.2
Photograph of surface before bonding (left: HAp-coated surface, right: blast surface)

Fig. 7.3
SEM photograph of plasma-sprayed HAp surface

Fig. 7.4
Schematics and appearance of bonding device

Fig. 7.5
Appearance of the interface of bonded specimen
7.3 Experimental Procedure of Measuring Bond Strength Between Ti-Alloy and HAp
Figure 7.6 shows bonded specimen used to measure bond strength. Tensile load is applied to this specimen under constant crosshead speed (2.5 mm/min). Care is taken to attach the specimen to testing machine to avoid bending or torsional load. If necessary, strain gauges are attached to the specimen to measure stresses within specimen. After tensile test, fracture surfaces are observed by scanning electron microscope (SEM) to confirm whether interfacial fracture occurs or not.


Fig. 7.6
Shape of tensile test specimen
7.4 Bond Strength Between Ti-Alloy and HAp
Figure 7.7 shows bond strength obtained by tensile test. Magnitude of bond strength is almost the same regardless of the diameter of the specimen. Bond strength varies depending on diameter of specimen. However, bond strength shows rather large scatter. The bond strength obtained with EP-138 is slightly higher than that of Super Bond. Scattering is larger on the diameter of φ7.0 and φ4.0. To investigate the cause of scatter, crystal structure of HAp thin film is identified by X-ray diffraction. X-ray diffraction patterns of specimens of different diameters are shown in Fig. 7.8. Crystal structure of HAp thin film is the same regardless of the specimen diameter. Therefore, HAp does not cause scattering of bond strength. Crystallinity of the HAp film will affect the bond strength. If the HAp coating has low crystallinity, interface strength value becomes low. Therefore, construction and spraying technique of HAp on substrate are important factors.
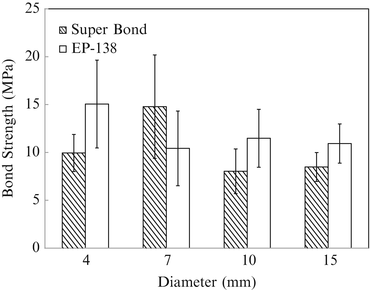
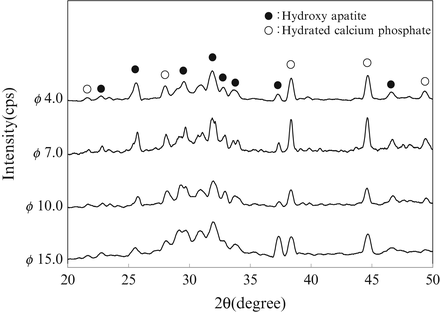

Fig. 7.7
Bond strength between Ti-alloy and HAp

Fig. 7.8
Result of X-ray diffraction analysis of HAp film on specimens of different diameters
The factors affecting scatter of bond strength in terms of the method of tensile test were considered. Bond strength obtained with specimens of diameters φ4.0 and φ7.0 shows larger scatter than other diameters. Axial deviation is considered to be a reason. The axis of specimen of both sides of HAp and bond layer shift each other about 10–50 μm. This shift produces un-axial load to the interface, and interfacial fracture occurs at lower load than anticipated. This may harm the accuracy of the test. Small diameter specimens are more susceptible for this inaccuracy. Therefore, the tolerance between the jig and the specimen is an important factor in the adhesion process of the test piece.
Stay updated, free articles. Join our Telegram channel

Full access? Get Clinical Tree


