2 The upper limb
At the end of this chapter you should be able to:
1. Find and recognize the shape and position of the clavicle, scapula, humerus, radius, ulna, carpal, and metacarpal bones and the phalanges
2. Recognize and palpate many of the bony features.
3. Name all the joints of the upper limb and understand their structure.
4. Trace the lines of the joints and where possible indicate their bony landmarks and surface markings.
5. Describe or carry out any accessory movements, possible noting the ranges in which they are most easily performed.
6. Note the ranges of each of the joints and indicate the factors limiting their movement.
7. Give the class and type of each joint, noting the axes of movement where possible.
8. Name and demonstrate the action of all the muscles palpable in the upper limb.
9. Outline the shape of the muscle on the surface and palpate its contraction.
10. Palpate tendons and attachments where possible.
11. Name and trace all the main nerves supplying the upper limb.
12. Demonstrate the course and distribution of each of the main nerves of the upper limb.
13. Name the main arteries of the upper limb, outlining their course and indicating their distribution.
14. Name the main veins of the upper limb, noting their drainage areas and course.
Bones
The pectoral region
The clavicle (Fig. 2.1)
The clavicle [clavis (L) or kleis (Gk) = key; also, clavis (L) = an S-shaped bar for striking a gong] is a bone about 10 cm long and situated between the manubrium sterni medially and the acromion process of the scapula laterally (Fig. 2.1). It is a long bone and is a shallow S-shape when viewed from above. It ossifies in membrane, which means that its articular surfaces are covered with fibrocartilage and it has no medullary cavity.
Palpation
For palpation in this region, the model should be in the sitting position.
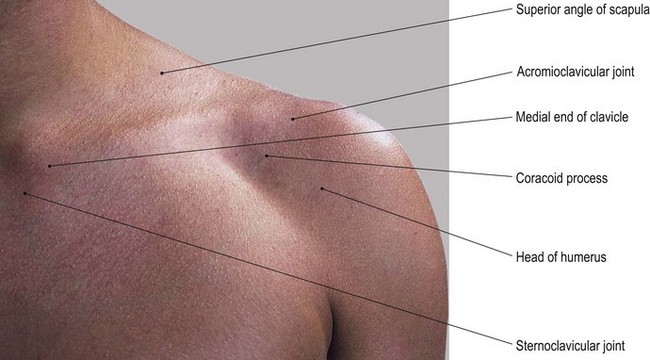
• The sternal (jugular) notch. Palpate the sternal (jugular) notch which is located centrally, at the lower boundary of the front of the neck. This is formed by the superior border of the manubrium sterni inferiorly and the medial end of each clavicle on either side. Articular cartilage together with an interarticular disc and interclavicular ligament are interposed between the medial ends of the clavicles and the skin.
• The medial third of the clavicle. Move your hands laterally and you will palpate the medial third of the bone which is convex forward with a superior and anterior surface. These features are easily palpable despite giving attachment to the sternocleidomastoid muscle superiorly and pectoralis major muscle anteriorly.
• The anterior end of the first rib. Now move your hands downwards to palpate the anterior end of the first rib. It is easily identifiable where it articulates with the lateral border of the manubrium sterni.
• The middle third of the clavicle. If you move your hands further laterally, you will notice that the middle third of the clavicle begins to curve backwards, being a little more rounded in cross-section.
• The supraclavicular fossa. Posterior to the superior surface of the clavicle you will palpate a depression: the supraclavicular fossa. This fossa contains the cord-like structures of the trunks of the brachial plexus running downwards and laterally towards the upper limb.
• The upper surface of the first rib. If you now apply deep, but careful, pressure in this notch in an inferomedial direction, you will be able to palpate the upper surface of the first rib, over which the trunks of the brachial plexus pass.
• The lateral third of the clavicle. You will notice that the lateral third of the clavicle becomes flattened from above down and that its sharper anterior border is concave forward. Its subcutaneous superior surface can be easily palpated through the skin, becoming thicker at the lateral end toward the acromioclavicular joint.
• The infraclavicular fossa. Below the anterior border of the clavicle you will palpate a depression: the infraclavicular fossa. This fossa is situated between the deltoid muscle laterally and pectoralis major inferomedially.
• The coracoid process of the scapula. The coracoid [korax (Gk) = a crow and oeides (Gk) = shape] process lies within the infraclavicular fossa and you can palpate its tip lying approximately 3 cm below the junction of the middle and lateral thirds of the anterior border of the clavicle and just medial to the anterior fibres of deltoid muscle.
• Note. Both anterior and posterior borders of the clavicle give attachment to muscles: deltoid anteriorly and trapezius posteriorly.
• The lateral end of the clavicle. This can be identified by a small tubercle on its superior surface which is palpable lying just medial to the acromioclavicular joint (see joints of the upper limb).
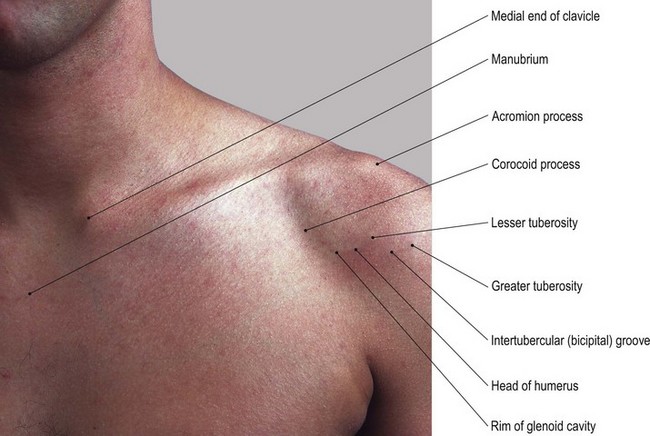
The upper end of the humerus
This comprises the head, the greater tuberosity and the lesser tuberosity.
Palpation
• The head of the humerus. On palpation, you will notice that the head is slightly more than half a sphere. It is smooth and is directed medially, slightly backwards and upwards. Its greater tuberosity lies laterally and the lesser tuberosity projects forwards with the intertubercular groove running vertically between the two tuberosities.
• The lesser tuberosity of the humerus. If you now move lateral to the coracoid process, you will palpate a slightly pointed projection. This is the lesser tuberosity of the humerus [humerus (L) = the shoulder].
• Note. This forms the medial border of the intertubercular groove, through which passes the tendon of long head of biceps.
• The intertubercular groove of the humerus. This groove can easily be palpated as it runs vertically downwards (Fig. 2.1).
• The greater tuberosity of the humerus. Lateral to the tendon of biceps, the anterior surface of the greater tuberosity may be difficult to palpate as it is covered by deltoid muscle. Place your fingers on the anterior aspect and bring your thumb in, just below and lateral to the angle of the acromion. You should now be able to grasp the greater tuberosity with your thumb and fingers between the fibres of deltoid muscle.
• Note. The greater tuberosity accounts, in part, for the rounded shape of the shoulder region.
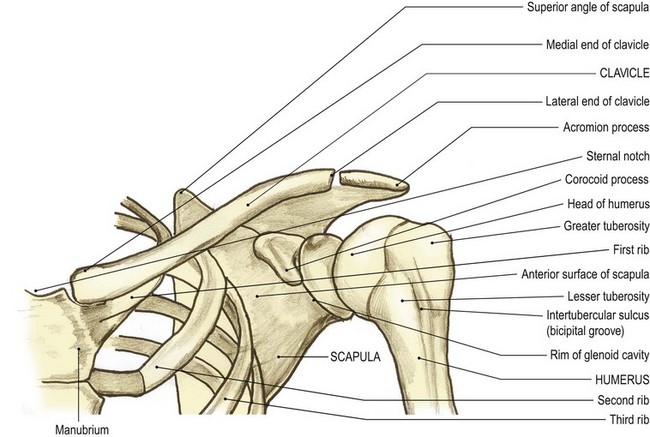
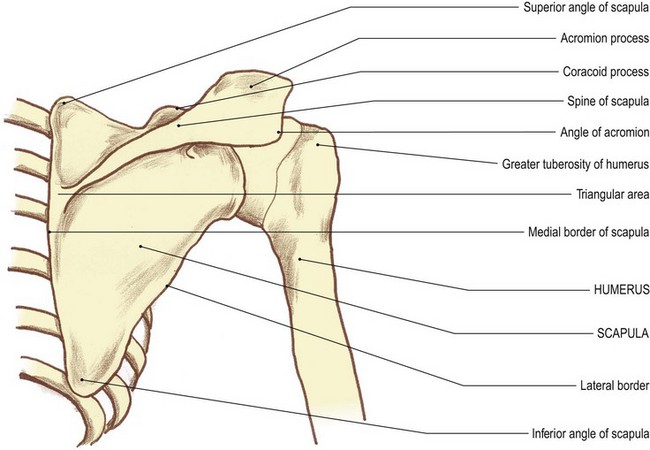
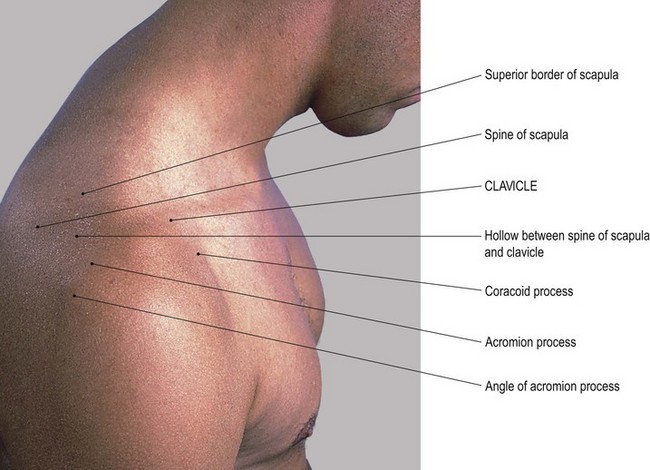
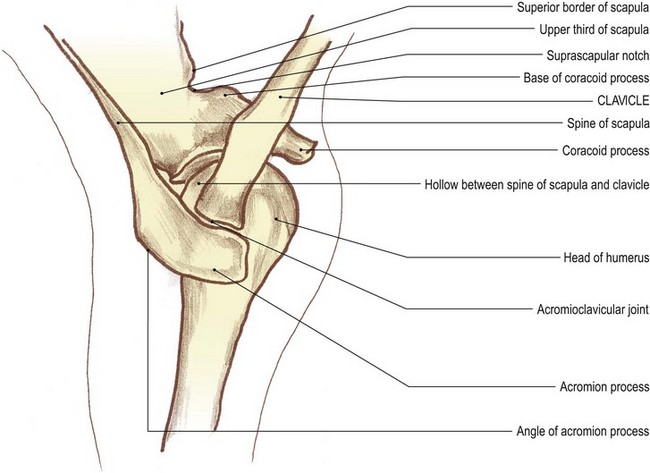
The scapula (Fig. 2.2)
The scapula [scapulae (L) = shoulder blades] (Fig. 2.2) is a flat triangular bone situated on the posterolateral aspect of the upper chest wall. It has three angles, three borders and costal and dorsal surfaces, the latter being marked by a ledge-shaped spine running almost horizontally.
Palpation
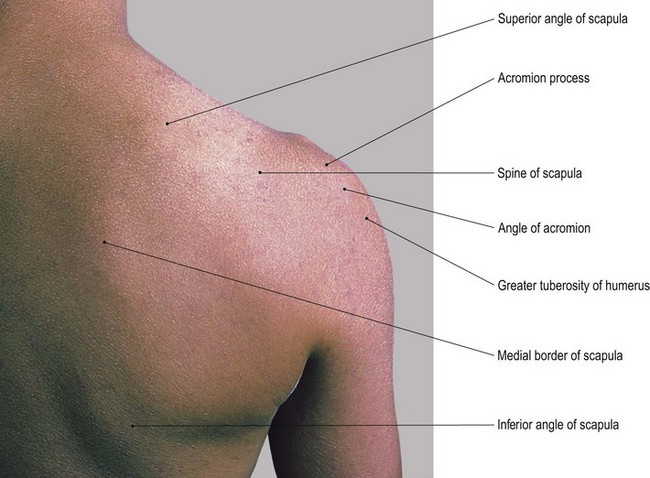
• The spine of the scapula. The whole length of the spine can be palpated between the acromion process laterally and the medial border of the scapula. You will be able to recognize its upper and lower lips even though they give attachment to the trapezius and deltoid muscles, respectively. The posterior surface is easily visible and palpable. Notice that it is narrow medially but that it gradually broadens out as it passes laterally to become the superior surface of the acromion.
• Note 1. At this point the spine is covered by a bursa (the supra-acromial bursa), enabling the skin to move easily over the bone.
• Note 2. The bone then appears to form a large quadrilateral surface, which is directed upwards and slightly backwards having posterior, lateral and short anterior borders. On its medial side, the lateral end of the clavicle and the small gap produced by the acromioclavicular joint can be palpated. The smooth triangular area at the medial end of the spine is also covered by a bursa and can be palpated through the tendinous lower fibres of trapezius muscle.
• The medial border of the scapula. The medial border of the scapula is approximately 5 cm lateral to the spines of the second to eighth thoracic vertebrae. Its full length can only be palpated with difficulty, except in lean subjects, as it gives attachment to levator scapulae above and rhomboid major and minor below, as well as being mostly covered by trapezius muscle.
• The superior angle of the scapula. This is buried in muscle and is tender on deep palpation.
• The inferior angle of the scapula. This can be identified lying on the posterolateral parts of the seventh and eighth ribs. Ask the model to raise the arm above the head. You will now be able to see and feel the inferior angle of the scapula moving laterally around the chest wall as far as the mid-axillary line.
• The lateral border of the scapula. This is very difficult to palpate as it is embedded in thick muscle (teres major and minor).
• Note. The lateral border of the scapula is by far the thickest of the borders and acts as a lever for its strong muscles to pull it laterally in scapula rotation.
• The coracoid process of the scapula. This process can be palpated where it lies anteriorly, in the infraclavicular fossa, 3 cm below the junction of the lateral and middle thirds of the clavicle. This is in spite of the fact that it gives attachment to three muscles: the short head of the biceps, coracobrachialis and pectoralis minor. Care should be taken not to apply very deep pressure as this may elicit tenderness in some subjects.
• The anterior rim of the glenoid cavity. The concave anterior rim of the glenoid cavity can be palpated just lateral to the coracoid process, running downwards and laterally for approximately 3 cm, with the head of the humerus lying on its lateral side.
Palpation on movement
For palpation in this area, the model should be in the standing or sitting position.
• Protrusion. Place your right hand on the point of the model’s right shoulder. Now place your left hand on the inferior angle and the lower part of the medial border of the scapula. Ask the model to pull the shoulder girdles forward as in hunching the shoulders (protrusion). You will be able to see and palpate the scapula moving forwards around the chest wall whilst remaining in its vertical position.
• Retraction. Ask the model to brace back the shoulder girdles. You will be able to see and palpate the scapula moving backwards, again not changing its vertical position.
• Elevation and depression. Keep your hands in the same position. Ask the model to raise (elevation) and lower (depression) the shoulder girdles as in shrugging. You will be able to see and palpate the scapula rising and lowering but still holding its vertical position.
• Lateral rotation. Ask the model to raise the right arm above the head. When the upper limb reaches 20°, you will be able to see and palpate the scapula rotating around an axis just below the spine nearer to its medial end. The superior angle will rise, moving medially, and the inferior angle will be observed, moving laterally and slightly upwards around the chest wall (lateral rotation). In fact, the inferior angle will reach as far as the mid-axillary line on full elevation of the humerus.
• Medial rotation. Ask the model to lower the right arm from above the head. As the arm is lowered, you will be able to see and palpate the scapula returning to its original position (medial rotation). If, however, the arm is taken behind the back, medial rotation continues and the inferior angle will come close to the spines of the vertebrae.
Anatomy
Palpation
• The acromion process of the scapula. [Akros (Gk) = summit and omos = shoulders]. Run your fingers from the anterior border of the clavicle across the acromioclavicular joint where the anterior border of the acromion process of the scapula continues in line for approximately 1.5 cm.
• The lateral border of the acromion process. It then passes backwards as the lateral border of the acromion for a further 5 cm.
• The inferior lip of the spine of the scapula. The border then turns medially (acromial angle) to become the inferior lip of the spine of the scapula. You will be able to palpate the whole of this area.
Palpation on movement
• Protraction. Place the fingers and thumb of your right hand on the medial end of the right clavicle. Now place the fingers and thumb of your left hand on the lateral end of the right clavicle. Ask the model to draw the shoulder girdle forward (protrusion). Palpate the lateral end of the clavicle as it moves forward, accompanied by the gliding of the scapula around the chest wall. Now palpate the medial end of the clavicle and note that it glides backwards in the clavicular notch of the sternum.
• Note. The axis around which this movement occurs is approximately 3 cm from the medial end of the clavicle, where the costoclavicular ligament attaches to the undersurface of the bone.
• Retraction. Ask the model to draw the shoulders backwards (retraction). Palpate the lateral end of the clavicle which will move backwards. Now palpate the medial end of the bone which will move forwards and become proud of the sternum.
• Elevation. Ask the model to raise the shoulder girdle (elevation). Now palpate the lateral end of the clavicle which will rise. Palpate the medial end of the bone which will move down, rolling into the clavicular notch of the sternum using the same fulcrum as above.
• Depression. Ask the model to lower the shoulder girdle. Now palpate the lateral end of the clavicle which will drop. If you palpate its medial end, you will feel this end of the bone rising to its original position. If you now ask the model to depress the shoulder girdle further, you will feel the medial end of the clavicle protruding upwards.
• Elevation of the upper limb. Ask the model to raise the arm above the head. Now palpate the clavicle as, initially, it will move as in the movement of elevation. In the final stage of the movement, however, you will be able to feel the entire bone rotating with its anterior surface moving upwards. You will also be able to palpate the lateral rotation of the scapula which accompanies this movement. If the model now lowers the arm, the shoulder girdle will return to its original position.
• Note. Movements of the clavicle, scapula and humerus and the joints between them are highly complex and should be studied in Anatomy and Human Movement (Palastanga et al 2002).
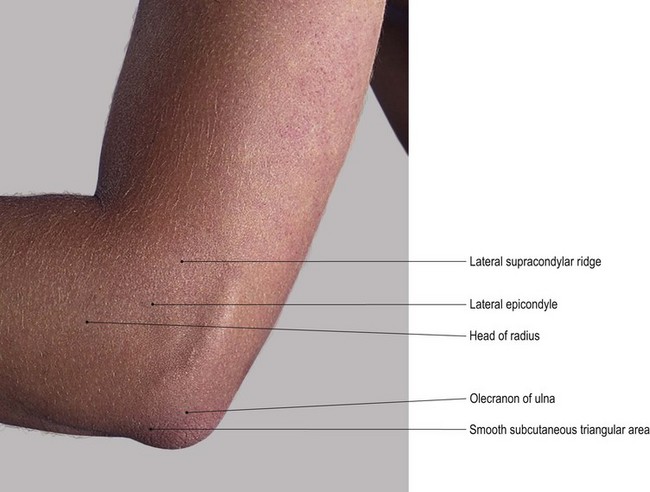
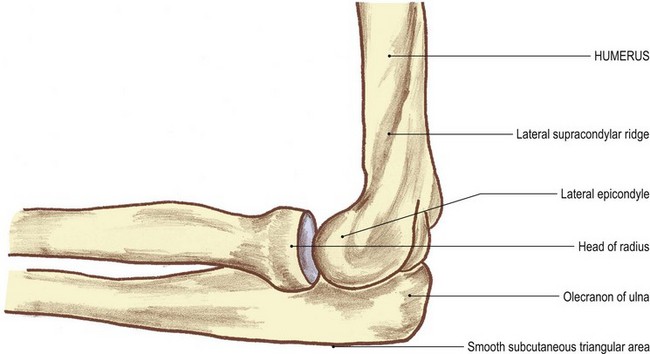
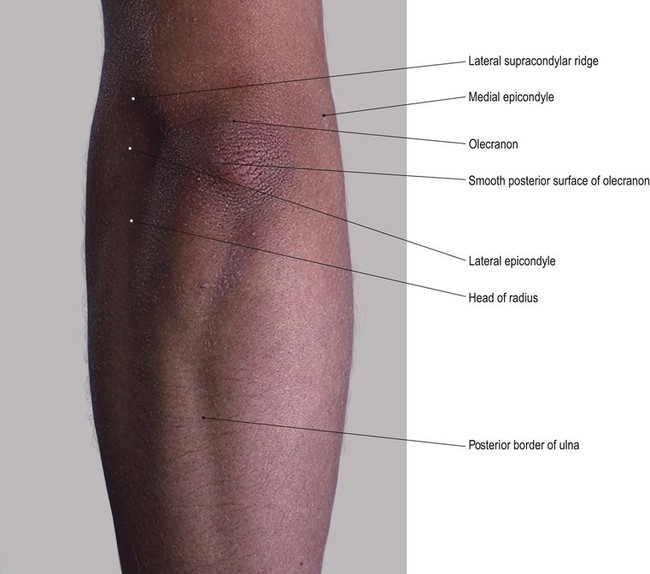
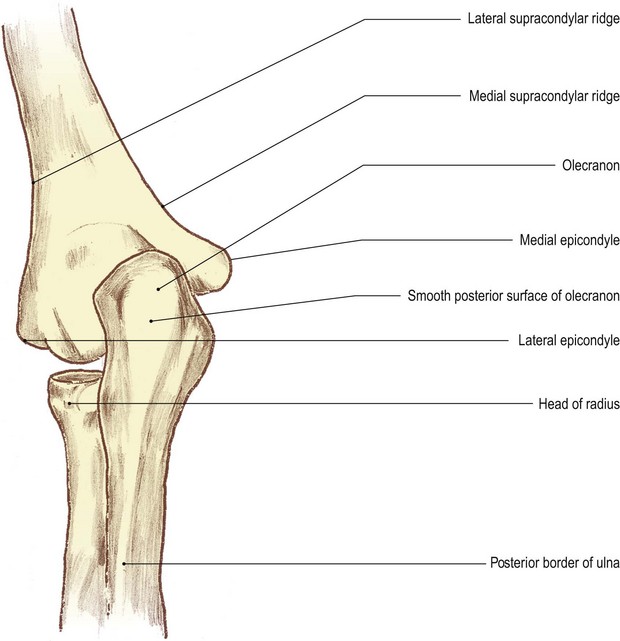
The elbow region (Fig. 2.3)
This region comprises the lower end of the humerus and the upper ends of the radius and ulna.
Palpation
For palpation in this area, the model should be in the sitting position.
• The humerus. Find the lower attachment of deltoid muscle which is halfway down the lateral side of the arm. Just below this, you will be able to palpate the humerus.
• Note. The humerus is crossed laterally by the radial nerve running downwards and forwards. Trauma in this area can cause pain, tingling and, sometimes, numbness of the posterolateral aspect of the hand.
• The lateral supracondylar ridge of the humerus. Inferiorly, you will palpate a sharp border on the bone. This is the lateral supracondylar ridge which terminates at the large lateral epicondyle.
• The lateral epicondyle of the humerus. You will be able to palpate the posterior surface of this epicondyle which is subcutaneous.
• The olecranon fossa of the humerus. Ask the model to flex the elbow. Now you can trace the ridge medially across the back of the humerus to the commencement of the olecranon [olekranon (Gk) = the point of the elbow] fossa.
• The head of the radius [radius (L) = spoke of a wheel]. Ask the model to extend the elbow. Now you will be able to palpate the lateral side of the button-shaped head of the radius situated immediately below the humeral epicondyle. The narrow groove running horizontally between the two is the radiohumeral part of the elbow joint.
• The neck of the humerus. Palpate around the lateral half of the radial head, posteriorly, as far as the posterior aspect of the superior radioulnar joint. Just below the head, laterally, palpate the narrowed radial neck which is hidden by muscles anteriorly and posteriorly.
• The olecranon process of the ulna (Fig. 2.3a, b). Ask the model to extend and then to flex the elbow. Now palpate the large bony formation of the olecranon, particularly when the elbow is flexed. Its superior surface is more difficult to feel because it is covered by the tendon of triceps as the tendon inserts into its posterior aspect.
• The olecranon bursa. Now place your fingers on the posterior triangular surface of the olecranon. You will find that the skin and superficial fascia can easily be moved owing to the presence of the subcutaneous olecranon bursa.
• Note. If pressure is applied for some time to this area, as in leaning on the elbows, the bursa can become inflamed and swollen (bursitis).
• The medial and lateral surfaces of the olecranon process. Palpate the narrow triangular surface which has its apex downwards and is continuous with the posterior border of the ulna. Palpate this border which is subcutaneous as far as its head. Whilst you will be able to palpate the medial and lateral surfaces of the olecranon relatively easily, they are covered by muscle lower down and are more difficult to identify. The olecranon is much more difficult to palpate when the elbow is extended, as it moves into the olecranon fossa of the posterior surface of the distal end of the humerus.
Palpation on movement
• Extension. Ask the model to flex the right elbow joint to 90°. Place the fingers of your left hand on the superior surface of the olecranon, which will be at the back of the elbow. Now place the fingers of your right hand on the medial epicondyle and your thumb on the lateral epicondyle of the humerus. Ask the model to extend the elbow joint. You will be able to palpate the olecranon which will virtually disappear into the olecranon fossa on the posterior aspect of the humerus.
• Pronation and supination. Ask the model to flex the right elbow joint. Now locate the outer edge of the disc-like head of the radius. Ask the model to pronate and supinate the forearm. Note the rotation of the head of the radius beneath your fingers.
• Finally, stand in front of the model. Ask the model to flex the elbow joint fully. Take the arm in your left hand and the forearm in your right. Now ask the model to extend the elbow joint. You will observe that the forearm, which was slightly medial to the line of the humerus, now moves more to the lateral side forming an angle with the upper part of the arm. This is termed ‘the carrying angle’.
Palpation
• The medial supracondylar ridge of the humerus. On the medial side of the elbow, you will be able to palpate the sharp medial supracondylar ridge. Trace this ridge upwards for approximately the lower quarter of the humerus.
• The medial epicondyle of the humerus. At the lower end of the medial supracondylar ridge, palpate a large, bony prominence 2 cm above the elbow joint and approximately 1 cm below the level of the lateral epicondyle. This is the medial epicondyle of the humerus, behind which there is a deep groove for the ulnar nerve.
• Note. Palpation of this area may be quite tender and could cause tingling or even numbness on the medial side of the hand due to pressure on the ulnar nerve. This is often erroneously referred to as the ‘funny bone’, owing to the strange sensation when the nerve is compressed.
• The olecranon fossa. Ask the model to flex the elbow joint fully. It is just possible to feel the depression of the olecranon fossa through the tendon of triceps.
• The medial and lateral epicondyles of the humerus. From the posterior aspect, locate the medial and lateral epicondyles.
• The olecranon process of the ulna. At a point midway between the two epicondyles, press your thumb onto the back of the triceps tendon. You will observe that the tendon will sink slightly into the olecranon fossa. Just below your thumb you will palpate the bony olecranon.
• The coronoid process of the ulna (coronoid [corone (Gk) = crown; also the name given to the pointed front of a ship or plough]). Ask the model to extend the right elbow joint and and fully supinate the forearm. With the forearm in this fully extended position, examine the anterior aspect of this region. Place the flat surface of your right hand 2.5 cm below and 2.5 cm lateral to the medial epicondyle of the humerus. You will feel a hard bony projection deep to the mass of the flexor muscles. This is the coronoid process of the ulna.
Functional anatomy
• Note 1. The title ‘carrying angle’ at the elbow joint must have been given when the carrying of pails of water was common. In fact most objects carried in the hand with the elbow extended are normally accompanied by the forearm being held in the mid prone position. This eliminates the angle at the elbow.
• Note 2. When the elbow is fully flexed the hand does not oppose the shoulder joint; it is located in the mid clavicular area.
• Note 3. If the model now flexes the shoulder joint, the hand is taken first to the chin and then to the mouth, thus facilitating feeding. Keep the arm in this position. If the forearm is then fully pronated and the fingers extended, the hand now becomes a protection to the face.
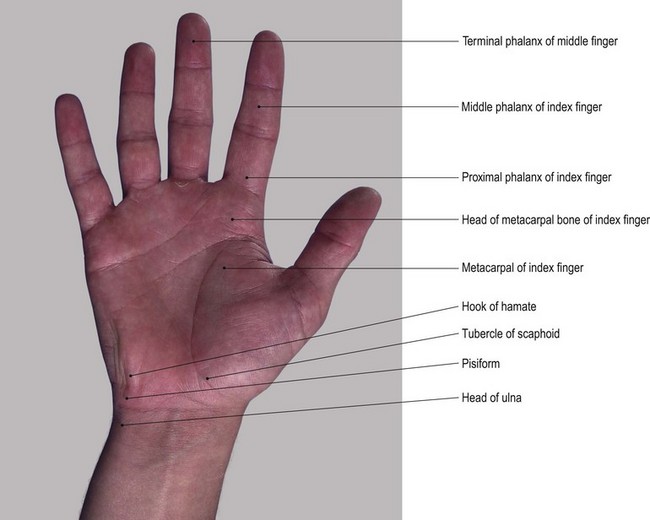
The wrist and hand
The lower ends of the radius and ulna form a shallow mortice into which three of the four bones of the proximal row of carpals – scaphoid, lunate and triquetral – fit. The fourth bone in the proximal row, the pisiform, lies anterior to the triquetral. Distally, the proximal row of carpal bones form another concavity for the reception of the second row of carpal bones: the trapezium, trapezoid, capitate [capitate (L) = head-shaped] and hamate. The capitate is the largest of the four and fits snugly into the deepest part of the concavity, being in contact with all the carpal bones except the pisiform, triquetral and trapezium (Fig. 2.4b).
Anterior, medial and lateral aspects
Palpation
• The triquetral bone [triquetrus (L) = having three corners]. Return to the wrist joint. Locate the head of the ulna on its medial side (Fig. 2.4). Immediately distal to this, palpate the medial and posterior surfaces of the triquetral bone.
• The pisiform bone [pisum (L) = a pea]. On the anterior surface of the triquetral bone, palpate the pea-shaped pisiform bone. This bone is easily recognizable owing to its prominence and by the attachment of the tendon of flexor carpi ulnaris to its proximal side.
• Note. Application of deep pressure on the pisiform bone may elicit tenderness.
• The hook of the hamate bone [hamatus (L) = hooked]. If you now apply relatively deep pressure with the tip of your thumb 1 cm distal and slightly lateral to the pisiform bone, you will be able to feel a small but distinct bony prominence. This is the hook of the hamate bone. Now move your thumb from side to side and palpate two small nerves: the superficial terminal branches of the ulnar nerve. These can be compressed against the prominent hook of the hamate.
• The tip of the radial styloid process. On the lateral side of the wrist, locate the tip of the radial styloid process. It lies within a space termed the ‘anatomical snuff box’.
• The anterior border of the radius. From the styloid process, trace upwards for a short distance and palpate the sharp anterior border of the radial shaft. The radial artery lies just medial to the crest of the anterior border.
• The scaphoid bone [skaphe (Gk) = a skiff] and the trapezium [trapezion (Gk) = an irregular four-sided figure]. Distal to the styloid process of the radius, palpate the lateral surfaces of the scaphoid and trapezium bones.
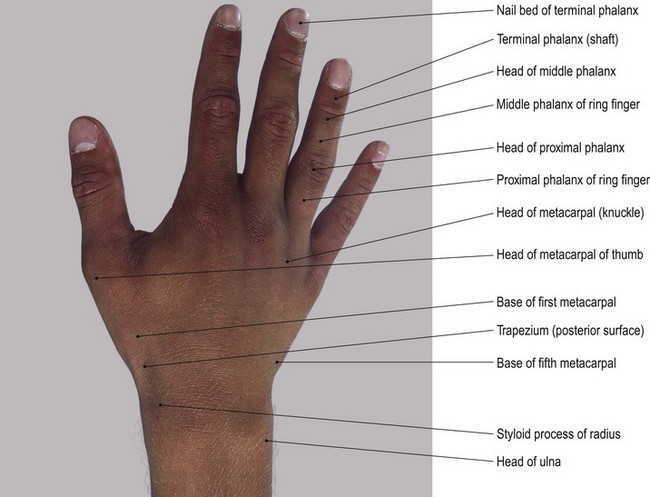
• The first metacarpal bone and its proximal and distal phalanges. The first metacarpal bone is identified by a small tubercle. Its shaft leads distally to its head. You should find the base, shaft and the head of the proximal phalanx easy to palpate. The base and shaft as far as the nail of the distal phalanx [phalanx (Gk) = a band of soldiers] are equally identifiable.
• Note. The posterior surface of the bones of the thumb face laterally due to the thumb lying at right angles to the palm. Medially, the anterior surfaces are difficult to palpate due to the presence of muscle and tendon.
• The tubercle of the scaphoid bone. To facilitate palpation of the tubercle of the scaphoid bone, ask the model to extend the wrist. The tubercle should then be palpable at the proximal end of the thenar eminence, on the front of the carpal region, 1 cm medial to the tip of the radial styloid process.
• The vertical edge of the trapezium bone. If you apply deep pressure, the vertical ridge of the trapezium is just palpable 1 cm distal to the scaphoid tubercle.
• Note 1. This can often be a painful area for deep palpation so it is advisable to limit the number of times this technique is performed.
• Note 2. The scaphoid tubercle is prominent enough to be damaged by falls on the outstretched hand leading to a fracture. This is likely to cause pain and dysfunction of the hand for many months due to its poor blood supply leading to a long healing time.
• The second–fifth metacarpal and phalangeal bones. The anterior surfaces of these remaining bones are difficult to palpate as they lie deep to the muscle and fascia. To facilitate palpation, ask the model to extend the fingers fully. The anterior surfaces of the heads of the metacarpals can be felt in line with each finger, 2 cm proximal to the web between the fingers. Ask the model to extend/hyperextend the metacarpophalangeal joints. Now palpate the heads of each phalanx, just proximal to the creases of the interphalangeal joints. If you now grip the lateral sides of the heads between your finger and thumb, you should be able to palpate a small tubercle situated on each side.
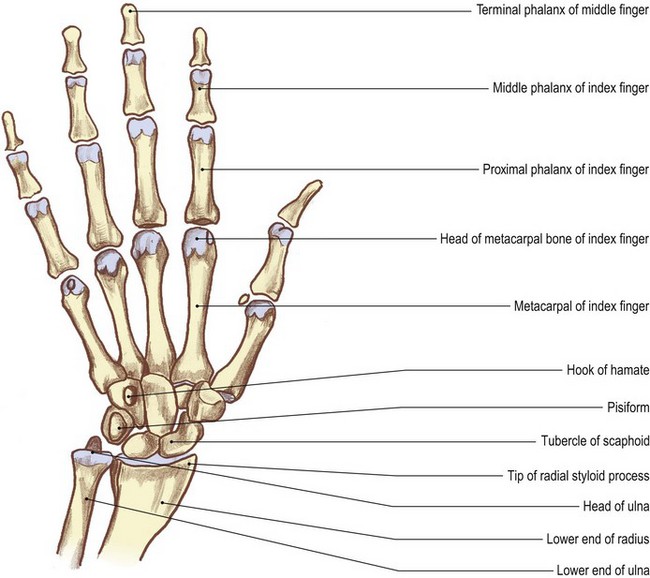
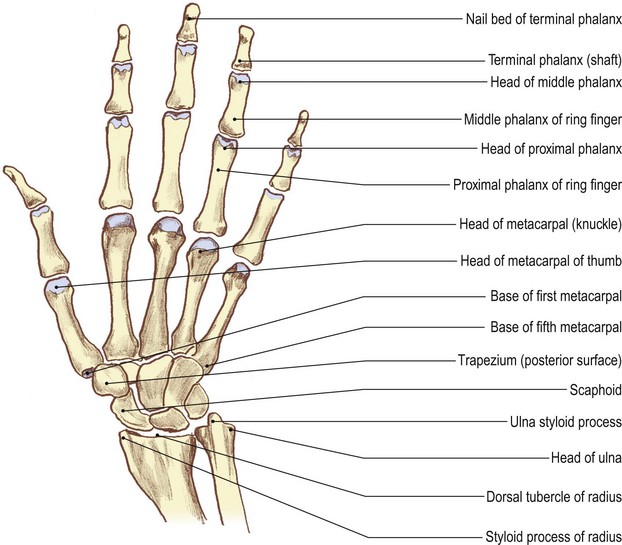
Posterior aspect (Fig. 2.5)
Palpation
• The styloid process of the ulna. Place your finger on the button-shaped head of the ulna. This is clearly palpable posteromedially, but is hidden by the tendon of flexor carpi ulnaris anteriorly. Palpate the ulna styloid process as a small projection on its posteromedial aspect, although this may be difficult as the bone is partially hidden by the tendon of extensor carpi ulnaris muscle. To facilitate palpation, ask the model to deviate the wrist radially. You will find that the head of the ulna and its styloid process become much easier to identify.
• The styloid process of the radius. Palpate the radial styloid process situated on the lateral side of the wrist, having tendons running in front and behind.
• The lateral side of the lower half of the radius. From the styloid process, trace upwards and palpate the lower half of the lateral side of the radius. From here, palpation becomes more difficult because the bone is covered by the bulk of brachioradialis muscle.
• Note. This region may be quite tender to palpate as it is often crossed by the superficial terminal branch(es) of the radial nerve.
• The dorsal tubercle of the radius. On the posterior aspect of the distal end of the radius, just above the level of the styloid process, the dorsal tubercle of the radius can be palpated. The tendon of extensor pollicis longus muscle grooves its medial side and uses it as a pulley.
• The posterior surfaces of the scaphoid, lunate [luna (L) = the moon] and triquetral bones. Find the dorsal tubercle of the radius. Below the level of this tubercle and the head of the ulna, locate a hollow; this is limited 2 cm below by the bases of the metacarpal bones. Ask the model to flex the wrist joint. Now palpate the posterior surfaces of the scaphoid, lunate and triquetral bones. They form a line distal to the tips of the radial and ulnar styloid processes.
• The trapezoid, capitate and hamate bones. Move your fingers just distal to the previous line of bones. Grip the bones between your fingers posteriorly and your thumb anteriorly. Just beyond them, palpate the trapezoid bone, which is situated at the base of the second metacarpal. Now palpate the capitate bone, situated at the base of the third metacarpal. Lastly, palpate the hamate, situated at the base of the fourth and fifth metacarpal bones.
• The second–fifth metacarpal and phalangeal bones. The lower limit of this area is marked by the bases of the metacarpal bones with their shafts running distally to end in rounded heads, all of which are easily palpable. To facilitate palpation, ask the model to flex the fingers. The base, shaft and head of each phalanx are now equally easy to palpate posteriorly. Anteriorly, they are hidden by tendons and the pulp of the fingers.
Palpation on movement
• Flexion and extension of the wrist. Ask the model to extend the wrist. Locate the tubercle of the scaphoid and the pisiform bone. Now ask the model to flex the wrist. Palpate the scaphoid and pisiform bones as they appear to move backwards and become indistinct. Keep the model’s wrist in flexion. Palpate the posterior aspect of the carpal bones just below the ulna and radius. Ask the model to extend the wrist. Palpate the posterior aspect to the carpal bones as they appear to move forwards and become indistinct.
• Flexion and extension of the fingers. Ask the model to extend the index finger. Now grip the base of the proximal phalanx with your thumb anteriorly and your fingers posteriorly. Ask the model to flex the finger. Palpate the phalanx as it moves round to the front of the head of the metacarpal leaving the head prominent (the knuckle). This is common to all the fingers, but more obvious in the index finger.
• Flexion of the interphalangeal joints. If you apply the technique as described above on the interphalangeal joints, you will palpate the head of the most proximal of the two bones as a small ‘knuckle’ shape.
• Flexion and extension of the thumb. If you now apply the same procedure as described above to the base of the proximal phalanx of the thumb, you will note that only half the movement is available and the head of the metacarpal is only partially exposed.
Joints
Joints of the pectoral girdle
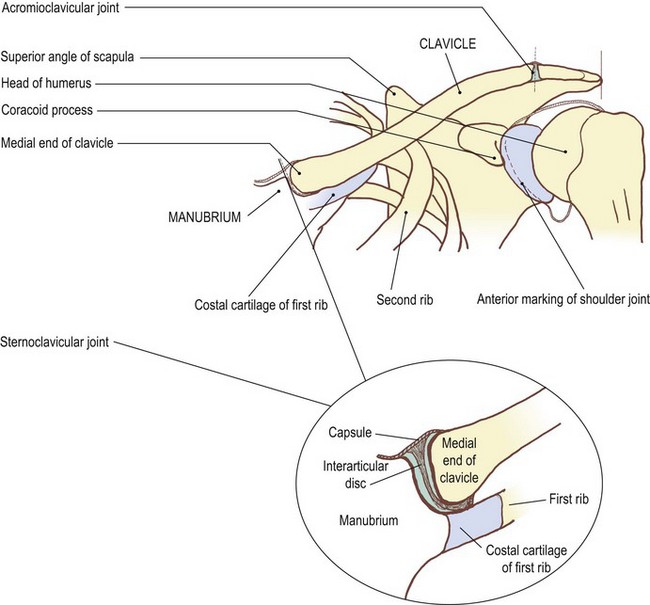
The sternoclavicular joint (Fig. 2.6)
Palpation
Surface marking
For palpation in this region, the model is in the sitting position.
• The sternoclavicular joint. You can palpate this joint at the upper lateral corner of the manubrium sterni. Draw a curved line concave laterally. It is approximately 1 cm in length, extending over the lower half of the medial surface of the clavicle, passing inferolaterally for approximately 0.5 cm. Run your fingers down the front of the neck until you reach the sternal notch. Below you will feel the manubrium sterni and laterally the medial end of the clavicle with the sternoclavicular joint between the two.
Palpation on movement
• Retraction. Immediately lateral to the joint, between the clavicle and the first rib, is the costoclavicular ligament. This is not palpable, but acts as the fulcrum for movements of the clavicle at the joint. Thus when the lateral end of the clavicle is drawn backwards (retraction), the medial end can be observed gliding forward, projecting anterior to the plane of the manubrium.
• Protraction. Similarly, when the lateral end of the clavicle is brought forwards (protraction), you will be able to palpate the medial end moving backwards behind the plane of the manubrium.
• Elevation 1. Ask the model to raise the lateral end of the pectoral girdle. Palpate the medial end of the clavicle as it glides downwards on the clavicular notch of the manubrium sterni until it is level with the superior border of the manubrium sterni.
• Elevation 2. Ask the model to raise the upper limb above the head. The scapula laterally rotates around the chest wall and the lateral end of the clavicle is elevated. During the final few degrees of movement, the clavicle rotates around its long axis so that the anterior surface faces more superiorly. This rotation is due to the tension developed in the coracoclavicular ligament.
• Depression. Ask the model to pull the pectoral girdle downwards (depression). Palpate the medial end of the clavicle as it rises on the clavicular notch.
• Note. All these movements can be observed occurring around the attachment of the costoclavicular ligament.


