5 The thorax
At the end of this chapter you should be able to
1. Find, recognize and name the constituent bony components of the thorax, including the clavicle, scapula, ribs and vertebrae, noting their size and position.
2. Palpate many of the bony features, being able to relate one to another.
3. Locate, name or number the spines and transverse processes of all the thoracic vertebrae.
4. Recognize and palpate all 12 of the ribs, noting their extent.
5. Name all the joints in which the clavicle, scapula, ribs, sternum and vertebrae are involved and palpate the joint lines where possible.
6. Give the class and type of all the joints named.
7. Demonstrate any accessory movements which may be possible in the joints of the thorax.
8. Locate and name the muscles which cover the thorax.
9. Draw the shape of the muscle on the surface and give its attachments.
10. Demonstrate the actions of all of the muscles covering the thorax.
11. Describe the position and attachments of the diaphragm.
12. Give an account of its actions and functional significance.
13. Demonstrate the cutaneous distribution of the thoracic nerves, giving an outline of the course each takes.
14. Describe the arrangement of chambers in the heart.
15. Give the surface markings of the main boundaries of the heart.
16. Describe the arrangement of the main arteries in the thorax, giving their surface markings.
17. Describe the arrangement of the main veins in the thorax, giving their surface markings.
Bones
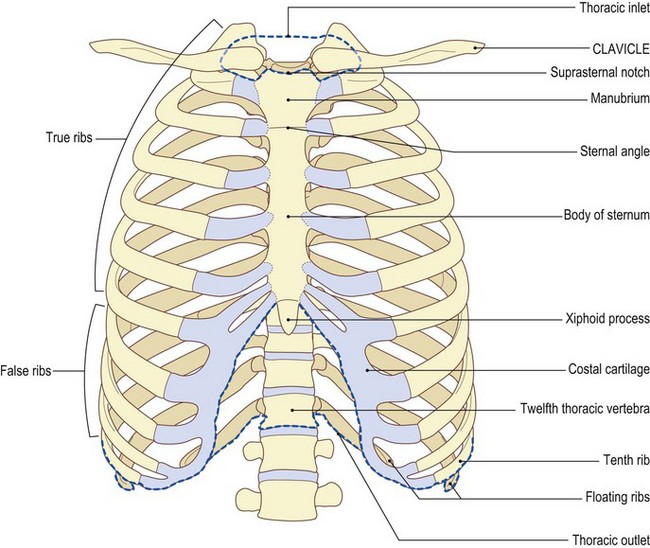
The thoracic cage
The bony structure of the thoracic cage consists of:
• the sternum [stereos (Gk) = solid, hard] anteriorly
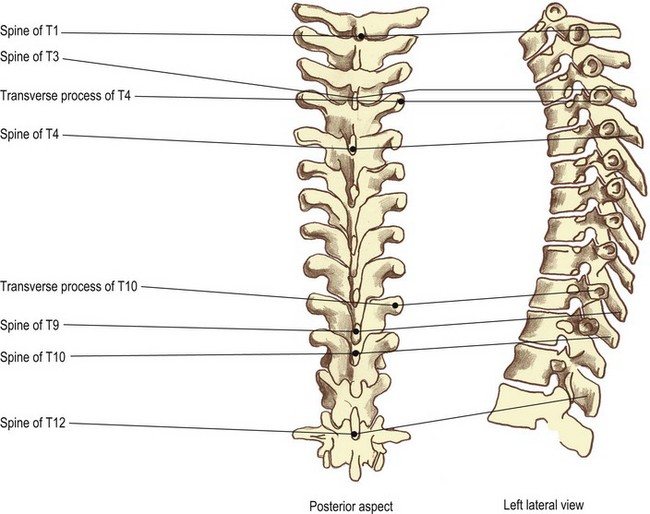
• the twelve thoracic vertebrae [vertebra (L) = joint; from verto – I turn] posteriorly, the first thoracic vertebra being the smallest and the twelfth the largest (see Figs 5.2–5.4), and
• the twelve ribs on either side linking the vertebrae with the sternum.
The clavicle and scapula
The clavicle lies almost horizontal, articulating with the superolateral part of the manubrium. Posterolaterally the scapula rests on the second to eighth ribs, with the acromion at the lateral end of the spine articulating with the lateral end of the clavicle at the acromioclavicular joint (see Fig. 2.7).
Palpation
For palpation in this region, the model can be in either the sitting or standing position.
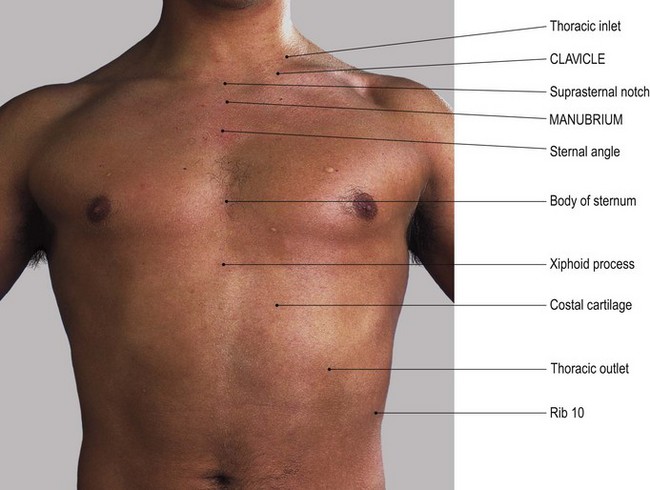
• The suprasternal notch. Identify the suprasternal notch which can be located at the upper border of the manubrium (Fig. 5.1a, b).
• The medial ends of the clavicle. On either side of the suprasternal notch, palpate the medial ends of the clavicle which project above the line of the manubrium sterni.
• The first rib. Just below the medial end of the clavicle, find the enlargement at the lateral end of the manubrium sterni. This is actually the anterior end of the first rib.
• The sternocostal joint. With careful palpation, you will be able to locate the joint between the first rib and the manubrium sterni running vertically, concave laterally 1 cm below and 1 cm lateral to the medial end of the clavicle.
• The manubriosternal joint (sternal angle). Trace down the anterior surface of the manubrium until you find a raised horizontal line. This is where it joins the body of the sternum at the manubriosternal (sternal angle) joint (Fig. 5.1a, b). The reflex angle between the manubrium and body of the sternum is of the order of 200°, changing some 5–7° between full inspiration and full expiration.
• The costal cartilages of the second ribs. On either side of the manubriosternal junction the costal cartilages of the second ribs can be palpated, with the lateral border of the manubrium just above.
• Ribs 3–6. Continue to trace down either side of the sternum and identify the third to sixth ribs and their costal cartilages with the lateral border of the sternum lying between their medial ends.
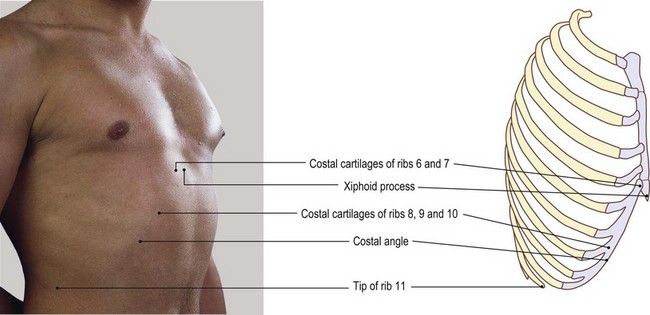
• The xyphoid process of the sternum. The sternum narrows inferiorly and usually dips inwards to join the cartilaginous xiphoid process. The costal cartilage of the seventh rib usually articulates with the sternum at the xiphisternal junction.
• Note 1. The whole of the sternum is subcutaneous and is commonly used to take samples of bone marrow.
• Note 2. The xiphoid process varies in its formation: it may appear to be pointed, double pointed or even rounded. Normally it projects forwards and can therefore easily be palpated. Occasionally it projects downwards and backwards and is then difficult to palpate.
The vertebrae
The transverse processes are much more difficult to palpate as they are covered by strong, thick muscles even in the leaner subject. The tips of the transverse processes are level with the upper border of their own vertebral body (Fig. 5.2).
Palpation
For palpation in this region, the model is in the slump sitting position.
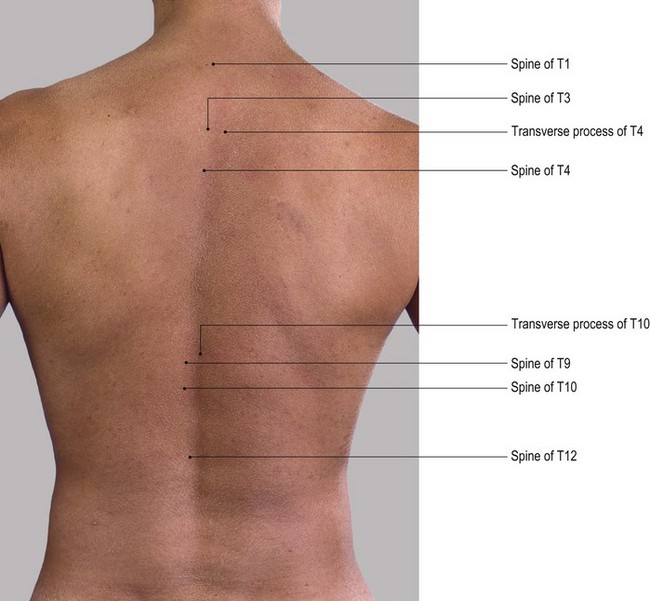
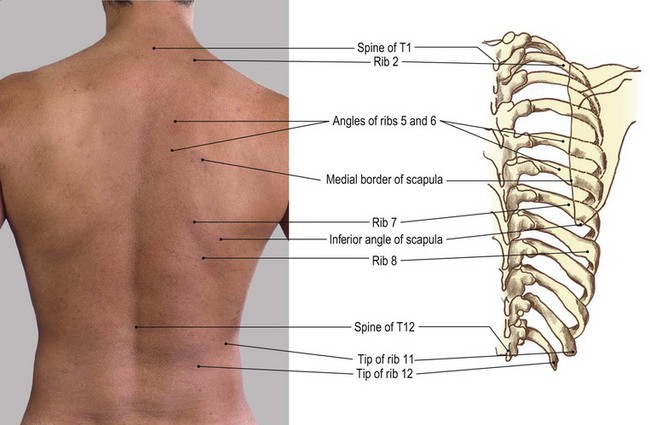
• The thoracic spines. The back is rounded by asking the model to place the chin on the chest. In this position, the tips of the spines become more identifiable.
• The spines of C7 and T1. First, identify the spines of C7 and T1: these are the two most prominent spines at the base of the neck.
• The thoracic spines. Carefully count down the tips of the spines, being sure to mark the upper spine with the fingers of one hand while seeking the spine below with the other. Each spine will feel quite pointed until the level of T12 where the spine becomes flattened. This is because the spine has features similar to those of a lumbar vertebra.
• Note. If you find that palpation is difficult, use the technique suggested on p. 6 where the fingertips are moved rapidly up and down the spine, in a scanning manner. This method of palpation is useful for locating and mapping structures which lie below the surface. It is, however, rarely used, as it gives the impression of merely moving the skin on the underlying structures. It amounts to the building up of a total picture by adding together many disparate pieces of information. Use the pads of all fingers of one hand (the most sensitive) if possible, to sweep across an area, allowing your fingers to move the skin and superficial fascia on the deeper structures. By using this technique, you will be building up a picture similar to that which would be achieved by the scanning beam of a video camera. Use the other hand to mark certain points and mark from where the previous information was obtained. More refined palpatory techniques can then be used on selected areas.
• The lateral tips of the thoracic transverse processes. These lie 3 cm lateral and parallel to the spines.
• Note. The tip of the spine lies 1 cm below the level of the transverse process of the vertebra below. This measurement remains constant because the shorter spines in the upper thorax are compensated for by the transverse processes being slightly raised.
• The costotransverse joints. Lateral to the tips of the transverse processes is a groove marking the line of the costotransverse joints.
The ribs (Fig. 5.3)
There are 12 ribs on either side. They are convex outwards, the eighth being the longest and the twelfth the shortest. The upper seven ribs articulate with the vertebral bodies and transverse processes posteriorly by the facets on their heads and tubercles. The first, tenth, eleventh and twelfth ribs have only one facet; the rest have two. The eleventh and twelfth ribs have no tubercles. Ribs 1–7 articulate with the sternum anteriorly via a varying length of costal cartilage. These are termed ‘true’ ribs. Ribs 8–10 articulate anteriorly via their costal cartilage, with the costal cartilage above, and are termed ‘false’ ribs. Ribs 11 and 12 do not articulate with their transverse process posteriorly and are free anteriorly. They are therefore termed ‘floating’ ribs (see Fig. 5.1).
Palpation
• The posterior section of the ribs. Just lateral to the tip of each transverse process the posterior section of each rib can be palpated, being separated from the transverse process by a depression.
• Ribs 1–10. Ask the model to hang the arm over the side of the plinth (i.e. the pectoral girdle is in protraction). Now find and trace the first to tenth ribs laterally. The rib angle lies approximately 3–4 cm lateral to the tips of the transverse processes. It can readily be palpated in the mid-thoracic region, becoming less clear above and below. The first rib does not possess an angle and those of the eleventh and twelfth ribs are slight if present.
• Ribs 1–12 and the intercostal spaces. Each rib, together with the intercostal spaces above and below, can be traced anteriorly to where it joins the sternum. The second to seventh or eighth ribs are usually hidden posterolaterally by the scapula, while the eleventh and twelfth ribs only exist posterolaterally.
• The first rib. This rib is the most difficult to palpate. It lies deep to the clavicle anteriorly and deep to the trapezius and levator scapulae muscles posteriorly. If you apply deep pressure immediately below the clavicle, 1 cm lateral to its medial end, you will be able to palpate the junction of the rib with the manubrium. By applying deep pressure above the middle of the clavicle in the supraclavicular fossa, it is possible to feel the lateral border of the first rib.
• Note. This area is particularly tender and may produce unpleasant reactions in the upper limb due to pressure on the trunks of the brachial plexus and subclavian artery.
• The neck and tubercle of the first rib. Posteriorly, the neck and tubercle of the first rib can be palpated running downwards and laterally approximately 2 cm lateral to the tip of the spine of C7. This, however, is dependent on the thickness of the upper fibres of trapezius.
• Ribs 8–10 and the costal angle. The costal cartilages at the anterior end of the eighth to tenth ribs form the anterior part of the costal margin, running superomedially to join the xiphoid process. At the level of the ninth costal cartilage an angle and projection are formed: the ‘costal angle’. This lies on a level with the transpyloric plane, in common with the spine of L1 and the tip of the twelfth rib.
• Ribs 11 and 12. Just above the twelfth, the eleventh rib can easily be identified, ending in a point just anterior to the mid-axillary line.
Joints
The thoracic vertebral column (Fig. 5.4)
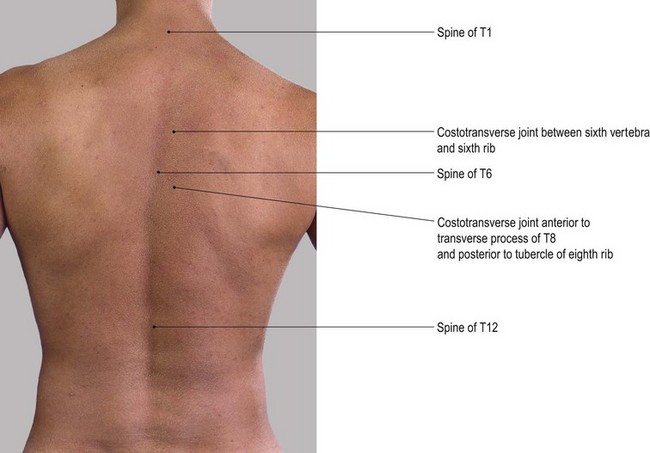
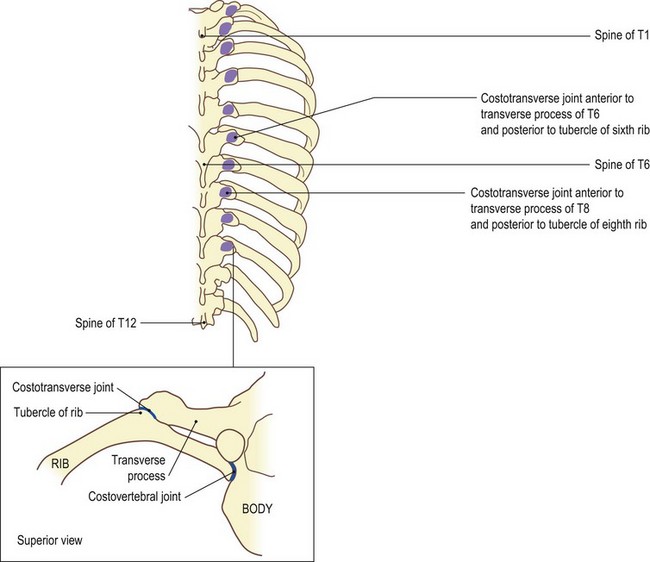
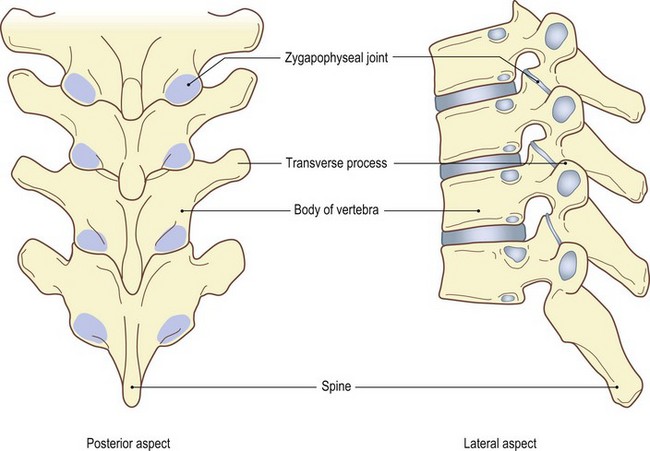
Fig. 5.4 (d, e) Zygapophyseal joints of thoracic spine. Shaded areas show joint surface deep to inferior articular processes
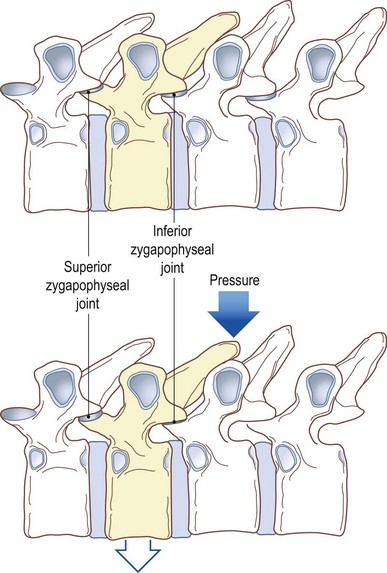
Fig. 5.4 (f, g) Vertebrae in horizontal position showing effect of pressure on spine in direction of arrow
On either side are the zygapophyseal joints (Fig. 5.4d, e) between the articular facets, two above and two below. In addition there are costovertebral joints (Fig. 5.4c) between the heads of the ribs and the side(s) of the body of the vertebrae and costotransverse joints between the tubercle of the rib and the transverse process (Fig. 5.4 a–c). The zygapophyseal, costovertebral and costotransverse joints are all synovial, surrounded by a capsule which is lined with synovial membrane and supported by ligaments. (For detailed study refer to Palastanga et al 2002.)
Palpation
All but the costotransverse and possibly the zygapophyseal joints are impossible to palpate.
• The costotransverse joints. These joints lie in the furrow between the transverse processes and the ribs. They can be located either by following backwards along the line of a known rib to the point where it is obscured by the transverse process or finding the tip of the spinous process of a known vertebra and tracing out laterally to the furrow mentioned above.
• Note. Due to the length of the spines in the thoracic area, the transverse process you can feel is that of the vertebra below.
• The laminae of the thoracic spines. The joints between the articular facets of the thoracic vertebrae lie at the upper edge of the lamina as it meets the lamina above. The joint is virtually impossible to palpate but the lamina can be traced a little laterally from the spines. Slip your fingers down the side of the spinous process. Note that the lamina you feel is that of the vertebra below.
Stay updated, free articles. Join our Telegram channel

Full access? Get Clinical Tree


