3 The lower limb
At the end of this chapter you should be able to:
1. Find, recognize the shape and position of the hip bone, femur, tibia, fibula, patella, tarsal, metatarsal bones and phalanges.
2. Recognize and palpate many of the bony features.
3. Name all the joints of the lower limb, recognizing the bones which form them.
4. Palpate and trace the lines of the joints, where possible, indicating their bony landmarks and surface markings.
5. Describe or carry out any accessory movements possible noting the ranges in which they are most obvious.
6. Note the ranges of each of the joints and indicate the factors limiting the movement.
7. Give the class and type of each joint, noting the axes of movement where possible.
8. Name and demonstrate the action of all the muscles palpable in the lower limb.
9. Indicate the shape of the muscle on the surface and palpate its contraction.
10. Palpate tendons and attachments where possible.
11. Name all the main nerves supplying the lower limb.
12. Demonstrate the course and distribution of each of the main nerves of the lower limb.
13. Name the main arteries of the lower limb, showing their course and giving their distribution.
14. Name the main veins of the lower limb, noting their drainage areas and course.
Bones
The hip region
Palpation
• Preliminary note. Owing to the size and thickness of muscle and fascia, you will find this region much more difficult to palpate than the shoulder. It is often covered by a layer of fat which makes palpation even more difficult.
• For palpation in this region, the model should be in the standing position.
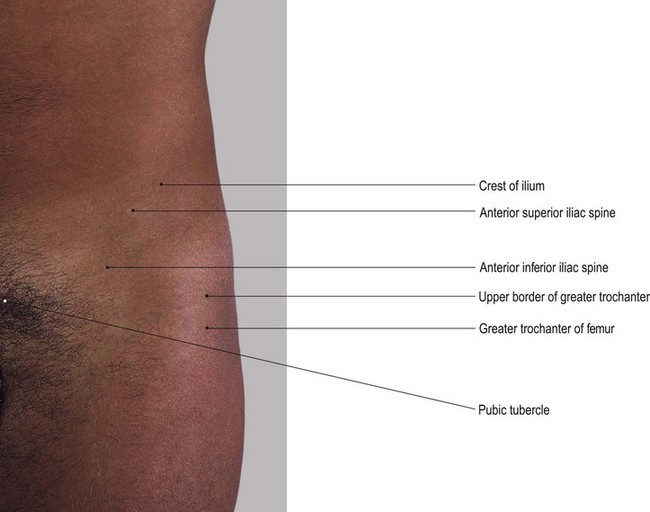
• The iliac [ilium (L) = the flank] crest. Place both hands around the model’s waist. Slide your hands downwards and identify a bony ridge on either side of the waist.
• Note 1. The iliac crest is convex laterally in its anterior two-thirds. It is broad and rounded, with inner and outer lips.
• Note 2. The posterior third of the iliac crest is concave laterally, less well defined and a little sharper on its superior border.
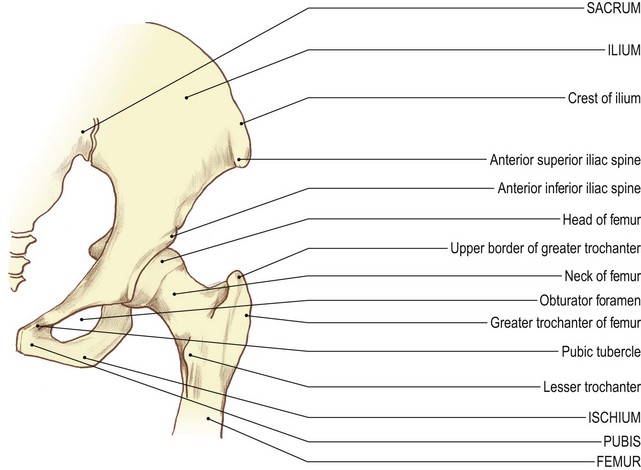
• The anterior superior iliac spine (ASIS) (Fig. 3.1). Trace each crest forwards until you identify a well-defined projection, the ASIS. Palpate the anterior superior iliac spines which are set approximately 30 cm apart (a little more in women), the abdomen usually protruding forwards between them.
• The posterior superior iliac spine (PSIS). Trace the iliac crest posteriorly to a small spine just prior to the bone angling downwards. This is the posterior superior iliac spine. In lean subjects the iliac crest is easily palpated from the ASIS to the PSIS.
• The tubercle of the iliac crest. Identify the tubercle of the iliac crest which lies approximately 5–7 cm posterior to the lateral lip of the ASIS.
• Note. The tubercle of the iliac crest gives attachment to the upper end of the iliotibial tract.
• The anterior inferior iliac spine (AIIS) (Fig. 3.1). From the ASIS, trace the sharp concave anterior border of the ilium downwards to another, less well-defined anterior projection, the AIIS. This lies approximately 2 cm above the rim of the acetablum.
• The anterior rim of the true pelvis (Fig. 3.1). Place the palm of your hand on the lower abdomen. Move it gently downwards where you will feel another ridge of bone approximately 4 cm above the genitalia. This is the anterior rim of the true pelvis.
• Note. This ridge is depressed centrally where the two pubic bones join: the pubic [pubes (L) = the growth of hair in the region in adulthood] symphysis. It is marked superiorly on either side by the pubic tubercles.
• The pubic tubercles. Palpate the pubic tubercles which lie approximately 1 cm on either side of the midline on the upper border of the pubis.
• Note 1. This area is quite tender on palpation.
• Note 2. It is frequently covered with a fatty pad of tissue which may make palpation of these tubercles difficult.
• The superior pubic ramus. Palpate the superior ramus of the pubis which is lateral to the pubic tubercles.
• Note. The superior pubic ramus gradually becomes hidden by muscle.
• The greater trochanter of the femur (Fig. 3.1). Trace a line along the pubic crest laterally beyond the region of the hip joint to the lateral aspect of the upper thigh. Palpate a hard, bony prominence. This is the greater trochanter of the femur. It lies approximately 10 cm below the most lateral aspect of the iliac crest.
• Note. The femoral trochanters are quadrilateral shape. Whilst they are surrounded by muscle, you should be able to identify them easily. They are the most lateral bony part of the hip region.
• From the back, the ease of palpation depends to a large extent on the build of the subject. The region is often covered with a thick layer of fat which may make it difficult to locate the bony points precisely.
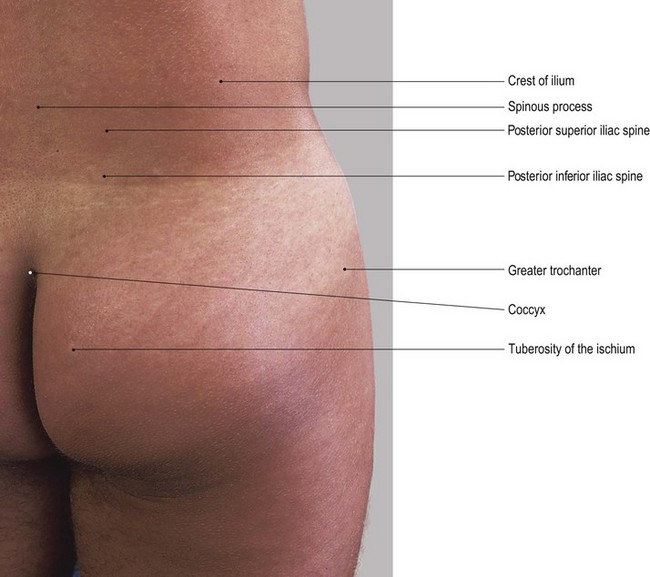
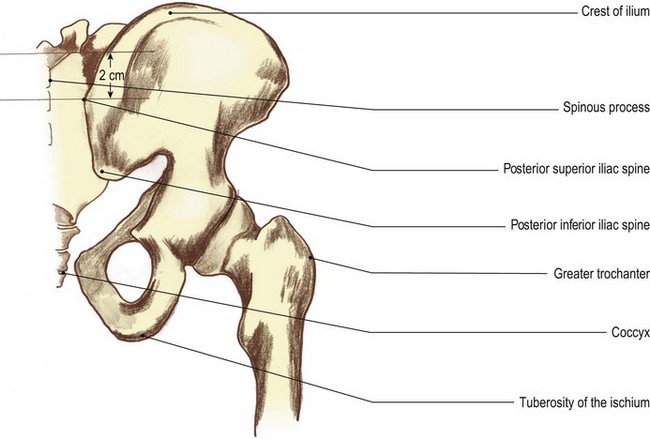
• The posterior superior iliac spine (PSIS) (Fig. 3.2). Return to the iliac crest. Trace the iliac crest backwards and medially until you reach the posterior superior iliac spine. You may find that this is more difficult to palpate than the ASIS.
• Note. In women, the PSIS is often located in a small dimple characteristic of this region.
• The posterior inferior iliac spine (PIIS). From the PSIS follow the posterior border downwards and slightly medially. It is concave posteriorly and terminates approximately 2.5 cm below at the PIIS.
• Note. From here the posterior border passes forwards. It forms the upper boundary of the greater sciatic notch. The notch itself is difficult to identify, except in lean subjects.
Palpation
• The sacral spinous processes (Fig. 3.2). Run your hand down the centre of the posterior surface of the sacrum. Palpate a series of up to five tubercles, gradually diminishing in size. The spinous processes lie in line with the spines of the lumbar vertebrae.
• The articular tubercles. Palpate the smaller tubercles which lie on either side of these spines. They are in line with the articular processes of the vertebrae above.
• Note. This area is often covered with a fatty pad of tissue which may make it difficult to identify these tubercles.
• The ischial tuberosity [ischion (Gk) = the socket in which the thigh bone turns] (Fig. 3.2). You will be able to palpate the ischial tuberosity when the model is in the standing or prone lying position. It is anterolateral to the lateral border of the sacrum and posteromedial to the greater trochanter of the femur. You will find it much easier to palpate the tuberosities if you ask the model to sit on your hands. Alternatively, ask the model to adopt the prone kneeling position. With the model in the sitting position, you will be able to feel large rounded processes carrying most of the weight of the trunk to the supporting surface. If you ask the model to move gently from side to side, you will be able to feel the transference of weight from one tuberosity to the other.
• Note 1. In sustained sitting on a hard surface, such as a wooden pew, these tuberosities become very tender and uncomfortable. The pressure is increased if the model sits upright, preventing the sacrum from sliding forward to take some of the weight.
• Note 2. The lower area of the tuberosities are covered partially by a bursa medially and the tendinous attachment of adductor magnus laterally. The bursa may become inflamed after long periods of sitting upright, causing acute pain over the area (bursitis).
Palpation on movement
• Forward tilting of the pelvis. Stand on the right side of the model. Place your right hand on the upper anterior part of the ilium and place your left hand on the sacrum. Now ask the model to drop the lower abdomen forwards by arching the lumbar spine. You will feel the pelvis tilting forwards.
• Backward tilting of the pelvis. Ask the model to pull in the lower abdomen and flatten the lumbar spine. You will feel the pelvis tilting backwards.
• Note. Both movements occur around a frontal axis running through the heads of both femora.
• Lateral tilting of the pelvis. Stand facing the model. Ask the model to stand on the right leg. Place one hand on the crest of both ilia. Ask the model to draw up the left side of the pelvis by using the left trunk side flexors of the same side and the hip abductors of the standing leg. If these muscles are then relaxed you will feel the pelvis drop on the left side.
• Note. This lateral tilting of the pelvis occurs around a sagittal axis through the right hip joint.
• Repeat the same procedure using the left leg as the standing leg.
• Rotation of the femoral trochanters. Stand behind the model. Place your fingers over the two greater trochanters. Ask the model to flex and extend the right hip rhythmically. Palpate the trochanter, rotating anticlockwise on flexion and clockwise on extension.
The knee region
Anterior aspect
Palpation
For palpation in this region the model is in the sitting position.
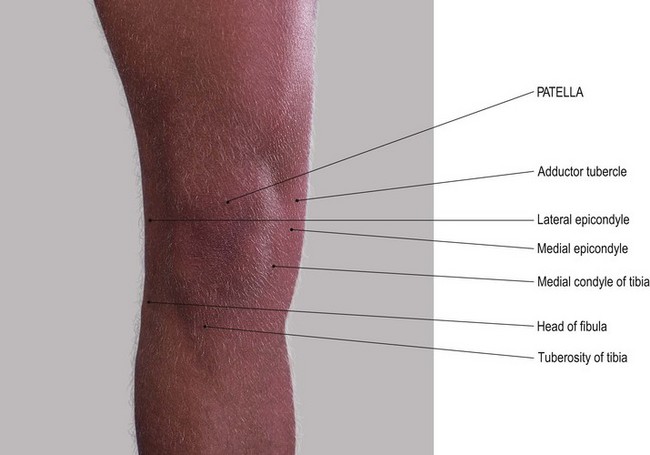
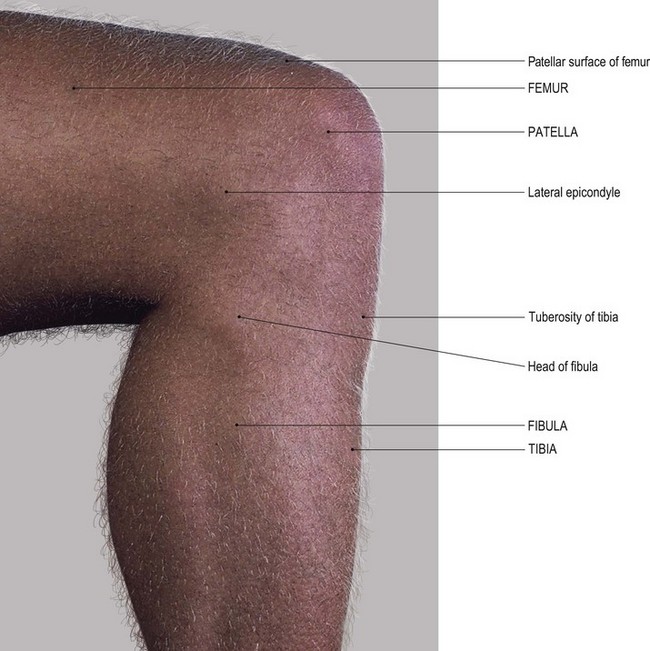
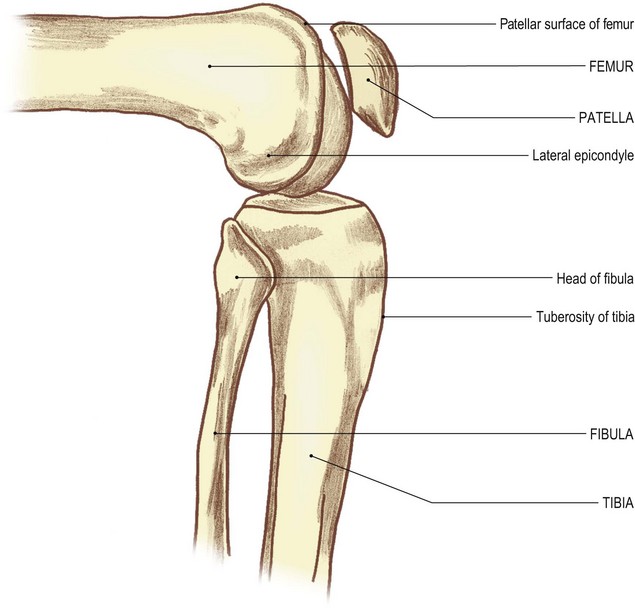
• The patella (1). Place your fingers on the anterior surface of the patella. Palpate its surfaces and borders.
• Note 1. The patella is broader superiorly. It narrows to a rounded point below where it is continuous with the ligamentum patellae.
• Note 2. The borders of the patella are rounded. The anterior surface, although appearing slippery due to the presence of the prepatellar bursa, has rough vertical ridges in line with the fibres of the tendon of quadriceps femoris.
• The patella (2). Ask the model to flex the knee 90°. This will make the patella much more prominent and therefore easier to palpate.
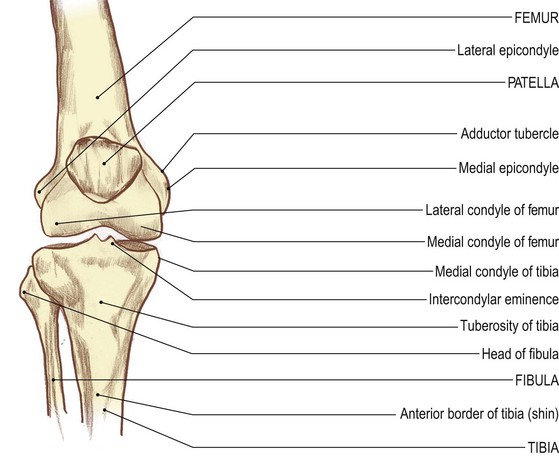
• The femoral condyles. Palpate the medial and lateral femoral condyles on either side of the patella and on which the patella sits.
• Note 1. Each femoral condyle is convex forwards and is palpable on either side of the patella. It is narrower superiorly and broader inferiorly due to the shape of the patella.
• Note 2. These condylar surfaces pass posteriorly into the knee joint itself.
• The tibial condyles. Palpate the medial and lateral tibial condyles below the femoral condyles. Palpate their flattened upper surfaces which are marked by a sharp circumference separating them from the more vertical surfaces of the shaft.
• The tibial tuberosity (Fig. 3.3). Palpate the large tibial tuberosity below and centrally from the patella.
• Note 1. The lower part is smooth and slippery, due to the presence of the superficial infrapatellar bursa.
• Note 2. The upper part gives attachment to the ligamentum patellae.
• Note 3. The tibial tuberosity is particularly noticeable when the knee is extended.
• The tibial condyles. Ask the model to flex the knees to 90°. Place your fingers in the small triangular fossae on either side of the ligamentum patellae. Palpate the upper surfaces of the tibial condyles below and the undersurface of the femoral condyles above. Between your fingers lies the ligamentum patellae.
• Note. Directly posteriorly is the cleft of the knee joint, with the medial and lateral menisci between.
• The menisci. These are not always palpable. Ask the model to flex the knee to 90° and then medially rotate the joint. You may now be able to palpate the anterior edge of the medial meniscus bulging forwards on medial rotation of the tibia. Now ask the model to laterally rotate the knee joint. You may now be able to palpate the anterior edge of the lateral meniscus on lateral tibial rotation.
Medial aspect
Palpation
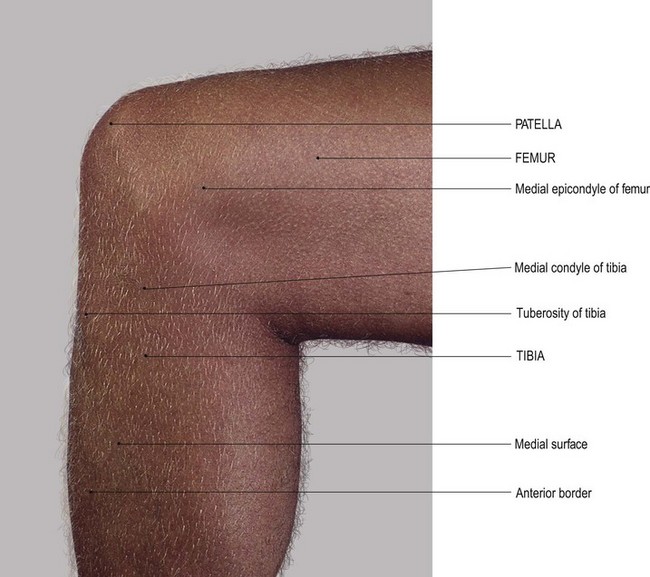
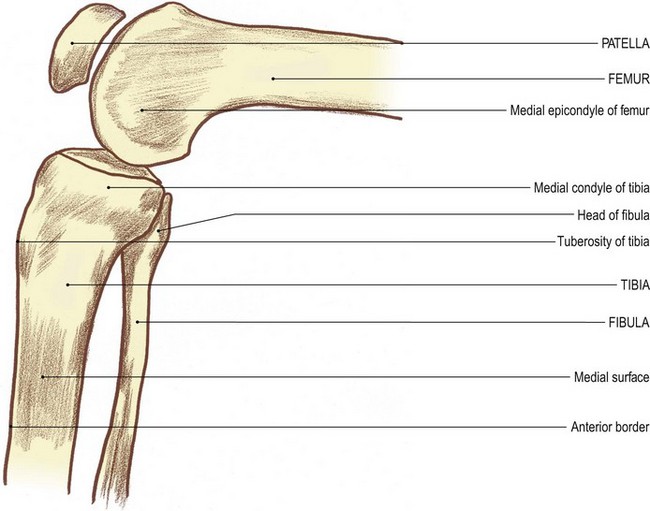
• The medial surface of the femoral condyle (Fig. 3.3). Palpate the medial surface of the femoral condyle and the epicondyle projecting from its mid point.
• The adductor tubercle. Palpate the adductor tubercle, which is approximately 2 cm proximal to the medial epicondyle. You may find this difficult because it is hidden to a certain extent by the attachment of the tendinous part of adductor magnus.
• Note. This tubercle represents the most distal part of the medial supracondylar ridge, little of which can be palpated.
• The medial tibial condyle (Fig. 3.3c, d). Palpate the medial tibial condyle below the femoral condyle.
• Note. It appears to be larger than the lateral tibial condyle.
• The medial surface of the tibial shaft. From the medial tibial condyle, trace around the medial side and then downwards where the condyle becomes continuous with the medial surface of the shaft of the tibia.
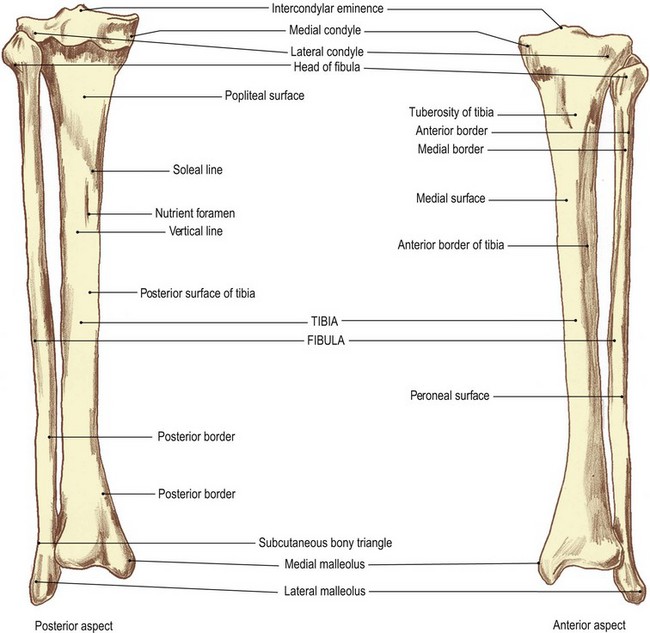
• The anterior tibial border. Palpate the subcutaneous anterior tibial border (the shin) and follow it down as far as the medial malleolus.
Palpation on movement
• The patella. Ask the model to extend the knee. Place the fingers of one hand on the medial condyle of the femur. Place the fingers of the other hand on the medial border of the patella. Now ask the model to flex the knee. Palpate the patella, sliding downwards and backwards on the femoral condyle until it lies inferiorly. Ask the model to return to the extended position.
• The medial tibial condyle. Now move your fingers from the patella and place them on the upper part of the medial surface of the medial condyle of the tibia, close to the joint line. Ask the model to flex the knee. Palpate the tibial condyle, moving backwards and upwards on to the posterior aspect of the femoral condyle.
• Note. As in the case of the lateral condyles, in this position the anterior part of the tibial condyle appears to part from the femoral condyle. This is due to the smaller articular surface at the posterior part of the femoral condyle.
Lateral aspect
Palpation
• The lateral femoral condyle. Palpate the flat lateral surface of the lateral femoral condyle, lying posterior to the lateral border of the patella. It is marked by a tubercle at its centre (the lateral epicondyle).
• The lateral supracondylar ridge of the femur. Run your fingers upwards from the lateral epicondyle. You may be able to palpate the lateral supracondylar ridge running vertically upwards.
• Note. This is difficult to palpate as the iliotibial tract tends to follow the same line.
• The lateral tibial condyle. Palpate the upper border of the lateral tibial condyle which lies approximately 2 cm below the lateral epicondyle and the lower border of the lateral femoral condyle running horizontally and diverging anteriorly.
• The head of the fibula (Fig. 3.4). Palpate the head of the fibula situated approximately 1 cm below the rim of the tibia. Run the palm of your hand up the lateral aspect of the model’s leg.
• The styloid process of the fibula. Palpate the styloid process of the fibula projecting upwards from the head; the narrower neck lies just below the head.
• Note. The remainder of the upper end of the shaft of the fibula is surrounded by muscles and is therefore not palpable.

Palpation on movement
• Movements of the patella. Ask the model to extend the knee fully. Place the fingers of one hand on the lateral side of the patella and the fingers of the other hand on the lateral surface of the femoral condyle. Ask the model to flex the knee. Palpate the patella, sliding downwards and backwards under the condyle, finally ending up inferiorly. Ask the model to return to the extended position.
• Movements of the tibia. Place your fingers on the lateral condyle of the tibia close to the knee joint. Now ask the model to flex the knee. Palpate the tibia, gliding backwards and upwards on to the posterior surface of the femoral condyles.
• Note. At this position the anterior part of the tibial condyle appears to part from the femoral condyle. This is due to the posterior surface of the femoral condyle being smaller than that of the tibia.
Posterior aspect
• The head of the fibula (Fig. 3.4). Palpate the head of the fibula on the lateral side of the popliteal fossa, with the tendon of biceps femoris attaching to its upper section.
• Note. Care must be taken when palpating in this area because the common peroneal nerve passes down the back of the head of the fibula en route to its passage around the lateral side of the neck.
• The patella. The model is in the supine lying position. Ask the model to extend the knee and relax the quadriceps femoris. Now move the patella from side to side.
• Note 1. This produces a knocking effect as the patella crosses either side of the grooved patellar surface of the femur.
• Note 2. This manoeuvre is classified as an accessory movement. It exposes a strip of the patellar surface of the femur on the side away from the direction of the movement. Hold the patella to one side. Now palpate the articular surface of the bone on that side for approximately 1 cm on its posterior surface.
The ankle region
The talus
Palpation
Anterior aspect
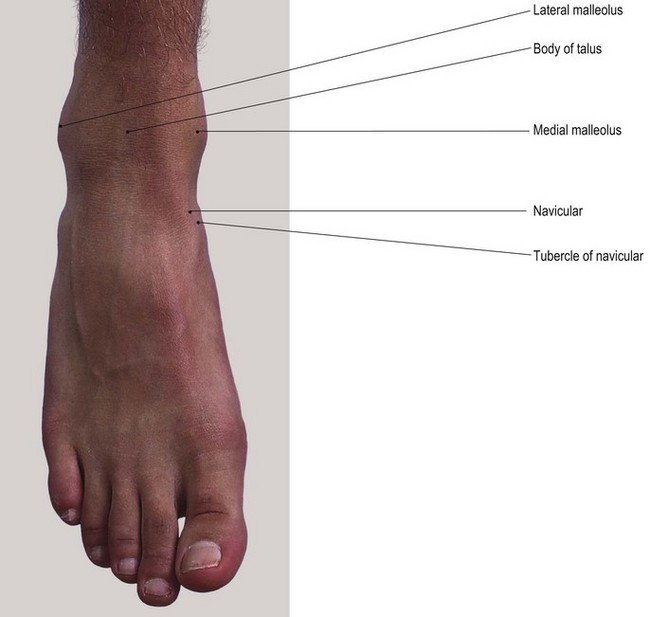
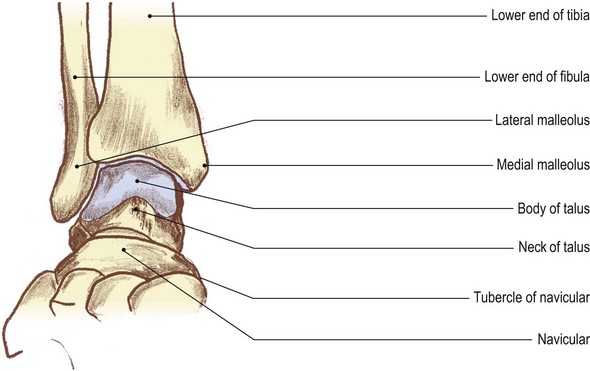
• The medial malleolus [malleolus (L) = a small hammer] (Fig. 3.5a, b). Place your hands on the subcutaneous medial surface of the tibia. Trace down the anterior border of the tibia (shin) which appears to form the anterior part of the malleolus. Palpate its anterior border and tip. The posterior border may be more difficult to palpate because it is partially hidden by tendons and the flexor retinaculum.
• Note. The anterior border of the malleolus continues upwards and laterally under the extensor tendons and extensor retinacula, marking the line of the ankle joint.
• The lateral malleolus (Figs 3.4e, f and 3.5). The lateral malleolus of the fibula is the most outstanding feature on the lateral side of the ankle.
• From the tip of the lateral malleolus, trace both the anterior and posterior borders upwards, encompassing the large prominence of the malleolus.
• Note. The tip of the lateral malleolus lies at a lower level than that of the medial malleolus.
• The shaft of the fibula. From just above the level of the ankle joint, at approximately 2.5 cm, palpate the fibula where it narrows to a triangular subcutaneous lateral surface. From here, trace the shaft upwards for approximately 15 cm.
• Note. At this point it becomes hidden by peroneus tertius anteriorly and peroneus brevis and the tendon of peroneus longus posteriorly.
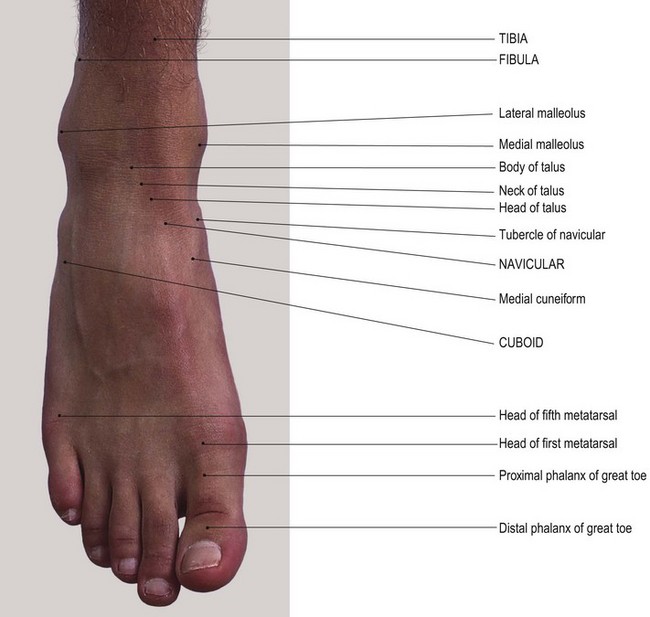
• The head and neck of the talus [talus (L) = the ankle bone]. With your right hand over the front of the ankle region, place your index finger on the lateral malleolus and your thumb on the medial malleolus of the model’s left ankle. Draw your finger and thumb forward into a small hollow on either side. Between your thumb and finger you will feel the head of the talus. Now ask the model to plantarflex the foot. Palpate the neck of the talus.
• The navicular. Immediately anterior to this point, palpate the narrow gap of the talonavicular joint and posterior part of the navicular with its prominent tubercle, medially.
• The upper surface of the calcaneus [calx (L) = a heel]. Ask the model to plantarflex the foot. Deep beneath the tip of your index finger, just lateral to the head of the talus, you will feel the anterior section of the upper surface of the calcaneus.
The calcaneus
• superior, marked by a smooth articular surface centrally
• medial, which is fairly smooth and converted into a hollow by the projection medially from its upper section of the sustentaculum tali
• lateral, which is roughened, presenting two tubercles
• posterior, which is rounded and roughened across its centre for the attachment of the tendo calcaneus
• inferior, which is slightly concave downwards and is roughened for the attachment of muscles and fascia. It is marked by three broad, rounded tubercles; two posteriorly and one anteriorly.
Palpation
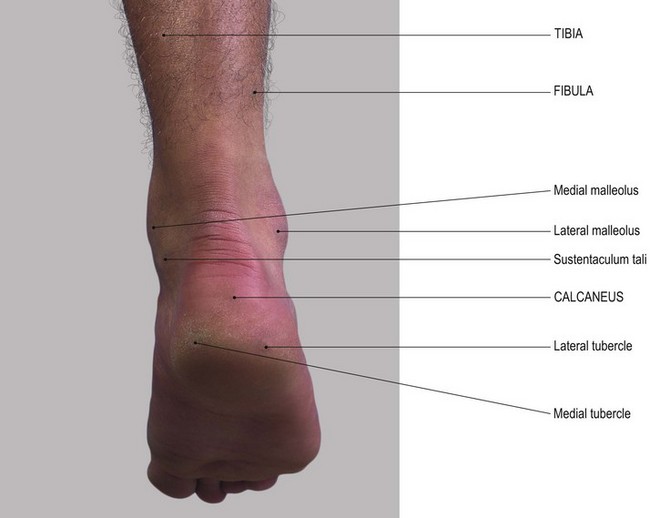
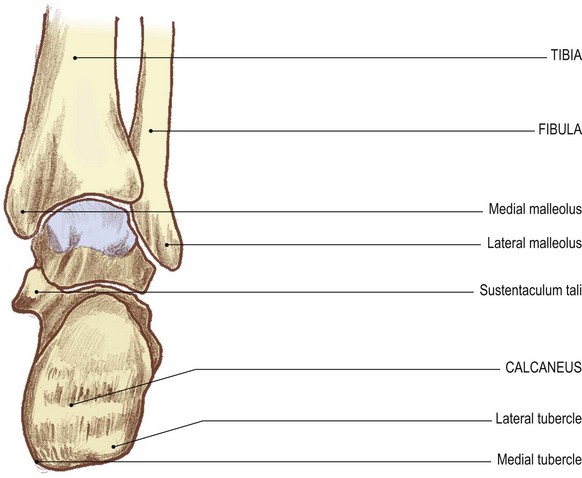
• The sustentaculum tali of the calcaneus. Ask the model to evert the foot. Place your hands at the tip of the medial malleolus. Move your fingers 1 cm down from this tip. You will feel the horizontal ridge of the sustentaculum tali. Trace the ridge as it runs for approximately 2–3 cm and is clearer anteriorly and posteriorly.
• The tubercle of the navicular. At the anterior end of this ridge identify a small gap. You will now be able to palpate the tubercle of the navicular.
• Note. This gap is spanned by the ‘spring ligament’.
• The malleolar fossae. You will find it difficult to identify many bony features posteriorly because the tendo calcaneus lies almost 2 cm clear of the ankle joint. If you pay particular attention to the posterior borders of the lateral and medial malleoli, you will be able to palpate small depressions. These are the malleolar fossae.
• Note. The posterior surface of the medial malleolus is continuous with the posterior border of the medial surface of the tibia (Fig. 3.5c, d).
Palpation on movement
• Movements of the talus 1. Stand facing the lateral side of the model’s ankle region. With your left hand, grip the two malleoli with your fingers on the medial and your thumb on the lateral. With your right hand, grip the anterior part of the body and neck of the talus with your fingers in the hollow just anterior to the medial malleolus and your thumb in the hollow just anterior to the lateral malleolus. Both sets of fingers and both thumbs should be close to each other. Starting from the fully plantarflexed position, ask the model to dorsiflex the foot. You will feel the anterior part of the body of the talus disappearing into the gap between the two malleoli. In fact, the fingers of your right hand will now be gripping the neck and head of the talus. At this point the ankle is in its close-packed position and no side-to-side movement is possible.
• Movements of the talus 2 – rocking. When the model fully plantarflexes from the dorsiflexed position the head and neck of the talus will move forwards and downwards and the anterior section of the body will reappear from within the mortice. At this point you can rock the head and neck of the talus from side to side. This is an accessory movement.
• Movements of the calcaneus 1. Ask the model to return the ankle to the mid position. Adopt the same procedure as described above. This time, move the fingers of your right hand to just below the tip of the medial malleolus. Identify the horizontal rim of the sustentaculum tali. Ask the model to plantar- and dorsiflex the ankle rhythmically. You will feel the sustentaculum tali moving forwards and backwards, describing a shallow arc around the medial malleolus.
• Movements of the calcaneus 2. Adopt the same position with your left hand. Place your right thumb on the two tubercles below the lateral malleolus. You will feel movement forwards and backwards around the malleolus when plantar- and dorsiflexion is performed.
• Movements of the calcaneus 3. Adopt the same position as described above. Grip the two malleoli with your left hand. Place your right hand under the heel with your fingers resting on the posterior aspect of the calcaneus on either side of the tendo calcaneus. Ask the model to dorsi- and plantarflex the ankle. You will feel the calcaneus moving forwards and backwards away and towards the posterior part of the tibia.
• Note. When the calcaneus passes downwards it is nearly impossible to move from side to side. This is because the anterior part of the talus moves into the mortice of the ankle joint.
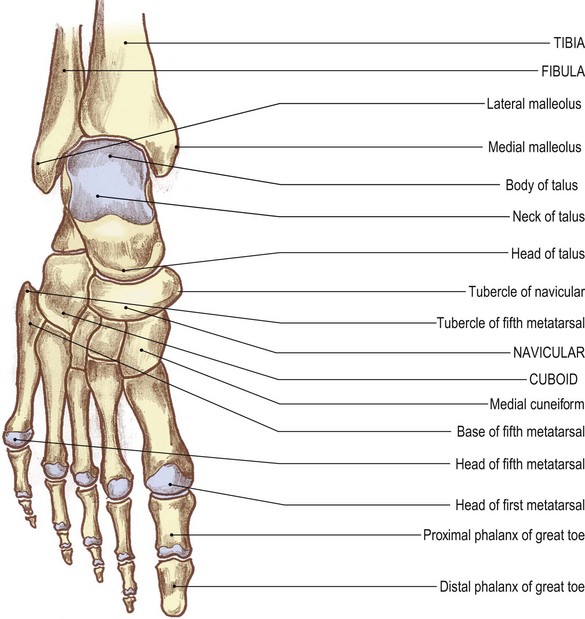
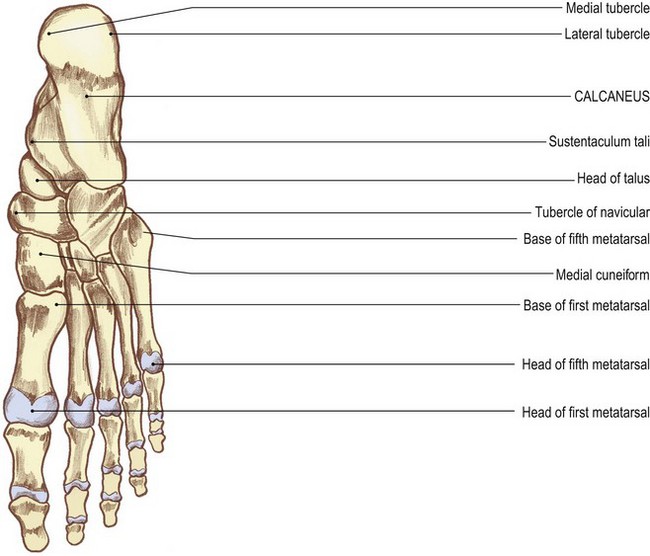
The foot
Three main groups of bones form the skeleton of the foot (Fig. 3.6).
• Posteriorly. The tarsus, comprises large irregular bones.
• Anteriorly. The phalanges: miniature long bones that form the toes.
• Linking the above groups are the metatarsals: also miniature long bones.
Dorsal aspect
• The talocalcaneonavicular joint. Locate the medial and lateral malleoli. Run your index finger and thumb forwards until you can grip the head of the talus between them. Now palpate the upper part of the talocalcaneonavicular joint.
• The tuberosity of the navicular (Figs 3.5a, b, and 3.6). Trace the roughened dorsal surface of the navicular medially to its large tuberosity. This projects downwards and medially and is approximately 2.5 cm downwards and forwards from the tip of the medial malleolus.
• The medial cuneform bone. Immediately distal to the navicular, palpate the medial cuneiform bone which projects downwards.
• The middle and lateral cuneform bones. Identify the dorsal surfaces of the middle and lateral cuneiform bones on the dorsum of the foot which lie lateral to the medial cuneiform bone.
• The first metatarsal bone. You will find it easy to identify the base, shaft and head of the first metatarsal bone.
• Note. The first metatarsal bone is much stouter than the other four. In some individuals the head projects medially, carrying the base of the toe with it. This causes inflammation of the bursa on its medial side which is often accompanied by pain and swelling. Such medial deviation of the metatarsal head commonly progresses to a condition termed ‘hallux valgus’.
• The second, third, fourth and fifth metatarsal bones. Run the pads of your fingers carefully over the dorsum of the foot. Now palpate the base, shaft and head of each of the remaining metatarsal bones. You can trace the base of the second metatarsal further proximally than the others to the middle cuneiform, the third to the lateral cuneiform and the fourth and fifth to the cuboid (Fig. 3.6).
• Note. The base of the fifth metatarsal is more expanded than the rest. It has a tubercle, or styloid process, which projects proximally on its lateral side.
• The base of the fifth metatarsal bone. Trace backwards along the shaft of the fifth metatarsal. Palpate the large lateral projection which is elongated proximally and overlies the lateral side of the cuboid.
• The peroneal tubercle. Identify the peroneal tubercle on the lateral side of the calcaneus. It is 1 cm below and just anterior to the tip of the lateral malleolus. This tubercle is elongated downwards and forwards. Ask the model to evert the foot. Two tendons appear to pull clear.
• Note 1. The tendon above the tubercle is peroneus brevis; the one below is peroneus longus.
• Note 2. This tubercle must not be confused with that of the calcaneofibular ligament. This can be found if you carefully palpate just below and posterior to the tip of the lateral malleolus.
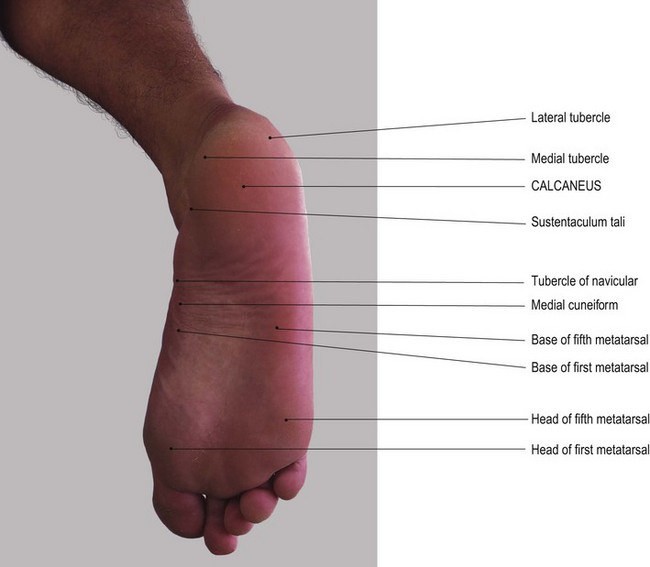
Plantar aspect
Palpation
For palpation in this region, the model is in the supine lying position.
• The calcaneus. Identify the heel, which is the most posterior and inferior aspect of the calcaneus. Palpate the large, broad tubercles (medial and lateral) on either side of the bone.
• Note 1. The tubercles give attachment to the more superficial of the plantar muscles.
• Note 2. There is often a horizontal raised area on the posterior aspect of the heel to which the tendo calcaneus attaches (see Fig. 3.22b).
• Note 3. Below this the posterior surface of the calcaneus is covered with a pad of tough fibrous tissue and fat.
• The peroneal tubercle. Locate the area below and in front of the tip of the lateral malleolus. Palpate the elongated tubercle (the peroneal tubercle) on the calcaneus.
• Note. The tendon of peroneus brevis is above; the tendon of peroneus longus is below.
• The sustentaculum tali of the calcaneus. Palpate the horizontal ridge immediately below the tip of the medial malleolus: the sustentaculum tali.
• Note. This is slightly hidden by the tendon of flexor digitorum longus.
• The tuberosity of the navicular. Palpate the inferior surface of the navicular tuberosity on the medial side of the foot 3 cm anteroinferior to the tip of the medial malleolus.
• Note. The base of the fifth metatarsal and its tubercle are covered by the plantar fascia and muscles.
• The heads of the metatarsals (Fig. 3.7). You will find these relatively easy to identify.
• Note. The heads of the first and fifth metatarsals lie deep to a pad of harder skin at the broadest part of the foot on the medial and lateral side, respectively.
• The heads of the second, third and fourth metatarsals. You will find these are less easy to palpate. They lie on a well-formed anterior metatarsal arch. Palpation is facilitated if the arch is flattened. Grasp the model’s toe between your finger and thumb of one hand. Passively extend the joint. Now palpate the metatarsal head on the plantar surface proximal to the base of the toe. If you ask the model to flex the toe at the metatarsophalangeal joint, you will feel the metatarsal head on the dorsum of the foot, as the knuckles would in the hand.
• The phalanges. Identify the base of the proximal phalanx just beyond the corresponding metatarsal head.
• Note. The heads of the proximal phalanges, particularly those of the second, third and fourth, are often flexed and project dorsally. They are covered by hard skin and a bursa which often swells and becomes inflamed. If not treated, the inflamed bursa may lead to a condition known as ‘hammer toes’.
• The proximal interphalangeal joints (Fig. 3.7). Ask the model to extend the toes at the proximal interphalangeal joint. Now identify the small bicondylar head of the bone.
Palpation on movement
• The head of the talus. Adopt the same position and the same hand holds as for palpation on movement, anterior aspect (see p. 95). Ask the model to plantarflex the ankle and then move the foot into adduction and abduction. Palpate the head of the talus moving from side to side.
Stay updated, free articles. Join our Telegram channel

Full access? Get Clinical Tree


