Techniques of Fine-Needle Aspiration, Smear Preparation, and Principles of Interpretation
Britt-Marie Ljung
Although most cytopathologists and clinicians who use fine-needle aspiration (FNA) biopsy in their practices are aware of the relationship between expertise in microscopic interpretation and diagnostic accuracy, the importance of sample quality and smear preparation is less well recognized. Several studies have shown that training and experience in obtaining and preparing the samples play a major role in the efficacy of the method (Lee et al, 1987A and B; Palombini et al, 1988; Layfield et al, 1989; Ljung et al, 2001). It is much easier to interpret FNA samples microscopically if they are abundant, representative, and well prepared. Optimal samples will contribute greatly to a very high degree of diagnostic accuracy. Thus, operators who are well trained in the sampling technique of various body sites will serve patients better (Shah et al, 1999; Rodrigues et al, 2000).
The FNA sampling technique is essentially the same for all organ sites, and can be applied to both palpable and nonpalpable lesions. In the latter case, the needle is guided to the target area by the use of various imaging modalities. Immediate examination of the cell harvest at bedside, using a quick staining procedure, ensures that representative material is obtained, and thus reduces the number of samples necessary for diagnosis (see below). The main objectives of aspiration biopsy are to distinguish benign from malignant lesions, and to classify neoplasms and other pathologic processes. Well-prepared, representative material is necessary for these objectives to be consistently achieved.
Critics of aspiration biopsy have emphasized the serious consequences of a false-positive diagnosis. The quality of the material plays a crucial role in avoiding this problem. The most common scenario for a false-positive diagnosis is that of a cytopathologist attempting to interpret scanty material that contains only a few abnormal cells. The situation may be further compromised by artifacts caused by improper smear preparation, and by the clinician’s insistence on a definitive diagnosis. A diagnosis of cancer must be based on ample evidence present in several different areas of the slide or in multiple slides. If a conclusion cannot be reached because of scanty or poorly preserved material, a descriptive diagnosis followed by re-aspiration or another diagnostic procedure is appropriate.
False-negative diagnoses most often are related to sample quality. The needle tip may not have been properly placed in the lesion, resulting in failure to obtain adequate material. The smears may show only benign structures from an area adjacent to the tumor.
The precise classification of a neoplasm generally requires more abundant and better-preserved material than does the differentiation between benign and malignant lesions. It is often necessary to study the architecture of cell clusters, as well as the nuclear and cytoplasmic features of individual cells. The success of the diagnosis depends on representative, ample, well-prepared material. Good judgment is particularly important for assessing specimens with unusual cytologic or clinical features.
Knowledge of the clinical history and presentation of the target lesions is part of the cytologic evaluation. If the cytologic material does not match the clinical findings, additional procedures may be required. For instance, if the clinical findings identify a breast mass suggestive of cancer, but the aspirate smears show only a few benign cells, it is likely that the lesion was not sampled correctly and should be reaspirated. On the other hand, if the breast lesion sampled is nodular and oblong by palpation, and the needle tip encounters firm fibrous resistance typical of fibrocystic change, a moderate number of clusters of well organized benign breast cells can be considered diagnostic of a benign disorder. If aspiration biopsy is used to confirm a benign lesion that does not require surgical removal, the lesion must be followed, preferably by clinical examination for 3-6 months. If the sampled mass grows larger or becomes firmer, or if its outline changes, additional sampling or a surgical biopsy should be performed. In one study, 60% of benign breast masses disappeared within 2 years (Sainsburg et al, 1988).
The purpose of this chapter is to provide an overview of the various aspects of the aspiration technique, such as indications for use, patient preparation, and possible side effects. Various sampling and smear preparation procedures will be described. The pitfalls of the technique and the means to avoid them will be discussed.
EQUIPMENT, PATIENT SELECTION, AND PREPARATION
Needles
Ordinary disposable hypodermic needles with long bevels are well suited for aspiration. The needles may vary in size from 22 to 27 gauge (outer diameter from 0.65 to 0.5 mm) (Fig. 28-1). The choice of gauge is a matter of personal preference, and to some degree depends on the situation. For example, larger-diameter needles may be needed for the evacuation of extremely viscous fluid. The larger-bore needles collect somewhat more material from loosely structured cellular organs (such as the normal liver) or lesions (such as most melanomas, small-cell tumors, and lymphomas). On the other hand, the smaller-bore needles are more effective for sampling tissue with few epithelial cells and extensive fibrosis because they penetrate the stroma more easily and are more effective in securing the epithelial cell component. Typical examples of this situation include invasive lobular carcinoma and fibrocystic change with the dominant fibrous component in the breast. Specially designed nonmagnetic needles can be used to sample lesions visualized by magnetic resonance imaging (MRI). Longer needles, provided with a needle guide and a trocar, are required to reach deep-seated thoracic or abdominal lesions visualized by computed tomography (CT), ultrasound, or fluoroscopy.
Syringes, Syringe Holders, and Other Items of Equipment
Slip Tip disposable syringes with an eccentric tip (Becton Dickinson & Co., Franklin Lakes, NJ) are recommended because of the ease of removing and reattaching the needle (Fig. 28-1).
Leakage of air from these syringes has not been a problem in my experience.
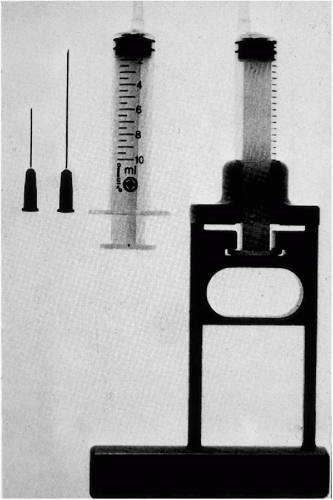 Figure 28-1 Instrumentation needed for thin needle aspirates of palpable lesions, showing needles of various lengths, a syringe with an eccentric tip, and a Franzén single hand-grip syringe holder. |
A syringe holder can be used when a free hand is needed to stabilize the palpable target during sampling. Several types of syringe holders are available (some examples are shown in Fig. 28-2). Prices vary; however, most syringe holders are reusable and are durable enough to last for a lifetime. The syringe holder should hold the syringe firmly, be comfortable to hold and easy to clean, and not slip easily out of position. It should allow for removal of the needle and retraction of the plunger without the necessity of removing the syringe from the holder.
A syringe holder that fits a 10-ml rather than a 20-ml syringe is easier to handle. The shorter 10-ml syringe decreases the distance between the hand and the target, making sampling easier. There is no significant advantage to the larger syringe, because only minimal suction (a vacuum of 1-2 ml) is sufficient to obtain the sample. A 20-ml syringe may be more convenient when aspirating cysts containing fluid volume in excess of 10 ml. However, in the case of a large cyst that exceeds the capacity of the syringe, the needle tip can remain within the cyst while the full syringe is removed and replaced by an empty one. This procedure can be repeated as often as necessary until all of the fluid is evacuated. The needle, syringe, and the syringe holder must be assembled before the procedure is started.
A pencil-grip syringe holder was developed by Tao and Smith (1999). The Tao Aspirator (Tao and Tao Technology, Inc., Carmel, IN) is easy to handle and offers a presetting of negative pressure to achieve adequate suction.
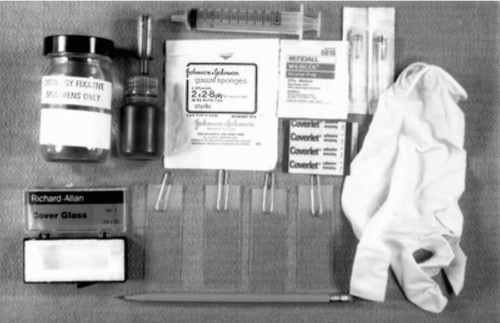
A supply of clean microscopic slides, coverslips, alcohol scrubs, fixatives, ingredients for rapid stains, sterile gauze, and bandaids must be available before the procedure is initiated (Fig. 28-3). Slides with frosted ends are desirable for identifying patients with a pencil.
Patient Selection
One of the great advantages of aspiration biopsy with thin needles is that it can be applied to almost any patient regardless of physical status, except for clotting disorders in deep-seated targets. The procedure causes few and mostly insignificant side effects, and only slight discomfort.
Contraindications
Sampling of carotid body tumors and pheochromocytomas may cause syncope and episodes of acute hypertension
(McCorkell and Niles, 1985). If clinical symptoms and physical examination suggest a carotid body tumor, CT (or MRI) will often provide sufficient diagnostic information to proceed with surgical removal (Olsen et al, 1987; Som et al, 1988). The same approach should be used in pheochromocytomas.
(McCorkell and Niles, 1985). If clinical symptoms and physical examination suggest a carotid body tumor, CT (or MRI) will often provide sufficient diagnostic information to proceed with surgical removal (Olsen et al, 1987; Som et al, 1988). The same approach should be used in pheochromocytomas.
There are very few other definite contraindications to FNA. Most often it is a matter of weighing alternative risks and choosing the safest diagnostic alternative. In many cases, the FNA, in spite of certain risk factors, is the safest diagnostic procedure for a given patient. Some contraindications are controversial. Ovarian cyst aspiration, for example, is considered by some to be contraindicated because of the risk of leakage and associated dissemination of disease in the peritoneal surface (Trimbos and Hacker, 1993), while others recommend cytologic investigation of ovarian lesions (Kreuzer et al, 1985). Most would agree that FNA of prostate should not be done in patients with obvious prostatitis (Esposti, 1975).
Serious complications in the aspiration of hydatid cysts, which may result in anaphylactic shock, have also been described. Hemorrhagic diathesis, extremely vascular lesions, and the patient’s inability to cooperate may be considered contraindications to deep-seated FNA. Likewise, severe emphysema, pulmonary hypertension, and conditions associated with severe hypoxemia are contraindications to FNA sampling of chest lesions (Green, 1982).
Patient Preparation
For most aspiration procedures, the only patient preparation needed is an explanation of the procedure and a discussion of possible side effects. Informed consent must be obtained. For superficial lesions, local anesthesia is optional, as the discomfort caused by its application is about the same as that of the aspiration itself. Furthermore, when very small targets are sampled, the injected anesthetic may make it more difficult to feel the mass and consequently to correctly place the needle.
Local anesthesia is routinely employed when sampling deep-seated targets with the aid of CT or ultrasonic guidance. These procedures tend to last longer and be more painful than aspiration of superficial targets: the needle has to travel a longer distance, several attempts may be needed to position the needle correctly, and the needle tip must often pass through muscle, which is especially sensitive to needle sticks.
A simple disinfection protocol of wiping the skin at and around the biopsy site with an alcohol-soaked swab is sufficient for superficial lesions. For deep-seated lesions, it is common practice to cleanse a larger area of skin and use sterile gloves and draping. This facilitates the insertion of the highly flexible needle by allowing the operator to hold onto and stabilize the shaft during insertion.
BASIC ASPIRATION TECHNIQUE
The basic principles described in this section are applicable to aspiration biopsies of all organ sites. Technical considerations with regard to specific organ sites and specific clinical presentations will be discussed separately.
The concept of aspiration using the system of thin needles and syringes is somewhat misleading, as it implies that cells are being sucked into the syringe. Suction alone will work only when the targeted lesion contains fluid. When the lesion is solid, the needle tip functions as a cutting instrument: as it is moved to and fro, tiny tissue fragments become dislodged and collected inside the needle. When suction is added to this procedure, the previously dislodged fragments are sucked into the needle and the tip of the attached syringe (Fig. 28-4). Except for fluids, the aspirate should not reach the barrel of the syringe, because it will be difficult to retrieve.
Palpable Lesions
Requirements for obtaining adequate samples via aspiration biopsy include target palpation, immobilization, and proper needle tip placement and movement. The following protocol is suggested when sampling palpable lesions:
Palpation of the Target and Planning of the Procedure. The target should be carefully palpated, and its size and distance from the overlying skin should be assessed. These determinations govern the placement of the needle tip. In small lesions (l cm in diameter), it is generally desirable to aim for the center of the lesion. In very large lesions (>5 cm in diameter), there may be central necrosis, and thus the periphery is more likely to yield diagnostic material. In medium-sized lesions (2 to 4 cm in diameter), it is often advantageous to collect samples from two different areas: one to the
side of the center, and another one in the mirror-image position of the previous aspiration. This approach will yield a more representative harvest. Also, the second sample is extracted from an area not previously disturbed by the needle, thereby decreasing the likelihood of contamination with excessive amounts of blood.
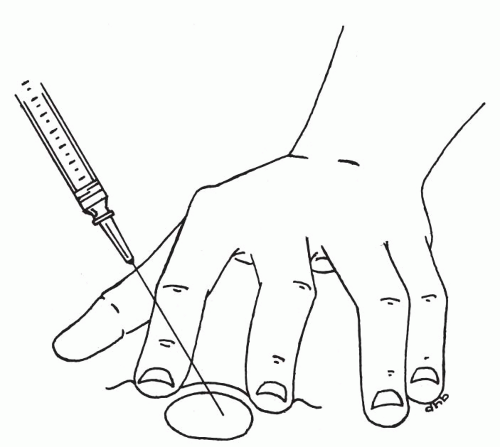
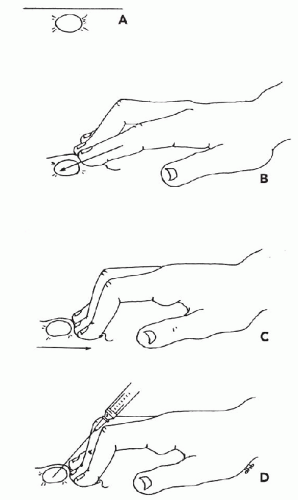
Immobilization of the Target. To collect an adequate sample, the target should not move with the needle. It is particularly important to immobilize lesions with dense stroma in order to facilitate penetration of the needle tip into the target. Lesions over 3 cm in diameter can be held in place with the thumb and forefinger. Smaller lesions (1 to 2.5 cm) can be more effectively immobilized between the forefinger and middle finger (Fig. 28-5). Note that the fingers should be placed very close to the lesion. Stretching the overlying skin tightly across the lesion further helps immobilize the target. Very small lesions (<1 cm in diameter) are often difficult to stabilize and sample. To immobilize these small targets, they should be palpated with the tips of the forefinger and middle finger held tightly together. The target should be pushed as far as possible in one direction in the subcutaneous space. Then, without lifting the finger-tips, the overlying skin must be retracted. The pressure will cause the lesion to “pop up” under the skin surface in front of the fingertips (Fig. 28-6). Without moving the fingers, cleanse the skin with an alcohol swab or other disinfectant prior to aspiration.
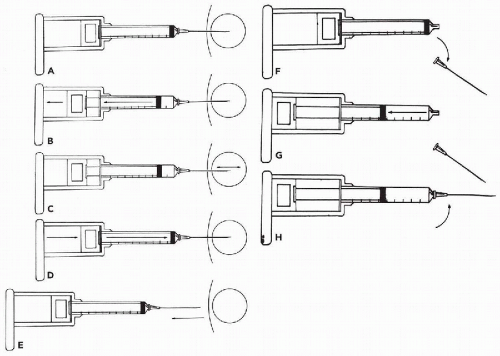
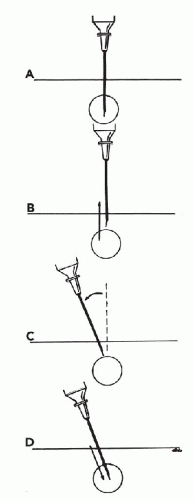
Insertion of the needle. Once the target has been secured, the previously assembled aspiration instrument must be picked up and the needle tip inserted into the target (Fig. 28-7A). Suction is applied by retracting the syringe plunger to the 1- to 2-ml mark. This level of suction is sufficient; however, more suction should not alter the outcome. It is best to find a position for the plunger that is comfortable, and to keep the suction at this level throughout the sampling period. Pumping the plunger up and down during the procedure should be avoided, as it detracts from essential needle movement and does not add to the quantity or quality of the sample.
Aspiration procedure. Once suction has been applied, the needle tip must be moved back and forth (or up and down) within the boundaries of the target (Fig. 28-7C). If the target is not spherical, the longest axis possible for the needle tip movement should be used. To collect sufficient material for at least two smears, typically 15 to 20 needle movements are required. If significant amounts of blood appear at the hub of the needle, it is best to limit the number of needle movements to about five in order to avoid excessive dilution with blood. If the needle is not moved, usually only blood will be aspirated. If after about 10 movements, blood starts to appear, the sampling should be ended for optimal results (see below for how bloody samples should be handled). It is usually best to move the needle in approximately the same plane, particularly in small targets. The needle will tend to travel in a slightly different
plane without a conscious effort on the part of the operator. In larger targets, the angle of the needle may be changed in small increments during sampling. Major changes in the direction of the needle must be avoided because they may cause bleeding, unless the procedure outlined below is carefully followed. Using this approach, optimal amounts of tissue will be collected in a short time with minimal bleeding and discomfort. At least one additional aspiration should be performed routinely to ensure representative sampling. However, if the first sample shows unequivocal evidence of a malignant tumor (by immediate assessment at the bedside), no further sampling is necessary unless material for special studies is required.
Withdrawal of the needle. After collecting the sample, release the suction before withdrawing the needle (Fig. 28-7D,E). This allows the collected material to stay within the needle and syringe tip. If suction is maintained while the needle is withdrawn, the collected material will be sucked into the barrel of the syringe and will be difficult to expel. After the needle is withdrawn from the lesion, remove the needle from the syringe (Fig. 28-7F) and pull back on the plunger (Fig. 28-7G). Then reattach the needle (Fig. 28-7H) and expel the material onto a glass slide by pushing the plunger swiftly through the syringe (Fig. 28-8). In order to avoid splattering, the tip of the needle should rest on the slide.
Changing the direction of the needle. Occasionally, a significant change in the direction of the needle path may be desired during sampling. To accomplish this maneuver, the needle tip should be withdrawn from the target while it remains under the skin. The angle of the needle is changed before the needle is reinserted
into the target (Fig. 28-9). Suction need not be released. If the needle is not withdrawn before the direction is changed, the target may merely be pushed to the side and the intended redirection of the needle tip will not be accomplished. The patient may also experience unnecessary discomfort and bleeding. Dramatically changing the direction of the needle during sampling requires additional time and skill, and, in my opinion, does not improve the harvest in most cases; therefore, it is not recommended as a standard procedure. An example of a lesion for which a change in the direction of the needle may improve the harvest is an ill-defined area of thickening that requires extensive sampling. This situation occurs most commonly when sampling the breasts of postmenopausal women. Usually the needle will meet with only slight resistance upon insertion, corresponding to adipose tissue. By changing the angle of the needle gradually throughout the thickened area, the chances of sampling areas containing epithelial cells increase substantially. In fact, the needle tip may be used as a “palpating” probe to seek out areas of increased resistance that are more likely to contain epithelium and abnormal components than the surrounding fat tissue.
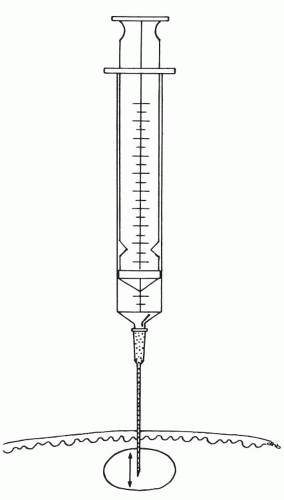 Figure 28-4 The needle tip is moved back and forth inside the lesion, dislodging and collecting small fragments of tissue. |
 Figure 28-8 Expel the harvest on the slide by swiftly pushing the plunger through the syringe. The needle tip should be in contact with the glass to avoid splatter. |
Nonpalpable Lesions
The aspirations are performed under stereoscopic imaging guidance. The principles of aspiration described above for palpable lesions must be observed.
ASPIRATION WITHOUT A SYRINGE
Zajdela et al (1987) described a sampling technique that uses a thin needle without suction. The target is identified and immobilized as described above. Then the needle, held by the hub, is placed within the target and moved back and forth to collect small fragments of tissue. The fragments are collected within the shaft of the needle. The hub-opening of the needle should be left uncovered during sampling. The main advantage of this technique is the ease with which the needle can be accurately positioned in the target. The thin needle is also easier to manipulate when it is not attached to a syringe. This simple technique also often enhances the differences in consistency between lesional tissue and the surrounding normal tissue. In addition, sampling without suction may reduce the amount of blood when highly vascular lesions or organs are sampled. Typically, the volume of the harvested material is usually smaller than that obtained by procedures that apply suction. However, the smaller volume may be more representative of the lesion. Sampling without suction may be especially useful in small, highly vascularized targets, such as the thyroid, and in other sites with abundant blood supply. This technique is not recommended for aspirating cystic lesions containing fluid.
SIDE EFFECTS AND COMPLICATIONS
Superficial Targets
The most common complication associated with FNA of superficial targets is local hematoma in and around the mass. The bleeding may occur during the sampling or for a few minutes after withdrawal of the needle. The size of the hematoma can be minimized by applying firm pressure to the mass and the surrounding area immediately following the sampling. It is usually most effective to have an assistant apply the pressure. If no assistant is available, the patient should be carefully instructed how to apply pressure before the procedure is initiated. If the patient has a bleeding disorder or is taking any type of medication that interferes with blood clotting (such as Coumadin and nonsteroidal anti-inflammatory drugs, including aspirin), the post-aspiration pressure should be extended for up to 10 minutes.
Any hematoma will make the palpable mass seem larger after the procedure, and typically the patient will experience minor discomfort, which usually peaks the day following the procedure. Thereafter, both the swelling and discomfort will gradually disappear, and are usually resolved within 3 to 7 days. Usually no intervention is needed, but on occasion a cold pack and/or an analgesic, such as acetaminophen, may be indicated. On extremely rare occasions, hematomas following
FNA may be large and may cause transient nerve paresis (for example, in the recurrent nerve adjacent to the thyroid gland).
FNA may be large and may cause transient nerve paresis (for example, in the recurrent nerve adjacent to the thyroid gland).
Local infection is extremely rare and can be treated with antibiotics. No serious infections following FNA of superficial targets have been reported.
On very rare occasions, FNA of superficial targets located near the chest wall, such as breast masses and lymph nodes in the axillary and supraclavicular locations, may cause pneumothorax (Chen, 1986). The patient typically experiences immediate pain and discomfort in the chest and/or shoulder. Most pneumathoraces are small and resolve spontaneously. Pneumothorax can be avoided by sampling with the needle positioned tangentially relative to the chest wall.
Deep-Seated Targets
The complication rates for deep-seated targets are higher than those for superficial targets, and occasional fatalities have been reported (Esposti et al, 1975; Livraghi et al, 1983; Droese et al, 1984; Malberger et al, 1984). However, the rate of complications is still extremely low when compared with surgical or core needle biopsy procedures that carry a much higher risk. As with superficial targets, bleeding is the most common complication. It is a more serious issue in the deep-seated targets, mainly because local compression cannot be applied to stem the bleeding. Serious bleeding is most likely to occur if the needle tip lacerates the liver or splenic capsule. The risk of laceration is significantly increased if the patient is not able to cooperate with breathing instructions. To minimize the risk of serious hemorrhage, the patient’s coagulation parameters should be evaluated before the procedure. It is sometimes advisable to temporarily stop medication that interferes with coagulation to reduce the risk of hemorrhage. Although bleeding rarely has serious consequences, the patient should be told that the aspiration procedure may result in hemoptysis, hematuria, hematospermia, or bloody discharge from the rectum or vagina, depending on the location of the target of the FNA.
The Thorax
Pneumothorax is the most common significant complication from FNA of targets within the thorax (Green, 1982). The vast majority of pneumothorax cases resolve spontaneously. Pneumothorax may also result from FNA in the upper abdomen if the needle tip accidentally penetrates the diaphragm and enters the pleural space. A rare but very serious complication when sampling the lung is systemic arterial air embolism (Aberle et al, 1987).
The Abdomen
In the abdomen, very rare but potentially serious complications include necrotizing pancreatitis (Evans et al, 1981), biliary peritonitis, bowel perforation, and localized peritonitis (Malberger et al, 1984). An obstructed and thus distended biliary system and intestine may be vulnerable to leaking and should be avoided. We observed a case of biliary peritonitis in a patient with distended Curvoisier gall bladder (Koss et al, 1992). However, in the vast majority of cases the penetration of bowel, vessels (including large arteries), and other abdominal structures with 22-gauge or thinner needles causes no significant damage. The hole created by the needle is smaller than those caused by sutures commonly used during abdominal surgery.
Infections in Transrectal Sampling
Although overall infection after FNA is exceedingly rare, it is a significant issue when performing transrectal FNA, particularly of the prostate gland (Esposti et al, 1975). There is some evidence that prophylactic antibiotics administered before the start of the procedure are protective. Fever over 101°F (38.5°C) that develops after transrectal sampling should be treated promptly and aggressively. Sampling the prostate in patients with symptoms of acute prostatitis should not be done.
Infarction
Complete or partial infarction of tumors and lymph nodes as a result of FNA may occur but is very rare. Most common sites reported are thyroid masses, tumors of the salivary gland, and lymph nodes (Davies and Webb, 1982; Jones et al, 1985; Kern, 1988; Jarayan and Agarval, 1989; Keyhani-Rofagha et al, 1990; Kini, 1996; Mukurnyadzi et al, 2000). We have also recorded a case of infarction of a lymph node. In most cases, the necrosis is not complete and a histologic diagnosis can be rendered. Us-Krasovec et al (1992) noted that tissue necrosis usually occurs if the lesion is sampled with multiple needle passes.
Tumor Implantation
Implantation of tumor along the needle track has been reported for both 22-gauge and thinner needles used for FNA as well as for core needles, 18 gauge and larger. Larger-bore needles carry a much higher risk of causing tumor seeding, and it has been estimated that increasing the diameter of the needle by a factor of 2 increases the seeding risk by a factor of 60 (Roussel et al, 1989). The most common sites of tumor implantation in needle track include the chest wall (Sinner and Zajicek, 1976; Moloo et al, 1984), the thyroid gland (Hales and Hsu, 1989; Karwowski et al, 2002), the kidney (Kiser et al, 1986; Wehle and Grabstald, 1986), and the pancreas (Smith et al, 1980; Caturelli et al, 1985, Rasleigh-Belcher et al, 1985). Although seeding of tumor in the needle track is of concern, it is not known whether this complication significantly changes the disease outcome for these patients. DeMay (1996) provided a comprehensive summary of published cases with documented tumor implantation.
Of more concern may be the possibility that tumor cells will be disseminated outside the primary tumor by FNA sampling, thus increasing the risk of metastatic disease. Two studies investigated the impact of FNA on long-term survival in patients with primary breast cancer (Berg and Robbins, 1962; Taxin et al, 1997). Neither study found any adverse effects of FNA.
Diagnostic Problems in Histopathology After Aspiration Biopsy
LiVolsi and Merino (1994) described a distortion of histologic patterns in the thyroids, mimicking carcinoma, after aspiration biopsy. We have treated many thousands of patients and have not experienced this problem. However, infarction of the tumor or a lymph node after aspiration may cause interpretative problems, particularly in the diagnosis of malignant lymphoma. In such a case seen by us, a second biopsy of a lymph node was required to establish the diagnosis.
BASIC SMEAR PREPARATION TECHNIQUES
The goal of smear preparation is to allow optimal distribution of well-preserved cells and small tissue fragments on the slide. Several different basic smearing techniques have been described. All have their advantages and disadvantages, and will produce different artifacts. The choice of smearing technique is partly a matter of preference, and most operators favor one method over another. Here, a one-step smearing technique will be described in detail and other methods will be mentioned briefly. The description is based on slides with frosted ends.
One-Step Technique
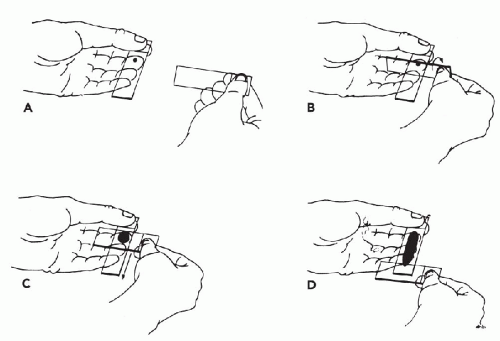
The basic one-step smearing technique (Abele et al, 1985) is designed to process a harvest consisting of one or two droplets of semisolid tissue material. A small amount of blood (one or two drops) may also be included. The non-dominant hand steadies the needle as the needle tip, bevel down, is touched to the frosted (proximal) end of a clean slide. The harvest (or part of it) is expelled onto the slide in the form of a droplet (see Fig. 28-8). Next, the slide is picked up by its frosted end between the thumb and forefinger of the nondominant hand. The other fingers are used to create a steady platform beneath the slide. A clean slide is then held by its frosted end in the dominant hand (Fig. 28-10A). Its lower long edge is placed against the first slide at a 45° to 90° angle proximal to the droplet (Fig. 28-10B). This top edge of the slide is then lowered until it touches and then covers the droplet and the two slides are flush (Fig. 28-10C). At this point, the material is spread in one smooth motion by pulling the top slide along the entire length of the bottom slide (Fig. 28-10D). The movement should be smooth and fairly rapid but not hurried. It is very important to keep the two slides parallel to each other during smear preparation to avoid scraping the bottom slide (Fig. 28-11). As soon as the smear has been prepared, the first (bottom) slide should be fixed. Any delay in fixation will result in air-drying artifacts. The second (top) slide used for smear preparation usually contains no diagnostic material and can be reused to make several smears from the same harvest.
When the droplet is large enough, the material can be divided to prepare additional smears. To divide the material, the two slides are initially positioned as for the one-step smear technique. The top slide is then gently rotated down until it just touches the droplet, thus picking up a portion of this material. The two slides are then separated. The top slide is kept in the dominant hand and is used to prepare a smear via the one-step method described above, using a new clean slide as the bottom slide. Finally, a smear is made of the original droplet, again using the one-step technique.
An alternative method


Stay updated, free articles. Join our Telegram channel

Full access? Get Clinical Tree


