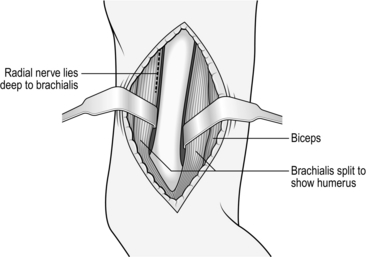
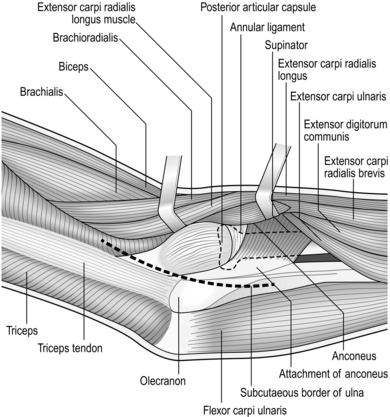
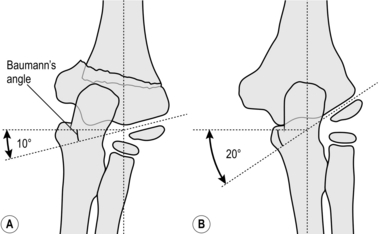
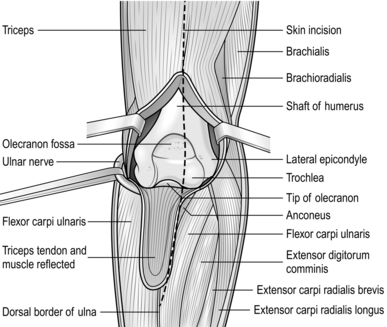
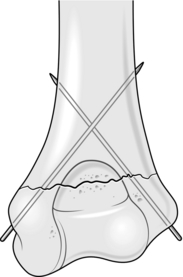
31 The anterior (deltopectoral) approach to the shoulder Decompression of the ulnar nerve (cubital tunnel) Decompression of the extensor pollicis brevis and abductor pollicis longus tendons Ganglion of the dorsum of the wrist Median nerve decompression in the carpal tunnel Approaches to the hand and fingers Release of trigger finger or thumb Percutaneous fasciotomy for Dupuytren’s contracture Pyogenic infections of the hand 1. The glenohumeral joint may be exposed through anterior, posterior or transacromial approaches, but most procedures can be carried out satisfactorily through the anterior approach (Fig. 31.1). 2. This is a straightforward approach through muscle planes and is truly ‘extensile’ in the manner described by Henry. It is particularly suited for exposure of the upper humerus for internal fixation or draining a potentially infected joint. 1. Operate under a general anaesthetic. 2. Place the patient supine on the operating table in a semi-reclining (beach chair) position with a long narrow sandbag between the shoulder blades or alternatively with the head supported in a neurosurgical head ring. 3. Have your unscrubbed assistant elevate the arm. 4. Clean the skin from the scapula posteriorly, round the axilla and over the chest wall to the midline anteriorly, and from the angle of the jaw to the costal margin and down the arm to the elbow. 5. Towel the head separately (see Chapter 20). 6. Carefully tuck a large drape, backed by a waterproof sheet, between the table and the trunk. Cover the trunk with another large sheet, the upper edge of which reaches the lower margin of the head towels. Wrap the arm in a medium-sized towel, from the fingertips to the midpoint of the upper arm, and secure this towel firmly with an open-weave bandage or stockinette. 7. Cover the exposed skin with a transparent adhesive skin drape, taking care to seal the axilla. 1. Incise the skin and subcutaneous fat in an arc from the clavicle above, downwards over the tip of the coracoid process to the anterior axillary fold following the anterior border of the deltoid muscle. Raise the flaps of skin and fat medially and laterally to expose the deltopectoral groove running obliquely across the wound (Fig. 31.1A). 2. Identify the cephalic vein in the deltopectoral groove and incise the investing fascia throughout the length of the vein. KEY POINTS Cephalic vein 3. It is not necessary to remove the ligated segment of vein, but cauterize its tributaries as you encounter them. 4. Separate the deltoid from the pectoralis major by blunt dissection and retract the muscles with a large self-retaining retractor, exposing the coracoid process and the underlying short head of biceps and coracobrachialis (Fig. 31.1B). 5. In a simple operation for drainage of the joint it is not necessary to divide the coracoid process, but be willing to do so if you require more extensive exposure. 6. Retract the bulk of the coracobrachialis and short head of biceps medially, so exposing the underlying subscapularis. It is possible to extend the approach distally along the lateral border of the biceps, so exposing the entire humeral shaft (see below). 7. Externally rotate the arm and identify the lower border of the subscapularis by seeing the branches of the anterior circumflex humeral vessels lying on its surface. Divide these between ligatures. 8. Identify the upper margin of the subscapularis and place stay sutures at the upper and lower margins at the musculotendinous junction. Divide the muscle just lateral to the stay sutures (Fig. 31.1C). 9. The underlying capsule is usually adherent to the deep surface and is frequently divided at the same time, opening the joint as the subscapularis is retracted medially. 10. If necessary, now dislocate the head of the humerus by external rotation and extension of the arm. 1. Have 2 units of cross-matched blood available. 2. Operate under general anaesthesia. 3. Place the patient supine on the operating table with a large arm table in place. 4. An unscrubbed assistant elevates the arm so that it can be cleaned from the neck to the wrist. 5. Place a small triangular towel or split sheet in the axilla and take it over the tip of the shoulder. Fasten with a towel clip. 6. Place a waterproof sheet and covering towel over the arm board and tuck under the trunk. 7. Place a large sheet over the trunk and head. 8. Wrap the forearm and hand in a small towel and bandage firmly to the forearm with an open-weave bandage or stockinette. 9. Cover the exposed upper arm with a large transparent adhesive drape. 1. Palpate the moveable mass of the biceps muscle overlying the fixed mass of the brachialis. 2. Make a longitudinal skin incision along the lateral border of the biceps from the deltoid above to the elbow below. Note that the upper part of the incision takes in the inferior limit of the anterior approach to the shoulder. Once again this is an extensile approach. 3. In the proximal part of the wound retract the deltoid laterally and the biceps and cephalic vein medially, dividing the lateral tributaries to expose the shaft of the humerus. 4. Distal to the insertion of the deltoid expose the brachialis muscle and split it longitudinally down to bone with the scalpel directed obliquely towards the midline of the humerus anteriorly (Fig. 31.2). 5. If necessary, extend the wound proximally by incising the skin in the line of the deltopectoral groove to the clavicle. 6. Detach the deltoid from its origin to the clavicle as far laterally as the acromioclavicular joint with the cutting diathermy. Leave sufficient tissue attached to the clavicle to take the sutures when closing. 7. Turn back the detached deltoid laterally to expose the tendon of pectoralis major. This may then be cut to allow retraction of the muscle medially, exposing the long and short heads of the biceps and the neurovascular bundle. 8. The anterior surface of the lower third of the humerus can be exposed by extending the skin incision distally along the lateral border of the biceps, curling medially and then distally again, to cross the elbow crease in the midline of the forearm (Fig. 31.3). 9. Split the brachialis as far as the elbow joint and flex the elbow to open the wound. 1. The elbow joint may be exposed from the anterior, posterior, medial or lateral aspects. 2. Avoid the anterior approach except for very special circumstances. 3. The posterior approach gives access to the whole of the lower end of the humerus, while the medial and lateral approaches give a more limited access to the corresponding side of the joint, which is sufficient for more limited procedures. 1. With the patient under general anaesthetic, apply a pneumatic tourniquet high on the upper arm. 2. Position and prepare the arm as if the humerus were to be exposed, leaving 12 cm of skin exposed above and below the tip of the olecranon. 3. Have an assistant flex the elbow and hold the arm across the chest or on a side table. 1. Begin the skin incision 3 cm proximal to the tip of the olecranon and continue distally between the olecranon and the lateral epicondyle down to the subcutaneous border of the ulna. 2. Divide the subcutaneous tissue and cut the deep fascia between the ulna and the anconeus and the extensor carpi ulnaris muscles (the Kocher interval). 3. Strip the anconeus from the ulna subperiosteally. Retract it laterally to expose the capsule covering the radial head and in the distal part of the wound the supinator muscle. 4. Incise the capsule over the radial head, so entering the joint. Extend this down to the annular ligament if you require greater access. 5. If necessary, irrigate the joint with physiological saline. 1. This fracture can be treated conservatively by manipulation or olecranon traction in children. 2. Take anteroposterior radiographs of both elbows in a comparable position, usually acutely flexed, after closed reduction. 3. Draw a line along the epiphyseal surface of the lower humeral metaphysis and measure the angle between this and a line perpendicular to the long axis of the humerus. Compare this angle (Baumann’s angle) on the two sides (Fig. 31.5). 4. Residual varus (Latin: = bent, towards the midline) or valgus (Latin: = originally meant bow-legged; now means bent away from the midline) tilt of more than 10° requires operative correction. 5. Circulatory impairment, either before or after closed reduction, demands immediate exploration of the brachial artery if the circulation cannot be restored by allowing the elbow to extend. Unless you are experienced, seek advice if at all possible (see Chapter 23). This gives the widest access to the lower end of the humerus and the elbow joint. 1. With the patient under general anaesthetic, apply a pneumatic tourniquet high on the upper arm. 2. Position and prepare the arm as if exposing the humerus, leaving 12 cm of skin exposed above and below the tip of the olecranon. 3. Have an assistant flex the elbow and hold the arm across the chest. 1. Start the skin incision in the midline 10 cm proximal to the tip of the olecranon and extend it distally in a gentle curve to pass just lateral to the tip of the olecranon, ending 5 cm distal to it over the subcutaneous border of the ulna. 2. Dissect the skin and subcutaneous tissues medially and laterally as far as the epicondyles and hold the edges apart with a self-retaining retractor. 3. Identify but do not disturb the ulnar nerve as it lies in its groove on the posterior surface of the medial epicondyle. 4. Identify the attachment of the central portion of the triceps tendon to the olecranon. Turn down a tongue-shaped flap, 7 cm long, based on the olecranon attachment by incising the tendon and the underlying muscle down to the bone (Fig. 31.6). 5. Sweep the residual attachments of the triceps muscle medially and laterally off the posterior surface of the condyles in continuity with the common flexor and extensor attachments, so exposing the distal humerus. 1. Drill a 1-mm Kirschner wire (K-wire) through the fracture surface of the distal fragment at approximately 45° to the long axis of the humerus, so that it emerges through the medial epicondyle and the overlying skin. Take care to avoid the ulnar nerve. 2. Withdraw the wire until only 1–2 mm protrudes from the fracture. 3. Reduce the fracture under direct vision, freeing any interposed soft tissue. 4. Flex the elbow to 90° and drill the K-wire back across the fracture to engage the lateral cortex of the shaft of the humerus (Fig. 31.7). 5. Through a small stab wound over the lateral condyle, drill a second wire across the fracture site to engage the medial cortex of the shaft. 6. Occasionally, a third wire needs to be introduced from either the medial or lateral side, if the fixation is not stable. 7. Confirm the accuracy of the reduction and the position of the wires by X-rays to check the accuracy of the reduction. Do not accept any position that is less than perfect. 8. If satisfactory, cut the wires leaving the ends just beneath the skin.
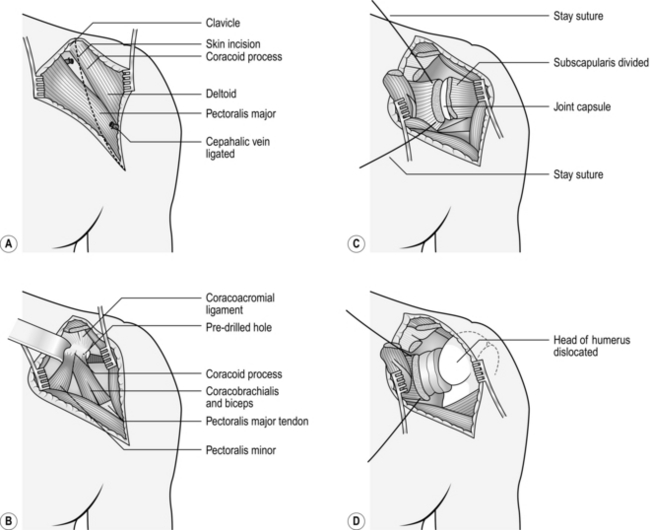
Orthopaedics and trauma
upper limb
THE ANTERIOR (DELTOPECTORAL) APPROACH TO THE SHOULDER
Appraise
Prepare
Access
Closure
APPROACHES TO THE UPPER ARM
ANTEROLATERAL APPROACH
Prepare
Access
APPROACHES TO THE ELBOW
Appraise
POSTEROLATERAL APPROACH (Fig. 31.4)
Prepare
Access
SUPRACONDYLAR FRACTURES
CONSERVATIVE TREATMENT
POSTERIOR APPROACH
Prepare
Access
Action
![]()
Stay updated, free articles. Join our Telegram channel

Full access? Get Clinical Tree


Orthopaedics and trauma: upper limb