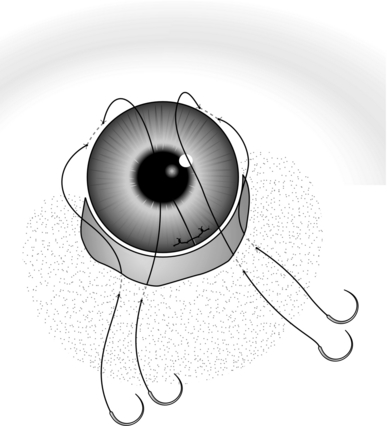
42 1. Many of the procedures described in this chapter can be carried out with small instruments available in a general surgical theatre. 2. Ideally, however, a selection of special instruments will render these eye operations easier to perform: 1. Take particular care when there is exposure of the cornea and there is risk of corneal ulceration. This is present when there is a seventh nerve palsy, trauma including burns causing eyelid damage, proptosis or herpes zoster ophthalmicus in which the cornea may also be anaesthetic, or in the unconscious patient. 2. When the problem is likely to be temporary, it may simply be necessary to apply copious artificial tear drops and ointment until recovery occurs. 3. When the problem is likely to be longstanding, arrange to cover the cornea with the eyelid, either by keeping the lid over the eye with paraffin gauze or an eye-covering gel, or by dropping the lid with botulinum toxin (see below). 4. Alternatively, suture the eyelids together with a tarsorrhaphy. 1. Stitching the lids together may be done either centrally, which of course obscures vision, or laterally, where the protection given is due to the shortening and consequent narrowing of the palpebral fissure. 2. Central tarsorrhaphy is advised where there is inability to close the lids (lagophthalmos) and there is drying of the cornea, or when ulceration is actually present. It is indicated also when severe or protracted ulceration occurs for other reasons, for example in an anaesthetic cornea. 3. In ectropion of the lower lid, in particular that occurring in facial palsy, a lateral tarsorrhaphy suffices. 4. A bandage soft contact lens may be useful in a non-healing corneal ulcer; if it is not available, copious lubricants and daily observation are required. 5. Temporary protection of the cornea can be achieved by inducing a ptosis. Inject 100 pg of botulinum A toxin into the levator palpebrae superioris through the upper lid, entering above the tarsal plate. Keep close to the orbital roof to avoid injecting the toxin into the superior rectus muscle, which would cause diplopia. 6. Superglue closure is dangerous because of the risk of the hardened glue rubbing on the cornea. 1. In all cases, use local anaesthesia with tetracaine (amethocaine) 1% drops to the conjunctiva and 1% lidocaine with adrenaline (epinephrine) infiltration into the lid substance, both subcutaneously and subconjunctivally. 2. In tarsorrhaphy proper, raw surfaces of the lid margins are prepared. The easiest way to do this is simply to divide the lid into anterior and posterior layers through the ‘grey line’ (Fig. 42.1A). This is the midline of the edge of the lid between the roots of the eyelashes in front and the mouths of the meibomian glands behind. The trouble is that in many patients it does not exist as a defined line, and when preparing the lid it is important to keep away from the roots of the lashes as this could distort them and lead to their growing inwards. 3. Start with the lower lid. Hold it up vertically with toothed forceps while an assistant holds it up with similar forceps some way along. Sink the blade (no. 15BP) of a scalpel in about 3–4 mm through the grey line in the plane of the lid, and take the cut the required length along the lid. If the initial stretch of lid grasped by yourself and your assistant is not long enough, both of you move along and continue the incision. Deal similarly with the upper lid opposite the raw area in the lower. In a lateral tarsorrhaphy make sure the two raw areas are continuous round the outer canthus. 4. Now insert the sutures (Fig. 42.1B). Use double-armed 4/0 black silk and pass the needle through the bore of a 3-mm length of rubber tube so as to prevent it cutting out. Grasp the edge of the lower lid with one blade of the toothed forceps in the raw area in the lid margin, the other in the substance of the lid 3–4 mm from the margin. Enter the needle through the skin 4 mm from the lid margin and come out in the raw area. Now grasp the upper lid similarly and pass this needle through the raw area and out on the skin 4 mm from the lid margin. Repeat this procedure with the other needle, entering the skin of the lower lid about 4 mm laterally or medially from the entry of the first. 5. Now pass one needle through a second similar piece of rubber tube and either tie it or, according to the length of lid closure required, put in as many more of these mattress sutures as are indicated. 6. Before tying, wipe away any clot from the raw edge of the lids. Do not buckle the lids when tying; moderately firm apposition is all that is needed as postoperative swelling will add further tension. 7. Put on antibiotic ointment and bandage the eye over paraffin gauze or non-adherent dressing and a pad only if bleeding has been excessive. Uncover the next day. Inspect again in a week and remove the sutures after 2 weeks. 1. Lacerations heal well, but there are important points to remember. 2. If the lid margin is involved, try to appose the edges as accurately as possible. Use 6/0 Vicryl for the skin but try to insert a suture of 6/0 silk through the lid margin itself. Enter the needle on one side through the grey line 2–3 mm from the cut edge, emerging in the latter a similar distance down the cut and then in reverse through the other edge. After tying the suture, leave the ends 3 cm long and strap them down, then check that they do not abrade the cornea. Use the skin sutures to tie over the long ends of the lid margin sutures to keep them out of the eye. 3. If the lids are widely split, suture the tarsal plate before tackling the skin. Do this with interrupted 6/0 absorbable stitches. Insert the sutures at 2-mm intervals, placing the knots anteriorly in the substance of the lid, not facing backwards where they will be uncomfortable and again may abrade the cornea. 4. In cases where the inner third of the lower lid is lacerated, or there is a deep horizontal cut of the upper lid, call in the experts immediately. Restoration of continuity of a possibly divided lower lacrimal canaliculus or levator repair is too specialized a procedure to be covered here. Simply suture the tarsal plate, orbicularis and skin, then refer for later surgery. 5. Massive loss of the substance of the lids may give rise to an immediate problem of ocular (particularly corneal) protection. A protective contact lens may be indicated. Immediate plastic procedures may be advisable, if possible, finishing with some form of tarsorrhaphy or even a purse-string conjunctival flap to protect the cornea. This creates a moist chamber. This entails making a circular incision around the ocular conjunctiva well away from the limbus, mobilizing the ocular conjunctiva off the sclera, then inserting a purse-string suture around the margin, drawing it together to form a closed chamber protecting the cornea. 1. Conjunctiva. Leave small cuts (less than 5 mm) alone. Suture larger ones under local anaesthesia with interrupted 8/0 synthetic absorbable sutures at 4-mm intervals, removing any prolapsed Tenon’s capsule, if excessive, or burying it. 2. Cornea and sclera. Insert a speculum, and find and remove foreign bodies. Glass from windscreens is especially difficult. Put a drop of fluorescein in the eye; it may help to show small particles as well as corneal epithelial loss. KEY POINT Foreign bodies 3. If obvious foreign bodies are present in the anterior chamber, only, attempt to remove them with the finest small-bladed forceps under high magnification after re-forming the anterior chamber with Viscoelastic. Do this only during a procedure for a lacerated cornea. There is no substitute for Viscoelastic, so do not attempt to re-form the anterior chamber if none is available. 4. Try to preserve iris and ciliary body if practical to do so, lens and vitreous, if coming out of the would will need to be removed. If the iris cannot be replaced then, pick it up with iris forceps etc. Pick them up with iris forceps and withdraw a little in an attempt to free them from an incarcerated position in the wound. Make a cut with De Wecker scissors to remove the tissue, flush with the plane of the globe at the site of the penetration. Gently replace any intraocular tissue remaining in the wound, using an iris repositor. In an emergency, leave alone incarcerated material that is not prolapsed externally, particularly if the anterior chamber is not lost. 1. Wound closure varies in difficulty. Insert sutures into clean lacerations of less than 5 mm only if aqueous humour is leaking. 2. As a general surgeon, you may not wish to undertake direct corneal or scleral suture. If you do undertake it, however, remember that, although the stitches should be almost full thickness, they must not penetrate into the eyeball (Fig. 42.2). Use magnification, if it is available, to ensure this. 3. Enter and emerge about 1–1.5 mm from the wound edge. Grasp each edge lightly with the finest-toothed forceps you have, such as Jayles, St Martin’s, or finer. Use 9/0 or 10/0 nylon and keep the sutures in a line perpendicular to the wound. In suturing scleral wounds it may be necessary to dissect the conjunctiva back from the edge. 4. It may, however, be unwise to attempt direct suture, either because you lack experience or because the wound is too irregular. In such cases, and particularly if the anterior chamber is shallow or absent, prefer to cover the wound with a conjunctival flap. In a corneal wound, for example, carry out a partial peritomy. Thus if, for example, the wound is in the 4 o’clock meridian, cut the conjunctiva at the limbus (Latin: = border; between the sclera and the cornea) from 1 o’clock to 7 o’clock in the lower left half of the globe (Fig. 42.3). If it is possible to choose the origin and direction of the flap, remember that the upper and temporal conjunctiva is the loosest and easiest to mobilize. Undermine the conjunctiva so freed back, for at least 15 mm. Insert one needle of a double-armed 8/0 absorbable suture in the paralimbal connective tissue at 8 o’clock and, using a second suture, do the same at 12 o’clock. 5. To insert these sutures, try to get a reasonable bite without going right through the sclera into the eye. Aim for a 2-mm track, parallel to and 1 mm from the limbus. To steady the eye use fine-toothed forceps such as Jayles, to grasp the episcleral tissue close to the point of suture insertion. 6. Now put the two arms of one suture through the edge of the freed conjunctiva at an appropriate place and repeat this with the other suture. Figure 42.3 indicates suitable insertion points. Tie each suture while an assistant, using two pairs of plain forceps, draws the edge of the flap well over the site of the penetration. If the penetration is central, it should still be possible to cover it in this way. 7. Finally, give a subconjunctival injection of cefuroxime 125 mg in 1 ml of water. Give the injection by passing the needle tangentially through the conjunctiva in a horizontal direction 1 cm back from the limbus, into the quadrant opposite to that of the penetrating injury.
Ophthalmology
INTRODUCTION
Prepare
PROTECTING THE EYE
Assess
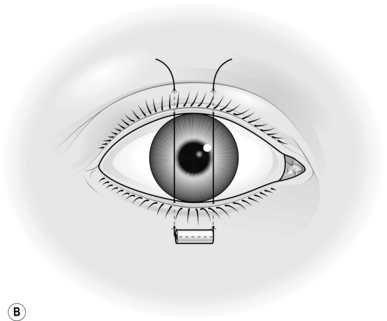
TARSORRHAPHY
Appraise
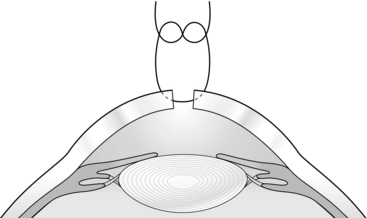
Action
EYELID INJURIES
INJURIES OF THE GLOBE
LACERATIONS
Appraise
 For removal of metal foreign bodies, see page 650, but always X-ray a lacerated eyeball as a matter of routine.
Closure
![]()
Stay updated, free articles. Join our Telegram channel

Full access? Get Clinical Tree


Ophthalmology