Laparoscopic Suturing and Stapling
Daniel B. Jones
Henry Lin
Brief History
Minimally invasive surgery evolved from loop ligatures to extracorporeal suturing, then to intracorporeal suturing, and finally to mechanical suturing devices. Each technique has particular advantages and disadvantages depending on tissue and the type of setting.
Loop Ligature
Loop ligatures are used for a variety of purposes, including ligating vascular pedicles or other structures such as an appendix. The loop ligature (see Fig. 1A and B) consists of a slip knot pre-tied, the standing end of the suture material that is swaged to the end of the rod through which the suture material passes through, and the pusher rod. Several manufacturers offer loop ligatures pre-packaged.
Optimal technique: The surgeon may break the swage ahead of time (Fig. 1C) and shorten the loop to appropriate length before the suture is placed into the body.
The loop ligature is placed through an ipsilateral trocar with the grasping forceps on the contralateral side.
The loop is swept over the target (Fig. 1D and E).
The grasper is inserted through the loop and to grasp the pedicle and retract it toward the anterior aspect of the body cavity, utilizing gravity as countertraction (Fig. 1F–G).
Then the loop is tightened. Placing the pre-formed slip knot on the target tissue and then tightening the loop toward the knot (Fig. 1H and I). Conceptualizing the tip of the rod as the surgeon’s finger tip in this knot-tying effort is a means to expedite the learning process for newer learners.
The traction of the suture should not exert undue pressure on the tissue to prevent avulsion.
Suturing Instrumentation for the Extracorporeal and Intracorporeal Suturing
There are several types of laparoscopic needle drivers. Spring-loaded needle drivers (see Fig. 2A) include both straight tip and spur tip (Fig. 2B and C). The handles of the needle drivers may be “pistol-grip” style (Fig. 2D) or “in-line” handles available today (Fig. 2A). Rod-like handles optimize full rotation of the needle driver without compromising the positions of the hand.
Extracorporeal/Hand Tie
The extracorporeal knot was developed as a technique to allow laparoscopic suturing without the perceived frustration of intracorporeal knot-tying. Extracorporeal suturing involves placing the needle and long suture into the abdomen, passing the needle and suture through the targeted tissue, and then pulling the needle and a portion of
the suture back through the port. Once both the ends of the suture are available, a standard hand knot is created and a suture passer is used to push the knot down through the trocar back onto the tissue.
the suture back through the port. Once both the ends of the suture are available, a standard hand knot is created and a suture passer is used to push the knot down through the trocar back onto the tissue.
 Fig. 1. A. Ligating loop. B. Endoloop. C. Break the swage. D. Sweeping over the target. E. Sweeping over the target completely. F. Grasping the target. G. Retracting the target and using gravity for counter traction. H. Start tightening the slip knot. I. Tightening the slip knot. J. Tightening the slip knot further. K. Tightening the slip knot completely. L. Loop ligature appendix. |
Optimal Technique
Choice of Needles:
Most curved needles still cannot fit through a 5-mm port. Most surgeons, therefore, have planned their ports in particular operations so that they have at least one 10-mm port to place a curved needle (SH) through. Most of the current commercially available trocar sleeves have trapdoor type valves that minimize desufflation when the suture “stents” the valve open during suturing.
A “ski needle” (see Fig. 3B) is frequently used by many surgeons through a 5-mm port as an alternative to the standard curved needle.
Sutures should be at least 30 cm long for optimal extracorporeal knot-tying.
Insertion of Needle and Suture:
The suture is grasped behind the swage and carried into the body cavity through the trocar of the dominant hand (see Fig. 3C).
The nonprimary or empty needle driver is used to grasp the needle and the first or primary needle driver is then used to push more slack of the braided suture into the body cavity (see Fig. 3D and E) to prevent accidental suture movement during passage of the needle through the tissue.
The dominant needle driver is then used to grasp the needle in the usual fashion as the open technique (see Fig. 3F and G). (With the advent of reliable needle drivers, grasping the needle at 90 degrees to the needle driver is no longer a compromise in the technique that is required.) To optimize the needle angle in the needle driver, while gently grasping the needle three-fifths from the tip with one needle driver, use the assisting needle driver to gently manipulate the suture so that the needle changes its position in the dominant needle driver (see Fig. 3H–J).
Tissue Passage:
The needle is passed through the tissue (see Fig. 3K–M).
The primary needle driver grasps the suture about 1.5 cm behind the swage (see Fig. 3N).
Withdrawal of the Needle:
The secondary needle driver is used as a “pulley” to protect the suture from “sawing” into the tissue (see Fig. 3O and P).
Then the primary needle driver is used to pull the suture and the needle back out of the body cavity and out of the primary trocar.
Knot-Tying:
The needle side of the suture is brought out of the body cavity at least 3 cm, preferably 6 cm, and tagged with clamp and the needle removed.
Two half-hitches followed by a squaring knot can be thrown (see Fig. 3Q).
Each half-hitch is pushed down onto the targeted tissue with a knot
pusher with carefully handling the tissue (see Fig. 3R–V).
The squaring knot must be watched carefully while placing to optimize snugness.
The suture is then cut with a laparoscopic nontissue, suture-cutting scissors.
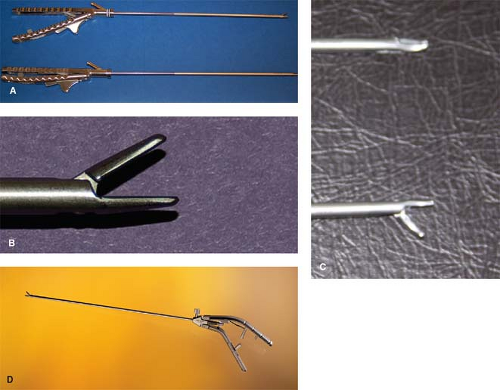 Fig. 2. A. Needle driver handles. B. Needle holder straight tip. C. Needle holder curved tip. D. Needle driver pistol grip. |
Types of tissue: This extracorporeal technique is very useful in the crural closure during hiatal hernia repair. However, the long suture length with extracorporeal tying is not as gentle on tissue. Thus, on delicate tissue, such as the common bile duct, intracorporeal suturing is the preferred method.
Intracorporeal/Instrument Tie
The intracorporeal “instrument” tie is one of the most advance techniques in laparoscopic surgery. Early laparoscopic surgeons like Kurt Semm utilized large straight needles with their needle drivers. Zoltan Szabo broke down the technique to component steps and quantified efficient knot-tying to 30 seconds for the square knot and 1 minute for the complete stitch (ii). Donald Murphy defined several methods for creating this intracorporeal surgeon’s knot.2 Yassine Nouira described a pre-looped intracorporeal knot that takes only 2 minutes after practice. Finally, James C. Rosser promulgates his “Top Gun” method of intracorporeal
anastomosis in his Top Gun Laparoscopic Skill and Suturing program that readily achieves intracorporeal complete knots in less than 30 seconds.ii
anastomosis in his Top Gun Laparoscopic Skill and Suturing program that readily achieves intracorporeal complete knots in less than 30 seconds.ii
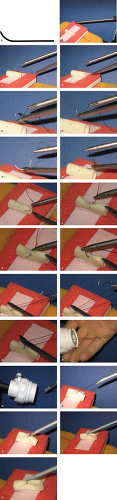 Fig. 3. A. “Ski’d” needle allows for easier passage through 5 mm trocar. B. Inserting extracorporeal suture via trocar. C. Pushing slack in. D. Pushing more slack in. E. Positioning the needle. F. Acquiring the needle. G. Manipulating the needle. H. Manipulating the needle: repositioning to optimal length of the needle. I. Manipulating the needle at 3/5ths along shaft. J. Passage through the tissue initially. K. Passage through the tissue halfway. L. Passage through the tissue near completion. M. Grasping suture and needle for extracorporeal tie. N, O. Using needle driver as a pulley to avoid “sawing” through tissue. P. Three half-hitches for extra corporeal knot. Q. Knot pusher: acquiring the knot. R, S. Knot pusher: pushing to the target. T. Knot pusher: pushing onto the target. U. Knot pusher: seated the knot. |
Moreover, these techniques have been incorporated into the skills portion of Fundamentals of Laparoscopic Surgery (FLS) course that is now a prerequisite before graduating surgical residents are permitted to enroll for the qualifying computer-based examination for the American Board of Surgery.3
Technique
Position: Visualize with the laparoscope from the same side of the surgeon. Suture length of 8 to 12 cm should be chosen for optimal looping and knot-tying.4 In addition, avoid grasping the suture with the needle drivers tightly since doing so will fray the suture and cause loss of tensile strength.
Needle Preparation:
Gently grasp the suture less than 1 cm behind the swage with the assisting grasper and then insert the needle into the body cavity via the nonsuturing trocar. The needle can be rested against an organ and the dominant needle driver grasps the needle in the ready position that is usually almost three-fifths from the needle tip (see Fig. 4B–D). Adjustment of the needle position can be performed by maintaining a gentle grasp of the needle with the dominant needle driver and then moving the suture with the assisting grasper to move the needle into the optimal or ready position (see Fig. 4E–L).
Stay updated, free articles. Join our Telegram channel

Full access? Get Clinical Tree


