This work is dedicated to the memory of Grace R. Durfee BS, CT(ASCP), a pioneer of cytotechnology and the author of this chapter in the first two editions of this book (1961 and 1968).
CYTOLOGIC TECHNIQUES
Over the years, cytopathology laboratories have experienced dramatic changes in the types and numbers of specimens submitted for cytologic evaluation. With the use of fiberoptic instruments and newer and more sophisticated imaging techniques guiding fine needle aspirations (FNA), cells can be obtained from almost all anatomic sites, presenting unique diagnostic challenges. More and more treatment decisions are being made on the basis of the cytologic diagnosis. The quality of the microscopic preparation being examined plays a major role in the cytopathologist’s ability to make an accurate diagnosis.
In the past, the trained cytotechnologist frequently was also responsible for collection, preparation, and staining of material. As a result, many of the pitfalls affecting the quality of the microscopic preparations to be screened were learned firsthand. However, most laboratories now employ personnel whose primary and only function is cytopreparation, with the cytotechnologist participating solely in a supervisory capacity. A thorough understanding of basic cytopreparatory techniques is required to effectively oversee or modify these procedures according to the needs of a laboratory.
Descriptions of new techniques and automated procedures have been added to this chapter. Some of the older methods have been retained for historical purposes. A thorough understanding of the nature of the specimen is necessary to produce optimal results, regardless of the material and methods at one’s disposal.
This chapter describes the basic techniques involved in cytopreparation, stressing the importance of the nature and type of the specimen rather than the site of origin.
Accurate cytologic interpretation of cellular material is dependent on:
Methods of specimen collection
Fixation and fixatives
Preservation of fluid specimens prior to processing
Preparation of material for microscopic examination
Staining and mounting of the cell sample
These steps will be considered separately because of the important role each plays in affecting the quality of the microscopic preparation.*
A detailed description of the clinical methods involved in the collection of cellular material for cytologic evaluation can be found in chapters dealing with specific organs or organ systems. The principles of collection and processing of material by FNA are described in Chapter 28.
FIXATION AND FIXATIVES
Fixation of Smears
Ethanol Fixation
Rapid fixation of smears is necessary to preserve cytologic detail of cells spread on a glass slide that are to be stained by the Papanicolaou method. If smears are allowed to air-dry prior to fixation, marked distortion of the cells occurs.
In the past, the fixative of choice for gynecologic and other smear preparations was the one recommended by Papanicolaou, namely, a solution of equal parts of ether and 95% ethyl alcohol. Subsequently, it has been necessary to abandon this original and excellent fixative because ether presents a fire hazard. Ninety-five percent ethyl alcohol (ethanol) is now employed as a fixative by most laboratories, with excellent results. This method of fixation may be used for all smears prepared at the side of the patient, such as vaginal, cervical, and endometrial aspiration smears; prostatic smears; breast smears; and aspiration biopsy smears. It is also used for the final fixation of all smears prepared in the laboratory from fresh fluids or those initially collected in 50% alcohol or other preservatives.
Smears should remain in the 95% ethyl alcohol fixative for a minimum of 15 minutes prior to staining. However, prolonged fixation of several days or even weeks will not materially alter the appearance of the smear.
To obtain ethanol without federal taxation, a license is required. Laboratories that do not have such a license may use other alcohols. However, to obtain results similar to those seen with 95% ethanol, different concentrations must be used. Table 44-1 shows equivalent concentrations of various alcohol fixatives as suggested and tested by Danos-Holmquist (1978).
These substitutes may also be used with membrane filters, except for 100% methanol that cannot be used for Millipore filters.
All alcohol fixatives should be discarded or filtered after each use with a good-grade, medium-speed filter, such as Whatman No.1, and the concentration should be tested with a hydrometer before reuse.
TABLE 44-1 EQUIVALENT CONCENTRATIONS OF SEVERAL ALCOHOLS FOR PURPOSES OF CELL FIXATION
100% Methanol
95% Ethanol
95% Denatured alcohol
80% Propanol
80% Isopropanol
Wet fixation with alcohol is recommended for all nongynecologic material to be stained by the Papanicolaou method. For gynecologic material, coating fixatives may be used.
Coating Fixatives
A number of agents on the market today can be sprayed or applied with a dropper to freshly prepared smears, thus eliminating the use of bottles and fixing solutions. Hairspray with high alcohol content was, at one time, effective as a fixative, but it is no longer considered suitable for this purpose. There are numerous cost-effective Pap smear collection kits and aerosol sprays currently available that produce excellent results. Most of these agents have a dual action in that they fix the cells and, when dry, form a thin, protective coating over the smear. These fixatives are particularly helpful if the smears must be mailed to a distant cytology laboratory for evaluation. The method is not recommended for smears prepared from fluids within the laboratory.
Instructions for applying the coating fixative accompany the product and should be followed carefully. Cans should be shaken well prior to each use to ensure optimal dispersal and adequate fixation. As in any good method of fixation, the coating fixative should be applied immediately to fresh smears. The distance from which the slides are sprayed with an aerosol fixative affects the quality of the cytologic detail. The optimal distance differs with the brand of fixative used (see Appendix to Chap. 8). Danos-Holmquist tested several spray fixatives and found that the distance of 10-12 inches was optimal. For details, see Table 44-2. There is a widespread tendency to hold the can too close to the slide; therefore, if you are experiencing suboptimal results with the spray fixative used by your clinicians, it should be tested for optimal distance. Aerosol sprays are not recommended for bloody smears because they cause clumping of erythrocytes. Coating fixatives may also be prepared inexpensively within the laboratory. Two such methods are given below.
TABLE 44-2 QUALITY OF CYTOLOGIC DETAIL WITH AEROSOL FIXATION AT VARIOUS DISTANCES
* Ether may be eliminated and 100 ml of 95% alcohol used.
Soften the polyethylene glycol in an incubator at 56°C and add the 95% ethyl alcohol. Let stand for several hours at room temperature, or use frequent agitation to hasten the dissolution of the polyethylene-glycol. The solution may be dispensed in small dropper bottles.
Freshly made smears are placed on a flat surface and the slides are covered immediately by five or six drops of the fixative. Allow the slide to dry for 5 to 7 minutes or until an opaque, waxy film forms over the surface.
† Diaphane is a synthetic resin made by Will Scientific, Inc., Rochester, NY.
Mix thoroughly at room temperature.
Fresh wet smears are placed on a flat surface and covered immediately with enough solution to form a thin coating over the slide—approximately 0.25 or 0.5 ml (5 or 6 drops) per slide. Allow the Diaphane coating to dry thoroughly (20 to 30 minutes) to a hard, smooth film that protects the smear. When smears are received in the laboratory, place in 95% ethyl alcohol to remove Diaphane before staining.
Processing of Smears Prepared With Coating Fixatives
Unless removed prior to staining, all coating fixatives will contaminate the staining solutions, particularly the hematoxylin. The water-soluble coating fixatives should be removed prior to staining by maintaining two separate dishes of 95% ethyl alcohol and leaving the slides in each dish for 5 to 10 minutes. The 95% ethyl alcohol used for washing off the coating fixative should be filtered or changed at least once each day, the number of times depending on the number of slides that are washed.
Manufacturers of spray fixatives occasionally use, in their products, concentrations of alcohol greater than those normally used for optimal fixation. This results in increased cellular shrinkage, which may cause loss of nuclear detail because of chromatin condensation. The increased density of the cell wall also can impede the penetration of light green dye, with resulting excessive cytoplasmic eosinophilia. Increasing the staining time in eosin-alcohol (EA) may give better cytoplasmic staining; however, better nuclear detail cannot be achieved. All commercial spray fixatives must be tested before acceptance and the results compared with smears that have been fixed in 95% ethyl alcohol.
Rehydration of Air-Dried Smears
Gynecologic Smears
In recent years, the use of unfixed, air-dried gynecologic smears has been advocated by some workers. Randall and von Amerongen (1997) recommend the submission of unfixed, air-dried smears and subsequent rehydration with 50% glycerin after arrival in the laboratory. They prefer this method over wet fixation because their educational efforts emphasizing proper fixation were ineffective when dealing with inexperienced medical staffs submitting small numbers of slides annually. A comparison in their laboratory of airdied and fixed cervicovaginal smears showed there was no significant difference between the two techniques in reference to their ability to detect abnormalities.
In our experience, even when dealing with large numbers of providers, air-drying artifact is less of a problem than it once was. This is most likely the result of years of education and the availability of inexpensive, easy to use fixatives and kits. However, if a laboratory receives large numbers of slides exhibiting air-drying artifact, and educational efforts have failed, this author thinks a more prudent alternative would be to rehydrate the defective slides rather than recommend that all slides be air-dried.
The rehydration procedure described below may be used for inadequately fixed smears. It must be noted that squamous cells may appear restored to a considerable extent after rehydration procedures whereas, in our experience, cells of secretory type often suffer irreparable damage.
The simplest rehydration technique that seems to work as well as, if not better than, most techniques was developed many years ago by R. G. Bonime of New York City (1966). Air-dried cytologic specimens are placed in a 50% aqueous solution of glycerin for 3 minutes followed by two rinses in 95% ethyl alcohol prior to staining by the routine Papanicolaou method.
Nongynecologic Smears
Since inadvertent air drying prior to ethanol fixation may occur when slides are prepared by physicians and ancillary health care staff, Shidham et al (2001) recommend purposely air drying all smears and rehydrating them with normal saline after arrival in the laboratory. Proponents of the procedure judge the cytologic detail of brush smears and fine needle aspiration smears superior to smears made from the same material that were immediately and adequately wet fixed in alcohol. Advantages cited include lesser risk of cell loss and ease of collection by untrained personnel.
The author has no personal experience with the method and recommends testing it in one’s own laboratory before adopting any permanent change in routine procedures.
Mailing of Unstained Smears
Unstained smears may be mailed to distant cytologic laboratories after the application of coating fixatives previously discussed. A variety of mailing containers are commercially available, ranging from plastic cylinders to cardboard containers and, if properly used, they will prevent breakage in the mail.
If coating fixative solutions are not available, the following method has been used for many years and gives very good results.
Smears are first fixed in 95% ethyl alcohol for a minimum of 15 minutes. The slides are then removed and one or two drops of glycerin are placed on the smear and covered with a clean glass slide. The slides may now be wrapped in wax paper and mailed to the laboratory in a suitable container.
Special-Purpose Fixatives
Neutral Buffered Formaldehyde Solution
37% to 40% Formaldehyde solution
100 ml
Water
900 ml
Acid sodium phosphate, monohydrate
4 g
Anhydrous disodium phosphate
6.5 g
Bouin’s Solution
1.2% (saturated) aqueous picric acid
750 ml
37% to 40% Formaldehyde solution
250 ml
Glacial acetic acid
50 ml
These two fixatives are particularly valuable in preserving nuclear features in small samples, such as cell blocks.
Methanol Acetic Acid Fixative
Howell et al (1993) reported that urine and bladder washings, fixed with an equal volume of 20:1 methanol plus acetic acid (MA), produced cytocentrifuge preparations with well preserved cells and good cytologic detail.
An earlier study, comparing DNA histograms of fresh urine and bladder washing to an aliquot of the same sample fixed in MA, resulted in increased diagnostic accuracy when MA fixation was used (Deitch et al, 1982). Diagnostic accuracy of DNA histograms done on the same samples fixed with MA improved from 58% to 92% in urines and from 50% to 100% in bladder washings. Ethanol fixation usually resulted in DNA histogram deterioration. They recommend that the MA fixative be used when both cytologic evaluation and flow cytometry is desired on the same urine or bladder washing sample.
Balanced Salt Solutions
Nasuti et al (2000) reported that Normosol, a balanced salt solution, is suitable for storage of fine needle aspirates. In a comparison of paired FNA needle rinses, stored for up to 60 hours in Carbowax and Normosol, Normosol was superior for nuclear preservation and lack of obscuring background artifact. Normosol is an excellent, low-cost alternative for short-term storage of FNA samples.
Formol Alcohol
A number of workers have recommended varying mixtures of formalin and alcohol for fixation of smears and cell block samples. Tang et al (1997) reported that smears made from urinary sediment that had been prefixed in 60% alcohol and 3% Carbowax 1500, dried on a 40°C hot plate for 15 minutes, and then fixed in 1:19 solution of 37% formaldehyde and absolute ethanol for 30 minutes retained significantly more cells than those fixed with 95% alcohol alone. The protein cross-linking properties of formalin may play a roll in making the cells adhere better to the glass slide. Nuclear and cytoplasmic staining and detail were similar, exhibiting excellent morphology; however, the greater yield of cells in the formalin-alcohol mixture resulted in detection of a higher number of abnormal cases.
Nathan et al (2000) recommends the use of an ethanol formalin fixative for processing of cell blocks. This fixative results in excellent cytomorphologic features that closely resemble the cytologic detail seen in Papanicolaou-stained smears. Preservation of histochemical and immunocytochemical properties are maintained. The fixative must be prepared fresh and used immediately because formalin is capable of oxidizing to formic acid. Nathan alcohol formalin substitute (NAFS) consists of a 1:9 solution of 40% formaldehyde and 100% ethanol. NAFS is added to spun-down cell pellets after the supernatant is discarded. After a minimum of 45 minutes, the sample is recentrifuged and the cell pellet wrapped in paper and placed into a cassette that is stored in 80% alcohol until ready for processing.
Saccomanno’s Fixative
Saccomanno’s fixative is 50% alcohol and approximately 2% Carbowax 1540 (www.ousc.com, Cat. #10063). Carbowax infiltrates and occupies submicroscopic spaces, preventing cell collapse, and thus protects the cells during air drying. Cells adhere well to glass slides as a consequence of air drying. This fixative, a variant of the fixative proposed by Ehrenreich and Kerpe in 1959 was first used by Saccomanno for prefixation of sputum but can be used for fluid specimens from other sites. Carbowax 1540 is solid at room temperature, with a melting point of 43° to 46°C. To avoid the necessity of melting it whenever the fixative is made, a stock solution of Carbowax can be prepared as follows: pour 500 ml of water or 50% ethyl alcohol into a 1,000-ml graduated cylinder. Melt Carbowax in an incubator or hot-air oven at 50° to 100°C. Add 500 ml of the melted Carbowax to the graduated cylinder. This mixture will not solidify and can be stored in a liter screwcap bottle.
A liter of Saccomanno’s fixative can be prepared by mixing 434 ml of water, 526 ml of 95% ethyl alcohol, and 40 ml of the water or alcohol-based stock solution. The final concentration of alcohol will be slightly different, depending on which stock solution is used; however, this difference is not critical. Never use absolute alcohol for preparation of Saccomanno’s fixative, since it may contain dehydrating agents that cause mucus to become hard and rubbery and difficult to blend.
Modifications have been recommended by various workers depending on the type of specimen being processed. The Bales method uses 2% carbowax and 70% alcohol for the final fixation of urinary sediment. Tang et al (1997) found that 3% carbowax gave a 3-dimensional appearance to cell clusters and that 60% ethanol was the optimal concentration of alcohol to ensure adequate fixation without protein precipitation.
Formalin Vapor Fixation
Some staining procedures require formalin vapor fixation. Place 1 to 2 ml of formalin solution of required concentration in a Coplin jar. Immediately after preparation of the smear, drop the slide into the Coplin jar, cell end up (label end down), and tightly cover the jar. The length of time required for fixation varies according to procedure.
Carnoy’s Fixative
95% Ethanol
60 ml
Chloroform
30 ml
Glacial acetic acid
10 ml
This fixative will hemolyze red blood cells and, therefore, is useful for bloody specimens. However, shrinkage of the epithelial cells is greater than that observed in specimens fixed in 95% ethanol. The staining time in hematoxylin must be reduced to prevent overstaining. Place the bloody smear in Carnoy’s fixative for 3 to 5 minutes, until the sediment becomes colorless, and then transfer to 95% ethanol or its equivalent. Nuclear chromatin will be lost if the cell sample remains in Carnoy’s fixative for longer than 15 minutes.
This fixative must be prepared fresh when needed and discarded after each use. Carnoy’s fixative loses its effectiveness on standing, and the chloroform can react with acetic acid to form hydrochloric acid. This fixative may be used for Millipore filters but will damage Nuclepore and Gelman filters.
LIQUID-BASED COLLECTION AND PROCESSING OF GYNECOLOGIC SPECIMENS
For many years, efforts have been made to develop methods that would enhance the sensitivity and specificity of the Papanicolaou smear. Emphasis has been placed on creating automated screening machines whose success depends on a representative sampling of cells on standardized slides containing a monolayer of well-stained, well-preserved cells.
From this research and development, liquid-based gynecologic specimen collection has evolved. Its proponents argue that liquid-based preparations outperform conventional smears because of improved fixation, decreased obscuring factors, and standardization of cell transfer. Proponents point out that, in direct smears, the cells are not transferred in a representative fashion and that up to 90% of the material scraped from the cervix may be discarded with the sampling device. With liquid-based collection, the sampling will be representative and operator-dependent variation will not occur since processing is controlled by the laboratory.
SurePath (TriPath Imaging, Inc, Burlington, NC) and ThinPrep 2000 System (Cytyc Corp, Marlborough, MA) are two such systems currently approved by the FDA for cervicovaginal testing. With both methods, the sample is collected in the conventional manner with one of the brush instruments (see Appendix to Chap. 8) but, instead of being spread onto a glass slide, it is transferred to a vial of fixative.
In the SurePath method, the sample is vortexed, strained, layered onto a density gradient, and centrifuged. Instruments required are a computer-controlled robotic pipette and a centrifuge. The cells form a circle 12.5 mm in diameter. The ThinPrep method requires an instrument and special polycarbonate filters. After the instrument immerses the filter into the vial, the filter is rotated to homogenize the sample. Cells are collected on the surface of the filter when a vacuum is applied. The filter is then pressed against a slide to transfer the cells into a 20 mm diameter circle.
Both methods result in a well preserved approximate monolayer of cells, with a background devoid of blood and mucus. However, the current high cost of these patented, commercial systems (i.e., $55,000 for the ThinPrep 2000 System and over $20.00 in cost of disposable materials for each specimen [Cytyc Corporation 2001 Price List]) is estimated to be the cost to implement the technique. This does not include the cost of retraining and recertification, required of cytotechnologists and pathologists in order to interpret the ThinPrep slides, which has led to the development and evaluation of alternative, less costly methods.
One such method referred to as SpinThin, developed by Khalbuss et al (2000), uses a modified electric toothbrush to release the cells into suspension from the collecting device. The cells are spun directly onto a 10 × 20 mm area of a glass slide using a Cytospin II cytocentrifuge with megafunnel. Results correlated very well with conventional smears and follow-up histology.
Another method described by Johnson et al (2000) places the cervical collection device into 15 ml of CytoRich Red (TriPath Imaging, Inc), a proprietary formula of buffering agents, emulsifiers, formaldehyde and alcohol. After arrival in the laboratory, cell suspensions are vortexed, poured through tulle (bridal veil fabric) and centrifuged. Following centrifugation, the supernatant is discarded and the sediment is vortexed. A drop of sediment is placed into an 8 ml Hettich cytocentrifuge chamber prefilled with 2 ml of CytoRich Yellow (TriPath Imaging, Inc), a proprietary Saccomanno-like fixative that prevents dehydration and collapse of 3-dimensional structures when slides are air-dried, and then spun onto adhesive-coated slides. Advantages include batch processing and reusability of its funnel assembly, which decreases the bulk of disposable plastic that can significantly impact the environment as well as add to the cost of individual tests.
Preliminary evaluation showed the method to be as efficacious and, in two instances, more specific than its conventional smear counterpart.
The cytopathology community is still assessing the relative efficacy of the costly liquid-based methods compared to that of the conventional smear. It remains to be seen whether the new technology will improve the prevention of cervical cancer (Bishop et al, 2000). One clear advantage of the new technology is the ability to perform additional testing, such as human papillomavirus (HPV) determination on the same sample (see Chap. 11). A major disadvantage is the introduction of artifacts such as cell shrinkage and modified staining properties requiring new training and experience. Until then, as stated by Austin (1998), “for now, it still may be premature to declare the Pap smear the most successful and proven cancer screening test in medical history, as ‘inefficient’ and ‘the problem’ while characterizing a less-tested new method amid Shakespearean overtones as ‘potent’, ‘the promise’ and ‘the hope’.”
PROCESSING OF FLUID SPECIMENS
Preservation of Material
Preservation of cellular morphology until the sample can be processed is essential to accurate cytologic interpretation. For the purpose of this discussion, “prefixation” refers to the collection of a fluid specimen in a medium that will preserve morphology up to the time of slide preparation. A “fresh sample” is one to which no fixative or preservative has been added.
Fresh Material
Specimens may be submitted to the laboratory without preservative if facilities for immediate processing are available. The length of time between collection and preparation of the sample before cellular damages occur depends on pH, protein content, enzymatic activity, and the presence or absence of bacteria. It is not possible to predict these variables, even in specimens from the same anatomic site. However, the following guidelines will usually yield acceptable results.
Specimens with a high mucus content, such as sputums, bronchial aspirates, or mucocele fluid, may be preserved for 12 to 24 hours, if refrigerated. Refrigeration slows the bacterial growth that causes cellular damage and the breakdown of mucus. Mucus apparently coats the cells, protecting them against rapid degeneration. The cells in specimens without thick mucus or specimens diluted with saliva are not as well protected and may deteriorate more rapidly.
Specimens with a high protein content, such as pleural, peritoneal, or pericardial fluids, may be preserved for 24 to 48 hours without refrigeration. The protein-rich fluid in which the cells are bathed acts as a tissue culture medium in preserving cellular morphology.
Specimens with low mucus or protein content, such as urine or cerebrospinal fluid, will endure only a 1 to 2-hour delay, even if refrigerated. The fluid medium in which these cells are bathed contains enzymatic agents capable of causing cell destruction. Refrigeration may inhibit bacterial growth but does not protect the cells.
Specimens with low pH, such as gastric material, must be collected on ice and be prepared within minutes of collection to prevent cellular destruction by hydrochloric acid.
Prefixation of Material
Prefixation may preserve some specimens for days without deterioration of cells. Some of the disadvantages of prefixation are precipitation of protein, hardening of cells in spherical shapes, and condensation of chromatin. The most common solutions used for this purpose are discussed below.
Ethyl alcohol (ethanol) [50% solution] was once considered the best universal fixative for fluid specimens. Its effectiveness as a preservative, particularly of urine samples, has come under scrutiny (Crabtree and Murphy, 1980). Pearson et al (1981) reported that the morphologic features of urothelial cells, suspended in urine at a pH of 4.5, were better preserved than in other samples, regardless of whether or not ethanol was added. The addition of methanol, however, improved preservation of detail in samples of pH higher than 4.5. This same study also found the pH of the first morning voiding to be lower than that of subsequent ones and that 1g of vitamin C, taken the night before sample collection, significantly reduced the pH. However, if one opts to use it as a preservative, ethanol should be added in equal volume to the fluid. Ethyl alcohol in a concentration higher than 50% should not be used in collecting fluids rich in protein, because the sediment becomes hardened and very difficult to spread on glass slides, particularly if the delay in processing is greater than 1 hour. However, 95% ethyl alcohol may be effectively used in the collection of gastric washings. Fixatives containing ether or acetone should never be used for liquid specimens that cannot be smeared on slides immediately after collection. Hardening of the sediment makes the subsequent preparation of smears almost impossible.
Saccomanno’s fixative. Samples can be collected directly into the Saccomanno’s fixative or the fixative can be added to the sample once it arrives in the laboratory. When used as a prefixative, it is generally recommended that it be added in equal volume to the specimen. See above for this method of preparation and additional uses.
Shandon Mucolexx is a commercial, mucoliquefying preservative designed for use in the collection of mucoid and fluid specimens. Its active ingredients were polyethylene glycol, methanol, buffering agents, and aromatics. An equal volume of undiluted Shandon Mucolexx added to the specimen was recommended by the manufacturer (www.Thermo.com, Product #9990370). A similar product called Mucolytic Agent (Stephens Scientific, Riverdale, NJ) is available (catalog no. S7744).
Commercial preservatives, such as Cytospin Collection Fluid (Thermo Electron Corporation, Pittsburgh, PA, www.thermo.com), are also available.
Many other preservatives have been developed for use with automated cytology systems that may have practical application for routine cytology. Weidmann et al (1997) tested CytoRich Red, a proprietary formula of buffering agents, emulsifiers, formaldehyde, and alcohol developed for use with TriPath PREP (TriPath Imaging, Inc) for use as a preservative. CytoRich Red was added to a variety of nongynecologic specimens. The specimens were kept for up to seven days before preparation of slides, using the Cytospin III (www.Thermo.com) and the Hettich Universal cytocentrifuge. There was a marked reduction of erythrocytes and background material, when compared to slides prepared from the same specimens collected in Cytospin Collection Fluid (www.Thermo.com). Table 44-3 summarizes the use of the preservatives described.
Comment
The decision to prepare slides from fresh or prefixed material is influenced by the number of specimens processed by the laboratory, the number of trained personnel available to prepare the material, and the cooperation of the physicians and nursing staff involved in collection of samples. We do not recommend one method in preference to another but believe that consistency is important. For example, if sputum or urine samples are routinely collected in 50% ethanol, unfixed samples should be fixed immediately upon arrival in the laboratory to ensure uniformly consistent cytologic artifacts for microscopic evaluation.
PREPARATION OF FLUIDS FOR MICROSCOPIC EXAMINATION
Many papers have been published comparing the diagnostic accuracy of different preparation techniques. Often, the results of these studies contradict one another. A detailed discussion of the advantages and disadvantages of each method is not possible in this chapter. As with collection techniques, the methods used for preparing specimens will vary according to the volume of specimens processed, personnel available, and collection techniques. The most commonly used procedures can be divided into the following categories:
TABLE 44-3 DIRECTIONS FOR USE OF SEVERAL FIXATIVES
Preservative
Specimen
Instructions
50% ethanol Saccomanno Mucolexx
All body sites except gastric
Sputums: Have the patient expectorate directly into cups containing 50 ml of preservative and shake well. Other specimens: add an equal volume of preservative and mix well.
70% ethanol
Sputum, bronchial aspirates, and washings
Same as above.
95% ethanol
Gastric, bronchial, and other saline washings
Add an equal volume of preservative and mix well.
Direct or sediment smears on glass slides
Cytocentrifuge preparations
Automated cytology systems
Preparation with membrane filters
Preparation of cell blocks
Materials required:
Petri dishes and brown paper toweling
Curets, applicator sticks, forceps, or similar instruments. The nasal curet shown in Fig. 44-1 is one such instrument that can be easily rinsed in a germicidal solution and flamed after each specimen.
Copper paper clips for keeping the slides separated from each other in the fixative.
Glass slides. Slides should be 0.95 to 1.06 mm in thickness to ensure good microscopic illumination. Slides may be plain, albuminized, or coated with another adhesive (see below) and can be labeled permanently with a diamond-point pencil or black laboratory ink. A lead pencil (No. 3 hardness) can be used for temporary identification of slides with frosted ends. Permanent paper labels can be applied after coverslipping. The choice of plain, albuminized, or adhesive-coated slides will depend on the mucus content of the material to be smeared. Totally frosted slides should not be used as they distort the cells on smearing.
Bottles of 95% ethyl alcohol or equivalent (see Table 44-1).
Centrifuge tubes: 50-ml capacity, preferably disposable plastic tubes with a screw cap
Centrifuge: 50-ml tube capacity with a horizontal head. Cell fractionation studies have shown that cells sediment best at 600 × gravity in 10 minutes. To determine the centrifuge speed or revolutions per minute (rpm) required to equal 600 × gravity for an individual centrifuge:
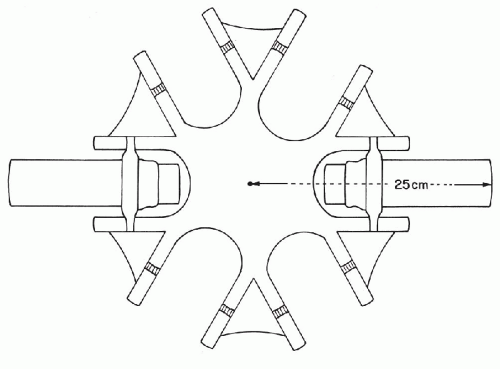
Measure the radius of the centrifuge from the center pin of the rotating head to the end of the extended cup (Fig. 44-2).
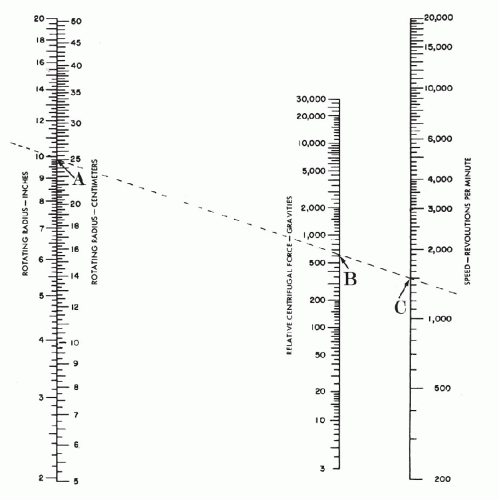
Place a straight edge on the chart in Fig. 44-3 intersecting the rotating radius and 600 gravities. The point at which the straight edge intersects the speed scale is the recommended rpm.
Figure 44-1 A small curet-type spoon successfully used in this laboratory for transferring sediment from centrifuge tube or sputum to slide.
Preparation of Direct or Sediment Smears on Glass Slides
Specimens consisting of a small amount of material that adheres well to glass slides (e.g., cervical scrapes, brushing, needle aspirates) can be smeared directly on a slide, using a steady motion (see Chap. 28 for further comments on smear preparation techniques).
Coating Glass Slides With Adhesives
In order to optimize the adhesion of cells to the surface of the glass slide, coating adhesives can be used. They can also be prepared in the laboratory.
Mayer’s Albumin
Mayer’s albumin is available commercially or can be prepared in the laboratory as follows: Mix by stirring 1 volume of fresh egg whites or reconstituted dried egg albumin (1 g of albumin per 20 ml of distilled water) with an equal volume of pure glycerol. Filter this mixture through damp muslin or coarse filter paper in an oven (55°-58°C). Add a few crystals of thymol or camphor to prevent growth of molds. Store this solution in small screw-capped bottles at a temperature of −4°C. The bottle of albumin currently in use must be refrigerated.
Figure 44-2 Determination of the rotating radius of the centrifuge.
Figure 44-3 Chart to be used for the determination of centrifuge speed (revolutions per minute) at gravity 600. The scale on the left shows the length of the rotating radius in centimeters or inches. The central scale shows relative centrifugal force or gravities. The right scale shows centrifuge speed expressed as revolutions per minute. In the example given, a straight line intersects the rotating radius at 25 cm, or approximately 10 inches (A), and the centrifugal force at 600 gravity (B). An extension of this line shows 1,500 as the number of revolutions per minute for optimal centrifugation (C).
Albuminized slides should be prepared one to several days before use to allow the slides to become tacky. Arrange the slides on a clean tray and, using a dropper, place a drop of Mayer’s albumin on each one. With the fingertip covered by a thin rubber cot, spread the albumin thinly and evenly over the entire slide, or lay another slide on top, rubbing the two slides together to obtain uniformly coated slides. Keep the coated slides in a dustproof area of the laboratory, in a closed slide box, or cover with wax paper.
Gelatin Chrome Alum
The adhesive gelatin chrome alum is superior to albumin for transferring cells from membrane filters to glass slides; it may also be of use for routine slide preparation of poorly adhesive samples. As described by Adler (1978), the adhesive consists of 1 g of gelatin plus 0.1 g of chrome alum dissolved in 100 ml of distilled water, to which 1 ml of 10% thymol in ethanol has been added. Slides are dipped once, drained, their backs wiped off, and then allowed to dry. Slides are stored, as previously described, for albuminized slides. They may be stored for weeks. However, maximal cell adhesion has been reported if the solution is prepared one day prior to use.
Poly-L-Lysine
Poly-L-lysine is a potent cell adhesive that is particularly useful in experimental work (scanning electron microscopy) and in immunocytochemistry (Domagala et al, 1979, Huang et al, 1983).
A 0.1% stock solution of poly-L-lysine in deionized water (molecular weight 380,000) is commercially available from Sigma Diagnostics (Sigma-Aldrich Co., St. Louis, MO, www.sigmaaldrich.com; catalog no. P8920) The stock solution is diluted 1:10 or 1:0 in deionized water. Clean glass slides are placed in the diluted solution at room temperature for 5 minutes and are oven-dried. Dried slides are ready to use. The coated slides significantly improve adhesion of cells and tissues. Poly-L-lysine is easy to use and can be used as a universal coating agent.
3-Aminopropyltriethoxysilane (3-APTES)
Another excellent adhesive is 3-aminopropyltriethoxysilane (3-APTES), also from Sigma Diagnostics (www.sigmaaldrich.com, catalog no. A3648). The compound adheres to glass and binds to cell surface. A 2% solution of 3-APTES in acetone is prepared. The solution may be used to coat clean slides, as described above, but may also be used to better attach cells and tissues to slides in archival material (Rule et al, 1989). We successfully used this compound in an in situ hybridization procedure of archival cervical smears with DNA biotinylated probes of human papillomavirus (Liang et al, 1991).
Shaklee Basic H and Surgipath Sta-on
Johnson et al (2000) developed a solution that simultaneously cleans the slides and coats them with a uniform layer of adhesive at a fraction of the cost of commercial adhesives. It uses a 1:9 mixture of Shaklee Basic H and Surgipath Sta-On. A stock solution with a shelf life of at least 1 year is prepared by mixing 10 cc Shaklee Basic H (Shaklee Corporation, Pleasanton, CA) with 90 cc Surgipath Sta-On (www.Surgipath.com, catalog nos. 03105 and 03107). The working solution, which is good for 1 week, consists of 20 cc of stock solution and 480 cc deionized water. Slides are dipped in the solution and air-dried.
Processing of Sputum, Bronchial Aspirates, and Other Mucus-Rich Samples
Mucoid samples present unique challenges. Concentration of cells by centrifugation is not possible because of high viscosity. To increase diagnostic yield, alternative methods, such as the “pick and smear” technique, Saccomanno’s technique (mechanical homogenization), and a variety of chemical homogenization procedures, have been developed.
A variety of methods using DTT homogenization (see below) seem economical, simple and easily adaptable for routine processing. One such method is described as follows.
Dithiothreitol (DTT) Mucus Liquefaction
DTT Solution: 0.2% DTT (www.sigmaaldrich.com, catalog no. D0632) in 60% ethanol and 3% Carbowax.
If the sample is fresh: add twice the volume of DTT solution. For example, to 5 cc of sputum, add 10 cc of DTT. Thoroughly agitate sample with a vortex mixer. Let stand at room temperature for 30-60 minutes vortexing periodically. Centrifuge sample, prepare slides by the method of your choice, allow slides to air dry, and stain as usual.
If sample is fixed: Centrifuge sample, pour off supernatant and prepare as described above.
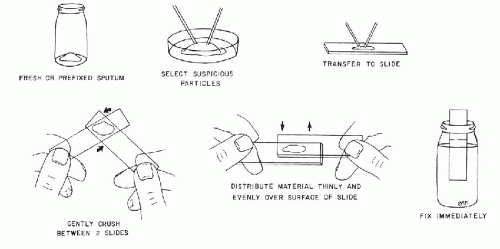
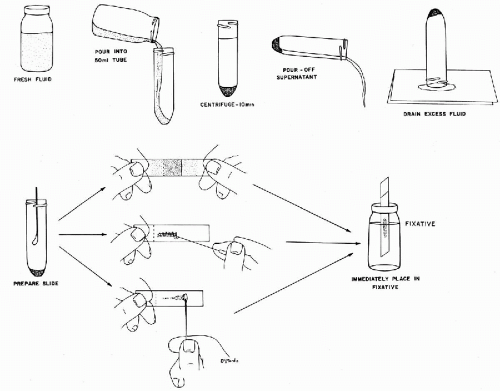
“Pick and Smear” Technique of Sputum Processing
This technique is applicable to fresh samples or samples prefixed in 50% alcohol (Fig. 44-4). The selection of bloody or solid particles is critical in correct processing of sputum. To select such particles, the sputum must be carefully inspected. This may be done by pouring the specimen into a Petri dish and examining it against a black background. Excellent results may be obtained by pouring sputum specimens on two or three thicknesses of brown paper toweling. The paper toweling absorbs most of the fluid portion of the specimen and allows the selection of particles. Sputum is often difficult to transfer to slides in small amounts because of its viscous, ropy consistency. The use of two specially-designed curet-type instruments, nasal curets (see Fig. 44-1), or applicator sticks, one in each hand, is required.
Select any bloody, discolored, or solid particles, if present, and place a small portion of each particle, not larger than the size of a small pea, on each of four plain slides. With a clean glass slide, crush the particle of sputum on each of the four slides, using a rotary motion. Then, with overlapping horizontal strokes, spread the material evenly over the slide so that the final preparation is only slightly thicker than a blood smear. Place the prepared slides immediately in a Coplin jar with 95% ethyl alcohol fixative, or its equivalent (see Table 44-1), making sure that the smeared surfaces remain separated by paper clips. In the absence of particles, sputum samples from at least four different portions of the specimen must be smeared.
If cell blocks are to be prepared, save the part of the specimen remaining after preparation of smears and proceed as outlined below.
Figure 44-4 Diagrammatic representation of steps in the preparation of smears from sputum.
Tang et al (1995) compared the sensitivity of the “pick and smear” method to the homogenization of the specimen with Dithiothreitol (DTT) (www.sigmaaldrich.com, catalog no. D0632). In their study, the relative sensitivity of detecting positive cases by the DTT method was 98.8% compared with 80.0% by the “pick and smear” method, a statistically significant difference in detection rates.
Saccomanno’s Technique
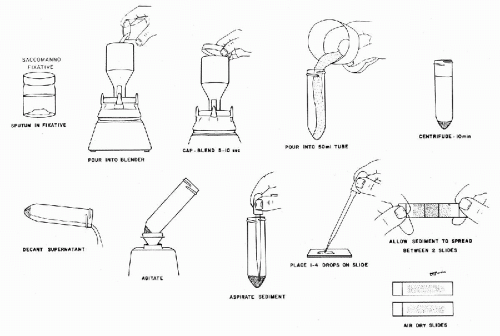
To a sputum specimen received in Saccomanno’s fixative (Fig. 44-5), described above, add sufficient Saccomano’s fixative to make a total volume of 50 ml. If specimen is received in 50% alcohol, add a sufficient amount of Saccomanno’s stock solution to achieve a final concentration of approximately 2% Carbowax; for example, to 45 to 50 ml of specimen, add 4 ml of Saccomanno’s stock solution and mix well. Specimen should remain in this fixative approximately a half hour before processing.
Pour the specimen into a semi-micro container (Cardinal Health, www.cardinal.com; Container, Semi-Micro Stainless Steel, Eberbach, catalog no. S8395-1) and blend in a Waring Blender (Cardinal Health, www.cardinal.com; Stirrer, Blender, 2 speed, Waring, catalog no. S8346-1) at high speed for 5 to 10 seconds. Container should remain capped during blending. If one prefers, blending can be avoided by adding a mucolytic agent, such as Sputolysin (Caldon Biotech, Inc, Carlsbad, CA) or Dithiothreitol (DTT) to the fixed specimen. Further processing of the sample is the same for blended or not blended specimens.
Pour blended specimen into a 50-ml test tube. If flecks and fine threads are still visible, return to blender for an additional 5 to 10 seconds. Cells are not damaged unless specimen is blended excessively.
Centrifuge specimen for 10 minutes at rpm determined for your centrifuge (see above). Decant supernatant, leaving a few drops of fluid to mix with the granular, pale sediment. Resuspend sediment by agitating the tube on a vortex mixer (Cardinal Health, www.cardinal .com; Maxi Mix Plus Mixer, catalog no. S8248-6).
Prepare smears by placing a few drops of the resuspended sediment in the center of a clean slide. The number of drops depends on the consistency of the sediment: use only one to two drops if the sediment is thick; use two to four drops if the sediment is thin and watery. Place a second, clean slide over the material and allow it to spread evenly between the two slides. Gently pull the slides apart with an easy sliding motion.
Allow slides to air-dry until ready for staining. Smears may be stored for months in this condition without adverse effects. As with coating fixatives, the slides should be rinsed in 95% alcohol for at least 10 minutes before staining to remove the Carbowax. Failure to rinse the slides properly will impede the stain’s penetration of the cell, alter the staining results, and contaminate the staining solutions.
We have found it useful to use three semi-micro containers on rotating bases. After the first specimen is blended and poured into a centrifuge tube, the semi-micro container is filled with a 1:10 dilution of household bleach (sodium hypochlorite) for cleaning purposes and allowed to stand while the second container is being used for the next specimen. The second container is used and then filled with bleach while the first container is emptied of bleach and placed under a faucet of hot running water. The third container is used for the third specimen and filled with bleach while the second container is put under running water and the first container is ready to use again. Many laboratories use only one container and just rinse it well under running water between samples.
Figure 44-5 Sputum preparation after Saccomanno.
Precautions
Harris, in a letter to the editor (1977), quotes a personal communication dated September 28, 1976, from J.E. Forney, Bureau of Laboratories, Centers for Disease Control, Atlanta, Georgia:
[T]he household blender has been shown to be one of the most hazardous pieces of equipment used in the laboratory in terms of production of potentially infectious aerosols. The blending step should be carried out in a safety-type blender which has been properly checked and maintained to prevent any leakage. Even when using the safety-type blender container, it should not be opened for at least one hour after the blending operation has been completed, because it takes that long for the infectious aerosols to settle in the atmosphere within the blender jar. The alternative would be to place the blender in a negative pressure cabinet which has an airflow velocity across the face of the cabinet of at least 75 linear feet per minute.
Saccomanno stated in a letter to the editor (1977):
[W]e have not experienced any infection in our laboratory utilizing this technique on over 125,000 specimens. We are aware that our area is not endemic for tuberculosis or fungal diseases. Also, we have added 3 mg of Rifampin to each fixative bottle with the understanding that this may be helpful and that a similar amount can be added to the specimen on arrival in the laboratory before preparation. Finally, a negative pressure hood should be used when possible.
Saccomanno (personal communication, August 1990) believes that blending pulmonary secretions poses no undue risk of exposure to the AIDS virus. His laboratory continues to blend samples under a negative-pressure hood, and his technologists wear gloves during the procedure (see below for a discussion of universal precautions).
Preparation of Rifampin Solution
Empty the contents of a 300-mg capsule of Rifampin (Rifadin, Aventis Pharmaceuticals, or Rimactane, CIBA Pharmaceutical Company, Division of Novartis, Summit, NJ) into 100 ml of 50% ethyl alcohol and blend at high speed in Waring blender. One ml of Rifampin solution should be added to each 50 ml of fixative just before it leaves the laboratory for distribution to patients or hospital wards.
As an added precaution, add another milliliter of Rifampin solution to each specimen of sputum returned to the laboratory and let stand for 24 hours before processing.
Molecular Analysis of Sputum Samples
To determine the method best suited for use with polymerase chain reaction (PCR), Tockman et al (1995) compared the efficacy of mucus liquefaction with a variety of chemicals to the mechanical blending utilized by Saccomanno’s technique. Using samples with known cell counts, the study showed a widespread loss of cells after mechanical mucolysis with a blender whereas there was an increase over baseline in cellularity of chemically homogenized samples. DTT was the most effective of the mucolytic chemicals studied. Homogenization with low-concentration DTT produced mucus-free monolayers, without background staining suitable for immunocytochemistry and single cell suspensions suitable for flow cytometry.
Pleural, Peritoneal Effusions, and Other High-Protein Fluids
Fresh Specimens
Pour specimen into 50-ml centrifuge tubes with screw cap and centrifuge for 10 minutes at recommended (usually 600) rpm (Fig. 44-6).
Pour off the supernatant. If there is only a small cell button, the tube should be inverted on paper toweling or gauze and allowed to stand until it is well drained. This prevents dilution of the sediment with the supernatant that runs down the sides of the tube. However, watch closely to prevent loss of the cell button on the paper toweling. Excess protein and blood coating the cells can interfere with the staining reaction. Washing the sediment once or twice with a balanced salt solution at this point will markedly improve the quality of the stain. If the sample is very bloody, the centrifugation may produce a buffy coat containing leukocytes and mesothelial and tumor cells, which may be observed above the layer of red blood cells. In order not to disturb the buffy coat, a Pasteur pipette can be used to remove all the supernatant. Under these circumstances, direct smears of the buffy coat may be obtained with excellent concentration of cells (see below for other methods for dealing with bloody fluids).
Transfer the sediment or buffy coat to a clean glass slide. Most well-drained sediments adhere well to clean slides; however, albuminized slides may be used. The following two methods are most frequently used for preparation of slides.
Place one to two drops of sediment on a slide by means of a disposable glass pipette or an instrument such as a nasal curet (see Fig. 44-1). Place a second clean slide over the sediment and allow it to spread evenly between the two slides. Gently pull slides apart with an easy sliding motion. Fix immediately by dropping slides into 95% ethyl alcohol or its equivalent (see Table 44-1). Uneven cell distribution (“ribbing effect”) will occur if a smooth continuous motion is not used when immersing the slides in alcohol.
Use a bacteriology wire loop to remove the sediment. Move the loop quickly in a longitudinal, then horizontal direction over the surface of the slide. Immediately fix slide as described above.
Clotted Specimens
Fluids high in protein or bloody fluids that were not collected in an anticoagulant may form clots. Clots may be gently twisted or pressed against the side of the container by means of a wooden stick to wring out the fluid and trapped cells. The fluid should be processed as described above and the remaining clot processed as a cell block.
Figure 44-6 Preparation of smears from body fluids.
Bloody Fluids
Smears may be prepared as described for fresh specimens. However, erythrocytes may obscure the epithelial cells on smears made from excessively bloody fluids. It is also difficult to concentrate the epithelial cell component in such fluids.
Several methods are available for handling bloody samples, such as flotation techniques to separate the erythrocytes from other cellular elements (see below): hemolyzing the erythrocytes before slide preparation, lysing them after slide preparation, and lysing them after the slide has been stained.
Methods of Erythrocyte Lysis Prior to Slide Preparation
Lysing erythrocytes prior to slide preparation results in smears that are easier to interpret because of better recovery of epithelial cells. Older methods of erythrocyte hemolysis include addition of one of the following to 50 ml of sample: 1 ml of glacial acetic acid, or a few drops of a special hemolyzing agent such as Lyse SIII used with the Coulter counter, or 0.1 normal HC1 until a uniformly brown color appears. Unfortunately, the older techniques may cause unacceptable changes in morphology of cells.
Newer methods, using proprietary commercial agents, developed for use with automated cytology systems, are now available. These agents not only lyse the red blood cells but also fix the other cellular elements. Two such fixatives are CytoRich Red (Tripath Imaging, Inc., Burlington, NC) and CytoLyte Solution (Cytyc Corporation, Marlborough, MA). Workers have recommended adding as little as 1 ml of fixative per 25-50 ml of sample. Some recommend equal volumes of fixative and sample. After letting the mixture sit for a few minutes, the sample is centrifuged, the supernatant poured off, and slides prepared by the usual method used in the laboratory. Alternatively, the solution can be added to the bloody sediment after centrifugation and the sample re-centrifuged after lysis of the erythrocytes.
Method of Erythrocyte Hemolysis after Slide Preparation
Weidman et al (1999) recommend the use of CytoRich Red Fixative (TriPath Imaging, Inc, Burlington, NC) for lysing erythrocytes on a bloody smear. The method involves immediately dropping the bloody smear into CytoRich Red just as if one were fixing it in ethanol. After 30 seconds, the slide is transferred to 95% ethanol and processed as usual. When compared to simultaneously prepared bloody smears not treated with CytoRich Red, there was no appreciable cell loss and the staining characteristics of cells were not altered.
Pieslor et al (1979) recommend the following method, which is suitable for both stained and unstained slides. The hemolyzing agent is a 2M urea solution that can be prepared by dissolving 120 g of powdered urea (JT Baker Chemical Co, Phillipsburg, NJ) in 1 liter of distilled water. After a minimum 5 minutes of fixation in 95% ethanol, bloody smears are placed in a Coplin jar containing the urea solution for 20 to 30 seconds, then transferred back to the ethanol fixative and stained routinely. To lyse cells from stained slides, remove coverslip and take slides back through xylene and alcohol to water. Place slide in urea for 5 to 10 minutes, transfer to 95% alcohol, and then restain slide with routine stain.
Carnoy’s fixative can also be used to lyse erythrocytes before and after a slide has been stained (see above).
Prefixed Fluids
Prepare slides as described under fresh specimens; however, the use of albuminized or adhesive-coated slides is essential.
Bronchial, Gastric, and Other Washings Collected in Normal Saline Solution
Pour washings into 50-ml plastic screw-cap centrifuge tubes and centrifuge for 10 minutes at predetermined (usually 600) rpm.
Pour off supernatant. If the sediment is very mucoid, smears may be prepared as described for sputums and bronchial aspirates (see Fig. 44-4). Sediment that contains only a small amount of mucus can be prepared by the two-slide pull method described for high-protein fluids (see Fig. 44-6). If the sediment has no visible mucus, it should be prepared as described for urine sediment (see below). The Saccomanno technique may be used by centrifuging the washing for 10 minutes at the proper rpm, discarding the supernatant, adding 50 ml of Saccomanno’s fixative to the sediment, and letting it stand for 2 hours. The slides are then hand-prepared as described in steps 2 through 7 of the Saccomanno technique for sputums (see above). If the bronchial washing is collected in Saccomanno’s fixative, steps 1 through 7 of the same procedure may be used.
Urine, Cerebrospinal Fluid, and Other Protein-Poor Fluids
A variety of methods has been developed to deal with the unique characteristics of fluids with low cellularity and low protein content. Cytocentrifuge preparations, membrane filters, Leif buckets, and direct smears from the sediment yield adequate preparations, if specimens are handled with care. In our laboratory, a combination of cytocentrifuge and direct smears of the sediment is used. Prevention of cell loss and satisfactory preservation of morphologic detail are the two goals of the procedure. Cell loss may be substantial if slides are wet fixed in alcohol. Beyer-Boon and Voorn-den Hollander (1978) estimated the loss to be from 74% to 98%. With the semi-automated technique developed in this laboratory (Bales, 1981), the cytocentrifuge preparations using Shandon Cytospin I (Thermo Electron Corporation) resulted in cell-rich monolayer preparations of excellent morphologic quality. The Bales method is applicable to urine, cerebrospinal fluid, and other specimens with a low cell and protein content. Likewise, the smears made directly from the sediment are generally rich in cells and exhibit outstanding cellular detail.
Figure 44-7 Bales’ method of preparation of voided urine sediment for cytologic examination (see Figs. 44-8 and 44-9).
Bales Method (Acta Cytol 25: 895-899, 1981)
Materials required:
Carbowax 1540
Ethanol (95% solution)
Oxford Series P-700 Micropipetting with one pipette each of capacities 3 μl, 50 μl, and 200 μl and plastic disposable tips suitable for the system chosen
Repipet dispenser of 1-ml capacity
Repipet dispenser of 5-ml capacity
Maxi Mix Plus Mixer (Fisher Scientific, catalog 12-815-18, www.Fishersci.com)
Plastic test tubes of 50-ml capacity
Clean glass slides
Preparation of Carbowax Stock Solution
Carbowax 1540 is solid at room temperature, with a melting point of 43° to 46°C. To avoid the necessity of melting it whenever the fixative is needed, a stock solution of Carbowax can be prepared as follows. Pour 500 ml of water into a 1,000 ml graduated cylinder. Melt the Carbowax in an incubator or hot-air oven at 50° to 100°C. Add 500 ml of the melted Carbowax to the graduated cylinder. This mixture will not solidify and can be stored in a liter screw cap bottle.
Preparation of 2% Carbowax Solution in 70% Ethanol
A liter of 2% Carbowax fixative in 70% ethanol is prepared by mixing 223 ml of water, 737 ml of 95% ethyl alcohol, and 40 ml of the water-based stock solution of Carbowax.
Preliminary Preparation of Sample
The preliminary preparation of a sample is carried out in the following steps (Fig. 44-7), using fresh urine or urine prefixed in an equal volume of 50% ethanol:
Centrifuge 50 ml of the sample for 10 minutes at 600 g.
Pour off the supernatant and invert the centrifuge tube on paper toweling to drain the sediment well.
Using a Vortex mixer, briefly agitate the well-drained sediment.
Proceed to cytocentrifuge or smear preparations as desired.
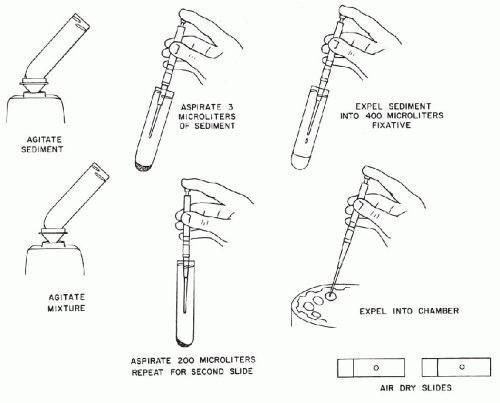
Preparation of Cytocentrifuge Slides*
To prepare slides by cytocentrifugation, use the following steps (Fig. 44-8):
Aspirate precisely 3 μl of the sediment obtained in the preliminary preparation of the sample.
Expel the sediment into a test tube containing 400 μl of 2% solution of Carbowax into alcohol (Test tubes can be filled in advance using a repipette set to dispense 400 μl of fixative. These tubes must be stored in the refrigerator until needed).
Briefly agitate the mixture on a Vortex mixer to prevent formation of cell aggregates.
Aspirate 200 μl with an automatic pipette and place in a cytocentrifuge chamber.
Repeat step 4 and place the remaining 200 μl in the opposed cytocentrifuge chamber.
Spin for 5 minutes, remove slides, and allow them to air-dry for 10 to 30 minutes in a dust-free environment.
Rinse slides in 95% alcohol for 10 minutes prior to staining.
Figure 44-8 Bales’ method of preparation of voided urine sediment for cytologic examination by cytocentrifugation (see Figs. 44-7 and 44-9).
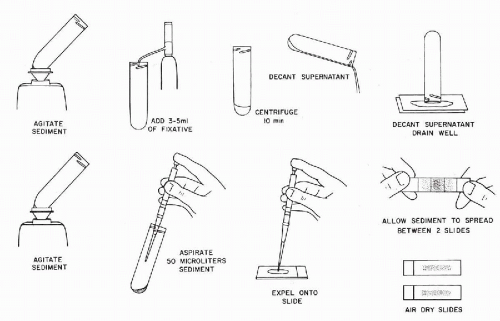
Preparation of Smears
Smears may be prepared from the sediment as follows (Fig. 44-9):
Add 3 to 5 ml of the 2% Carbowax solution to the sediment obtained in the preliminary preparation of the sample and agitate on a Vortex mixer.
Let stand in a vertical position for 10 minutes and, thereafter, centrifuge at 600 g for 10 minutes.
Pour off the supernatant and drain the sediment as described in step 3 of the preliminary preparation of sample. Agitate the sediment on the Vortex mixer.
Aspirate 50 μl of the sediment by means of an automatic pipette and place on a clean glass slide. Lay second clean slide on top of the sediment and let the sediment spread spontaneously between the two slides. Pull the slides apart with a gentle gliding motion. Place the two slides with the gray sediment face up and let them air-dry for 10 to 30 minutes in a dust-free location. Rinse the dry slides for 10 minutes in 95% ethanol prior to staining.
Results
Cell-rich, yet flat, monolayer cytocentrifuge preparations of urine and cerebrospinal fluid were routinely obtained by the use of this method. The epithelial cells, whether benign or malignant, were exceptionally well preserved. There was virtually no overlapping of cells. Minimal drying artifacts were occasionally observed in polymorphonuclear leukocytes. The method provided sufficient detail for it to be used routinely in image analysis of sediments of voided urine with excellent results (Koss et al, 1984, 1985, 1987; Sherman et al, 1986). Examples of the results are shown in Chapters 22 and 23. Equally good results were obtained in cerebrospinal fluid (see Chap. 27).
The method is highly recommended and can be executed by technical personnel with minimal training and experience.
CYTOCENTRIFUGATION
A cytocentrifuge is a device that spins cells in a fluid suspension directly onto a glass slide. Since the introduction of the Cytospin I by Thermo Electron Corporation, other instruments have been developed with slightly different features. Following the guidelines and procedures recommended by the manufacturer of the instrument usually results in excellent cytologic material.
Cytocentrifuges
Shandon Cytospin II and III
Newer Cytospin models (Thermo Electron Corporation, www.thermo.com) have features that increase cell recovery. The Cytospin II and III form an air bubble between the sample and the slide which increased cell recovery rates when compared to the Cytospin I. Also available is a Megafunnel for use with the Cytospin II or III, which allows the processing of up to 12 times the sample volume (6 ml) and deposits the cells over an area 10 times larger than the cell deposition area of Cytofunnel. The Megafunnel is designed for highly cellular samples such as effusions, bronchial washings and sputums.
Figure 44-9 Bales’ method of preparation of smear of voided urine sediment for cytologic examination (see Figs. 44-7 and 44-8).
Wescor Cytopro
Wescor Cytopro (Wescor, Inc, Logan, UT) is an economical, easy to use, 8-chamber, stand-alone cytocentrifuge. Wescor also has an automated cytology slide stainer that can deliver 160 stained slides per hour. Since each slide is stained individually, there is no possibility of cross contamination and no filtering of reagents is necessary. This stainer can be converted to a cytocentrifuge by adding the Cytopro rotor.
Hettich Cytocentrifuge
The Hettich Cytocentrifuge (Andreas Hettich Co, Tuttlingen, Germany) has 8 ml chambers that resemble a flat bottom test tube. It deposits cells on the slide in a circle 17.5 mm in diameter. Because of its comparatively low cost, ease of operation and reusable chambers, some workers recommend this instrument for liquid-based gynecologic cytology as well as for nongynecologic material.
Leif’s Centrifugal Cytology Buckets
An excellent method that, unfortunately, never received wide acceptance, was a bucket method wherein cells suspended in small amounts of fluid, for example, in cerebrospinal fluid, could be spun directly onto glass slides. The method was developed by Leif (1975) and was marketed by Coulter Electronics (Coulter Electronics, Inc., Hialeah, FL [now Beckman Coulter, Fullerton, CA]). The 8-chamber bucket, which can be adapted with almost any laboratory centrifuge, allows simultaneous processing of three samples. The manufacturer provides detailed guidance on the use of the bucket. This author has no personal experience with the method; however, review of slides prepared in this manner exhibited excellent cytologic detail with uniform cell distribution. The cells are wet-fixed during centrifugation, thereby avoiding air-drying artifacts.
Optimal Use of a Cytocentrifuge
Major objections to the use of the cytocentrifuge include distortion of cellular morphology due to air-drying artifact and loss of cells by absorption of fluid into the filter card. Both of these difficulties have been overcome with the newer techniques described. The rare drying artifact of polymorphonuclear leukocytes rarely affects epithelial cells; hence, the diagnostic value of the preparation is not reduced. During the developmental stages of the Bales Method, the quantification of sediment necessary to achieve a monolayer cytocentrifuge preparation was studied by flow cytometry. The particle counts obtained in this manner proved to be of no assistance in achieving the goal. After considerable trial and error, it was determined that the volume of sediment, rather than the particle count, was crucial to achieving cytocentrifuge preparations with minimal overlap of cells and satisfactory morphologic characteristics. The precise amount of sediment (3 μl) obtained by means of an automated calibrated pipette has consistently resulted in monolayer cytocentrifuge preparations. Our procedure was developed using the Cytospin I. In 1981, Shandon introduced the Cytospin II with slightly different features, one of which is the automatic formation of an air bubble between the cell suspension and the slide. Recovery rates from the Cytospin II were consistently twice as high as those with the Cytospin I (Boon et al, 1983). When, however, the air bubble was deliberately introduced into the chambers of Cytospin I, the recovery rates were similar.
Because of the increased cell recovery with newer model centrifuges, the volume of sediment must be reduced in order to achieve a monolayer. We recommend experimenting with different volumes of sediment to determine the optimal volume needed to produce a monolayer for the cytocentrifuge used in your laboratory.
Not only is the volume of sediment critical to producing a monolayer of cells, but the amount of diluent is important. Grover, Blee, and Stokes (1995) compared cell recovery using the Wescor Cytopro (Wescor, Inc, Logan, UT) and Shandon Cytocentrifuge II (www.thermo.com). Fixed cell numbers were suspended in varying amounts of diluent so that, regardless of the amount of fluid placed in the chamber, the number of cells per chamber remained the same.
As the volume of fluid increased, the fractional recovery of cells increased from 10% to 100%. The distribution of cells on the slide also improved with the higher volume of fluid. Deposition of the cells at the periphery (bull’s-eye effect) was eliminated as fluid volume increased.
The sample volume required per chamber was between 200 to 500 μl in both high and low cellularity samples. Whether re-suspending cells in a diluent or using unspun samples, it is important to bring the volume up to at least 200 μl per chamber. In the case of low cellularity samples, such as cerebral spinal fluid, it is especially important, since one can ill afford the loss of cells.
Precaution: If reusable chambers are used after processing Carbowax-treated samples, the sample chamber should be washed thoroughly, not just soaked in a disinfectant. Chambers that are merely rinsed and allowed to dry, even after weeks of disuse, can contaminate other specimens with residual well-preserved cells from previous runs. Washing the chambers with a small brush or soaking them in bleach usually prevents this from occurring. Alternatively, the chambers can be sterilized with boiling water or autoclaved at a maximum temperature of 120°C, or they can be cleaned with a chemical sterilizing agent.
FILTERS
The use of membrane filters for the concentration of cancer cells suspended in fluid was introduced by the late Dr. Sam H. Seal of Memorial Sloan-Kettering Cancer Center. Gelman, Millipore, and Nuclepore, are the trade names of the most commonly used filters. Each filter has different physical, chemical, and optical properties and must be handled differently to obtain optimal results.
Gelman and Millipore filters are made of cellulose, are approximately 140 μm thick, and are opaque white in appearance, until cleared in xylene and mounted in a mounting medium with a similar refractive index. The Nuclepore is a colorless, transparent membrane 10 μm thick, made of polycarbonate. Rectangular sheets (19 × 42 mm Millipore and Nuclepore, 17 × 42 mm Gelman), 25-mm disks, and 47-mm disks that can be cut in half to make two slides, are available. The pore diameter most frequently used for cytologic preparation is 5 μm.
The materials needed, specimen requirements, and method of filtration are essentially the same for all three types of filters. The major differences are related to staining and the mounting of the filters.
Materials needed:
Membrane filters
Filter holder to fit membrane to be used
Vacuum flask, tubing, and a three-way stopcock
Vacuum source with regulator and gauge
Forceps (nonserrated)
Balanced salt (electrolyte) solution, such as Hanks’ balanced salt solution, or Abbot’s Normosol. Normal saline solution is frequently used but is reported to cause nuclear and cytoplasmic distortion.
Petri dishes
95% Ethyl alcohol
Ball-point pen with indelible ink
Specimen Requirements
For best results, the specimens should be collected fresh. Prefixation coagulates proteins that may clog the filters and harden the cells into spherical shapes, preventing flattening of the cells on the membrane’s surface.
With the exception of urine specimens, small-volume and clear fluids may be filtered directly without prior centrifugation. Urine contains salts that are in solution at body temperature but that may precipitate when the urine cools to room temperature. Even though the urine appears grossly clear, these salts may clog the filters. Body cavity fluid specimens also contain debris and protein that may clog the filters. Therefore, urine samples, body cavity fluids, and other voluminous fluid samples should be centrifuged for 10 minutes at the recommended rpm; the supernatant is poured off; and the sediment resuspended in a balanced salt solution. Centrifuge this sample again and carefully pour off the supernatant. Once washed, cells do not adhere well to the centrifuge tube. Mix sediment with the small amount of balanced salt solution that runs down the side of the tube. The sample is now ready for filtration.
Mucoid specimens must be liquefied by use of a mucolytic agent, such as described above, or by blending as described in the Saccomanno technique. The specimen should then be centrifuged and washed as described above.
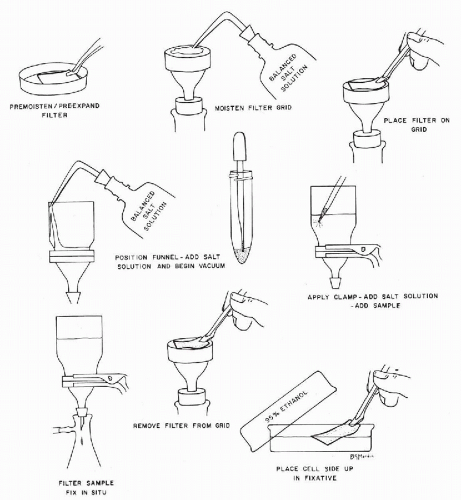
Filtration Procedures
Label Millipore and Gelman filters with indelible ink to identify patient and the cellular side of the filter (Fig. 44-10). Nuclepore filters may be marked with a hard lead pencil. If a 47-mm filter is used, the left and right sides should be labeled since the filter will be cut in half.
Pre-expand Millipore and Gelman filters in a Petri dish filled with 95% ethyl alcohol for 10 to 15 seconds. This prevents wrinkling of the filter when refixed in alcohol. Moisten Nuclepore filters in a Petri dish filled with a balanced salt solution.
Moisten the grid of the filter setup with balanced salt solution. Using nonserrated forceps, lay the pre-expanded or premoistened filter on the grid, label side up.
Place the funnel on top of the filter. Do not clamp funnel to base. Add 15 to 20 ml of balanced salt solution to funnel and start the vacuum. The filter will be flattened by allowing a portion of the salt solution to pass through the filter. Stop the vacuum at this point and clamp the funnel to the grid.
Add 50 to 100 ml of balanced salt solution to the funnel. By means of a disposable pipette, add one to two drops of the sediment to the solution in the funnel.
Start vacuum (up to 100 mm of Hg for Millipore and Gelman filters and up to 20 mm of Hg for Nuclepore filters). As the specimen filters, add balanced salt solution from a squeeze bottle to rinse filter well. The stream of the squeeze bottle should be directed against the sides of the funnel to minimize aerosol sprays and to prevent disturbance of the cells on the surface of the filter. Stop the vacuum as soon as the flow of liquid begins to slow down. The filter should appear to be clean. Red blood cells will give the filter a reddish hue. To lyse these red blood cells, add a few milliliters of 50% ethanol. If the filter is not overloaded, it will change from red to white. If the filter appears clean, add more salt solution and restart vacuum until a small amount of solution remains. The surface of the filter should always be covered with fluid, and not merely moist or wet-looking. Never permit the filter to dry.
Add 20 to 30 ml of 95% ethanol to fix the cells in situ. After 1 minute, carefully restart the vacuum to pull the fixative through the filter. Stop the vacuum when a small amount of alcohol still remains to cover the filter.
Unclamp the funnel, remove the wet filter with a nonserrated forceps, and place the filter, cell side up, in a Petri dish with 95% ethanol. The filter is ready for staining after remaining in fixative for one-half hour (see below for special staining and mounting requirements).
Place funnel, forceps, and grid in disinfectant solution.
Figure 44-10 Method of filter preparation (for details see text).
Filters are excellent means of recovering cells from sparsely cellular specimens; however, we do not recommend their use for effusions. To ensure good cytomorphology, the limitations and advantages of the different filters must be understood. Careful attention to the chemical, physical, and optical properties of the filters will maximize their efficiency and minimize their limitations (Table 44-4).
The methods of staining, mounting, and dissolving filters are described below.
Methods of Transferring Cells From Filters to Glass Slides
Monolayer imprint smears can be prepared from filter preparations and stained as usual. Volet described a technique of transferring prefixed cells from filters to glass slides in 1965. The use of cold slides was essential to ensure good adhesion of the cells to the slide. A similar technique using frozen slides without any coating adhesive was described by Boccato in 1981. Sarkar and Kyriakos (1995) obtained excellent results by spraying the undersurface of slides kept at room temperature with a commercial cryofixative (Frostbite, Surgipath Medical Industries Inc, Richmond, IL), placing the filter cell side down and applying firm but gentle pressure to filter paper placed on top of the slide. The slide was immediately fixed in 95% ethyl alcohol. Cell loss was minimal and cells were deposited in a concentrated area within a clean background. Cell preservation and cytologic detail were excellent.
TABLE 44-4 EFFECTS OF VARIOUS COMMON CHEMICALS ON FILTERS
Little or No Effect
Some Effect
May Dissolve or Deform
Millipore Filter
Chloroform
Formalin
Acetone
100% Isopropanol
95% Ethanol: Swells
Methanol
Xylene
100% Ethanol
100% 2-Propanol
Gelman Filter
Formalin
100% 2-Propanol
100% Isopropanol
95% Ethanol: Swells
Chloroform
Xylene
Acetone
100% Methanol
100% Ethanol
Nuclepore Filter
Formalin
100% 2-Propanol
100% Isopropanol
Xylene: Curls if left longer than 10 to 15 min.
Chloroform
100% Methanol
100% Ethanol
95% Ethanol
Cyto-Tek MonoPrep Manual Filtration System
The Cyto-Tek MonoPrep (www.emsdiasum.com) is a simple liquid-based slide preparation method that does not require a major capital expense. The system consists of vials containing a preservative with mucolytic action, a syringe, a housing assembly with proprietary filter, and a fixative used for slide preparation. Specimens may be collected in the preservative or the preservative may be added to fresh samples in the laboratory. Fine needle aspirations performed by clinicians can be expelled into the preservative for transport to the laboratory. Briefly, the procedure consists of attaching the syringe housing the filter to the collection vial, pulling back the plunger until it locks, waiting for the fluid to stop flowing into the chamber (which occurs when the filter is covered with cells), placing the filter cell side down on a glass slide, applying fixative, blotting the filter, peeling the filter from the slide and fixing the slide in 95% alcohol. A monolayer of cells is deposited within an 18 mm diameter circle. Background material such as blood, inflammatory debris and mucus are eliminated. According to the manufacturer, the Cyto-Tek MonoPrep system is equivalent to automated systems and consistently produces slides with cells that exhibit optimal morphology with crisp nuclear detail, and preserves the architectural features of small cell aggregates.
LIQUID-BASED AUTOMATED PREPARATIONS OF NONGYNECOLOGIC SAMPLES
The use of automatic monolayer devices for the preparation of nongynecologic material is becoming popular. These instruments were originally developed to prepare slides from gynecologic material for automated screening systems. AutoCyte Prep, now called SurePath (TriPath, Inc), and the ThinPrep Processor (Cytyc Corp) have both been approved for preparation of nongynecologic material. See above for a description of these devices. Many workers endorse their use, rating the slides superior to slides made by less expensive conventional techniques. Other investigators refute the findings of improved quality and adequacy, contending that diagnostic accuracy may be adversely affected by cell shrinkage, dispersion or clustering caused by the automated preparation devices.
It is interesting to note, that while the debate continues over the efficacy of these instruments over conventional preparatory methods, another debate is in progress over the efficacy of purposely allowing slides to air dry and rehydrating them in saline as opposed to conventional wet fixation methods. The artifact produced by the air drying method is opposite to that of the liquid based systems which causes cells to shrink, in that cells are enlarged and exhibit better morphologic features. Proponents of both methods use such adjectives as “exquisite cytologic detail,” “superior cytomorphology,” “improved cytologic detail,” and “preferred by cytotechnologists.” These, and all methods of preparation, produce unique artifacts. Which method is used is usually a matter of personal preference and experience. We suggest that specimens be prepared by the same method within each laboratory so that a firm set of criteria can be established. We do not recommend one method over another; however, we do believe that when a procedure adds substantial costs, such as that associated with automated devices, continued unbiased investigation must be undertaken to justify their use over older and proven, much less expensive cytopreparatory procedures. For comments on processing of FNAs, see Chapter 28. It has been proposed that residual material collected by the ThinPrep method can be processed as cell blocks (Keyhani-Rofagha and Vesey-Shecket, 2002; Akpolat et al, 2004).
PREPARATION OF CELL BLOCKS
Cell block technique or paraffin embedding of sediments of fluids is among the oldest methods of preparing material for microscopic examination. The method uses histologic techniques for processing and thus offers one major advantage: multiple sections of the same material may be processed for routine stains, such as hematoxylin and eosin, and for special stains that may serve for immunocytochemistry and for identification of mucin, melanin, or other cell products, and identification of bacteria and fungi.
With the development of excellent cell preparation techniques, described in the foregoing pages, the cell block technique has been abandoned by many laboratories. This neglect is not justified in our opinion. The cell block technique should be used for processing all residual material remaining after completion of cytologic preparations. This material often contains valuable diagnostic evidence and tissue fragments that cannot be processed by cytologic techniques. Richardson et al (1955) have shown that additional diagnoses of cancer can be obtained in 5% of fluid specimens if smear technique is supplemented by cell block sections of residual material. The additional benefit of cell block technique is the recognition of histologic patterns of disease that sometimes cannot be reliably identified in smears or filter preparations.
Aspiration biopsy material (FNA), but also sputum, effusions, urine sediment, and material from the gastrointestinal tract, are suitable for cell block processing, as are all tissue fragments incidentally obtained during any other diagnostic cytologic procedure.
In our experience, the best cellular details in cell blocks are obtained with Bouin’s fixative or picric acid fixative. However, a more practical fixative is buffered formalin that allows a wide range of additional procedures.
Methods
Fixed Sediment Method
Mix sediment or tissue fragments in one of the fixatives recommended for cell blocks. If the sediment is bloody, the blood may be hemolyzed prior to the addition of fixative by one of the methods described above. Fibrin clots can be wrung out as described previously and placed in fixative. Steps 2 and 3 are not necessary for fibrin clots.
Centrifuge this mixture for 10 minutes at the appropriate rpm (see above).
Pour off supernatant and drain tube well by inverting the tube on a paper towel.
Carefully remove the packed sediment or fibrin clot from the test tube by means of a spatula and wrap it in lens paper. Place wrapped sediment in a carefully labeled tissue cassette.
Put tissue cassette into a jar of the same type of fixative used in step 1. Process as tissue.
Bacterial Agar Method (3% Agar)
Steps 1 through 3 are the same as for the fixed sediment method.
4. If sediment becomes hard and packs well, gently remove it from the test tube with a spatula and place it, conical side up, on a paper towel.
5. Slice the sediment in half from the top to the bottom of the conical clot with a scalpel.
6. Place the cut side of the packed sediment in a small pool of melted agar that has been spread on a glass slide or in a Petri dish. Cover all exposed areas of the sediment with melted agar and let stand a few minutes to harden. Care must be exercised to avoid bubbles in the agar.
7. Trim the excess agar from the sediment and place the agar button in a tissue cassette.
8. Same as step 5 of the fixed sediment method.
9. If sediment does not pack well or only a small amount is available after completion of steps 1 through 3, a few drops of melted agar should be added to the test tube and mixed thoroughly with sediment. After the agar hardens, gently remove the agar button from the test tube and cut it in half as described in step 5 before placing it into fixative.
Preparation of Agar
The 3% agar is prepared by dissolving 3 g of bacterial agar in 100 ml of boiling water. The melted agar may be colored with a small amount of food coloring to ensure contrast with the paraffin. The dissolved agar should be poured into individual sterile glass tubes with a screw cap. Cap the tubes loosely until the agar cools and hardens. When the agar has cooled, tighten the caps and place the tubes in a refrigerator until ready for use. When it is needed, melt the agar in a 60°C water bath. Discard unused agar at the end of the day.
Simplified Cell Block Technique
In 1988, Krogerus and Anderson introduced a simple technique for the preparation of cell blocks from material obtained by fine-needle aspiration, brushings, and effusions. The technique is unique in that the procedure is carried out in the sample tube, ensuring minimal cell loss. No transfer of cells to a cassette is necessary, eliminating the need for wrapping paper, agar, or thrombin. The procedure is as follows:
In a 50-ml plastic, conical centrifuge tube, fix cell sample with 50% alcohol for 1 hour.
Spin sample at 300 g for 7 minutes and pour off supernatant.
Re-suspend cell pellet in 3 ml of acetone for 10 minutes.
Spin sample at 300 g for 10 minutes. Pour off acetone.
Place tubes for 1 hour on a warm plate (not more than 60°C).
Add melted paraffin to the dry, warm pellet.
After paraffin has solidified, tap the bottom of the tube to remove block.
Cut and process the conical end of the paraffin block as you would any tissue section.
Plasma-Thrombin Clot Method
Thoroughly mix a few drops of outdated blood plasma obtained from blood bank with the fresh unfixed sediment. Plasma may be colored with a small amount of food coloring to ensure contrast with the paraffin. If the sample was prefixed with alcohol, the sediment must be washed several times with a balanced salt solution, since alcohol inhibits the clotting action of plasma and thrombin.
Add the same number of drops of thrombin solution as of the pooled plasma and mix well. (Thrombin, 5000 units, topical, 1 vial: Add 10 ml of distilled water.)
This mixture will form a clot in 1 to 2 minutes if the reagents are fresh and not too cold. Place resulting clot in a cassette that has been lined with lens paper to prevent the clot from oozing through the holes.
Same as step 5 of the Fixed Sediment Method. This clot is very soft and a spatula, instead of a forceps, is recommended for transfer to the embedding mold.
Compact Cell Block Technique
Yang et al (1998) described a technique that produces a compact cell block about 10% to 20% the size of conventional cell blocks. Cells are packed into a small area free of erythrocytes and extracellular protein, thereby reducing screening time, and often eliminating the need for deeper cuts.
Pour off the supernatant after centrifugation of 40 cc of a well mixed aliquot of the sample.
Mix the sediment with an equal volume of CytoRich Red.
After 2 minutes, add 4 drops of plasma and 3 drops of thrombin (5,000 μl/10 ml).
Gently agitate the mixture. When the clotting stops, slide the clot onto lens paper that has been placed on top of paper towels.
Fold the lens paper over the clot and press and mold the clot flat and compact with a gloved fingertip. Wrap the compact clot tightly in lens paper and place in fixative of your choice.
Processing of Tissue Fragments from Smears
Papalioannou et al (1997) described a method for preparing cell blocks from tissue fragments obtained from fine needle aspirations using cigarette rolling paper. Smears are prepared as usual and wet fixed in 96% ethyl alcohol. The syringe and needle are rinsed with fixative and expelled into the fixative jar. Thick tissue fragments are scraped from the surface of the slide into the fixative. The fixative is filtered through a single sheet of commercially available cigarette rolling paper that has been placed in a funnel with filter paper used for support. The cigarette paper is folded, placed in a cassette, and submerged in a 9:1 mixture of 96% ethyl alcohol and 4% buffered formalin. After one-half hour, it is transferred to 96% ethyl alcohol. It is then processed as any tissue. Sections are suitable for special and immunocytochemical stains.
Verbeek et al (1996) described a method of removal of small tissue fragments from stained cytology smears for histology processing that leaves the cytology slide undamaged. The method can be used on gynecologic and nongynecologic material. Both immunocytochemistry and routine stains can be done on the paraffin processed histologic sections.
Prior to removing the coverslip, the location of the microbiopsy is marked with a diamond pen on the underside of the slide. After the coverslip is removed, a thick layer of mounting medium is poured onto the slide and allowed to dry for 45 minutes. The mounting medium surrounding the targeted microbiopsy is cut with a scalpel and gently removed from the surface of the slide. The microbiopsy is not destained but placed in xylene for 30 minutes and then embedded in paraffin from which 2μ sections are cut and stained as usual. The slide from which the microbiopsy was removed is soaked in xylene to remove the excess mounting medium and then recoverslipped. An alternate method of analysis of thick tissue fragments is by the costly and timeconsuming method of confocal microscopy (see Chap. 2).
Microwave Technique for Rapid Processing of Cell Blocks
Since the early 1970s, microwaves have been used by histopathology laboratories to shorten fixation and processing times of tissue samples. In 1988, Kok et al described a method in which cell blocks from fresh sputum can be prepared in 35 minutes. The method can be adapted for use with other types of specimens.
Best results were obtained with a fixative consisting of 500 ml 96% ethyl alcohol, 430 ml of distilled water, and 70 ml of polyethylene glycol.
Place sputum in 40 ml of fixative in a microwave-safe jar.
Microwave sample at 450 watts with the temperature set at 70°C. This usually takes 5 minutes.
Place the sputum, which has become condensed and rubbery, into a tissue cassette. Put the cassette into 40 ml of absolute ethyl alcohol and microwave at 450 watts and 70°C. This usually takes 3 minutes; however, let the cassette sit in the microwave for another 2 minutes.
Transfer cassette to 40 ml of Histoclear (www.ralamb. net, Cat. #C-78G). Microwave at 450 watts or 80°C for 7 minutes.
Embed the material, cool blocks, cut and mount sections.
Sections can be de-paraffinized by placing them in Histoclear and microwaving them for 5 minutes at 700 watts and then stained by the method of choice.
Cell Blocks From Millipore Filters
Baloch et al (1999) described a technique for specimens of limited cellularity in which a portion of a Papanicolaoustained Millipore Filter (Millipore Corporation) can be converted into a cell block if other stains or immunocytochemical analysis are desired. In their hands, the technique produced H&E preparations with superb morphologic detail and excellent results for all antibodies tested. The background staining often seen in routine cell blocks was not seen in most cases. Since only half of the filter is used, the original cytologic preparation is preserved.
Remove filter after soaking slide in xylene to remove coverslip.
Rinse filter in a 1:1 solution of propanol and xylene for 5 minutes to remove all traces of mounting medium.
Roll the filter into a tube, cut in half and place into a cassette, fix in 10% neutral-buffered formalin. Embed and process as you would any tissue.
Remount the remaining half of the filter and return to cytology file.
Dehydration of Cell Blocks after Fixation.
Regardless of which method is used, the dehydrated paraffin-infiltrated cell block may be processed just as any other tissue. Histology laboratories usually process the cell blocks. However, if this service is not available, the following dehydration and embedding procedures may be used.
Dehydration after fixation by placing the cassettes in the following solutions:
1.
70% Alcohol (ethyl)
1 hour
2.
95% Alcohol (ethyl)
1 hour
3.
95% Alcohol (ethyl)
30 minutes
4.
95% Alcohol (ethyl)
30 minutes
5.
Absolute alcohol
1 hour
6.
Absolute alcohol
1 hour
7.
Absolute alcohol
1 hour
8.
Xylol
1 hour
9.
Xylol
1 hour
10.
Paraffin
2 hours
11.
Paraffin
at least 2 hours
Embed in clean paraffin, trim blocks, cut sections at 4 to 6 μm, and mount on slides according to standard histologic techniques.
STAINING TECHNIQUES
Numerous staining techniques are available today for routine and for cytochemical and immunocytochemical purposes. Only those techniques that have practical value in diagnostic cytology, or that are mentioned in the text, are reported here. Numerous special books, listed in the appended bibliography, are available and may be consulted if additional staining techniques are desirable. See also Chapter 45.
The Papanicolaou Stain
For routine diagnostic cytology, the Papanicolaou stain is recommended (two films are available from the American Society of Cytopathology, www.cytopathology.org/teach): “The Papanicolaou Stain: Principles” and “The Papanicolaou Stain: Materials & Methods”). The use of the Papanicolaou stain results in well-stained nuclear chromatin, differential cytoplasmic counterstaining, and cytoplasmic transparency. A modification of the original Papanicolaou stain (1942) was published by Dr. Papanicolaou in 1954. A set-up for the Papanicolaou stain is shown in Figure 44-11
Only gold members can continue reading. Log In or Register to continue