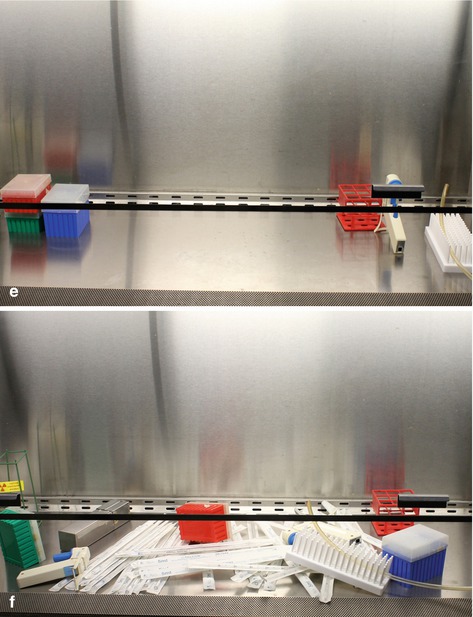
Fig. 6.1
Proper use of the laminar flow hood provides an aseptic area for performing cell culture. (a) Vertical laminar flow of air blowing at the front of the hood. (b) Blocked vents at the front of the hood disrupt the laminar flow. (c) Proper way to reach for something in the hood by moving around open containers. (d) Improper way to maneuver inside the hood involves passing your hands or arms over open containers. (e) Proper organization inside the laminar flow culture hood. (f) Improper storage of materials leads to a cluttered laminar flow hood and poor sterility
Most hoods also contain an ultraviolet (UV) lamp that can be used to kill any bacteria on the interior surfaces. Because UV light degrades plastic, and most bacteria die within minutes of exposure, not to mention that UV bulbs are expensive to replace, it is not necessary to leave the UV lamp on for extended periods of time. Twenty or 30 min at the beginning of the day will usually suffice. Finally, while it is advisable to have all your materials near at hand while working in the hood, the workspace should be uncluttered (Fig. 6.1e). Items such as Styrofoam racks and cardboard boxes, which can harbor bacteria, should not be stored in the hood (Fig. 6.1f).
The second line of defense is ethanol. Once laminar airflow has been established for 10–15 min, the interior of the hood should be sprayed down with 70 % ethanol to kill any bacteria that the previous user may have left behind. Everything that enters the hood should be liberally sprayed with 70 % ethanol including, but not limited to, bottles of medium, tube racks, the bottoms of pipet tip boxes and ice buckets, and your gloved hands. An important exception to this rule involves cleaning up spills. When medium is spilled in the hood, it should first be cleaned with distilled water and wiped up. After the medium is removed, the ethanol can be deployed. If ethanol is sprayed directly on a solution that contains protein, the protein will precipitate out and stick to the hood surface, providing the perfect environment for bacteria to grow. A final wipe down of the hood when your experiments are complete is good practice and will reduce the incidence of contamination.
The third line of defense is a clean lab coat and gloves. Coats used for cell culture work should not be worn in lab spaces where animals are held or animal surgeries are performed. Animal dander and fur carry lots of microorganisms that can grow faster than your cells and take over the entire culture. Lab coats should also be laundered on a regular basis to keep them free of the microflora from your skin and hair. Disposable gloves, generally latex, should also be worn when performing cell culture. Refrain from touching your face, hair, smartphone, MP3 player, coffee cup, etc. with your gloves. If you have to take a call, or skip a bad song, take the gloves off and grab a new pair when you’re ready to get back to work. If you have a latex allergy, there are many other options, such as nitrile and vinyl gloves, which will allow you to keep your cultures contaminant-free without breaking out in hives.
The absolute last line of defense is the mixture of antibiotics and antimycotics in your cell culture medium. Since growth medium is a nutrient-rich mixture that feeds and nourishes cells, it is the perfect place for microorganisms to flourish. If one or two microorganisms manage to sneak past the other barriers described above, these drugs should keep them from taking over your culture; however, this is not an excuse to be sloppy! Poor aseptic technique almost always leads to contamination, regardless of the presence of antibiotics. On the opposite side of this coin, some cell types cannot tolerate antimicrobials and must be grown without them. Extra care must be taken here, or contamination, wasted time, and a lot of frustration are guaranteed to ensue.
Dealing with Contamination
Despite your best efforts, contamination will bring your experiments to a screeching halt, often at the worst possible time. Some indications of contamination include cloudy growth medium (bacteria), floating puff balls (mold/fungi), and an incubator that smells like baking bread (yeast). Another way to check for contamination is under the microscope. The usual bacterial suspects are staphylococci that live on your skin and appear as tiny, wriggling spots under most cell culture microscopes. In 1 or 2 days, these organisms quickly take over the rich culture medium and make it impossible for your cells to grow. Molds tend to grow more slowly, are often found floating on top of the culture medium at the air-liquid interface, and will usually have hyphae that are visible at low magnification. Yeast will also make the medium cloudy and appear as large oval-shaped cells. In media that contain a pH indicator, these contaminants will also usually cause the medium to change color.
Unfortunately, if one culture flask or dish shows signs of contamination, it is likely that the entire experiment has been compromised. The most important thing to remember is not to open any contaminated items in the culture room! Remove the offending items to a non-culture area and then add bleach (10 %, volume/volume) to everything before discarding. If you notice contamination in multiple cell types which all use the same medium, you should check to make sure the medium is safe. The best way to do this is by placing some of the suspect medium in a culture dish in the incubator for a few days. If nothing grows in it, it is probably fine to use. If you want to be completely sure, simply discard the medium and make it again.
To combat microbial contamination, make sure to keep the interior surfaces of your incubator clean. Wipe up any spilled medium immediately, and then clean with water and ethanol as described above (see section “Sterile Technique”). While it is tempting, do not use bleach on stainless steel surfaces, as this can cause corrosion and pitting, giving microbes a foothold in the smooth surface of the stainless steel. You should also check the CO2 levels weekly to make sure your cells have optimal growth conditions. Monthly calibration of the CO2 levels using a Fyrite® gas analyzer (Bacharach, Inc., New Kensington, Pennsylvania) is highly recommended, since the actual concentration can vary widely from the digital readouts on modern incubators. Since humidity can affect the concentration of CO2 in the incubator, make sure the water pan is kept full. Be sure to keep any water baths in the culture room clean, and change the water frequently, as this can be a breeding ground for microbes. Most water baths and incubators also specify reverse osmosis purified water, to prevent deposition of minerals found in tap water. Take care to bleach the liquid in your waste container and remove it after each day’s experiments, to prevent microbial growth in the waste flask from spreading into the room. Make sure to also keep track of culture medium components, as something may have been contaminated or may have expired.
Finally, a group of small bacteria known as mycoplasmas (taxonomic class Mollicutes) can sometimes contaminate your cultures and lead to strange behavior from your cells, such as slow growth or strange morphology (see section “Know Your Cells”). Because mycoplasmas lack a cell wall and are dependent on the environment or host organism to supply many essential biomolecules, they are slow growing, small enough to pass through commonly used 0.2-μm sterilization filters, not susceptible to widely used antibiotics, and difficult to detect using the techniques described above [1]. These free-living bacteria are ubiquitous in nature and can colonize many species, including humans [1]. Although commercially acquired cell culture reagents are generally certified to be sterile, serum is routinely tested for mycoplasma contamination, the incidence of contamination in primary cultures is low, and murine cell lines are less susceptible to contamination [2], caution is still recommended. Testing may be offered at your research institution, and kits are also commercially available, such as the Universal Mycoplasma Detection Kit from the American Type Culture Collection (ATCC).
Know Your Cells
A more troublesome form of contamination can arise when other cell lines take over your culture. This can happen when you are harvesting tissue and starting a primary cell line yourself, or it may happen when aggressive commercial cell lines contaminate other cultures. For example, when harvesting smooth muscle cells from an abdominal aorta, it is possible to have fibroblasts take over the culture and outcompete the smooth muscle cells. Make sure you characterize your primary cells by staining for specific markers they are known to express, smooth muscle cell alpha actin, for instance. Try to replicate experiments that others have performed with your cells and verify that your cells respond the same way to a particular treatment. If you are working with multiple cell lines, follow two simple pieces of advice: only bring one cell type at a time into the culture hood, and always work with primary cell lines first, then with commercial cell lines, which are often immortalized. For instance, cervical cancer cells isolated from Henrietta Lacks in 1951, known as HeLa cells, proliferate aggressively and there is documented evidence of them taking over other cell lines. You should also check on your cultures daily to chart their progress and get a feel for how fast they grow to confluence when plated at a particular density.
To estimate confluence, mentally move the cells in the microscope field of view to one side, and then determine how much of the surface is covered by cells. As you grow accustomed to this method, your estimations will improve, allowing you to determine the exact plating density to achieve a specific level of confluence on a desired day. This is important, since adherent cells often require interaction with other cells in order to proliferate effectively. On the other hand, when cells are plated at too high a density, they can grow too rapidly and become over-confluent. With certain cell types, such as vascular smooth muscle cells, this can lead to a change in phenotype and can affect the outcome of your experiments. When performing assays that measure proliferation, it is important that cells not be too confluent, or they will have no room to grow during the experiment. For experiments where DNA or RNA is transfected into mammalian cells, be sure to follow the transfection reagent manufacturer’s suggestion for plating density, as these experiments often require higher cell confluence to achieve the desired results.
Last but not least, make sure that you treat your cells well! Keep them warm, removing them from the incubator just before your experiment and putting them back in as soon as possible after you are done. If possible, bring your media up to room temperature so cells are not shocked by the cold. It is especially important that cells not be allowed to dry out when performing treatments, as this can lead to cell death and skew your results. It is good practice to remove the medium from a few wells or plates at a time, and then treat, repeating this process until all wells/plates are treated. You must also be certain that cells are plated on tissue culture-treated dishes, as most adherent cells will not stick to dishes that are not treated. In special cases, protein coatings are sometimes required to get cells to adhere to dishes. Various coatings are available to simulate the extracellular matrix and allow the cells to adhere and proliferate.
Counting Using the Hemocytometer
In order to accurately determine the correct number of cells to plate for an experiment, you should count cells using a phase-contrast microscope, a manual cell counter, and a hemocytometer (Fig. 6.2a, b). If cells are adherent, they must first be removed from the tissue culture surface by trypsin dissociation and then uniformly resuspended. Cells that are clustered or clumped cannot be accurately counted and will skew your plating density. A typical protocol for adherent cells is given below. For suspension cultures, pelleted cells are resuspended in an appropriate volume per flask and then counted as below.
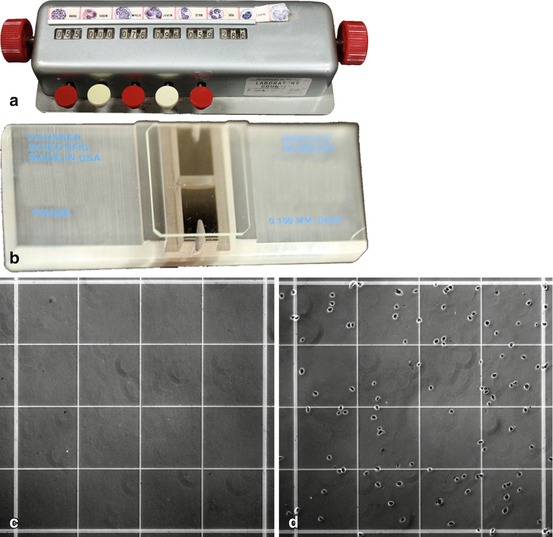
Fig. 6.2
Materials required for counting cells using a hemocytometer. (a) Manual cell counter. (b) Hemocytometer slide. (c) Magnified view (100×) of one quadrant of the hemocytometer chamber. (d) Magnified view (100×) of one quadrant of the hemocytometer chamber loaded with cells at an appropriate concentration for counting
First, remove the medium from 80 – 90 % confluent T-175 flasks by aspiration using a sterile Pasteur pipet. Remember to move quickly so that cells do not dry out. Next, rinse the flasks with 3 mL Hanks’ balanced salt solution (HBSS), or Phosphate Buffer Saline (PBS) without calcium and magnesium, and remove by aspiration. Make sure not to dispense the HBSS or PBS directly on to the cells, as this could dislodge them from the surface. To detach the cells, add 3 mL of HBSS or PBS and then 3 mL of trypsin-ethylenediaminetetraacetic acid (trypsin-EDTA). Here, too it is important not to add the trypsin directly to the cells but on the bottom of the flask. Over the next 5 min, use the microscope to check the flasks regularly for detached cells, which will appear as spheres floating through the solution. Gently tapping the sides of the flask will help to speed things along, as leaving the trypsin on for longer than 5 min can damage cells. Next, add 6 mL complete medium per flask to neutralize the trypsin solution.
Transfer the cell suspension into an appropriately sized conical tube and centrifuge at no more than 300 × g for 5 min (~100 × g is sufficient for most cells). Carefully remove the supernatant medium by aspiration, taking care not to disturb the cell pellet. Next, resuspend cells in 10 mL complete medium, bringing up the volume to a total of 10 mL medium per collected flask. For example, if you trypsinized five T-175 flasks, resuspend the cells in 50 mL of medium. Make sure that the cell pellet is completely resuspended by gently pipetting the suspension up and down several times and checking for clumps. The smaller the bore of the pipet used, the faster the pellet will disperse. Take care here not to introduce bubbles into the solution, aspirate the cells up into the pipettor, or overflow the tube you are using to resuspend the cells.
Once the cells are thoroughly suspended, place 10 μL of the suspension into the counting chamber on each side of a clean hemocytometer (Fig. 6.2c). The coverslip should be on the hemocytometer when you pipet the cells on to make sure that the suspension spreads evenly over the gridded surface. To prevent contamination of your cell suspension, make sure to change pipet tips before pipetting cells to the other chamber of the hemocytometer. If you get air bubbles trapped under the coverslip, clean the hemocytometer with water and ethanol and start again. If you move the coverslip, you may also move the cells around so that the dispersion isn’t even, and you should start over again. Use the 10× objective on the microscope to locate the grid on the hemocytometer. Cells should be visible as spheres in all sections of the grid (Fig. 6.2d). For ease of visibility, focus on the grids that are divided into 16 squares and are at the 4 corners of the 9-square grid. Use the manual cell counter to count two of these 16-grid squares in each chamber of the hemocytometer. It is recommended that each square be counted in a separate channel so that you do not lose count if someone distracts you. If you resuspend and pipet carefully, the numbers for all four squares should be similar, but one or two outliers can be discarded. Take the average of the squares counted and multiply by 104 to obtain the cell concentration (density per mL) of your solution. For plating details, see the next section.
Stay updated, free articles. Join our Telegram channel

Full access? Get Clinical Tree


