Standard dilutions
Standard estradiol, ng/mL
Volume of standard added, μL
Volume of solution, mL
Concentration, ng/mL
Dilution 1
10,00,000
40
10
4000
Dilution 2
4000
50
10
20
Calibration standard
20
25
25
0.02
3.
Calibration standard of d3-estradiol (50 pg/mL, 183.5 pmol/L): It is prepared in water and methanol (1:1) according to Table 2.
Table 2
Dilutions for preparation of d3-estradiol working internal standard
Standard dilutions | Standard d3-estradiol, ng/mL | Volume of standard added, μL | Volume of solution, mL | Concentration, ng/mL |
|---|---|---|---|---|
Dilution 1 | 10,00,000 | 50 | 10 | 5000 |
Dilution 2 | 5000 | 300 | 10 | 150 |
Working internal standard | 150 | 8.3 | 25 | 0.05 |
4.
Calibrators are prepared in 0.05 % BSA in PBS and freshly spiked with calibration standard of estradiol at concentrations of 0.5, 1.0, 2.5, 5.0, and 10 pg/mL (1.8, 3.7, 9.2, 18.4, 36.7 pmol/L) according to Table 3.
Table 3
Preparation of calibration curve
Concentration (pg/mL) | Working calibration standard (μL) | BSA (μL) |
|---|---|---|
0.0 | 0 | 200 |
0.5 | 5 | 200 |
1.0 | 10 | 200 |
2.5 | 25 | 200 |
5.0 | 50 | 200 |
10.0 | 100 | 200 |
5.
Quality control samples:
(a)
Negative control: 0.05 % BSA in PBS. Stable for 2 years at −70 °C.
(b)
Quality control level 1: Prepare from a human serum pool containing low total estradiol by spiking 100 times in excess (to account for estradiol binding to proteins such as SHBG ) to give a concentration of 1.5 pg/mL. Stable for 6 months at −70 °C.
(c)
Quality control level 2: Prepare from a human serum pool containing low total estradiol by spiking 100 times in excess (to account for estradiol binding to proteins such as SHBG ) to give a concentration of 6.0 pg/mL. Stable for 6 months at −70 °C.
(d)
Quality control level 3: Prepare from a human serum pool containing low total estradiol by spiking 100 times in excess (to account for estradiol binding to proteins such as SHBG ) to give a concentration of 23.0 pg/mL. Stable for 6 months at −70 °C.
2.4 Equipment
1.
A triple quadrupole mass spectrometer API5500 with TurboV ion source (AB SCIEX, Foster City, CA).
2.
Software: Analyst 1.6.2.
3.
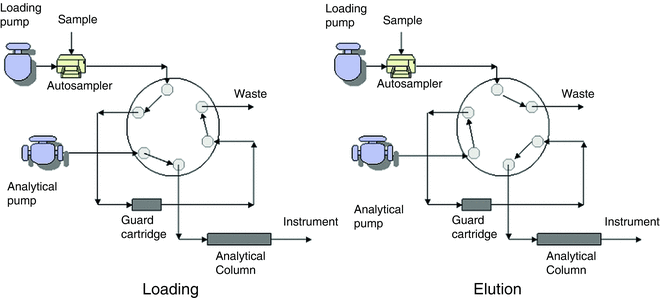
Two binary HPLC pumps series 1200 SL (Agilent Technologies, Santa Clara, CA), vacuum degasser, 6-port switching valve, autosampler CTC PAL (Carrboro, NC) equipped with fast wash station.
4.
Vortex with adaptor for microcentrifuge tubes.
5.
Evaporator for 96-well plates.
6.
Centrifuge for 2 mL microcentrifuge tubes.
7.
Centrifuge with buckets for 96-well plates.
2.5 Supplies
1.
Eppendorf microcentrifuge tubes (2 mL).
2.
96-well plates (deep plates with square wells, 2 mL) with sealing mats (Phenomenex).
3.
Trap cartridge for first dimension separation: guard cartridge C1 (Cat # AJO 4299) in Security Guard™ cartridge holder (both Phenomenex, CA) maintained at ambient temperature.
4.
HPLC column for analytical separation: Gemini C6 phenyl TMS end capping column (Cat # 00D-4443-B0) with Security Guard™ cartridge holder (Cat # AJO 7914) (both Phenomenex, CA) maintained at 30 °C.
5.
The trap and HPLC column are connected to the six port/two position switching valve (VICI VALCO Instruments Inc., Houston, TX) (Fig. 1).


Fig. 1
Switching valve setup for chromatographic separation
6.
Harvard Equilibrium Dialysis plate (Cat # 74-2330 Harvard Apparatus).
3 Methods
3.1 Stepwise Procedure
1.
250 μL of patient samples and controls are aliquoted into the clear side of the Harvard Equilibrium Dialysis plate and an equal volume of dialysis buffer added to the orange side of the plate. The wells are numbered corresponding to the samples. The unused wells of the plate are covered with caps to avoid contamination. The calibrators do not undergo dialysis.
2.
The plate is allowed to spin at 37 °C for 22 ± 1 h.
3.
A print layout of the 96-well plate with sample IDs listed in corresponding wells of the map is prepared.
4.
At the end of dialysis remove the plate from the chamber and remove 200 μL of buffer from the buffer side of the plate and aliquot into the 96-well plate.
5.
Label 2.0 mL microcentrifuge tubes with sample ID.
6.
Organize the run to include calibrators. Prepare the calibration curve by adding 200 μL of 0.05 % BSA to each tube and a negative control. Aliquot appropriate volumes of working calibration standard to the respective tubes as indicated in Table 3.
7.
Add 20 μL of internal standard (50 pg/mL) to all the tubes.
8.
Add 1.3 mL MTBE to the tubes and cap them.
9.
Vortex tubes at low speed (setting 2–3) for 10 min (vortexing at high speed may result in formation of emulsion).
10.
Centrifuge tubes at −4 °C at 14,000 × g for 10 min.
11.
Set tubes in −70 °C freezer for 10 min (or until bottom aqueous solution is frozen).
12.
Transfer the organic layer to the numbered wells of the 96-well plate taking care not to transfer any aqueous portion.
13.
Evaporate the organic layer in a 96-well plate evaporator at 50 °C and a nitrogen flow rate of 50 psi.
14.
Take the remaining aqueous layer and repeat the extraction process.
15.
Add 1 mL MTBE to all tubes containing the aqueous layer.
16.
Vortex for 5 min at low speed.
17.
Centrifuge tubes at −4 °C at 14,000 × g for 10 min.
18.


Set tubes in −70 °C freezer for 10 min (or until bottom aqueous solution is frozen).
Stay updated, free articles. Join our Telegram channel

Full access? Get Clinical Tree


