Chapter 34 Basic Second and Third Trimester Obstetric Ultrasound
Equipment
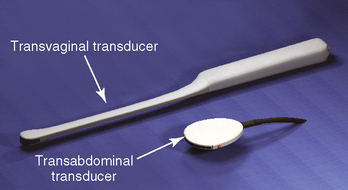
In the first trimester, the fetus is best visualized with a transvaginal transducer of 5 to 7 MHz. The second and third trimester scans mostly use the 3 to 5 MHz transabdominal transducer (Figure 34-1).
Key steps
1. Confirm single-living intrauterine pregnancy: Sweep the entire uterus to check for multiple gestations, and confirm fetal viability by identifying fetal cardiac activity.
2. Determine presenting part: To determine the fetal presenting part and orientation, begin the examination in the lower uterine segment with the transducer in the transverse plane (Figure 34-2). Determine the location of the fetal skull. The presence of the fetal skull in the lower uterine segment usually confirms a vertex presentation (Figure 34-3).
3. Determine orientation: To determine orientation, visualize the long axis of the fetal spine. After orienting to the fetal spine, you will be three-dimensionally oriented to the fetal position. Visualize fetal extremities or the face to confirm position (Figure 34-4).
4. Determine placental location: Scan with the transducer in the sagittal position, slowly scanning from the lower uterine segment to the fundus. The placenta appears as hyperechoic tissue. Calcifications may be observed (Figure 34-5). If the placenta cannot be visualized, it may be located posteriorly, obscured by fetal parts. Note the position of the placenta. If the placenta is near the cervix (placenta previa), it should be noted and followed. Record all findings.
Stay updated, free articles. Join our Telegram channel

Full access? Get Clinical Tree


