TABLE 1.2 Prefixes Used with SI Units
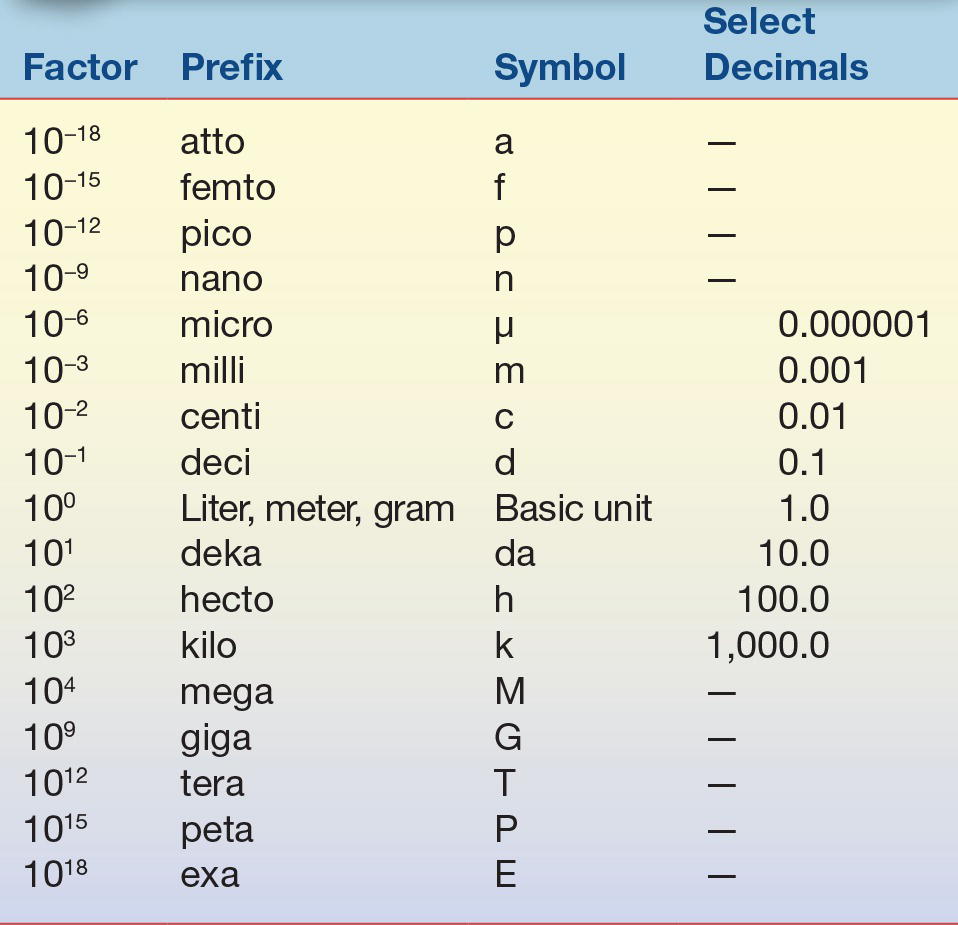
Prefixes are used to indicate a subunit or multiple of a basic SI unit.
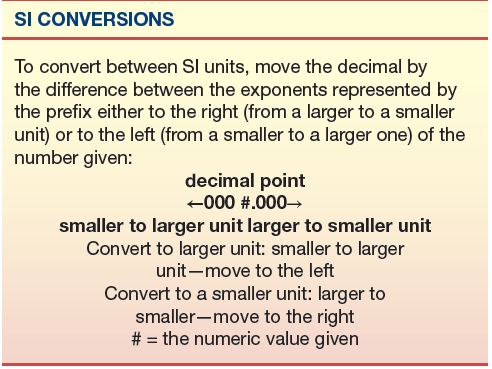
It is important to understand the relationship these prefixes have to the basic unit. The highlighted upper portion of Table 1.2 indicates prefixes that are smaller than the basic unit and are frequently used in clinical laboratories. When converting between prefixes, simply note the relationship between the two prefixes based on whether you are changing to a smaller or larger prefix. For example, if converting from one liter (1.0 × 100 or 1.0) to milliliters (1.0 × 10⁻³ or 0.001), the starting unit (L) is larger than the desired unit by a factor of 1,000 or 103. This means that the decimal place would be moved to the right three places, so 1.0 liter (L) equals 1,000 milliliters (mL). When changing 1,000 milliliters (mL) to 1.0 liter (L), the process is reversed and the decimal point would be moved three places to the left to become 1.0 L. Note that the SI term for mass is kilogram; it is the only basic unit that contains a prefix as part of its name. Generally, the standard prefixes for mass use the term gram rather than kilogram.
Example 1: Convert 1.0 L to μL
1.0 L (1 × 100) = ? μL (micro = 10−6); move the decimal place six places to the right and it becomes 1,000,000 μL; reverse the process to determine the expression in L (move the decimal six places to the left of 1,000,000 μL to get 1.0 L).
Example 2: Convert 5 mL to μL
5 mL (milli = 10−3, larger) = ? μL (micro = 10−6, smaller); move the decimal by three places to the right and it becomes 5,000 μL.
Example 3: Convert 5.3 mL to dL
5.3 mL (milli = 10−3, smaller) = ? dL (deci = 10−1, larger); move the decimal place by two places to the left and it becomes 0.053 dL.
Reporting of laboratory results is often expressed in terms of substance concentration (e.g., moles) or the mass of a substance (e.g., mg/dL, g/dL, g/L, mmol/L, and IU) rather than in SI units. These familiar and traditional units can cause confusion during interpretation. Appendix D (on thePoint), Conversion of Traditional Units to SI Units for Common Clinical Chemistry Analytes, lists both reference and SI units together with the conversion factor from traditional to SI units for common analytes. As with other areas of industry, the laboratory and the rest of medicine are moving toward adopting universal standards promoted by the International Organization for Standardization, often referred to as ISO. This group develops standards of practice, definitions, and guidelines that can be adopted by everyone in a given field, providing for more uniform terminology and less confusion. Many national initiatives have recommended common units for laboratory test results, but none have been widely adopted.2 As with any transition, clinical laboratory scientists should be familiar with all the terms currently used in their field.
REAGENTS
In today’s highly automated laboratory, there seems to be little need for reagent preparation by the clinical laboratory scientist. Most instrument manufacturers make the reagents in a ready-to-use form or “kit” where all necessary reagents and respective storage containers are prepackaged as a unit requiring only the addition of water or buffer to the prepackaged components for reconstitution. A heightened awareness of the hazards of certain chemicals and the numerous regulatory agency requirements has caused clinical chemistry laboratories to readily eliminate massive stocks of chemicals and opt instead for the ease of using prepared reagents. Periodically, especially in hospital laboratories involved in research and development, biotechnology applications, specialized analyses, or method validation, the laboratorian may still face preparing various reagents or solutions.
Chemicals
Analytic chemicals exist in varying grades of purity: analytic reagent (AR); ultrapure, chemically pure (CP); United States Pharmacopeia (USP); National Formulary (NF); and technical or commercial grade.3 A committee of the American Chemical Society (ACS) established specifications for AR grade chemicals, and chemical manufacturers will either meet or exceed these requirements. Labels on reagents state the actual impurities for each chemical lot or list the maximum allowable impurities. The labels should be clearly printed with the percentage of impurities present and either the initials AR or ACS or the term For laboratory use or ACS Standard-Grade Reference Materials. Chemicals of this category are suitable for use in most analytic laboratory procedures. Ultrapure chemicals have been put through additional purification steps for use in specific procedures such as chromatography, atomic absorption, immunoassays, molecular diagnostics, standardization, or other techniques that require extremely pure chemicals. These reagents may carry designations of HPLC (high-performance liquid chromatography) or chromatographic on their labels.
Because USP and NF grade chemicals are used to manufacture drugs, the limitations established for this group of chemicals are based only on the criterion of not being injurious to individuals. Chemicals in this group may be pure enough for use in most chemical procedures; however, it should be recognized that the purity standards are not based on the needs of the laboratory and, therefore, may or may not meet all assay requirements.
Reagent designations of CP or pure grade indicate that the impurity limitations are not stated and that preparation of these chemicals is not uniform. It is not recommended that clinical laboratories use these chemicals for reagent preparation unless further purification or a reagent blank is included. Technical or commercial grade reagents are used primarily in manufacturing and should never be used in the clinical laboratory.
Organic reagents also have varying grades of purity that differ from those used to classify inorganic reagents. These grades include a practical grade with some impurities; CP, which approaches the purity level of reagent grade chemicals; spectroscopic (spectrally pure) and chromatographic grade organic reagents, with purity levels attained by their respective procedures; and reagent grade (ACS), which is certified to contain impurities below certain levels established by the ACS. As in any analytic method, the desired organic reagent purity is dictated by the particular application.
Other than the purity aspects of the chemicals, laws related to the Occupational Safety and Health Administration (OSHA)4 require manufacturers to indicate any physical or biologic health hazards and precautions needed for the safe use, storage, and disposal of any chemical. A manufacturer is required to provide technical data sheets for each chemical manufactured on a document called a Safety Data Sheet (SDS).
Reference Materials
Unlike other areas of chemistry, clinical chemistry is involved in the analysis of biochemical by-products found in biological fluids, such as serum, plasma, or urine, making purification and a known exact composition of the material almost impossible. For this reason, traditionally defined standards used in analytical chemistry do not readily apply in clinical chemistry.
A primary standard is a highly purified chemical that can be measured directly to produce a substance of exact known concentration and purity. The ACS has purity tolerances for primary standards, because most biologic constituents are unavailable within these tolerance limitations; the National Institute of Standards and Technology (NIST)-certified standard reference materials (SRMs) are used instead of ACS primary standard materials.5, 6, 7
The NIST developed certified reference materials/SRMs for use in clinical chemistry laboratories. They are assigned a value after careful analysis, using state-of-the-art methods and equipment. The chemical composition of these substances is then certified; however, they may not possess the purity equivalent of a primary standard. Because each substance has been characterized for certain chemical or physical properties, it can be used in place of an ACS primary standard in clinical work and is often used to verify calibration or accuracy/bias assessments. Many manufacturers use an NIST SRM when producing calibrator and standard materials, and in this way, these materials are considered “traceable to NIST” and may meet certain accreditation requirements. There are SRMs for a number of routine analytes, hormones, drugs, and blood gases, with others being added.5
Water Specifications8
Water is the most frequently used reagent in the laboratory. Because tap water is unsuitable for laboratory applications, most procedures, including reagent and standard preparation, use water that has been substantially purified. There are various methods for water purification including distillation, ion exchange, reverse osmosis, ultrafiltration, ultraviolet light, sterilization, and ozone treatment. Laboratory requirements generally call for reagent grade water that, according to the Clinical and Laboratory Standards Institute (CLSI), is classified into one of six categories based on the specifications needed for its use rather than the method of purification or preparation.9,10 These categories include clinical laboratory reagent water (CLRW), special reagent water (SRW), instrument feed water, water supplied by method manufacturer, autoclave and wash water, and commercially bottled purified water. Laboratories need to assess whether the water meets the specifications needed for its application. Most water-monitoring parameters include at least microbiological count, pH, resistivity (measure of resistance in ohms and influenced by the number of ions present), silicate, particulate matter, and organics. Each category has a specific acceptable limit. A long-held convention for categorizing water purity was based on three types, I through III, with type I water having the most stringent requirements and generally suitable for routine laboratory use.
Prefiltration can remove particulate matter from municipal water supplies before any additional treatments. Filtration cartridges are composed of glass; cotton; activated charcoal, which removes organic materials and chlorine; and submicron filters (≤0.2 mm), which remove any substances larger than the filter’s pores, including bacteria. The use of these filters depends on the quality of the municipal water and the other purification methods used. For example, hard water (containing calcium, iron, and other dissolved elements) may require prefiltration with a glass or cotton filter rather than activated charcoal or submicron filters, which quickly become clogged and are expensive to use. The submicron filter may be better suited after distillation, deionization, or reverse osmosis treatment.
Distilled water has been purified to remove almost all organic materials, using a technique of distillation much like that found in organic chemistry laboratory distillation experiments in which water is boiled and vaporized. Many impurities do not rise in the water vapor and will remain in the boiling apparatus so that the water collected after condensation has less contamination. Water may be distilled more than once, with each distillation cycle removing additional impurities. Ultrafiltration and nanofiltration, like distillation, are excellent in removing particulate matter, microorganisms, and any pyrogens or endotoxins.
Deionized water has some or all ions removed, although organic material may still be present, so it is neither pure nor sterile. Generally, deionized water is purified from previously treated water, such as prefiltered or distilled water. Deionized water is produced using either an anion or a cation exchange resin, followed by replacement of the removed ions with hydroxyl or hydrogen ions. The ions that are anticipated to be removed from the water will dictate the type of ion exchange resin to be used. One column cannot service all ions present in water. A combination of several resins will produce different grades of deionized water. A two-bed system uses an anion resin followed by a cation resin. The different resins may be in separate columns or in the same column. This process is excellent in removing dissolved ionized solids and dissolved gases.
Reverse osmosis is a process that uses pressure to force water through a semipermeable membrane, producing water that reflects a filtered product of the original water. It does not remove dissolved gases. Reverse osmosis may be used for the pretreatment of water.
Ultraviolet oxidation, which removes some trace organic material or sterilization processes at specific wavelengths, when used in combination with ozone treatment, can destroy bacteria but may leave behind residual products. These techniques are often used after other purification processes have been completed.
Production of reagent grade water largely depends on the condition of the feed water. Generally, reagent grade water can be obtained by initially filtering it to remove particulate matter, followed by reverse osmosis, deionization, and a 0.2-mm filter or more restrictive filtration process. Type III/autoclave wash water is acceptable for glassware washing but not for analysis or reagent preparation. Traditionally, type II water was acceptable for most analytic requirements, including reagent, quality control, and standard preparation, while type I water was used for test methods requiring minimum interference, such as trace metal, iron, and enzyme analyses. Use with HPLC may require less than a 0.2-mm final filtration step and falls into the SRW category. Some molecular diagnostic or mass spectrophotometric techniques may require special reagent grade water; some reagent grade water should be used immediately, so storage is discouraged because the resistivity changes. Depending on the application, CLRW should be stored in a manner that reduces any chemical or bacterial contamination and for short periods.
Testing procedures to determine the quality of reagent grade water include measurements of resistance, pH, colony counts on selective and nonselective media for the detection of bacterial contamination, chlorine, ammonia, nitrate or nitrite, iron, hardness, phosphate, sodium, silica, carbon dioxide, chemical oxygen demand, and metal detection. Some accreditation agencies11 recommend that laboratories document culture growth, pH, and specific resistance on water used in reagent preparation. Resistance is measured because pure water, devoid of ions, is a poor conductor of electricity and has increased resistance. The relationship of water purity to resistance is linear. Generally, as purity increases, so does resistance. This one measurement does not suffice for determination of true water purity because a nonionic contaminant may be present that has little effect on resistance. Note that reagent water meeting specifications from other organizations, such as the ASTM, may not be equivalent to those established by the CLSI, and care should be taken to meet the assay procedural requirements for water type requirements.
Solution Properties
In clinical chemistry, substances found in biologic fluids including serum, plasma, urine, and spinal fluid are quantified. A substance that is dissolved in a liquid is called a solute; in laboratory science, these biologic solutes are also known as analytes. The liquid in which the solute is dissolved—in this instance, a biologic fluid—is the solvent. Together they represent a solution. Any chemical or biologic solution is described by its basic properties, including concentration, saturation, colligative properties, redox potential, conductivity, density, pH, and ionic strength.
Concentration
Analyte concentration in solution can be expressed in many ways. Routinely, concentration is expressed as percent solution, molarity, molality, or normality, Note that these are non-SI units, and the SI expression for the amount of a substance is the mole.
Percent solution is expressed as the amount of solute per 100 total units of solution. Three expressions of percent solutions are weight per weight (w/w), volume per volume (v/v), and weight per volume (w/v). Weight per weight (% w/w) refers to the number of grams of solute per 100 g of solution. Volume per volume (% v/v) is used for liquid solutes and gives the milliliters of solute in 100 mL of solution. For v/v solutions, it is recommended that grams per deciliter (g/dL) be used instead of % v/v. Weight per volume (% w/v) is the most commonly used percent solution in the clinical laboratory and is defined as the number of grams of solute in 100 mL of solution. This is not the same as molarity and care must be taken to not confuse the two.
Molarity (M) is expressed as the number of moles per 1 L of solution. One mole of a substance equals its gram molecular weight (gmw), so the customary units of molarity (M) are moles/liter. The SI representation for the traditional molar concentration is moles of solute per volume of solution, with the volume of the solution given in liters. The SI expression for concentration should be represented as moles per liter (mol/L), millimoles per liter (mmol/L), micromoles per liter (μmol/L), and nanomoles per liter (nmol/L). The familiar concentration term molarity has not been adopted by the SI as an expression of concentration. It should also be noted that molarity depends on volume, and any significant physical changes that influence volume, such as changes in temperature and pressure, will also influence molarity.
Molality (m) represents the amount of solute per 1 kg of solvent. Molality is sometimes confused with molarity; however, it can be easily distinguished from molarity because molality is always expressed in terms of moles per kilogram (weight per weight) and describes moles per 1,000 g (1 kg) of solvent. Note that the common abbreviation (m) for molality is a lowercase “m,” while the uppercase (M) refers to molarity. The preferred expression for molality is moles per kilogram (mol/kg) to avoid any confusion. Unlike molarity, molality is not influenced by temperature or pressure because it is based on mass rather than volume.
Normality is the least likely of the four concentration expressions to be encountered in clinical laboratories, but it is often used in chemical titrations and chemical reagent classification. It is defined as the number of gram equivalent weights per 1 L of solution. An equivalent weight is equal to the gmw of a substance divided by its valence. The valence is the number of units that can combine with or replace 1 mole of hydrogen ions for acids and hydroxyl ions for bases and the number of electrons exchanged in oxidation–reduction reactions. Normality is always equal to or greater than the molarity of the compound. Normality was previously used for reporting electrolyte values, such as sodium [Na+], potassium [K+], and chloride [Cl−], expressed as milliequivalents per liter (mEq/L); however, this convention has been replaced with the more familiar units of millimoles per liter (mmol/L).
Solution saturation gives little specific information about the concentration of solutes in a solution. A solution is considered saturated when no more solvent can be dissolved in the solution. Temperature, as well as the presence of other ions, can influence the solubility constant for a solute in a given solution and thus affect the saturation. Routine terms in the clinical laboratory that describe the extent of saturation are dilute, concentrated, saturated, and supersaturated. A dilute solution is one in which there is relatively little solute or one that has a lower solute concentration per volume of solvent than the original, such as when making a dilution. In contrast, a concentrated solution has a large quantity of solute in solution. A solution in which there is an excess of undissolved solute particles can be referred to as a saturated solution. As the name implies, a supersaturated solution has an even greater concentration of undissolved solute particles than a saturated solution of the same substance. Because of the greater concentration of solute particles, a supersaturated solution is thermodynamically unstable. The addition of a crystal of solute or mechanical agitation disturbs the supersaturated solution, resulting in crystallization of any excess material out of solution. An example is seen when measuring serum osmolality by freezing point depression.
Colligative Properties
Colligative properties are those properties related to the number of solute particles per solvent molecules, not on the type of particles present. The behavior of particles or solutes in solution demonstrates four repeatable properties, osmotic pressure, vapor pressure, freezing point, and boiling point, these are called colligative properties. Vapor pressure is the pressure exerted by the vapor when the liquid solvent is in equilibrium with the vapor. Freezing point is the temperature at which the first crystal (solid) of solvent forms in equilibrium with the solution. Boiling point is the temperature at which the vapor pressure of the solvent reaches atmospheric pressure (usually one atmosphere).
Osmotic pressure is the pressure that opposes osmosis when a solvent flows through a semipermeable membrane to establish equilibrium between compartments of differing concentration. The osmotic pressure of a dilute solution is directly proportional to the concentration of the molecules in solution. The expression for concentration is the osmole. One osmole of a substance equals the molarity or molality multiplied by the number of particles, not the kind of particle, at dissociation. If molarity is used, the resulting expression would be termed osmolarity; if molality is used, the expression changes to osmolality. Osmolality is preferred since it depends on the weight rather than volume and is not readily influenced by temperature and pressure changes. When a solute is dissolved in a solvent, the colligative properties change in a predictable manner for each osmole of substance present. In the clinical setting, freezing point and vapor pressure depression can be measured as a function of osmolality. Freezing point is preferred since vapor pressure measurements can give inaccurate readings when some substances, such as alcohols, are present in the samples.
Redox Potential
Redox potential, or oxidation–reduction potential, is a measure of the ability of a solution to accept or donate electrons. Substances that donate electrons are called reducing agents; those that accept electrons are considered oxidizing agents. The pneumonic—LEO (lose electrons oxidized) the lion says GER (gain electrons reduced)—may prove useful when trying to recall the relationship between reducing/oxidizing agents and redox potential.
Conductivity
Conductivity is a measure of how well electricity passes through a solution. A solution’s conductivity quality depends principally on the number of respective charges of the ions present. Resistivity, the reciprocal of conductivity, is a measure of a substance’s resistance to the passage of electrical current. The primary application of resistivity in the clinical laboratory is for assessing the purity of water. Resistivity or resistance is expressed as ohms and conductivity is expressed as ohms−1.
pH and Buffers
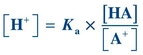
Buffers are weak acids or bases and their related salts that, as a result of their dissociation characteristics, minimize changes in the hydrogen ion concentration. Hydrogen ion concentration is often expressed as pH. A lowercase p in front of certain letters or abbreviations operationally means the “negative logarithm of” or “inverse log of” that substance. In keeping with this convention, the term pH represents the negative or inverse log of the hydrogen ion concentration. Mathematically, pH is expressed as
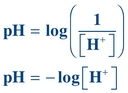 (Eq. 1-1)
 where [H+] equals the concentration of hydrogen ions in moles per liter (M).
The pH scale ranges from 0 to 14 and is a convenient way to express hydrogen ion concentration.
Unlike a strong acid or base, which dissociates almost completely, the dissociation constant for a weak acid or base solution (like a buffer) tends to be very small, meaning little dissociation occurs.
The dissociation of acetic acid (CH3COOH), a weak acid, can be illustrated as follows:
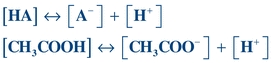 (Eq. 1-2)
 HA = weak acid, A− = conjugate base, H+ = hydrogen ions, [] = concentration of anything in the bracket.
Sometimes, the conjugate base (A−) will be referred to as a “salt” since, physiologically, it will be associated with some type of cation such as sodium (Na+).
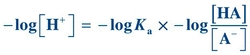
Note that the dissociation constant, Ka, for a weak acid may be calculated using the following equation:
 (Eq. 1-3)
 Rearrangement of this equation reveals
 (Eq. 1-4)
 Taking the log of each quantity and then multiplying by minus 1 (−1), the equation can be rewritten as
 (Eq. 1-5)
 By convention, lowercase p means “negative log of”; therefore, −log[H+] may be written as pH, and −Ka may be written as pKa. The equation now becomes
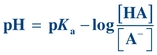 (Eq. 1-6)
 Eliminating the minus sign in front of the log of the quantity  results in an equation known as the Henderson-Hasselbalch equation, which mathematically describes the dissociation characteristics of weak acids (pKa) and bases (pKb) and the effect on pH:
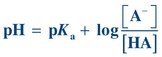 (Eq. 1-7)
 When the ratio of [A−] to [HA] is 1, the pH equals the pK and the buffer has its greatest buffering capacity. The dissociation constant Ka, and therefore the pKa, remains the same for a given substance. Any changes in pH are solely due to the ratio of conjugate base [A−] concentration to weak acid [HA] concentration.
Ionic strength is another important aspect of buffers, particularly in separation techniques. Ionic strength is the concentration or activity of ions in a solution or buffer. Increasing ionic strength increases the ionic cloud surrounding a compound and decreases the rate of particle migration. It can also promote compound dissociation into ions effectively increasing the solubility of some salts, along with changes in current, which can also affect electrophoretic separation.
CLINICAL LABORATORY SUPPLIES
In today’s clinical chemistry laboratory, many different types of equipment are in use. Most of the manual techniques have been replaced by automation, but it is still necessary for the laboratory scientist to be knowledgeable in the operation and use of certain equipment. The following is a brief discussion of the composition and general use of common equipment found in a clinical chemistry laboratory, including thermometers, pipettes, flasks, beakers, and dessicators.
Thermometers/Temperature
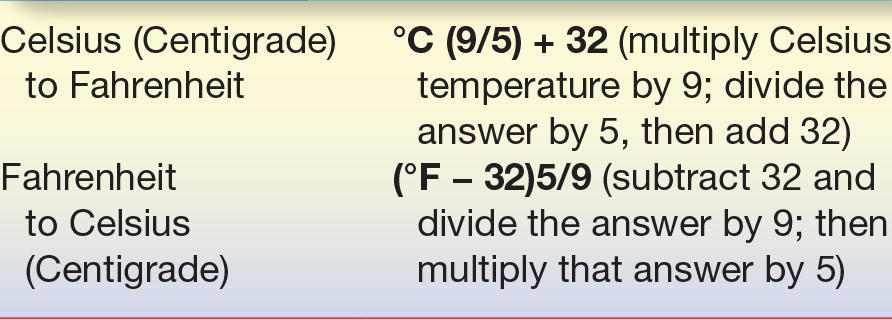
The predominant practice for temperature measurement uses the Celsius (°C) scale; however, Fahrenheit (°F) and Kelvin (°K) scales are also used.12 The SI designation for temperature is the Kelvin scale. Table 1.3 gives the conversion formulas between Fahrenheit and Celsius scales and Appendix C (thePoint) lists the various conversion formulas.
TABLE 1.3 Common Temperature Conversions
All analytic reactions occur at an optimal temperature. Some laboratory procedures, such as enzyme determinations, require precise temperature control, whereas others work well over a wide range of temperatures. Reactions that are temperature dependent use some type of heating/cooling cell, heating/cooling block, or water/ice bath to provide the correct temperature environment. Laboratory refrigerator temperatures are often critical and need periodic verification. Thermometers either are an integral part of an instrument or need to be placed in the device for temperature maintenance. The two types of thermometers discussed include liquid-in-glass and electronic thermometer or thermistor probe; however, several other types of temperature-indicating devices are in use. Regardless of which is being used, all temperature-reading devices must be calibrated to ascertain accuracy. Liquid-in-glass thermometers use a colored liquid (red or other colored material), encased in plastic or glass material. They usually measure temperatures between 20°C and 400°C. Visual inspection of the liquid-in-glass thermometer should reveal a continuous line of liquid, free from separation or bubbles. The accuracy range for a thermometer used in clinical laboratories is determined by the specific application.
Liquid-in-glass thermometers should be calibrated against an NIST-certified or NIST-traceable thermometer for critical laboratory applications.13 NIST has an SRM thermometer with various calibration points (0°C, 25°C, 30°C, and 37°C) for use with liquid-in-glass thermometers. Gallium, another SRM, has a known melting point and can also be used for thermometer verification.
As automation advances and miniaturizes, the need for an accurate, fast-reading electronic thermometer (thermistor) has increased and is now routinely incorporated in many devices. The advantages of a thermistor over the more traditional liquid-in-glass thermometers are size and millisecond response time. Similar to the liquid-in- glass thermometers, the thermistor can be calibrated against an SRM thermometer.
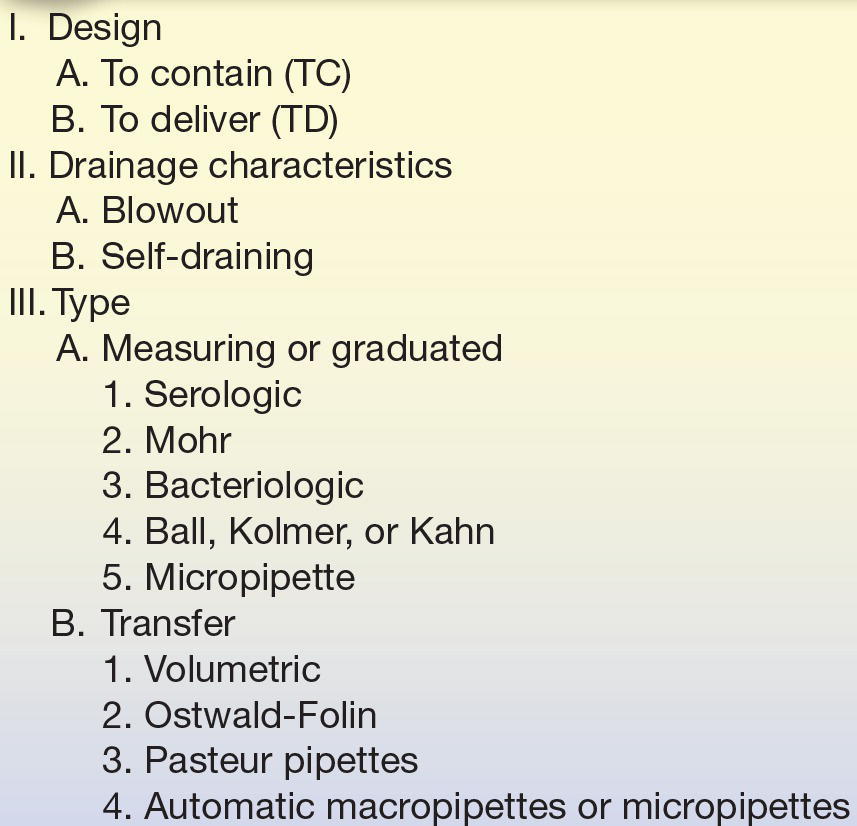
Glassware and Plasticware
Until recently, laboratory supplies (e.g., pipettes, flasks, beakers, and burettes) consisted of some type of glass and could be correctly termed glassware. As plastic material was refined and made available to manufacturers, plastic has been increasingly used to make laboratory equipment. Before discussing general laboratory supplies, a brief summary of the types and uses of glass and plastic commonly seen today in laboratories is given (see Appendices G, H, and I on thePoint). Regardless of design, most laboratory supplies must satisfy certain tolerances of accuracy and fall into two classes of precision tolerance, either Class A or Class B as given by the American Society for Testing and Materials (ASTM).14,15 Those that satisfy Class A ASTM precision criteria are stamped with the letter “A” on the glassware and are preferred for laboratory applications. Class B glassware generally have twice the tolerance limits of Class A, even if they appear identical, and are often found in student laboratories where durability is needed. Vessels holding or transferring liquid are designed either to contain (TC) or to deliver (TD) a specified volume. As the names imply, the major difference is that TC devices do not deliver that same volume when the liquid is transferred into a container, whereas the TD designation means that the labware will deliver that amount.
Glassware used in the clinical laboratory usually fall into one of the following categories: Kimax/Pyrex (borosilicate), Corex (aluminosilicate), high silica, Vycor (acid and alkali resistant), low actinic (amber colored), or flint (soda lime) glass used for disposable material.16 Whenever possible, routinely used clinical chemistry glassware should consist of high thermal borosilicate or aluminosilicate glass and meet the Class A tolerances recommended by the NIST/ASTM/ISO 9000. The manufacturer is the best source of information about specific uses, limitations, and accuracy specifications for glassware.
Plasticware is beginning to replace glassware in the laboratory setting. The unique high resistance to corrosion and breakage, as well as varying flexibility, has made plasticware appealing. Relatively inexpensive, it allows most items to be completely disposable after each use. The major types of resins frequently used in the clinical chemistry laboratory are polystyrene, polyethylene, polypropylene, Tygon, Teflon, polycarbonate, and polyvinyl chloride. Again, the individual manufacturer is the best source of information concerning the proper use and limitations of any plastic material.
In most laboratories, glass or plastic that is in direct contact with biohazardous material is usually disposable. If not, it must be decontaminated according to appropriate protocols. Should the need arise, however, cleaning of glass or plastic may require special techniques. Immediately rinsing glass or plastic supplies after use, followed by washing with a powder or liquid detergent designed for cleaning laboratory supplies and several distilled water rinses, may be sufficient. Presoaking glassware in soapy water is highly recommended whenever immediate cleaning is impractical. Many laboratories use automatic dishwashers and dryers for cleaning. Detergents and temperature levels should be compatible with the material and the manufacturer’s recommendations. To ensure that all detergent has been removed from the labware, multiple rinses with appropriate grade water is recommended. Check the pH of the final rinse water and compare it with the initial pH of the prerinse water. Detergent-contaminated water will have a more alkaline pH as compared with the pH of the appropriate grade water. Visual inspection should reveal spotless vessel walls. Any biologically contaminated labware should be disposed of according to the precautions followed by that laboratory.
Some determinations, such as those used in assessing heavy metals or assays associated with molecular testing, require scrupulously clean or disposable glassware. Some applications may require plastic rather than glass because glass can absorb metal ions. Successful cleaning solutions are acid dichromate and nitric acid. It is suggested that disposable glass and plastic be used whenever possible.
Dirty reusable pipettes should be placed immediately in a container of soapy water with the pipette tips up. The container should be long enough to allow the pipette tips to be covered with solution. A specially designed pipette-soaking jar and washing/drying apparatus are recommended. For each final water rinse, fresh reagent grade water should be provided. If possible, designate a pipette container for final rinses only. Cleaning brushes are available to fit almost any size glassware and are recommended for any articles that are washed routinely.
Although plastic material is often easier to clean because of its nonwettable surface, it may not be appropriate for some applications involving organic solvents or autoclaving. Brushes or harsh abrasive cleaners should not be used on plasticware. Acid rinses or washes are not required. The initial cleaning procedure described in Appendix J (thePoint) can be adapted for plasticware as well. Ultrasonic cleaners can help remove debris coating the surfaces of glass or plasticware. Properly cleaned laboratory ware should be completely dried before using.
Laboratory Vessels
Flasks, beakers, and graduated cylinders are used to hold solutions. Volumetric and Erlenmeyer flasks are two types of containers in general use in the clinical laboratory.
A volumetric flask is calibrated to hold one exact volume of liquid (TC). The flask has a round, lower portion with a flat bottom and a long, thin neck with an etched calibration line. Volumetric flasks are used to bring a given reagent to its final volume with the prescribed diluent. When bringing the bottom of the meniscus to the calibration mark, a pipette should be used when adding the final drops of diluent to ensure maximum control is maintained and the calibration line is not missed.
Erlenmeyer flasks and Griffin beakers are designed to hold different volumes rather than one exact amount. Because Erlenmeyer flasks and Griffin beakers are often used in reagent preparation, flask size, chemical inertness, and thermal stability should be considered. The Erlenmeyer flask has a wide bottom that gradually evolves into a smaller, short neck. The Griffin beaker has a flat bottom, straight sides, and an opening as wide as the flat base, with a small spout in the lip.
Graduated cylinders are long, cylindrical tubes usually held upright by an octagonal or circular base. The cylinder has calibration marks along its length and is used to measure volumes of liquids. Graduated cylinders do not have the accuracy of volumetric labware. The sizes routinely used are 10, 25, 50, 100, 500, 1,000, and 2,000 mL.
All laboratory utensils used in critical measurement should be Class A whenever possible to maximize accuracy and precision and thus decrease calibration time (Fig. 1.1 illustrates representative laboratory glassware).
FIGURE 1.1 Laboratory glassware.
Pipettes
Pipettes are glass or plastic equipment used to transfer liquids; they may be reusable or disposable. Although pipettes may transfer any volume, they are usually used for volumes of 20 mL or less; larger volumes are usually transferred or dispensed using automated pipetting devices. Table 1.4 outlines the classification applied here.
TABLE 1.4 Pipette Classification
Similar to other laboratory equipment, pipettes are designed to contain (TC) or to deliver (TD) a particular volume of liquid. The major difference is the amount of liquid needed to wet the interior surface of the pipette and the amount of any residual liquid left in the pipette tip. Most manufacturers stamp TC or TD near the top of the pipette to alert the user as to the type of pipette. Like other TC-designated labware, a TC pipette holds or contains a particular volume but does not dispense that exact volume, whereas a TD pipette will dispense the volume indicated. When using either pipette, the tip must be immersed in the intended transfer liquid to a level that will allow the tip to remain in solution after the volume of liquid has entered the pipette—without touching the vessel walls. The pipette is held upright, not at an angle (Fig. 1.2). Using a pipette bulb or similar device, a slight suction is applied to the opposite end until the liquid enters the pipette and the meniscus is brought above the desired graduation line (Fig. 1.3A), and suction is then stopped. While the meniscus level is held in place, the pipette tip is raised slightly out of the solution and wiped with a laboratory tissue of any adhering liquid. The liquid is allowed to drain until the bottom of the meniscus touches the desired calibration mark (Fig. 1.3B). With the pipette held in a vertical position and the tip against the side of the receiving vessel, the pipette contents are allowed to drain into the vessel (e.g., test tube, cuvette, or flask). A blowout pipette has a continuous etched ring or two small, close, continuous rings located near the top of the pipette. This means that the last drop of liquid should be expelled into the receiving vessel. Without these markings, a pipette is self-draining, and the user allows the contents of the pipette to drain by gravity. The tip of the pipette should not be in contact with the accumulating fluid in the receiving vessel during drainage. With the exception of the Mohr pipette, the tip should remain in contact with the side of the vessel for several seconds after the liquid has drained. The pipette is then removed (Fig. 1.2).

FIGURE 1.2 Correct and incorrect pipette positions.
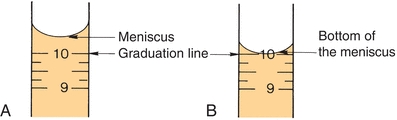
FIGURE 1.3 Pipetting technique. (A) Meniscus is brought above the desired graduation line. (B) Liquid is allowed to drain until the bottom of the meniscus touches the desired calibration mark.
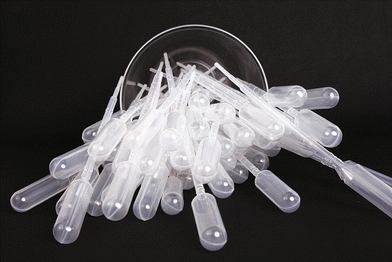
FIGURE 1.4 Disposable transfer pipettes.
Measuring or graduated pipettes are capable of dispensing several different volumes. Measuring pipettes are used to transfer reagents and to make dilutions and can be used to repeatedly transfer a particular solution. Because the graduation lines located on the pipette may vary, they should be indicated on the top of each pipette. For example, a 5-mL pipette can be used to measure 5, 4, 3, 2, or 1 mL of liquid, with further graduations between each milliliter. The pipette is designated as 5 in 1/10 increments (Fig. 1.5) and could deliver any volume in tenths of a milliliter, up to 5 mL. Another pipette, such as a 1-mL pipette, may be designed to dispense 1 mL and have subdivisions of hundredths of a milliliter. The markings at the top of a measuring or graduated pipette indicate the volume(s) it is designed to dispense. The subgroups of measuring or graduated pipettes are Mohr, serologic, and micropipettes. A Mohr pipette does not have graduations to the tip. It is a self-draining pipette, but the tip should not be allowed to touch the vessel while the pipette is draining. A serologic pipette has graduation marks to the tip and is generally a blowout pipette. A micropipette is a pipette with a total holding volume of less than 1 mL; it may be designed as either a Mohr or a serologic pipette.
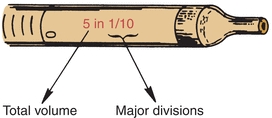
FIGURE 1.5 Volume indication of a pipette.
The next major category is the transfer pipettes. These pipettes are designed to dispense one volume without further subdivisions. Ostwald-Folin pipettes are used with biologic fluids having a viscosity greater than that of water. They are blowout pipettes, indicated by two etched continuous rings at the top. The volumetric pipette is designed to dispense or transfer aqueous solutions and is always self-draining. The bulb-like enlargement in the pipette stem easily identifies the volumetric pipette. This type of pipette usually has the greatest degree of accuracy and precision and should be used when diluting standards, calibrators, or quality control material. They should only be used once prior to cleaning. Disposable transfer pipettes may or may not have calibration marks and are used to transfer solutions or biologic fluids without consideration of a specific volume. These pipettes should not be used in any quantitative analytic techniques (Fig. 1.4).
The automatic pipette is the most routinely used pipette in today’s clinical chemistry laboratory. Automatic pipettes come in a variety of types including fixed volume, variable volume, and multichannel. The term automatic, as used here, implies that the mechanism that draws up and dispenses the liquid is an integral part of the pipette. It may be a fully automated/self-operating, semiautomatic, or completely manually operated device. Automatic and semiautomatic pipettes have many advantages, including safety, stability, ease of use, increased precision, the ability to save time, and less cleaning required as a result of the contaminated portions of the pipette (e.g., the tips) often being disposable. Figure 1.6 illustrates many common automatic pipettes. A pipette associated with only one volume is termed a fixed volume, and models able to select different volumes are termed variable; however, only one volume may be used at a time. The available range of volumes is 1 μL to 5,000 mL. The widest volume range usually seen in a single pipette is 0.5 μL to 1,000 μL. A pipette with a pipetting capability of less than 1 mL is considered a micropipette, and a pipette that dispenses greater than 1 mL is called an automatic macropipette. Multichannel pipettes are able to attach multiple pipette tips to a single handle and can then be used to dispense a fixed volume of fluid to multiple wells, such as in delivery to a multiwell microtiter plate. In addition to classification by volume delivery amounts, automatic pipettes can also be categorized according to their mechanism: air-displacement, positive-displacement, and dispenser pipettes. An air-displacement pipette relies on a piston for creating suction to draw the sample into a disposable tip that must be changed after each use. The piston does not come in contact with the liquid. A positive-displacement pipette operates by moving the piston in the pipette tip or barrel, much like a hypodermic syringe. It does not require a different tip for each use. Because of carryover concerns, rinsing and blotting between samples may be required. Dispensers and dilutor/dispensers are automatic pipettes that obtain the liquid from a common reservoir and dispense it repeatedly. The dispensing pipettes may be bottle-top, motorized, handheld, or attached to a dilutor. The dilutor often combines sampling and dispensing functions. Many automated pipettes use a wash between samples to eliminate carryover problems. However, to minimize carryover contamination with manual or semiautomatic pipettes, careful wiping of the tip may remove any liquid that adhered to the outside of the tip before dispensing any liquid. Care should be taken to ensure that the orifice of the pipette tip is not blotted, drawing sample from the tip. Another precaution in using manually operated semiautomatic pipettes is to move the plunger in a continuous and steady manner. These pipettes should be used according to the individual manufacturer’s directions.
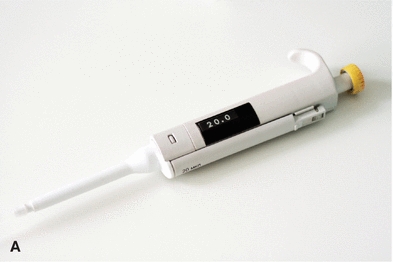

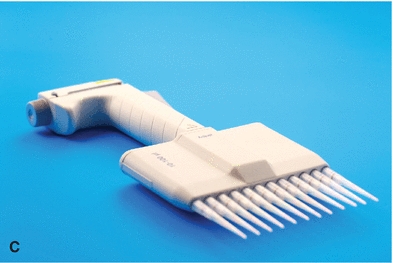
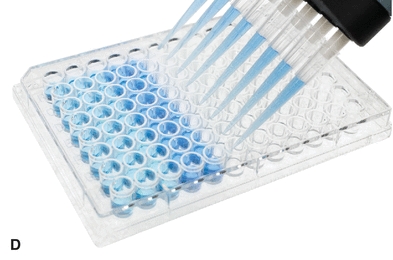
FIGURE 1.6 (A) Adjustable volume pipette. (B) Fixed volume pipette with disposable tips. (C) Multichannel pipette. (D) Multichannel pipette in use.
Disposable one-use pipette tips are designed for use with air-displacement pipettes. The laboratory scientist should ensure that the pipette tip is seated snugly onto the end of the pipette and free from any deformity. Plastic tips used on air-displacement pipettes can vary. Different brands can be used for one particular pipette but they do not necessarily perform in an identical manner. Tips for positive-displacement pipettes are made of straight columns of glass or plastic. These tips must fit snugly to avoid carryover and can be used repeatedly without being changed after each use. As previously mentioned, these devices may need to be rinsed and dried between samples to minimize carryover.
Class A pipettes, like all other Class A labware, do not need to be recalibrated by the laboratory. Automatic pipetting devices, as well as non–Class A materials, do need recalibration.17,18 Calibration of pipettes is done to verify accuracy and precision of the device and may be required by the laboratory’s accrediting agency. A gravimetric method (see Box 1-1) can accomplish this task by delivering and weighing a solution of known specific gravity, such as water. A currently calibrated analytic balance and at least Class 2 weights should be used. A pipette should be used only if it is within ±1.0% of the expected value following calibration.
 BOX 1-1 Gravimetric Pipette Calibration
Materials
Pipette
10 to 20 pipette tips, if needed
Balance capable of accuracy and resolution to ±0.1% of dispensed volumetric weight
Weighing vessel large enough to hold volume of liquid
Type I/CLRW
Thermometer and barometer
Procedure
1. Record the weight of the vessel. Record the temperature of the water. It is recommended that all materials be at room temperature. Obtain the barometric pressure.
2. Place a small volume (0.5 mL) of the water into the container. To prevent effects from evaporation, it is desirable to loosely cover each container with a substance such as Parafilm. Avoid handling of the containers.
3. Weigh each container plus water to the nearest 0.1 mg or set the balance to zero.
4. Using the pipette to be tested, draw up the specified amount. Carefully wipe the outside of the tip. Care should be taken not to touch the end of the tip; this will cause liquid to be wicked out of the tip, introducing an inaccuracy as a result of technique.
5. Dispense the water into the weighed vessel. Touch the tip to the side.
6. Record the weight of the vessel.
7. Subtract the weight obtained in step 3 from that obtained in step 6. Record the result.
8. If plastic tips are used, change the tip between each dispensing. Repeat steps 1 to 6 for a minimum of nine additional times.
9. curacy or the ability of the pipette to dispense the Obtain the average or mean of the weight of the water. Multiply the mean weight by the corresponding density of water at the given temperature and pressure. At 20°C, the density of water is 0.9982.
10. Determine the accuracy or the ability of the pipette to dispense the expected (selected or stated) volume according to the following formula:
Stay updated, free articles. Join our Telegram channel

Full access? Get Clinical Tree


