PREPARATION OF TISSUES FOR STUDY
Transmission electron Microscopy
VISUALIZING SPECIFIC MOLECULES
INTERPRETATION OF STRUCTURES IN TISSUE SECTIONS
H istology is the study of the tissues of the body and how these tissues are arranged to constitute organs. The Greek root histo can be translated as either “tissue” or “web,” both of which are appropriate because tissues are usually webs of interwoven filaments and fibers, both cellular and noncellular, with membranous linings. Histology involves all aspects of tissue biology, with the focus on how cells’ structure and arrangement optimize functions specific to each organ.
Tissues have two interacting components: cells and extracellular matrix (ECM). The ECM consists of many kinds of macromolecules, most of which form complex structures, such as collagen fibrils and basement membranes. The ECM supports the cells and the fluid that transports nutrients to the cells, and carries away their catabolites and secretory products. The cells produce the ECM and are also influenced and sometimes controlled by matrix molecules. Cells and matrix interact extensively, with many components of the matrix recognized by and attaching to cell surface receptors. Many of these protein receptors span the cell membranes and connect to structural components inside the cells. Thus, cells and ECM form a continuum that functions together and reacts to stimuli and inhibitors together.
The fundamental tissues of the body are each formed by several types of cell-specific associations between cells and ECM. These characteristic associations facilitate the recognition of the tissue types by students. Organs are formed by an orderly combination of several tissues, and the precise combination of these tissues allows the functioning of each organ and of the organism as a whole.
The small size of cells and matrix components makes histology dependent on the use of microscopes and molecular methods of study. Advances in biochemistry, molecular biology, physiology, immunology, and pathology are essential for a better knowledge of tissue biology. Familiarity with the tools and methods of any branch of science is essential for a proper understanding of the subject. This chapter reviews several of the more common methods used to study cells and tissues, focusing on microscopic approaches.
PREPARATION OF TISSUES FOR STUDY
The most common procedure used in histologic research is the preparation of tissue sections or slices that can be studied with the light microscope. Under the light microscope, tissues are examined visually in a beam of transmitted light. Because most tissues and organs are too thick for light to pass through them, they must be sliced to obtain thin, translucent sections that are attached to glass slides for microscopic examination.
The ideal microscopic preparation is preserved so that the tissue on the slide has the same structure and molecular composition as it had in the body. However, as a practical matter, this is seldom feasible, and artifacts, distortions, and loss of components due to the preparation process are often present. The basic steps used in tissue preparation for light microscopy are shown in Figure 1–1.
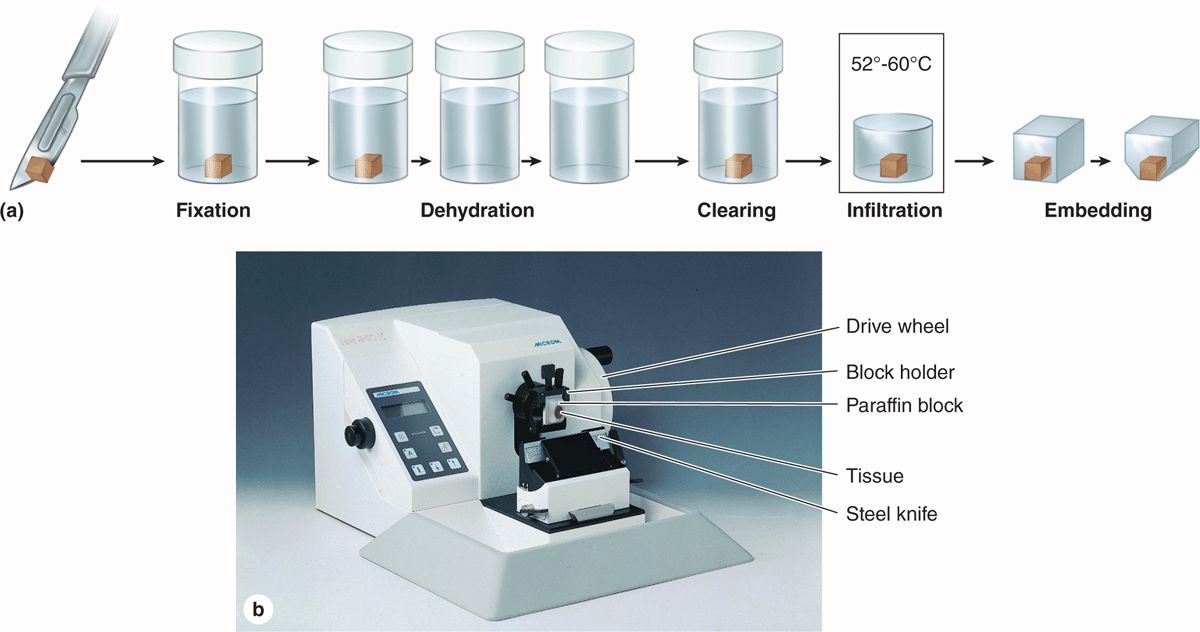
FIGURE 1–1 Sectioning fixed and embedded tissue.
Most tissues studied histologically are prepared as shown, with this sequence of steps (a):
 Fixation: Small pieces of tissue are placed in solutions of chemicals that preserve by cross-linking proteins and inactivating degradative enzymes.
 Dehydration: The tissue is transferred through a series of increasingly concentrated alcohol solutions, ending in 100%, which removes all water.
 Clearing: Alcohol is removed in toluene or other agents in which both alcohol and paraffin are miscible.
 Infiltration: The tissue is then placed in melted paraffin until it becomes completely infiltrated with this substance.
 Embedding: The paraffin-infiltrated tissue is placed in a small mold with melted paraffin and allowed to harden.
 Trimming: The resulting paraffin block is trimmed to expose the tissue for sectioning (slicing) on a microtome.
Similar steps are used in preparing tissue for transmission electron microscopy (TEM), except special fixatives and dehydrating solutions are used with smaller tissue samples and embedding involves epoxy resins which become harder than paraffin to allow very thin sectioning.
(b) A microtome is used for sectioning paraffin-embedded tissues for light microscopy. The trimmed tissue specimen is mounted in the paraffin block holder, and each turn of the drive wheel by the histologist advances the holder a controlled distance, generally between 1 and 10 μm. After each forward move, the tissue block passes over the steel knife edge and a section is cut at a thickness equal to the distance the block advanced. The paraffin sections are placed on glass slides and allowed to adhere, deparaffinized, and stained for light microscope study. For TEM, sections less than 1 μm thick are prepared from resin-embedded cells using an ultramicrotome with a glass or diamond knife.
Fixation
To avoid tissue digestion by enzymes present within the cells (autolysis) or bacteria and to preserve cell and tissue structure, pieces of organs begin to be treated as soon as possible after removal from the body. The initial treatment—fixation—usually involves immersion in solutions of stabilizing or cross-linking compounds called fixatives. Because a fixative must fully diffuse through the tissues to preserve all cells, tissues are usually cut into small fragments before fixation to facilitate penetration and better ensure tissue preservation. Intravascular perfusion of fixatives can be used with some organs or laboratory animals. Because the fixative in this case rapidly reaches the tissues through the blood vessels, fixation is improved.
One fixative widely used for light microscopy is formalin, a buffered isotonic solution of 37% formaldehyde. The chemistry of the process involved in fixation of many tissue components is complex and not always well understood. Both formaldehyde and glutaraldehyde, a fixative often used for electron microscopy, react with the amine groups (NH2) of tissue proteins, preventing their degradation. Glutaraldehyde reinforces this fixing activity by being a dialdehyde capable also of cross-linking proteins.
With the greater magnification and resolution of very small structures in the electron microscope, fixation must be done carefully to preserve “ultrastructural” detail. Toward that end, a double-fixation procedure, using a buffered glutaraldehyde solution followed by immersion in buffered osmium tetroxide, is a standard method to prepare tissue for such studies. Osmium tetroxide preserves (and stains) membrane lipids as well as proteins.
Embedding & Sectioning
Tissues are embedded in a solid medium to facilitate sectioning. In order to cut very thin sections, tissues must be infiltrated after fixation with embedding material that imparts a rigid consistency to the tissue. Embedding materials include paraffin and plastic resins; paraffin is used routinely for light microscopy, resins for both light and electron microscopy.
Paraffin embedding, or tissue impregnation, is preceded by two other main steps: dehydration and clearing. In dehydration, water is extracted from the fixed tissues by successive transfer through a graded series of ethanol and water mixtures, usually from 70% to 100% ethanol. The ethanol is then replaced by an organic solvent miscible with both alcohol and the embedding medium. As the solvent infiltrates the tissues, they become more transparent (undergo clearing). The fully cleared tissue is then placed in melted paraffin in an oven at 52°-60°C. At such temperatures the clearing solvent evaporates and the tissue is filled with liquid paraffin. The impregnated tissue then hardens in a small container of paraffin at room temperature. Tissues to be embedded with plastic resin are also dehydrated in ethanol and—depending on the kind of resin used—subsequently infiltrated with plastic solvents. The ethanol or solvents are later replaced by plastic solutions that harden with the addition of cross-linking polymerizers. Plastic embedding avoids the higher temperatures needed for paraffin embedding, which helps avoid shrinkage and major distortion of the tissue.
A hardened block containing tissue and paraffin is placed in an instrument called a microtome (Figure 1–1) and sliced by the steel blade into extremely thin sections. Paraffin sections are generally cut at 1-10 μm thickness, while the glass or diamond knives of ultramicrotomes produce sections of less than 1 μm for electron microscopy. One micrometer (1 μm) equals 1/1000 of a millimeter (mm) or 10-6 m. Other spatial units commonly used in histology include the nanometer (1 nm = 0.001 μm = 10-6 mm = 10-9 m) and angstrom (1 Å = 0.1 nm or 10-4 μm). The very thin sections are placed on glass slides and stained for light microscopy or on special grids for electron microscopic staining and examination.
 MEDICAL APPLICATION
Biopsies are tissue samples removed during surgery or routine medical procedures. In the operating room or medical center, biopsies are fixed in vials of formalin for later processing and microscopic analysis in a pathology laboratory. If results of such analyses are required before the medical procedure is completed, for example to know whether a growth is malignant before the patient is closed, a much more rapid processing method is used. The biopsy is rapidly frozen in liquid nitrogen, preserving cell structures and at the same time making the tissue hard and ready for sectioning. A microtome called a cryostat in a cabinet at subfreezing temperature is used to section the block with tissue, and the frozen sections are placed on slides for rapid staining and microscopic examination by a pathologist.
Freezing of tissues is also effective in the histochemical study of very sensitive enzymes or small molecules, because freezing, unlike fixation, does not inactivate most enzymes. Finally, because clearing solvents such as toluene dissolve cell lipids in fixed tissues, frozen sections are also useful when structures containing lipids are to be studied histologically.
Staining
Most cells and extracellular material are completely colorless, and to be studied microscopically sections must typically be stained (dyed). Methods of staining have been devised that not only make the various tissue components conspicuous but also permit distinctions to be made between them. Dyes stain tissue components more or less selectively, with many behaving like acidic or basic compounds and forming electrostatic (salt) linkages with ionizable radicals of molecules in tissues. Cell components such as nucleic acids with a net negative charge (anionic) stain more readily with basic dyes and are termed basophilic; cationic components, such as proteins with many ionized amino groups, have affinity for acidic dyes and are termed acidophilic.
Examples of basic dyes are toluidine blue, alcian blue, and methylene blue. Hematoxylin behaves like a basic dye, staining basophilic tissue components. The main tissue components that ionize and react with basic dyes do so because of acids in their composition (DNA, RNA, and glycosaminoglycans). Acid dyes (eg, eosin, orange G, and acid fuchsin) stain the acidophilic components of tissues such as mitochondria, secretory granules, and collagen.
Of all staining methods, the simple combination of hematoxylin and eosin (H&E) is used most commonly. Hematoxylin produces a dark blue or purple color, staining DNA in the cell nucleus and other acidic structures (such as RNA-rich portions of the cytoplasm and the matrix of cartilage). In contrast, eosin stains other cytoplasmic components and collagen pink (Figure 1–2a). Other dyes, such as the trichromes (eg, Mallory stain, Masson stain), are used in more complex histologic procedures. The trichromes, besides showing the nuclei and cytoplasm very well, help to distinguish extracellular tissue components better than H&E.
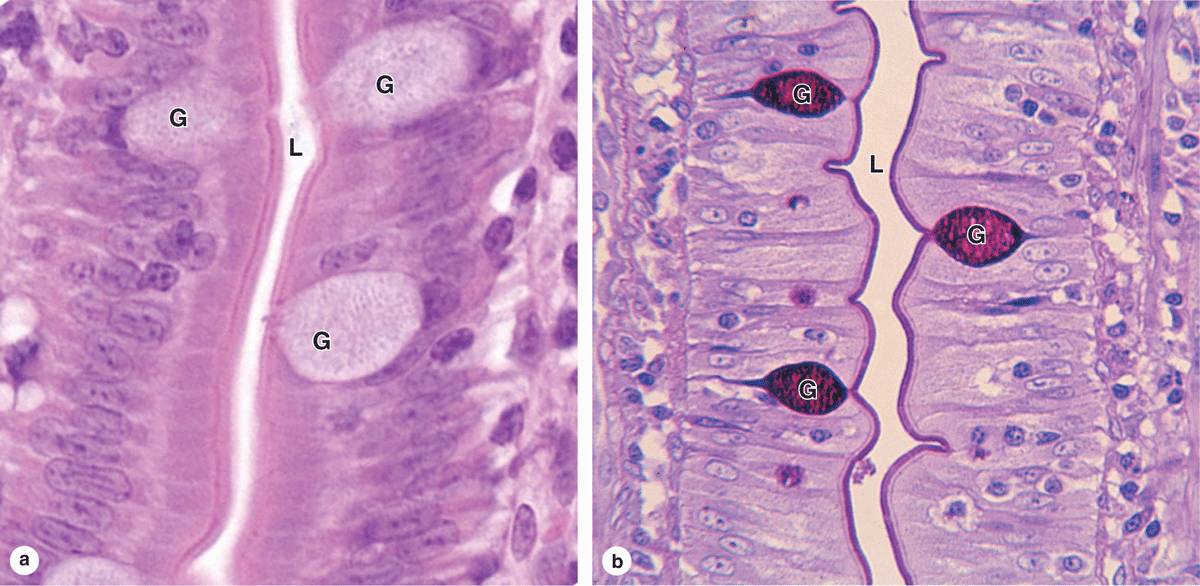
FIGURE 1–2 Hematoxylin and eosin (H&E) and periodic acid-Schiff (PAS) staining.
The chemical basis of other staining procedures is more complicated than that of the electrostatic interactions underlying basophilia and acidophilia. DNA can be specifically identified and quantified in nuclei using the Feulgen reaction, in which deoxyribose sugars are hydrolyzed by mild hydrochloric acid, followed by treatment with periodic acid-Schiff (PAS) reagent. This PAS reaction is based on the transformation of 1, 2-glycol groups present in the sugars into aldehyde residues, which then react with Schiff reagent to produce a purple or magenta color.
Polysaccharides constitute a heterogeneous group in tissues, occurring either in a free state or bound to proteins and lipids. Because of their hexose sugar content, many polysac-charides can also be demonstrated by the PAS reaction. A very common free polysaccharide in animal cells is glycogen, which can be demonstrated by PAS in liver, striated muscle, and other tissues where it accumulates.
Short branched chains of sugars (oligosaccharides) are attached to specific amino acids of glycoproteins, making most glycoproteins PAS-positive. Figure 1–2b shows an example of cells stained by the PAS reaction. Glycosaminoglycans (GAGs) are anionic, unbranched long-chain polysaccharides containing aminated sugars. Many GAGs are synthesized while attached to a core protein and are part of a class of macromol-ecules called proteoglycans, which upon secretion make up important parts of the ECM (see Chapters 5 and 7). GAGs and many acidic glycoproteins do not undergo the PAS reaction, but because of their high content of anionic carboxyl and sulfate groups, they show a strong electrostatic interaction with alcian blue and other basic stains.
Basophilic or PAS-positive material can be further identified by enzyme digestion, pretreatment of a tissue section with an enzyme that specifically digests one substrate. For example, pretreatment with ribonuclease will greatly reduce cytoplasmic basophilia with little overall effect on the nucleus, indicating the importance of RNA for the cytoplasmic staining. Similarly, free polysaccharides are digested by amylase, which can therefore be used to distinguish glycogen from glycoproteins in PAS-positive material.
In many staining procedures certain structures such as nuclei become visible, but other parts of cells remain color-free. In such cases a counterstain is used to give additional information. A counterstain is usually a single stain that is applied separately to allow better recognition of nuclei and other structures. In H&E staining, eosin is the counterstain to hematoxylin.
Lipid-rich structures of cells are best revealed with lipid-soluble dyes and avoiding the processing steps that remove lipids such as treatment with heat, organic solvents, or paraffin. Typically, frozen sections are stained in alcohol solutions saturated with a lipophilic dye such as Sudan black, which dissolves in lipid-rich structures of cells. Specialized methods for the localization of cholesterol, phospholipids, and glycolipids are useful in diagnosis of metabolic diseases in which there are intracellular accumulations of these different lipids. In addition to staining tissues with dyes, metal impregnation techniques usually using solutions of silver salts are a common method of visualizing certain ECM fibers and specific cellular elements in nervous tissue.
The whole procedure, from fixation to observing a tissue in a light microscope, may take from 12 hours to 2½ days, depending on the size of the tissue, the fixative, the embedding medium, and the method of staining. The final step before microscopic observation is mounting a protective glass coverslip on the slide with clear adhesive.
LIGHT MICROSCOPY
Conventional bright-field microscopy, as well as fluorescence, phase-contrast, differential interference, confocal, and polarizing microscopy are all based on the interaction of light with tissue components and are used to reveal and study tissue features in different ways.
Bright-Field Microscopy
With the bright-field microscope, widely used by students of histology, stained preparations are examined by means of ordinary light that passes through the specimen. The microscope includes an optical system and mechanisms to move and focus the specimen (Figure 1–3). The optical components consist of three lenses. The condenser collects and focuses a cone of light that illuminates the object to be observed. The objective lens enlarges and projects the image of the object in the direction of the eyepiece. The eyepiece or ocular lens further magnifies this image and projects it onto the viewer’s retina or a charge-coupled device (CCD) highly sensitive to low light levels with a monitor and camera. The total magnification is obtained by multiplying the magnifying power of the objective and ocular lenses.
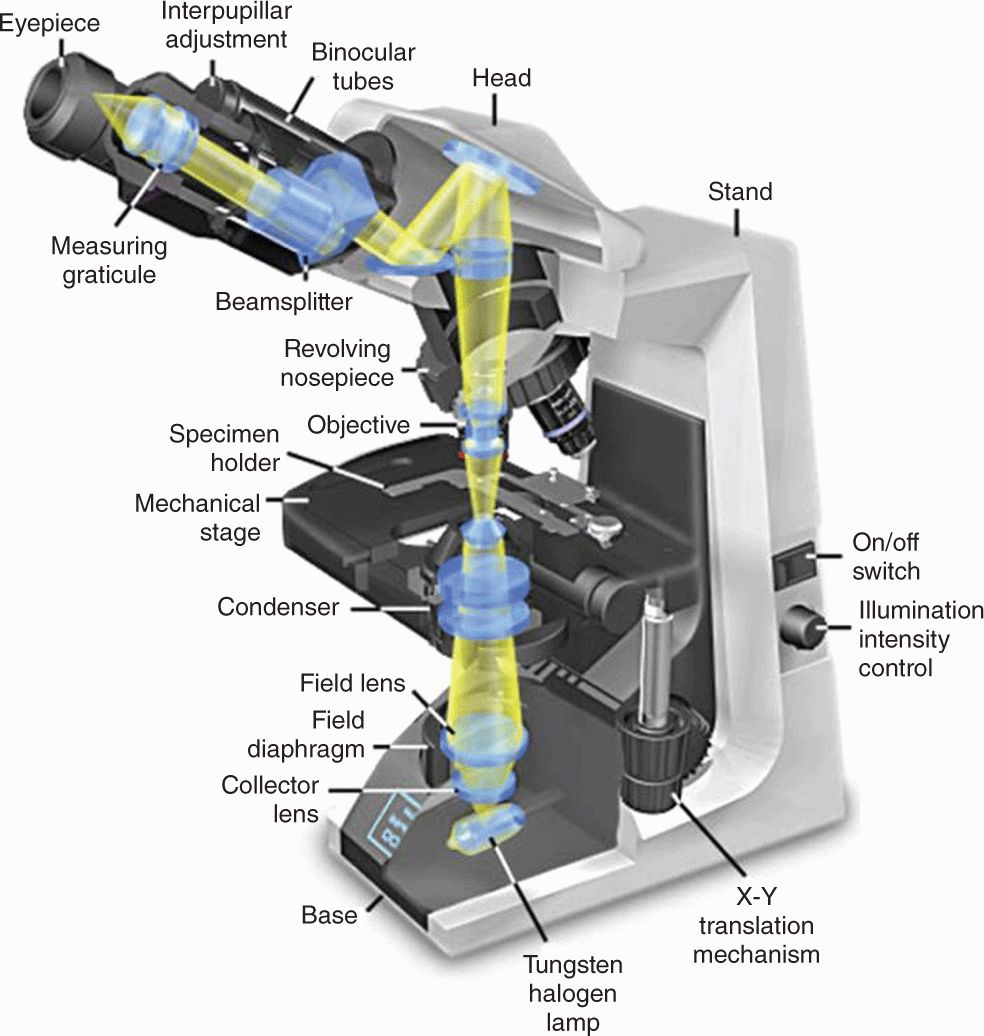
FIGURE 1–3 Components and light path of a bright-field microscope.
Photograph of a bright-field light microscope showing mechanical components and the pathway of light from the substage lamp to the eye of the observer. The optical system has three sets of lenses:
 The condenser collects and focuses a cone of light that illuminates the tissue slide on the stage.
 Objective lenses enlarge and project the illuminated image of the object toward the eyepiece. Interchangeable objectives with different magnifications routinely used in histology include X4 for observing a large area (field) of the tissue at low magnification; X10 for medium magnification of a smaller field; and X40 for high magnification of more detailed areas.
 The two eyepieces or oculars magnify this image another X10 and project it to the viewer, yielding a total magnification of X40, X100, or X400.
(With permission, from Nikon Instruments.)
The critical factor in obtaining a crisp, detailed image with a light microscope is its resolving power, defined as the smallest distance between two particles at which they can be seen as separate objects. The maximal resolving power of the light microscope is approximately 0.2 μm, a power that permits good images magnified 1000-1500 times. Objects smaller or thinner than 0.2 μm (such as a ribosome, a membrane, or a filament of actin) cannot be distinguished with this instrument. Likewise, two structures such as mitochondria will be seen as only one object if they are separated by less than 0.2 μm. The quality of the image—its clarity and richness of detail—depends on the microscope’s resolving power. The magnification is of value only when accompanied by high resolution. The resolving power of a microscope depends mainly on the quality of its objective lens. The eyepiece lens enlarges only the image obtained by the objective; it does not improve resolution. For this reason, when objectives of different magnifications are compared, those providing higher magnification also have higher resolving power.
Digital cameras highly sensitive to light enhance the power of the bright-field and other light microscopes by allowing the capture of images suitable for quantitative analysis and immediate printing. The frontiers of light microscopy have been redefined by the use of digital cameras, and image-enhancement programs (eg, to improve contrast) allow objects that may not be directly visible through the eyepieces to be analyzed on the video screen. Such systems are also useful for studying living cells for long periods of time because they use low-intensity light that avoids damaging the cells with heat from more intense illumination. Software developed for image analysis allows rapid measurements and quantitative study of microscopic structures.
Fluorescence Microscopy
When certain cellular substances are irradiated by light of a proper wavelength, they emit light with a longer wavelength—a phenomenon called fluorescence. In fluorescence microscopy, tissue sections are usually irradiated with ultraviolet (UV) light and the emission is in the visible portion of the spectrum. The fluorescent substances appear brilliant on a dark background. For this method, the microscope has a strong UV light source and special filters that select rays of different wavelengths emitted by the substances.
Fluorescent compounds with affinity for specific cell macromolecules may be used as fluorescent stains. Acridine orange, which binds both DNA and RNA, is an example. When observed in the fluorescence microscope, these nucleic acids emit slightly different fluorescence, allowing them to be localized separately in cells (Figure 1–4a). Other compounds such as DAPI and Hoechst stain specifically bind DNA and are used to stain cell nuclei, emitting a characteristic blue fluorescence under UV. Another important application of fluorescence microscopy is achieved by coupling compounds such as fluorescein to molecules that will specifically bind to certain cellular components and thus allow the identification of these structures under the microscope (Figure 1–4b). Antibodies labeled with fluorescent compounds are extremely important in immunohistologic staining. (See section on Visualizing Specific Molecules.)
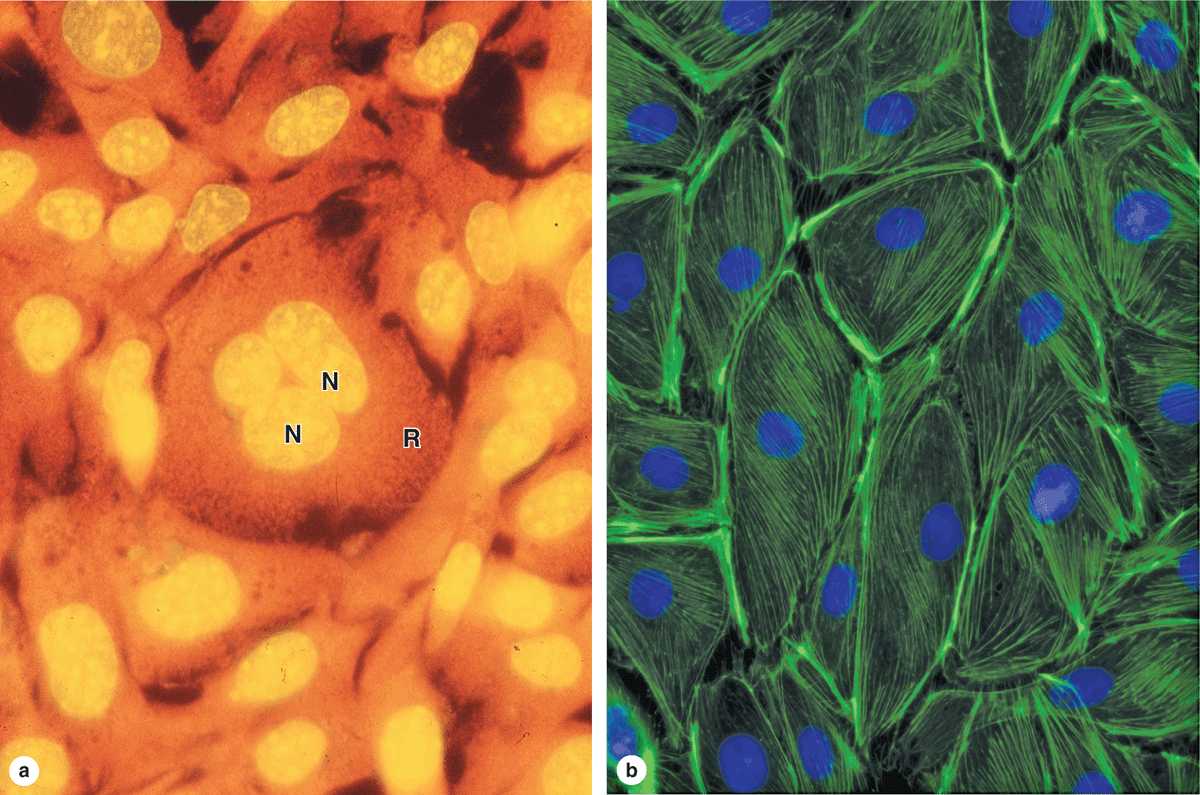
FIGURE 1–4 Appearance of cells with fluorescent microscopy.


