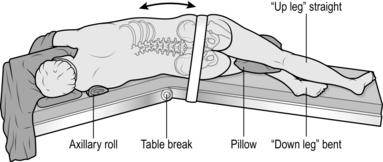
27 1. Operate with the patient under general anaesthetic. Ensure that a double lumen endobronchial tube is in place. 2. Position the patient in the lateral decubitus position (Fig. 27.1), arm at 90 degrees in the ‘praying’ position, back flush with edge of operating table. Support the patient with sandbags or a vacuum suction bean bag, strapped to the table for additional security if necessary. Apply padding to bony prominences, for example place a pillow between the knees. 3. Break the table to increase the distance between the rib spaces. 4. If necessary shave the skin, then prepare the chest, extending down to the operating table on both sides, up to the neck and down to the umbilicus. Apply the drapes. 5. Identify the tip of the scapula. Initially, start the incision approximately 2 cm below the tip of the scapula, and approximately 5 cm anterior to it, extending along the intercostal space to between the scapula and the spine. If necessary, extend the incision during the operation. Deepen the incision down to the dermis, followed by diathermy through the superficial fat down to the latissimus dorsi fascia. Two Langenbeck retractors are used to expose the muscle and diathermy slowly through it layer by layer. Grasp with forceps and cauterize any visible blood vessels. Once through the latissimus, place a finger on the interspaces above and below the rib, and apply diathermy directly down to the rib. Pick up the anterior fascia with the cold tip of the diathermy, slide two fingers into the space and apply diathermy onto the finger. Repeat for the posterior aspect. 6. Check with the anaesthetist to ensure lung isolation – ventilation is undertaken by the single contralateral lung). 7. Count the ribs and correctly identify the interspace to incise it. The standard position is the 5th interspace (between the 5th and 6th ribs), corresponding to the line of the oblique fissure. Diathermy in a posterior to anterior direction through the intercostal muscles, to ensure that you stay on the superior border of the lower rib. 8. Visualize the pleura and puncture it with the cold tip of the diathermy. Insert your finger into the pleural space to ensure that the lung is not adherent and to protect the lung from the diathermy, and apply diathermy onto the finger. 9. Resect a small section (1 cm) of lower rib using a costotome at the most posterior aspect if you need to increase access. Insert a swab at the posterior osteotomy site to achieve haemostasis. 10. Introduce a suitable retractor, such as Finocheitto’s or two Tudor-Edwards retractors, with a medium and small blade on each. 11. Using the long tip diathermy extend the incision anteriorly and posteriorly with diathermy through the intercostal muscle. 1. After achieving haemostasis, check for air leaks which may require attention. 2. Pour warm saline – or water in the presence of malignant disease – into the thoracic cavity and ask the anaesthetist to gently re-inflate the lung. Air leaks are revealed by bubbling. 3. After securing air leaks, insert one or two (28–32F) chest drains, through separate stab incisions anterior to the mid-axillary line. 4. Secure the drains with a purse-string suture so that the nurses can tie the purse string when the drains are removed. 1. Close the rib interspace incision with a pericostal suture such as 1 PDS. Take care not to catch the lung, intercostal vessels or drains in the sutures. Ensure that the lung inflates fully and in the correct orientation before you tie the pericostal sutures. 2. Close the muscle layer with a continuous suture such as 0 PDS. 3. Close the subcutaneous fat with a continuous suture such as 2/0 Vicryl. 4. Close the skin with a subcuticular stitch, using 3/0 Vicryl or metal clips. Cover it with an occlusive dressing. 1. This is the incision of choice for access to the sympathetic chain in the upper thorax, and is used by some surgeons to undertake pleurectomy. 2. It is not suitable for resecting bulky tumours, sleeve resections or radical pneumonectomy. 1. Make the skin incision in the desired interspace, continued down to the anterior border of the latissimus dorsi. 2. Retract the latissimus dorsi posteriorly and split the serratus anterior muscle in the direction of its fibres. 3. Access the rib interspace in the same manner as a posterolateral thoracotomy. 1. This is an alternative to median sternotomy. 2. Utilize it when you require simultaneous bilateral thoracic access; for example, for penetrating chest injuries. 3. Through it, you can achieve digital control of penetrating wounds, cross-clamping of the thoracic descending aorta or pulmonary hilum, and internal cardiac massage. 1. Make the incision over the 4th or 5th interspace extending to each posterior axillary line. 2. Beware of the internal thoracic vessels, each of which lies approximately 1 cm lateral to the sternal edge. Identify and ligate them. 3. Transect the sternum transversely with an oscillating or Gigli saw. 4. A midline incision in the pericardium allows access to the heart. 1. Make a 5–6-cm transverse incision just lateral to the sternum at the 2nd or 3rd intercostal space. 2. Split the pectoralis major transversely and identify the intercostal space. A section of costal cartilage can be resected to allow better access but this is rarely necessary. Identify and attempt to preserve the internal thoracic vessels. 3. Dissect off the mediastinal pleural reflection from the sternum and retract it laterally. Use finger dissection to identify the aorta and pulmonary artery. Identify lymph nodes and assess masses for fixation to surrounding structures. Biopsy tissue under direct vision using a mediastinocope or a thoracoscope. 4. If required, open the pleura and obtain a lung biopsy: drain the chest if lung biopsy is performed. 1. Diagnostic applications of video-assisted thoracoscopic surgery (VATS) include cancer staging, lung and pleural biopsy. 2. Therapeutic uses include drainage of fluid such as an effusion, empyema, blood, pleurodesis (Greek: desis = a binding together), pleurectomy, lung resection and sympathectomy. 1. Position the patient as for posterolateral thoracotomy, with the operating table counter-flexed to increase the space between the ribs and to ensure that the hip does not restrict downward angulation of the camera. 2. Thoracoscopes range from 5–10 mm in diameter with varying degrees of lens angulation (0, 30 and 45 degrees). The standard scope is a 10-mm, 0 degree scope. 3. Your position depends on the site of the pathology. Place the monitor so that you, the site of pathology, and the monitor are aligned to allow you to look straight ahead when operating. 4. Vision is facilitated by white balancing of the camera and application of an anti-fog solution (e.g. FRED® – fog reduction elimination device). 1. Correlate the initial port insertion with preoperative imaging. If you are undertaking VATS for a pleural effusion, you can use a needle and syringe to aspirate for fluid to ensure a safe position for entry. 2. Insert the camera port first. For indications such as pleurodesis the site of insertion is the junction between the middle and lower thirds of the chest. For indications such as management of pleural effusion place the incision a hand’s breadth above the costal margin (corresponding to the dome of the diaphragm). 3. Insert all other ports under direct vision (Fig. 27.7). 4. The length of VATS port incisions is similar to the diameter of the port (e.g. 11.5 mm). A Roberts’ forceps can be used as a retractor. Use diathermy all the way to the pleura. Ensure that the lung is isolated (see posterolateral thoracotomy above) before entry to the pleural cavity. Perform a finger sweep to confirm safe entry into the chest. 5. Instrument ports are inserted under direct vision using the scope. They are positioned to triangulate the lesion to facilitate easier dissection. 6. Rotation or tilting of the operating table can improve visualization by allowing the lung to drop away from the area to be examined. 1. Intercostal chest tube drainage with an underwater seal is a simple, effective and occasionally life-saving method to eliminate air or fluid in the pleural cavity. 2. Knowing when and how to insert a chest drain and its subsequent management is an important skill for all surgeons. 1. This versatile percutaneous technique involves passing the drain over a guide-wire and was devised by the Swedish radiologist Sven-Ivar Seldinger in 1953. It is relatively atraumatic compared to the open technique and is easy to learn. 2. Seldinger chest drains may be used to manage pneumothoraces (small air leak) or pleural effusions. 3. The disadvantage of Seldinger drains is that insertion is blind. You cannot use a finger sweep to ensure that there are no adhesions and so avoid lung injury. The size of drains available is smaller when compared to open chest drains. There is also the possibility of losing the guide-wire in the pleural cavity. 1. In elective situations, have adequate imaging available (chest X-ray, ultrasound or CT) to confirm the site of drain insertion. 2. Ultrasound is particularly useful to identify a safe site for the entry point of a Seldinger drain for effusions, as it can identify the position of the diaphragm and the presence of any loculations. It is important to carry out the procedure with the patient in the same position as when the scan was performed. 3. Position the patient lying supine at 45 degrees with the arm resting on the side of the patient (Fig. 27.8), or sitting leaning forwards. 1. Ensure all equipment is present before starting. Seldinger chest drains come in pre-packaged sterile sets. 2. If possible, have a nurse or assistant helping you. 3. Before starting, confirm the site for drain insertion. Review the chest X-ray and percuss the chest to establish the fluid level. 4. Create a wheal of local anaesthetic over the point of entry. Continue deeper into the pleural space (confirmed by a flash back of fluid or bubbles) and withdraw slightly to anaesthetize the pleura. 5. Introduce the trocar attached to a syringe into the intercostal space and advance it slowly while aspirating on the syringe. A ‘give’ may be felt as the parietal pleura is punctured or fluid may be aspirated. As soon as fluid is aspirated stop advancing the needle. Remove the syringe and introduce the guide-wire. 6. Remove the needle over the guide-wire. Never let go of the guide-wire. Next, introduce the dilator over the guide-wire. If the entry point is too tight, widen it with a scalpel. 7. Remove the dilator and pass the chest drain over the guide-wire. Then remove the guide-wire, connect the drain to an underwater seal and suture the drain in place with a horizontal mattress stitch.
Thorax
ACCESS
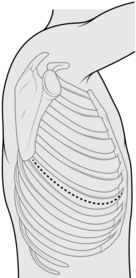
POSTEROLATERAL THORACOTOMY (Fig. 27.2)
Access
Before closure
Closure
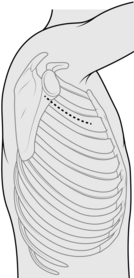
AXILLARY THORACOTOMY (Fig. 27.4)
Appraise
Action
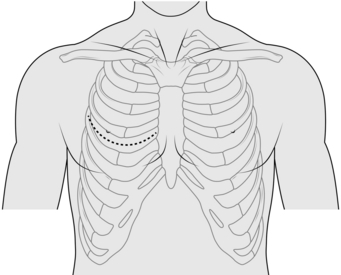
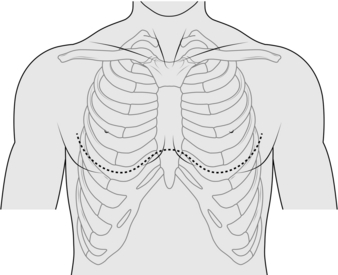
TRANSVERSE THORACOTOMY (CLAMSHELL) (Fig. 27.5)
Appraise
Action
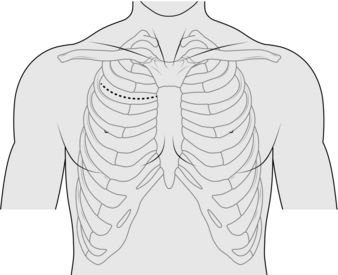
ANTERIOR MEDIASTINOTOMY (Fig. 27.6)
Action
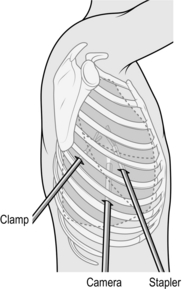
VIDEO-ASSISTED THORACOSCOPIC SURGERY
Appraise
Prepare
Action
CHEST DRAINS
PERCUTANEOUS/SELDINGER CHEST DRAIN
Appraise
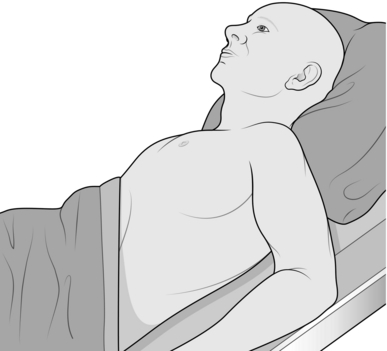
Prepare
Action
![]()
Stay updated, free articles. Join our Telegram channel

Full access? Get Clinical Tree


Thorax