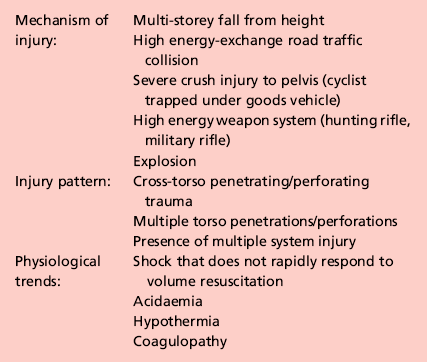
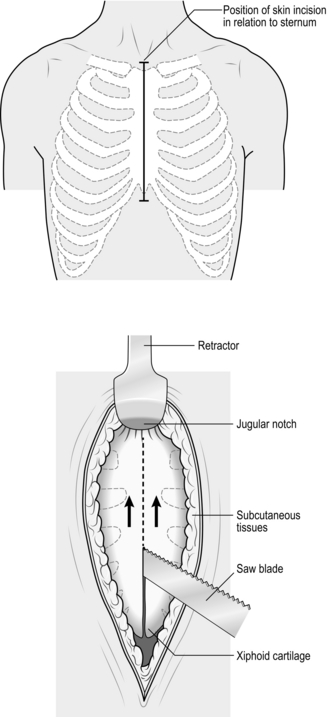
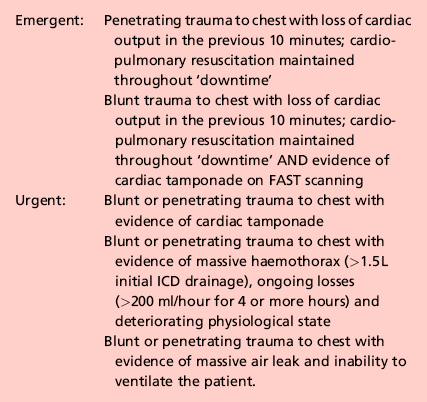
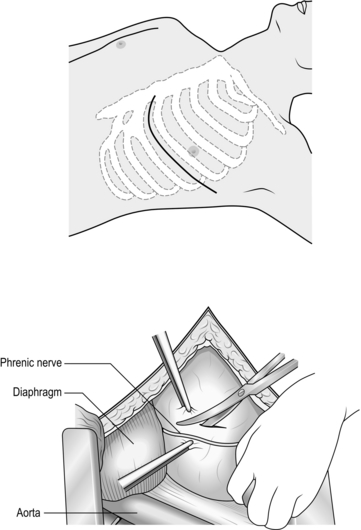
3 1. Damage control surgery (DCS) is a well-established suite of techniques relevant to the management of severely injured patients. 2. The essence of the damage control approach is to tailor the extent of the surgical intervention to that which will most rapidly restore physiological normality in the patient. Control of haemorrhage takes precedence, with completeness of surgical reconstruction sacrificed, in order that the physiological burden of surgery is as light as possible. Keep the first operation (DCS phase one) short, completing the procedure within 60–90 minutes, and deferring definitive closure of body cavities if required. After a period of time in intensive care (DCS phase two – which may be hours or days depending on how rapidly the patient can be returned to physiological normality), the patient may be transferred back to theatre for re-inspection and completion of surgery plus closure if appropriate (DCS phase three). 3. Patients with serious injury, particularly when shocked, are at risk of acute coagulopathy of trauma (ACoT). Hypoperfusion and tissue damage, exacerbated by hypothermia and acidaemia, can serve to disable the normal clotting pathways, leading to continued haemorrhage (often from multiple sites) and a lethal outcome. By choosing a damage control approach, you can rapidly reduce the chance of ACoT developing, or mitigate the extent of ACoT if it is already present. An important and recently developed adjunct to damage control is the use of matched ratios of blood (packed cells) and plasma during initial and ongoing fluid resuscitation efforts. Published experience from the wars in Iraq and Afghanistan, combined with data from civilian centres, supports early use of equal or near-equal ratios (1:1–1:2) of packed cells and plasma in reducing mortality, organ failure rates and ongoing need for blood transfusion, especially if used in conjunction with aggressive, early use of platelet transfusion. Damage control resuscitation (DCR) is the overarching term used to describe this haemostatic transfusion strategy plus damage control surgery to optimally treat the major trauma patient. As a practitioner of damage control surgery, you must be conversant with modern fluid resuscitation in order to ensure that your anaesthetic colleagues and other members of the trauma team are optimally managing the patient’s physiological requirements. 4. Having decided on which cavity or body area requires initial attention, you next need to determine whether the patient will tolerate a definitive repair of their injury complex, or whether damage control mode needs to be selected. This can only be answered by rigorously seeking information from other members of the trauma team – particularly the anaesthetist – as to the current and anticipated physiological state of the patient. Remember that this state is dynamic, and although a patient may appear to be stable on cursory assessment, never underestimate the ability of fit young patients to compensate for severe haemorrhage until they enter a rapid and unanticipated phase of terminal decline. Always be prepared to ‘course-correct’ according to new information that is presented to you. 1. Ensure that you have gained sufficient information from physical examination and relevant investigations to undertake the operation you deem necessary. Whilst a thorough physical examination is required (always examine the back), this does not mean exhaustive special investigations, particularly when you suspect haemorrhage. There is a danger in utilizing additional investigations as a means of ‘opting out’ (or deferring) decision-making in trauma, particularly when faced with the prospect of performing an unfamiliar surgical intervention in unfamiliar clinical circumstances. Transfer for surgical control of haemorrhage is occasionally indicated very early on in the primary survey – sometimes as part of ‘C’ (Circulation) – so address it before making the rest of the assessment. 2. Ensure rapid transport to the operating theatre. Activate the hospital’s massive transfusion protocol. Relay your intentions to the anaesthetic and scrub teams, stating what you expect to find, what you plan to do about it, and your back-up plan. Give your anaesthetic colleagues an opportunity to do the same. Ensure that all relevant surgical sets, equipment and sutures are available, including two suckers and multiple large packs. Call for assistance from colleagues early, particularly if you require specialist assistance. Alert intensive care and ensure that they are updated regularly with the progress of the case. In cases of competing injury sets (e.g. abdominal haemorrhage plus open femoral fracture; pelvic fracture plus knee dislocation with lower limb ischaemia) decide upon surgical priority with relevant colleagues before beginning operation. 3. Supervise the transfer of the patient on to the operating table and ensure adequate access. The standard patient position for truncal trauma is supine with arms outstretched at 90 degrees (cruciform position). Ensure ECG leads and tubing (ventilation, urethral catheter, chest drains) are routed away from your preparation area. Place a warming blanket over the extremities and the head; adjust operating room temperature upwards to mitigate hypothermia. 4. Prepare the entire torso from the level of the mid thighs to the clavicles. Lay drapes, covering the groin with a separate towel. If necessary, control active bleeding (from a neck or groin wound) with a sponge stick during the preparatory phase. 1. Make all surgical incisions in trauma patients large enough to allow full access to the relevant cavity or structure that is injured. Incisions should be extensile, i.e. amenable to elongation along an appropriate axis. The workhorse incisions for torso trauma are full-length midline laparotomy (abdominal and pelvic trauma), left/right anterolateral thoracotomy – proceeding to clamshell thoracotomy if required (thoracic trauma), and median sternotomy (control of aortic arch vessels). Any of these incisions can be combined with other incisions – for instance, laparotomy may be combined with a right anterolateral thoracotomy in cases of severe liver injury – if that is what is required to effect rapid visualization and control. 1. The keys to making an accurate assessment of the injury set and determining the source(s) of haemorrhage are: 2. If the degree of bleeding is not consistent with the degree of physiological instability, you must ensure that another cavity does not harbour the primary source of shock. For instance, if you performed a laparotomy, but are unconvinced that the degree of haemorrhage encountered explains the shock, search for bulging of the diaphragm and check chest drainage output as a means of re-assessing the thoracic cavity. 1. Having identified the bleeding organ or vessel, first control the haemorrhage. Initially you should use your hands to accomplish this, judiciously applying direct pressure (e.g. to a bleeding vessel), pinching tissue (such as the hilar vessels supplying a bleeding spleen or liver), or packing around a bleeding structure (such as the liver) in order to diminish blood loss and give yourself a little time to organize yourself and your team. 2. Whilst performing this initial manoeuvre, think: ‘Is my incision large enough for what I wish to accomplish? Have I got the correct retractors? Have I deployed my assistants correctly to use them properly? Are the lights angled correctly to give maximum illumination? What clamps/sutures/needle-holders/forceps do I need? Are the instruments the scrub team has laid out for me sufficient?’ Getting these factors addressed – setting yourself up correctly for success – is easier whilst maintaining digital haemorrhage control. 3. Communicate with the anaesthetist and explain what the source of the bleeding is, what you plan to do about it, and allow him or her a short period of time to optimize the requirements before removing your hands and proceeding. 4. Typically, gaining definitive control requires definitive visualization, often preceded by some dissection, and application of a clamp or haemostatic sutures, and/or resection of tissue or organ removal. These steps in haemostatic control may be made difficult by excessive haemorrhage, distorsion of normal anatomy by haematoma, and unfamiliarity with the procedure or anatomy. Your difficulties may be compounded by your natural anxiety at, and awareness of, the time-critical nature of the procedure. In such circumstances, energy and visual focus may become funnelled in to a particular task (‘I must correctly clamp the thoracic aorta’) at the expense of overall situational awareness (‘The internal mammary arteries, sectioned on entry to the chest, are still bleeding and need to be ligated’). Furthermore, under excessive stress, you lose creativity, so surgical technique and action resort to stereotype (‘This haemostatic suture has not worked; I shall ask for another suture and repeat the manoeuvre until something changes, even though this technique did not work the first time round’) – a phenomenon that Mattox and Hirschberg aptly describe as ‘flailing’. Be aware of this phenomenon, monitor yourself and the success of the manoeuvre you are employing to dissect/control/clamp/suture – above all, maintain situational awareness. 1. DCS laparotomy is always accompanied by temporary means of abdominal cavity closure in order to diminish (but not abolish) the risk of abdominal compartment syndrome and to allow for easy re-exploration in DCS phase three. Similarly, when operating on the injured extremity, the likelihood of compartment syndrome is significantly reduced by adequate fasciotomy. Have a very good reason NOT to leave the operated cavity open. 2. Having completed the surgery, consider and plan for the actions needed so that the patient can be eventually returned to the theatre for completion of surgery. 1. Penetrating trauma to the neck is more likely to require intervention than blunt trauma. The key decision you need to make is: does the patient need to go to theatre immediately or not? Patients who need urgent surgical exploration are those who display active arterial bleeding, have an expanding haematoma, or are shocked with poor response to haemostatic resuscitation. If your patient does not fall in to this category, examine the wound and determine if it has breached the platysma. You should be able to do this without formally exploring the wound. If the wound is superficial to platysma, simply close the skin. If the platysma is breached, investigate with imaging to exclude damage of the vascular or visceral structures. Contrast enhanced multi-detector CT has largely replaced screening by formal selective arteriography and barium contrast swallows for penetrating neck injuries. Reviewing the images, you should be able to follow the track of any penetrating mechanism and account for the integrity of all structures in the path, marrying up structural information with clinical features such as haemoptysis, haematemesis, neurological injury, or an obvious air leak, to enhance diagnosis. 2. Injuries to the lateral aspect of the neck, related to the thoracic outlet, may be associated with vascular compromise to the upper limb (damaged subclavian or axillary vessel) and damage to the brachial plexus. Endovascular stent grafting of these vessels may be an acceptable alternative to open surgery. 3. You must ensure that the airway is definitively controlled in the unstable patient. In the stable patient it is also wise to default to early intubation and ventilation when you have sufficient information to predict that the patient will require surgery. 1. When operating on injured structures in the neck, be aware of the zone of likely injury and ready yourself accordingly. Zone I injuries (inferior to the cricoid cartilage) are likely to require a median sternotomy to gain access to the proximal aortic branches. Zone III injuries, superior to the angle of the mandible, prove problematic in gaining distal control of the internal carotid and may require manoeuvres such as dislocation of the mandible to gain access. 2. Ensure that your preparation and draping takes account of these issues. In general, have the patient’s head rotated away from the side of the injury to gain better access to the carotid sheath. 1. When exploring the neck for possible vascular injury, begin by making a full-length incision along the anterior border of the sternocleidomastoid muscle, from mastoid process to jugular notch. Retract the SCM muscle laterally as you deepen the incision. The first structure you encounter is the internal jugular vein. Divide the facial vein and the omohyoid muscle, stretching across the carotid artery, to gain access to this vessel and its bifurcation. Divide the stylohyoid muscle in the superior part of the wound to gain access to the higher internal carotid. Be wary of the XII nerve as it crosses the internal carotid artery (see Chapter 23). 2. Be prepared to commence exploration of a Zone I injury by performing a median sternotomy (see Chapter 27), particularly if the patient is unstable. Open the pericardium and identify the aortic origin, then follow the vessel as it curves upwards and posteriorly, giving off the brachiocephalic, left common carotid and left subclavian arteries. Dividing the innominate vein gives better access; it can be repaired at the completion of the procedure if circumstances permit (Fig. 3.1). 3. Expose the 2nd part of the subclavian artery by a supraclavicular incision that runs above the medial two-thirds of the clavicle. Cut through platysma and the clavicular head of the sternocleidomastoid. Sweep the scalene fat pad laterally and palpate the anterior scalene muscle, running supero-inferiorally. Divide this muscle, sparing the phrenic nerve lying on the anterior surface, to reveal the subclavian artery lying in the base of the wound. 4. Having gained proximal and distal control, consider your options. Simply ligate veins. Repair damaged arteries if possible. Always repair the common or internal carotid. Excise injured arterial tissue and tack down the intima if there is a danger of a flap. Close simple lacerations transversely to avoid luminal narrowing. Usually, a patch of vein or Dacron is required. Prefer to repair segmental loss with an in-situ graft. In patients unable to tolerate definitive repair, then shunt the vessel with a commercial shunt or a short segment of diameter-matched IV tubing. You may safely ligate the external carotid artery. Haemorrhage from the vertebral artery is usually more difficult to deal with. Obtain access by retracting the carotid sheath medially and incising the prevertebral tissue plane so revealed. Beware of the prevertebral venous plexus which adds to the haemorrhage if damaged. You may achieve haemostasis using bone wax and pressure but otherwise control the artery above and below the injury by removing the costal face of the appropriate cervical transverse processes with bone nibblers. Repair of the vessel is technically difficult and ligation or clipping is usually the most practical option. 5. Explore tracheal wounds through a transverse skin crease incision or, if associated with a carotid injury, via medial dissection from the standard anterior sternocleidomastoid approach. You can normally repair the trachea using a single layer of absorbable material over the endotracheal tube. Check for associated pharyngeal injuries and repair them in two layers. Ensure that the two repairs are separated, to avoid a fistula forming. A mobilized length of strap muscle serves this purpose well. 1. Perform thoracotomy for trauma under emergent or urgent conditions. Undertake emergency thoracotomy on an in-extremis casualty who has no detectable circulation. The patient’s condition usually precludes transport to the operating theatre and for this reason the surgery is often performed in the Emergency Department. The outcome is far better following penetrating trauma than after blunt trauma. Survivors of emergent thoracotomy are generally those patients who have sustained a small stab wound to the front of the heart where loss of circulation has occurred in the presence of the trauma team. Factors mitigating against successful outcome include blunt mechanism of injury without evidence of tamponade, exsanguinating hypovolaemia, and prolonged ‘downtime’ (absence of circulation) prior to presentation to hospital. Tamponade is the injury pattern most amenable to emergency thoracotomy. Always search for it in the in-extremis or unstable casualty with thoracic trauma. This is particularly so when the injury is to ‘The Box’ of the anterior chest wall – an area demarcated superiorly and inferiorly by horizontal planes passing through the xiphisternum and jugular notch respectively, and bounded laterally by vertical planes passing through each nipple. Ultrasound scan is the most useful emergency department tool for detecting tamponade. 2. Urgent thoracotomy is usually performed in the operating theatre on a casualty who is unstable but exhibiting spontaneous circulation and has yet to decompensate. The diagnosis is usually either massive haemothorax or cardiac tamponade, but there is more time for you to plan your approach. In circumstances other than emergencies always ensure you have addressed the fundamental principles of current trauma management in Advanced Trauma Life Support® protocols, including appropriate imaging and correctly sited chest drainage. 1. Double lumen tubes are seldom required for these patients. Do not allow the search for double lumen tubes or a ‘cardiac anaesthetist’ familiar with double lumen intubation to delay surgery. 2. Standard trauma preparation and drape; cruciform position. Preparation consists of pouring of antiseptic skin solution onto the chest in the emergent situation. 1. For suspected tamponade, perform a left anterolateral thoracotomy (Fig. 3.2). Identify the fifth interspace immediately inferior to the male nipple, or by counting down from the angle of Louis (2nd costal cartilage meets sternum at this point). Make a bold transverse incision from the midline of the sternum, curving posteriorly and superiorly, following the fifth interspace as far back as the space between the mid and anterior axillary lines (Fig. 3.2). Deepen the incision. Retract the lowermost portion of pectoralis major superiorally or cut through these inferior fibres to reach and swiftly divide intercostal muscle with knife or scissors. Cleave the muscles toward the lower rib and avoid the intercostal bundle. 2. Prior to perforating the pleura, ask the anaesthetist to disconnect the patient from the ventilator in order to drop the lung away from the knife. Extend the perforation medially and laterally with scissors prior to re-ventilation. 3. Place the blades of a Finnecetto retractor in the wound and open up the incision to expose the pleural contents. Obtain maximal exposure. If time allows, examine the medial (sternal) portion of the wound as you widen the retractor, clamping and ligating the ipsilateral internal mammary artery.
The severely injured patient
PRINCIPLES OF DAMAGE CONTROL
Prepare
Access
Assess
Action
Checklist
NECK AND THORACIC OUTLET
Appraise
Prepare
Access
CHEST
THORACOTOMY
Appraise
Prepare
Access
![]()
Stay updated, free articles. Join our Telegram channel

Full access? Get Clinical Tree


The severely injured patient