• A single-center randomized trial comparing cephalic and contrast-guided axillary vein techniques found no difference in early or late complications, but longer procedural time for cephalic vein implantation and implant success of only 64%.4 Operators in this study were inexperienced, however.
• Intrathoracic subclavian vein puncture is discouraged due to the risk of complications including pneumothorax and an elevated likelihood of subclavian crush in between the clavicle and first rib.5
• Recent data from two ICD lead models with accelerated failure rates suggests that cephalic vein implantation may be associated with improved lead survival.6,7 Whether this translates to other lead models is unknown. Slightly higher failure rates with subclavian implantation may be due to improper technique rather than the access route itself.
ANATOMY
• The cephalic vein is formed from the dorsal venous arch of the hand before ascending the lateral aspect of the upper limb.
• At the level of the shoulder it courses along the delto-pectoral groove, between the lateral border of the pectoralis major and medial aspect of the deltoid. This is the point of access for endovascular leads (Figure 58-1A).

FIGURE 58-1A Anatomy of the venous drainage of the upper limb relevant to endovascular lead implant.
• From the deltopectoral groove, the cephalic vein descends deeply, piercing the clavipectoral fascia, to join the axillary vein (itself a continuation of the basilic vein from the same dorsal arch of the hand). This is illustrated in Figure 58-1B.
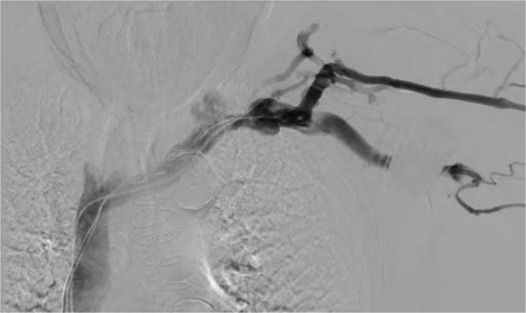
FIGURE 58-1B Digital subtraction contrast venogram demonstrating the radiographic anatomy of the cephalic, axillary, and subclavian veins. Note the pacemaker anterior to the axillary vein. The leads were implanted via the subclavian vein, which remains patent.
• The axillary vein ends at the lateral border of the first rib, where it becomes the subclavian vein (see Figure 58-1A).
• A medial site of entry into the subclavian vein risks passage through the costoclavicular ligament and/or the subclavius muscle, with subsequent “subclavian crush” leading to conductor fracture.8
• The relative courses of leads implanted via cephalic and axillary approaches are shown in Figure 58-2.
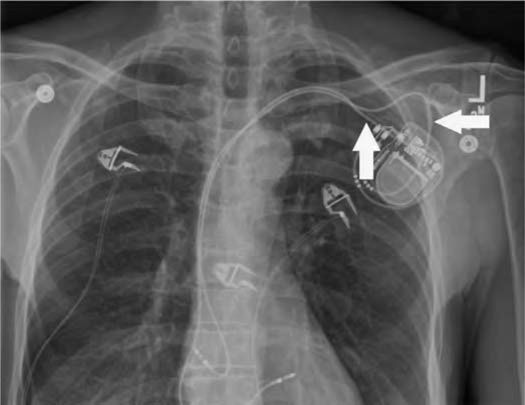
FIGURE 58-2 Postero-anterior chest x-ray demonstrating the radiographic correlates of cephalic and subclavian vein implant routes. The ventricular lead of this dual chamber pacemaker was implanted through the cephalic vein and advanced to the RV septum. This was not of sufficient caliber to accept two leads (which occurs uncommonly), so the atrial lead was implanted through the extrathoracic subclavian vein. Note the different initial angles of approach (marked by the arrowed anchoring sleeves); then both leads converge on the subclavian vein.
CEPHALIC VEIN CUT DOWN TECHNIQUE
In our practice, three routes for permanent endovascular lead implantation are used: extrathoracic subclavian vein puncture, cephalic vein cut down, and iliac vein puncture.
Cephalic vein cut down is performed as follows:
• The incision is made to expose the superior part of the delto-pectoral groove (Figure 58-3A). This may be accomplished by a horizontal incision parallel and inferior to the clavicle, with its lateral margin overlying the deltopectoral groove. In some cases this may be displaced laterally relative to a conventional approach for subclavian access. The alternative approach, favored by our group, is to make a diagonal incision along the deltopectoral groove itself, extending superiorly to terminate approximately 1 cm below the inferior margin of the clavicle. The groove is easily visualized in thin or muscular patients. In obese patients, it is best palpated.

FIGURE 58-3A Following formation of the subcutaneous pocket and minor dissection of soft tissues, the cephalic vein is exposed in the delto-pectoral groove. In this series of intraoperative photographs, medial is at the top, and cephalad at right.
• Typically, we create a pocket first, since this provides more mobility in the space and permits assessment of hemostasis during the procedure. A conventional subcutaneous pocket may be formed, or submuscular if desired. The deltopectoral groove from this position is usually marked by a line of adipose tissue between pectoralis and deltoid, covered by a light condensation of fascia. These connective tissues are separated using blunt dissection to expose the cephalic vein in the groove.
• Further blunt dissection is performed to remove adherent connective tissues and thus mobilize several centimeters of the vein. It is important to expose the proximal aspect of the vein before it passes below the clavicle since this portion may deviate in direction or lead to branch vessels which may need to be tied off.
• The vein is controlled with two silk half-ties with long tails: one distally and one proximally (Figure 58-3C
Stay updated, free articles. Join our Telegram channel

Full access? Get Clinical Tree


