Fig. 8.1
Six principal steps in biopsy of the first polar body (PB1) using the partial zona dissection method: (a) Fixation of the oocyte on the holding pipette. (b) Positioning of PB1 out of the focal plane. (c) Penetration of zona pellucida (ZP) with a sharp microneedle. (d) Rubbing of the microneedle against the holding pipette in order to open the ZP. (e) Positioning of PB1 in the same focal plane with a small cut in the ZP. (f) Insertion of non-bevelled biopsy micropipette through the ZP into the perivitelline space. (g–i) Aspiration of PB1 into the non-bevelled micropipette
2.
Using a very sharp microneedle, the ZP is penetrated tangentially at 4–5 o’clock, passing through the perivitelline space, and out at 7–8 o’clock (Fig. 8.1c).
3.
The opening in the ZP is made by gently rubbing the microneedle attached to part of the ZP against the holding pipette until a cut of about 20–40 μm long and 1–2 μm wide is created (Fig. 8.1d).
4.
The oocyte is further oriented with the help of both the holding pipette and the microneedle so that PB1 is positioned in the same focal plane as the small cut in the ZP made earlier (Fig. 8.1e).
5.
The biopsy micropipette, which has an inner diameter of 15–20 μm and is primed with 10 % PVP solution, is then inserted through the hole into the perivitelline space, and, by applying negative pressure, PB1 is separated gently from the oocyte and drawn into the micropipette (Fig. 8.1f–i). The same access and the same aspiration procedure should be also used for the removal of PB2.
Bevelled vs. Non-bevelled Biopsy Micropipettes
There are no universal rules governing the correct micropipette shape for PB biopsy. Under optimal biopsy conditions, for instance when both PBs are mature and loosely connected within the oolemma, it is advisable to use a non-bevelled micropipette, as this enables a very smooth mode of PB aspiration (Fig. 8.1). Difficulties during biopsy usually arise when one PB (usually PB2) is still firmly held to the oolemma; in such cases, the use of a bevelled micropipette is technically more practical as it is easier to dislodge the attachment. If removal of the PB still proves technically difficult, a higher pressure combined with some rigorous back and forth movements of the micropipette might help break the tight connection between PB and cytoplasm. However, anomalies at fertilization, such as the appearance of oocytes with a single pronucleus (1pn) or three pronuclei (3pn), are often seen after this exceptional extirpation of PB1 or PB2 from the cytoplasm of the oocyte. Alternative solutions, such as prolongation of oocyte incubation for a couple of hours, as suggested by Montag et al. [24], can sometimes be very helpful in facilitating the biopsy procedure by allowing completion of the meiotic cell cycle leading to complete PB1 or PB2 extrusion.
PB Transfer to Reaction Tube
Transfer of PBs from culture medium to reaction tubes following biopsy is another delicate step of this procedure. This “tubing” step requires a witness to ensure that patient name, PB number, and negative control are all correct. Tubing should in all cases be done in a running laminar flow under strict hygienic conditions to reduce DNA cross-contamination. Under a high-contrast stereomicroscope installed under laminar flow, the PB is washed at least twice in washing buffer droplets (e.g. PBS). Next, the PBs are transferred into a PCR-grade plastic capillary tube (120–170 μm inner diameter). Tube composition is critical to prevent possible PB loss if a glass capillary tube were to shatter or fracture. The volume of carry-over medium should be as small as possible.
Cryopreservation/Vitrification After Biopsy
Immediately after the introduction of PBD, it became clear that cryotechnology could play an important role in preservation of the developmental potential of biopsied oocytes. Nevertheless, the past period of almost two decades since the first use of PBD is notable for the almost total absence of published reports regarding cryopreservation of biopsied oocytes. It is also somewhat astonishing that not even the most experienced PBD teams, such as the Chicago group, released any report on cryopreservation of biopsied oocytes or embryos following biopsy during this period. The lack of literature data on cryopreservation after PBD can be interpreted in several ways, but the presence of a low number of genetically normal oocytes in general is definitely one of the important factors explaining why cryopreservation of biopsied oocytes has not been offered routinely to PGD couples. Indeed, apart from cases leading to a few genetically normal oocytes, which were kept in culture for fresh embryo transfer, PBD often terminated in producing a cohort of affected oocytes. In addition, the interpretation of genetic results was found not uncommonly to be impossible because of amplification and other problems. So, these two groups of PBD oocytes had to be excluded from further culture. An even stronger argument for the frequent rejection of freezing after biopsy was that the conventional slow-freezing method used did not offer optimal conditions for the cryopreservation of biopsied oocytes, and the survival rate of biopsied oocytes after slow freezing was so low that the number of successfully established pregnancies was practically negligible [26, 27].
One of the greatest technological breakthroughs in human embryology was the introduction of vitrification into routine clinical practice. Ever since Kuwayama and co-workers published their data on the successful use of the novel vitrification protocol, interest in cryopreservation of biopsied oocytes has increased dramatically [28, 29]. After thorough investigation of this new method of cryopreservation, our group was also able to demonstrate that vitrification is a very effective procedure for freezing mouse and human biopsied oocytes [20, 30]. We have since developed a strategy for vitrifying all oocytes immediately after sequential PB1 and PB2 biopsy. We named it “comprehensive cryopreservation” since it includes vitrification of all oocytes displaying two PNs following PB biopsy [20]. With embryo transfer in such instances postponed until the next cycle, this comprehensive vitrification approach may improve the overall success of PBD procedures in several ways. First, it could lead to an increase in overall diagnostic accuracy because it allows sufficient time for complex genetic tests. Second, the legal problems provoked by embryo freezing due to an unplanned prolongation of PBD and genetic analysis can be simply avoided with the inception of the ultra-rapid vitrification protocol. Finally, PBD combined with vitrification may facilitate the implementation of an elective single embryo transfer protocol for a selected group of young patients in order to avoid complications due to multiple-gestation pregnancies without adversely affecting pregnancy rates.
In the meantime, this comprehensive vitrification approach has been confirmed clinically at our institution with several pregnancies and live births having been achieved in a relatively short period of time following PBD. However, for full clinical validation, this protocol still awaits the results of prospective randomized studies, and also the final report of the ESTEEM polar body study, which was initiated after a successful multicentre pilot study organized a few years ago by the ESHRE PGS Task Force [31, 32].
FISH/Array-CGH
Fluorescence In Situ Hybridization
FISH on fixed nuclei of biopsied cells with target-specific DNA probes allows detection of chromosome imbalances associated with chromosome rearrangements. FISH has also been used to screen embryos for sporadic chromosome aneuploidy in PGS. However, using FISH in PGS on PB has several disadvantages. First, only a limited number of chromosomes can be analysed. Second, the interpretation is very challenging since the DNA is frequently of very low quality and degraded. Last but not least, it is technically very demanding to process a single cell for FISH. Accordingly, several clinical trials have failed to show any improvement in delivery rates either for poor prognosis [2, 33–35] or for good prognosis patients [36–39].
The principle of FISH is to use target-specific DNA probes labelled with fluorochromes or haptens to detect the copy number of specific loci. The biopsied cell has to be spread within a predefined area on the slide in order to facilitate its localization following hybridization; extreme care needs to be taken in ensuring that the cell is lysed, that the cytoplasm is dispersed, and that the nucleus is visible and intact. Stringent rules and protocol/interpretation guidelines should be applied [40]. Best practice guidelines for FISH technique have been summarized by Harton et al. [41].
How to Perform FISH [42]
Solutions
0.01 N HCl
Pepsin 10 mg/ml
1 % Paraformaldehyde/PBS
20×SSC: 3 M sodium chloride, 0.3 M tri sodium citrate, pH 7.2
60 % formamide/2×SSC
20 % Tween 20
4×SSC/0.05 % Tween
1 ml Vectarshield + 6 μl DAPI
Pretreatment
1.
Pre-wash fix nuclei on slides using PBS for 5 min at room temperature
2.
Add 0.5 ml pepsin to preheated (37 °C) 0.01 N HCl. Incubate the slides in this solution for 20 min at 37 °C
3.
Rinse the slides briefly in H2O and PBS
4.
Fix the slides using 1 % paraformaldehyde/PBS for 10 min at 4 °C
5.
Rinse slides briefly in PBS followed by H2O
6.
Dehydrate the slides (3 min each in 70 % EtOH, 90 % EtOH, 100 % EtOH) and air dry
7.
Add the FISH probe to the slide, add coverslip, and seal the coverslip with rubber cement
8.
Denature slides for 3 min at 75 °C, followed by incubation at 37 °C for a minimum of 2 h (best results with overnight incubation).
Post-treatment (in the dark)
1.
Remove coverslip and incubate the slides at 42 °C 5 min in 60 % formamide/2×SSC.
2.
Wash at 42 °C for 5 min in 2×SSC
3.
Wash at room temperature for 5 min in 4×SSC/0.05 % Tween 20.
4.
Dehydrate the slides (3 min each in 70, 90, and 100 % EtOH) and let the slides air dry
5.
Mount the slides in Vectarshield
6.
Store the slides in the dark at 4 °C until ready for analysis.
7.
Score signal by direct visualization using a fluorescence microscope.
Array-CGH
Array-CGH circumvents the limitations of the FISH technique by allowing the parallel analysis of all chromosomes rather than just a limited number. The ESHRE PGS Task Force conducted a pilot study in which both PBs were biopsied simultaneously following ICSI and analysed by array-CGH in order to predict aneuploidy status in the corresponding embryo [31]. The protocol can be completed within 12 h. The study demonstrated that the euploid/aneuploid status of the PBs was highly concordant (94 %) with the status of the corresponding zygotes. Analysis of the pattern of segregation errors of the chromosomes in the two PBs and corresponding zygote demonstrated that almost all errors in the first meiotic division (MI) are caused by inappropriate early division of sister chromatids rather than the non-disjunction of whole chromosomes and that many oocytes have multiple meiotic errors [43].
Since aneuploidy correction might occur due to premature division of sister chromatids for one of the homologous chromosomes followed by random segregation of the chromatid in meiosis II (M II), both PBs from an oocyte should be tested. If PB1 shows a chromosome aneuploidy and PB2 a reciprocal loss or gain of the same chromosome (Fig. 8.2), then the corresponding oocyte (and thus the resulting zygote) might be euploid [44]. In cases where there are other oocytes with normal PB1 and PB2, these would be selected for IVF. However, this concept is important in cases where none of the tested oocytes has normal PBs.
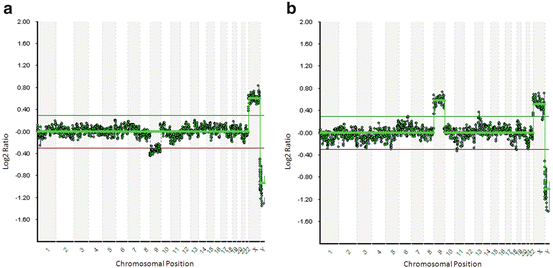
Fig. 8.2
Array comparative genomic hybridization (array-CGH) profiles of an example of a reciprocal chromosomal aneuploidy correction (Array-CGH: 24sure V3; Illumina, San Diego, CA, USA; image analysis: BlueFuse Multi, Illumina, San Diego, CA, USA). There is one error in meiosis I in PB1: a chromatid loss for chromosome 9 (a), which is balanced by a chromatid gain in PB2 (b). All other autosomes are within the bounds of normality. Green and red horizontal lines represent the 95 % confidence interval for normal copy number
How to Perform Array-CGH
The principle of array-CGH includes the following steps:
1.
Whole genome amplification of the sample DNA. The cell is lysed and the DNA is fragmented and amplified by polymerase chain reaction (PCR) using universal primers.
2.
Label amplified sample and control DNA with Cy3 and Cy5 fluorescent dyes, respectively. The master mix contains the reaction buffer, primer solution, dCTP-labelling mix, and the appropriate fluorescent dye. The labelling reaction is performed at 37 °C for 2–16 h. Labelled sample and control DNA are then combined and COT DNA is added to block repetitive sequences of the genome, followed by a co-precipitation step.
3.
Hybridization of combined labelled sample and control DNA on microarray slides, after a washing step with EtOH. The clean pellet is then re-suspended in pre-warmed hybridization buffer and denatured at 75 °C. Denatured DNA is thereafter applied to a microarray slide and hybridized at 47 °C for 4–16 h.
4.
Microarray slide washing.
5.
Scanning of arrays slides using a two-channel scanner.
6.
Analysis of the results and interpretation.
PGD for Single-Gene (Mendelian) Disorders by Molecular Genetic Analyses of Polar Bodies
Genetic analysis of PB1 and PB2 can be used for the diagnosis of various single-gene disorders with a maternal contribution (dominant or recessive mutation). The genetic testing procedure in PGD comprises a personal consultation with the couple and an initial genetic examination of both partners and additional family members, followed by analysis of PBs. PGD is considered only if the DNA of an index patient is available. Moreover, additional family members are included for segregation analysis and the identification of informative flanking markers. The couple is provided with the following information: an explanation of the genetic origin of the disease and its mode of inheritance, risk assessment and recurrence risk, principles of the molecular genetic testing procedure, reliability of the test and possible misdiagnosis, alternatives to PGD, time frame, and costs [7].
Linkage Analysis
In addition to confirmation of the disease-causing mutation in the family, the PGD procedure involves linkage analysis with mutation-flanking polymorphic markers to increase reliability and to reduce misdiagnosis due to allele dropout (ADO). For this purpose, DNA from the couple and additional family members is analysed with highly polymorphic intra- or extra-genic variants to determine which marker alleles co-segregate with the disease-causing mutation. This haplotype analysis requires at least two generations and an index patient in the family. Two types of markers are commonly used in PGD: microsatellites (short tandem repeats or STRs) and single nucleotide polymorphisms (SNPs).
DNA Amplification from a Single Genome
A major challenge in genetic testing is the limited amount of genetic material available, as this leads to a number of problems compared to routine diagnostic PCR where the amount of DNA is not limited. For efficient and reliable DNA amplification, different techniques have been developed. Two frequently used methods are (1) multiplex PCR and (2) whole genome amplification (WGA).
1.
Multiplex PCR involves the combination of multiple primer pairs in one PCR reaction to amplify multiple loci simultaneously [45]. For detection of the amplified alleles, conventional gel electrophoresis, capillary electrophoresis of fluorescently labelled PCR products, or Sanger DNA sequencing can be used [45]. The advantage of this technique is the increased specificity and sensitivity afforded by amplifying unique sequences; however, the method requires a family-specific design, which is time-consuming and labour-intensive [46].
2.


WGA, which amplifies the entire genome, is an alternative approach that provides a sufficient amount of DNA for downstream applications [47].
Stay updated, free articles. Join our Telegram channel
Full access? Get Clinical Tree
