Fig. 1.1
A drawing of a mechanical stylus equipment clearly demonstrating the influence of the stylus tip. The measured profile is significantly smoother than the real surface (Figure produced by Braian Development AB, Malmö, Sweden)
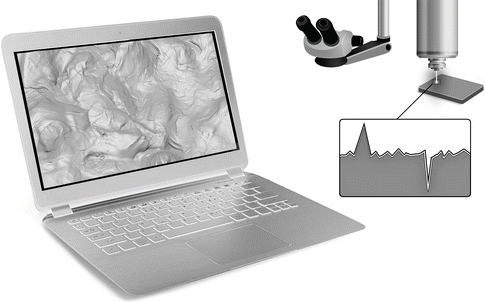
Optical instruments: in particular interferometry has been found appropriate for measuring a huge variation of implant surfaces, from smooth to rough surface modifications. The technique uses reflecting light as an optical stylus (Fig. 1.2). The measuring range is within a few millimetres. The technique provides high resolution, down to the nanometre level in height direction but is limited in spatial direction to approximately 0.3 μm; thus, the technique is most appropriate for surface characterisation at the micrometre level. In relation to oral implants, one big advantage with the technique is the possibility to access all parts of the implant, even flank areas, which is important since these areas are the largest part of the implant that is in contact with the surrounding bone. One disadvantage with optical instruments is that studied objects need some reflecting capacity, at least 4 % of the incident light as a minimum.


Fig. 1.2
A drawing of an optical profiler. Due to the noncontact technique, the horizontal resolution is increased. The light beam can follow the irregularities quite well (Figure produced by Braian Development AB, Malmö, Sweden)
Atomic force microscopy (AFM): AFM can work in principle in three different modes of operation, contact, noncontact and tapping mode. The instrument uses a tip and cantilever with similar principle as the stylus instrument but with a huge difference in size. The AFM tip is in the range of a few to approximately 20 nm in diameter. The tip can be in contact with the surface during measurements or above it with the help of van der Waals forces. The measuring area is rather small, typically in the submicron range. The resolution can approach molecular levels both in height and spatial directions which makes it possible to measure nanostructures. However, many implants have a surface that is too rough for the equipment; thus, for oral implants the application is limited to rather smooth surfaces. Furthermore, flank areas are difficult to measure, due to the same reasons as for the stylus instrument.
Quantitative Evaluation of Measurements
Independent of measuring instruments the measuring data is used to calculate the dimensions and properties such as slope of the irregularities included in the surface. There are hundreds of different parameters; the challenge is to find descriptors that can predict the biological response to certain surface structures.
An implant surface is a geometrical combination of overlay features in different scales:
1.
Overall form such as discs, cylinders or screws
2.
Waviness due to, for example, machining vibration or marks from cutting tools
3.
Micro features, for example, peaks, valleys, scratches, pits, ridges and porosity
4.
Smaller nano-features, for example, tubes, peaks, pits and ridges
Stylus instruments originally provided information from one profile alone, i.e. 2D data. Today 3D characterisation is far more common. Needless to say 3D provides much more data; thus, the parameter values will be more reliable.
2D descriptions can be used to describe relatively simple surfaces and simple thread geometries, but very often a three-dimensional (3D) representation of a surface is required to quantify directional surface features like ‘craters’, ‘droplets’, pits, tubes, etc., features quite common on oral implants. This largely excludes 2D metrology and 2D characterisation as suitable for dental implant measurement purposes.
Before the mid-1990s, the common practice for dental implant surface geometry specification was at best the 2D profile amplitude parameters R a and R t describing the average and maximum amplitudes of the profile (ISO 4287:1996). Extensive research in the area resulted in a suggestion for a parameter set for dental implant characterisation based on the current EUR 15178N and ISO 25178 standards [1]. For an acceptable characterisation of implant topography, at least 1 height, 1 spatial and 1 hybrid parameter were suggested to be presented.
Stay updated, free articles. Join our Telegram channel

Full access? Get Clinical Tree


