■ Please refer to the appropriate chapter for further details.
TECHNIQUES
ACCESS AND PORT PLACEMENT
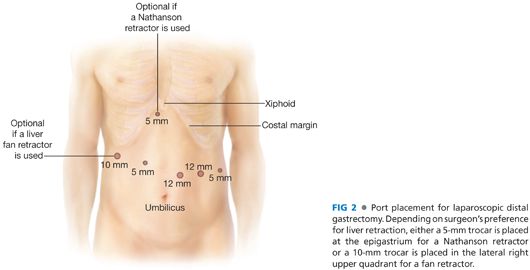
■ Same as Minimally Invasive Distal Gastrectomy, except for the camera port, which is placed routinely two to three fingerbreadths above the umbilicus and to the left of the midline, and a 15-mm trocar used for the most lateral trocar site on the left (FIG 2).
■ Please refer to the appropriate chapter for further details.
DISSECTION OF THE GREATER CURVE
■ Retract the transverse colon and the greater omentum caudally.
■ Access the lesser sac by entering the gastrocolic ligament in an avascular area with ultrasonic shears.
■ Extend the dissection of the gastrocolic ligament distally toward the pylorus and cephalad toward the spleen with the ultrasonic shears.
■ Continue the dissection of the gastrocolic ligament along the upper third of the greater curvature with the division of the left gastroepiploic vessels and then the gastrosplenic ligament including the short gastric vessels. This portion of the dissection is greatly facilitated by bringing the stomach down and rolling it up to expose the back wall of the stomach.
■ By performing the dissection of the greater curvature lateral to the gastroepiploic arcade, the lymph nodes along the gastroepiploic vessels (stations 4d and 4sb) are included in the specimen.
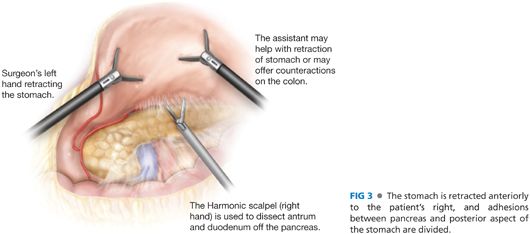
■ In order to expose the lesser cavity in its entirety, divide the avascular posterior gastropancreatic adhesions that are almost always present between the posterior wall of the stomach and the anterior surface of the pancreas. Division of those adhesions will also facilitate anterior retraction of the stomach (FIG 3).
■ Next, continue the dissection more cranially along the greater gastric curvature, until all of the short gastric vessels are divided and the fundus is completely mobilized. At this time, the left crus and the hiatus with the distal esophagus should be visualized (FIG 4). Having the operating surgeon retract the anterior fundus toward the anterior abdominal wall and to the patient’s right with the assistant retracting the posterior fundus in the same direction can improve the exposure.
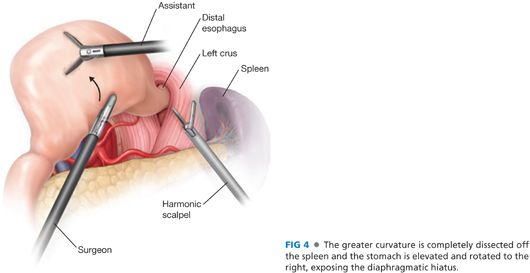
■ Using the ultrasonic dissector, divide the lateral portion of the phrenoesophageal ligament and expose the fibers of the left crus.
ANTRAL DISSECTION
■ Firm anterior retraction of the stomach aids in the duodenal dissection. While retracting the antrum toward the abdominal wall, separate bluntly or with Endoshear the posterior wall of the duodenum off the anterior surface of the pancreatic head. The gastroduodenal artery marks the limit of this pancreaticoduodenal dissection (FIG 5).
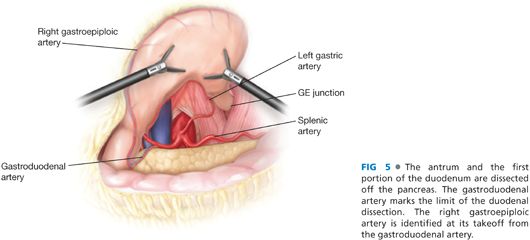
■ Identify the origin of the right gastroepiploic artery. This is usually a direct continuation of the gastroduodenal artery caudally emanating from the inferior edge of the pancreas. Use the lower border of the pancreas as a guide for where to divide the right gastroepiploic artery.
■ Sweep the lymphatic tissue around the right gastroepiploic vessels (infrapyloric nodes, station 6) toward the specimen. Now, divide the right gastroepiploic vessels between clips or using a vascular load stapler. If clips have been used in proximity of the vessels, take great care to ensure they are not included in the stapler line.
■ The right gastric artery can be dissected from behind the stomach and duodenum with good visualization. Dissect the filmy adhesions superior and posterior the first portion of the duodenum until the right gastric artery is visualized. Sweep the lymphatic tissue around the right gastric artery toward the specimen. This maneuver clears the suprapyloric lymph nodes (station 5).
■ You can also retract the duodenum caudally and visualize the right gastric artery anteriorly at its takeoff from the common hepatic artery. Dissect it free, doubly clip, and divide it.
DIVISION OF THE DUODENUM
■ Remove nasogastric tubes and/or temperature probes from the patient’s mouth to prevent their inclusion in the jaws of the stapler.
■ Make sure adequate length of duodenum is mobilized to easily allow placement of a linear stapler across the first portion of the duodenum, just distal to the pylorus.
■ Place an Endo GIA with 3.5-mm cartridge close to the level of the duodenal dissection to avoid the pyloric ring and minimize duodenal ischemia. We often use a staple line reinforcement of biologic material, although usefulness of this device for prevention of postoperative leakage has not been proven. Before firing, make sure that any esophageal tube has been removed and that the portal structures are excluded from your stapler line.
■ Make every attempt to divide the duodenum in one firing. Carefully inspect the integrity of duodenal staple line.
DISSECTION OF THE HEPATODUODENAL LIGAMENT
■ Incise the peritoneum overlying the common hepatic artery and the bile duct with the hook electrocautery. Divide the gastrohepatic ligament, remaining along the left lobe of the liver and paying attention to identify and preserve an accessory or replaced left hepatic artery.
■ Identify the base of the right crus.
■ The lymph nodes along the common hepatic (station 8) and proper hepatic (station 12) arteries are removed en bloc just anterior to the portal vein. Our preference is to use the hook for dissection and the ultrasonic scalpel for division of larger vessels. Frequently, a vessel loop around the hepatic artery aids in retraction.
DISSECTION OF THE INTRAABDOMINAL ESOPHAGUS
■ Have the assistant retract the stomach down and to the patient’s left. This will improve exposure to the right crus, which had been previously identified.
■ Free the gastroesophageal junction from the hiatus by dissecting up the right crus with ultrasonic shears.
■ Take down the phrenoesophageal ligament and proceed through the connective tissue posterior to the esophagus to extend the dissection toward the left crus.
■ Divide the right and left vagus nerves when identified.
■ The gastroesophageal junction is now dissected circumferentially. Guide a 2-cm wide Penrose drain around the esophagus. Secure the two ends of the Penrose together with an Endo GIA stapler (Covidien, Norwalk, CT) or an Endo loop, leaving little space between the drain and the esophageal wall.
■ The assistant may now use the Penrose drain to retract the esophagus caudally and increase exposure of the hiatal region. Complete the dissection of the lower esophagus using blunt and ultrasonic dissection.
DIVISION OF THE LEFT GASTRIC ARTERY
■ Use either the Nathanson liver retractor or a handheld retractor to elevate the stomach and identify the left gastric artery and the celiac trunk.
■ The left gastric vessels at this time should be readily identifiable caudad to the Penrose drain, between the two “windows” created by the hiatal dissection, and by the opening of the gastrohepatic ligament.
■ Once the celiac anatomy is evident, dissect the left gastric artery and skeletonize its takeoff from the celiac trunk, therefore mobilizing nodal tissue of station 7 (left gastric artery) and 9 (celiac artery) anteriorly toward the specimen. Once the left gastric pedicle is skeletonized, divide it at its origin, using a 2.5-mm Endo GIA cartridge flush, with the anterior pancreatic body. Our practice is to take the coronary vein and the left gastric together in a single fire of the stapler.
■ Once the left gastric artery is divided, skeletonize the splenic artery thus mobilizing station 11 nodes. Again, vessel loops may aid in retraction of the larger arteries in concert with gentle downward retraction of the pancreatic body. Care must be taken to identify and preserve the splenic vein.
■ We do not routinely include the peritoneum covering the anterior surface of the pancreas in our dissection.
■ We do not routinely perform a splenectomy or a distal pancreatectomy, because in the western literature, potential benefits of a complete dissection of the lymph nodes in station 11 is outweighed by a significant increase in postoperative morbidity (specifically pancreatic leaks) without measurable effect in long-term survival.
PROXIMAL DIVISION
■ Division of the left gastric artery will increase exposure to the hiatus.
■ With the assistant pulling on the Penrose to retract the stomach caudally, complete (if necessary) the mobilization of the intraabdominal esophagus using ultrasonic shears.
■ Place two stay sutures on each side of the esophagus, proximally to the planned division. Those sutures will facilitate retrieval of the esophagus should it retract in the mediastinum after removal of the specimen.
■ Transect the distal esophagus using a 3.5-mm Endo GIA of appropriate length.
■ The specimen is placed in a 15-mm endo bag and extracted by enlarging as needed the most lateral trocar site on the left. If you have to make a large incision to remove the specimen, you may need to use a ballooned trocar for this site to seal the peritoneal cavity and avoid loss of the pneumoperitoneum.
■ Obtain hemostasis.
■ The stump of the excised portion of esophagus may be submitted for frozen section examination to assure a microscopically negative margin.
RECONSTRUCTION WITH STAPLED ESOPHAGOJEJUNOSTOMY
■ Our choice for the reconstruction is a Roux-en-Y esophagojejunostomy in an antecolic fashion, using an end-to-end anastomosis (EEA) OrVil™ stapler device with a 25-mm diameter. Alternatively, a 21-mm diameter EEA stapler can be used for a smaller caliber esophagus.
■ The OrVil™ is a device prepared with an EEA anvil head fastened in a tilted state to a long polyester tube.
■ End-to-side esophagojejunostomy
■ Exposure of the distal esophagus is facilitated by gentle tension on the stay sutures previously placed.
■ Insert the OrVil™ device through the patient’s mouth and guide it into the esophagus until the tip reaches the stapled line at its blinded end.
■ Create a small esophagotomy in the midportion of the stapled line, and let the tip of the OrVil™ pass through it.
■ Use a grasper inserted through a left trocar to pull the tube outside the esophagus, until the anvil is seen effacing the stapled line at the end of the esophageal stump. You must pay extreme attention during this maneuver, as it is relatively easy to tear the esophagus. Maneuvers that assist in passing the OrVil™ include adequate paralysis, jaw thrust, and deflating the balloon in the endotracheal tube.
■ The anvil head and the tube are kept connected by two pieces of polyester yarns; while securing the anvil, cut one thread and detach the tube from the anvil.
■ Identify the ligament of Treitz at the base of the transverse mesocolon. Proper anatomy is confirmed by visualization of the inferior mesenteric vein.
■ Divide the jejunum 20 cm away from the ligament of Treitz with a 3.5-mm Endo GIA.
■ Starting from the mesenteric side, remove most of the stapled line from the distal limb of the divided jejunum. Make sure not to completely excise the stapled line from the jejunum, but leave it attached to the antimesenteric side; you can use it as a handle to facilitate maneuvering this loop of bowel over the stapler.
■ Remove the trocar from the left lateral incision and use this opening to insert the EEA stapler into the abdomen. Enlarge this incision as needed to accommodate the EEA. Usually, two fingerbreadths are sufficient. Your assistant should now use two graspers to grab the mesenteric side and the thin strip of jejunum with the staples still attached to the antimesenteric side. While your assistant provides adequate exposure of the jejunal lumen with the two graspers, guide the EEA inside the lumen of the jejunum.
■ Select an appropriate site on the antimesenteric side of the jejunum for the esophagojejunostomy. Make sure it can easily reach the esophageal stump without tension.
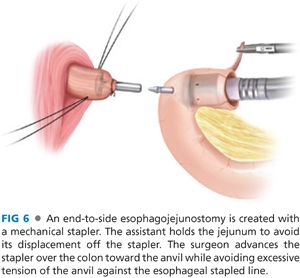
■ Once you are satisfied with the site for the anastomosis, advance the spike of the EEA through the antimesenteric wall of the jejunum.
■ Ask your assistance to maintain tension on the jejunum, so that it does not retract off the EEA. Paying extreme attention to keep the spike of the EEA through the jejunotomy, advance the EEA toward the esophageal stump (FIG 6).
Stay updated, free articles. Join our Telegram channel

Full access? Get Clinical Tree


