■ Pad pressure points along arms and legs and secure the knees in the locked position. Pillow cases or folded sheets and 2-in silk tape can be used to keep the knees from buckling. Arms are secured either by Kerlix™ gauze wrapped around the armboard or by commercially made arm straps.
■ Prior to prepping and draping, check the positioning by manipulating the bed in all of the positions that will be used during the operation.
TECHNIQUES
ACCESS AND PORT PLACEMENT
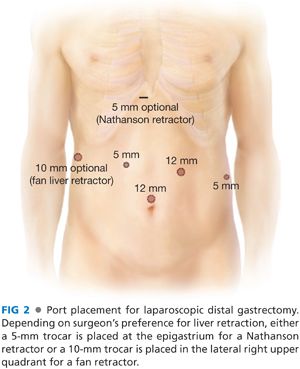
■ Port placement is dictated by the body habitus of the patient. The umbilical trocar is generally used for the camera. In obese patients, or with an unusually low umbilicus, the camera port may need to be more cephalad, often two or three fingerbreadths above the umbilicus and left to the midline.
■ Place a 10-mm trocar at the umbilicus with usual Hassan technique.
■ Establish a 15 mmHg pneumoperitoneum and perform a diagnostic laparoscopy to rule out peritoneal or hepatic metastases. If metastatic lesions are suspected, they should be biopsied and sent for frozen section prior to committing to gastrectomy. If ascites is present, washings should be performed.
■ Identify the neoplasm by visualization or by palpation. If unsuccessful, intraoperative endoscopy is encouraged.
■ Place the patient in steep reverse Trendelenburg position and insert the trocars under direct visualization and in a direction that minimize torque. Our typical port setup is shown in FIG 2.

■ Retract the liver with a subxiphoid Nathanson retractor. However, stiff or floppy livers are best retracted with a 10-mm handheld fan retractor from the patient’s right side.
GASTROCOLIC DISSECTION
■ Reflect the greater omentum cephalad. Retract the transverse colon caudally.
■ Mobilize the omentum off of the transverse colon using ultrasonic scissors. In the course of this mobilization, the lesser sac is entered. It is helpful to widely open the lesser sac in order to aid the anterior retraction of the distal stomach.
■ Care must be taken to preserve at least the most proximal short gastric vessels to assure adequate perfusion to the remnant stomach.
■ Lysing the gastropancreatic adhesions is helpful in obtaining the proper retraction.
ANTRAL DISSECTION
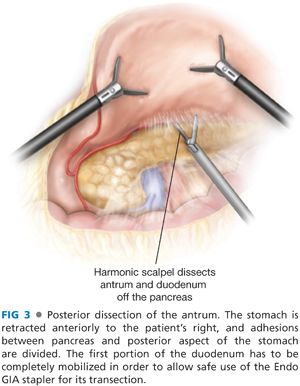
■ Once the greater curvature is fully mobilized, complete the gastric dissection by dividing sharply any gastropancreatic or retrogastric adhesions until the entire posterior wall of the stomach are visualized in its entirety (FIG 3).

■ Firm anterior retraction of the stomach aids in the duodenal dissection. By retracting the antrum toward the abdominal wall, the duodenum may be freed from the anterior surface of the pancreatic head. The gastroduodenal artery marks the limit of this pancreaticoduodenal dissection.
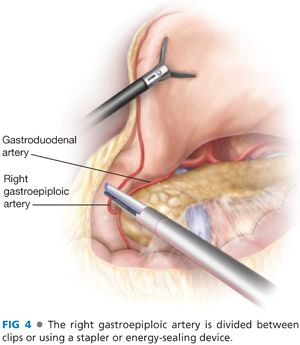
■ Identify the origin of the right gastroepiploic artery (which corresponds to lymph node station 6 [FIG 4]). This is usually a direct continuation of the gastroduodenal artery, caudally emanating from the inferior edge of the pancreas. Use the lower border of the pancreas as a guide for where to divide the right gastroepiploic artery.

■ Sweep the lymphatic tissue around the right gastroepiploic vessels toward the specimen. Then divide the right gastroepiploic vessels between clips or using a vascular load stapler. If clips have been used in proximity of the vessels, take great care to ensure they are not included in the stapler line.
■ The right gastric artery can be dissected from behind the stomach and duodenum with good visualization. Dissect the filmy adhesions superior and posterior to the first portion of the duodenum until the right gastric artery is visualized. You can also retract the duodenum caudally and visualize the right gastric anteriorly at its takeoff from the common hepatic artery. Dissect it free, doubly clip, and divide it.
DIVISION OF THE DUODENUM
■ Remove nasogastric tubes and/or temperature probes from the patient’s mouth to prevent their inclusion in the jaws of the stapler.
■ Make sure adequate length of duodenum is mobilized to easily allow placement of a linear stapler across the first portion of the duodenum, just distal to the pylorus.
■ Place an Endo GIA with 3.5-mm cartridge close to the level of the duodenal dissection to avoid the pyloric ring and minimize duodenal ischemia. We often use a staple line reinforcement of biologic material, although usefulness of this device for prevention of postoperative leakage has not been proven. Before firing, make sure again that any esophageal tube has been removed and that portal structures are excluded from your stapler line.
■ Make every attempt to divide the duodenum in one firing. Carefully inspect the integrity of the duodenal staple line.
DISSECTION OF THE HEPATODUODENAL LIGAMENT
■ Incise the peritoneum overlying the common hepatic artery and the bile duct with the hook electrocautery. Take care to identify aberrant left hepatic arteries. Divide the entire lesser omentum remaining along the left lobe of the liver.
■ The base of the right crus is identified.
■ Identify the hepatic artery and skeletonize it, mobilizing stations 12, 5, and 8. Our preference is to use the hook for dissection and the ultrasonic scalpel for division of larger vessels. Frequently, a vessel loop around the hepatic artery aids in retraction.
DIVISION OF THE LEFT GASTRIC ARTERY
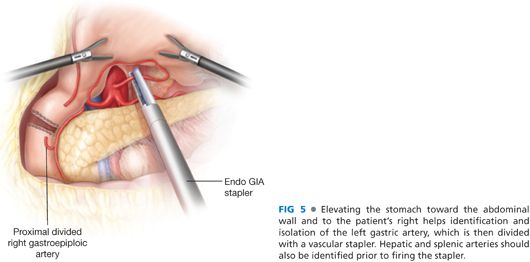
■ Use either the Nathanson liver retractor or a handheld retractor to elevate the stomach and identify the left gastric artery and the celiac trunk.
■ Once the celiac anatomy is evident, dissect the left gastric artery and skeletonize its takeoff from the celiac trunk by mobilizing station 9 nodal tissue anteriorly. Once the left gastric pedicle is skeletonized, divide it at its origin using a 2.5-mm Endo GIA cartridge flush with the anterior pancreatic body (FIG 5). Our practice is to take the coronary vein and the left gastric together in a single fire.

Stay updated, free articles. Join our Telegram channel

Full access? Get Clinical Tree


