(1)
Laboratoire d’Optique et Biosciences, INSERM U696-CNRS UMR7645, Ecole Polytechnique, Palaiseau, France
(2)
Faculty of Sciences, Department of Physics and Astronomy, VU University Amsterdam, Amsterdam, The Netherlands
(3)
Laboratory of Biochemistry, Wageningen University, Wageningen, The Netherlands
(4)
Molecular Plant Physiology and Biophysics, Julius-Maximilians-University Würzburg, Würzburg, Germany
(5)
Laboratory of Biochemistry and Microspectroscopy Centre, Wageningen University, Wageningen, The Netherlands
(6)
Center for BioSystems Genomics, Wageningen, The Netherlands
Abstract
This chapter describes the procedure for globally analyzing fluorescence lifetime imaging (FLIM) data for the observation and quantification of Förster resonance energy transfer (FRET) in live plant cells. The procedure is illustrated by means of a case study, for which plant protoplasts were transfected with different visible fluorescent proteins and subsequently imaged using two-photon excitation FLIM. Spatially resolved fluorescence lifetime images were obtained by application of global analysis using the program Glotaran, which is open-source and freely available software. Using this procedure it is possible to extract the fraction and distance of interacting species between, or conformational changes within proteins, from complex experimental FRET–FLIM datasets, even at low signal-to-noise ratios. In addition, the software allows excluding inherently present autofluorescence from the plant cells, which improves the accuracy of the FRET analysis. The results from the case study are presented and interpreted in the context of the current scientific understanding of these biological systems.
Key words
FLIMFRETmTurquoise1Global analysisTime-resolved fluorescenceMicroscopyGlotaran1 Introduction
Fluorescence microscopy in combination with Förster resonance energy transfer (FRET) is nowadays a widely used method for visualizing protein interactions in living cells. FRET is a process in which the excited-state energy from a fluorescent donor molecule is transferred non-radiatively to an acceptor molecule. FRET is based on very weak dipole–dipole coupling and therefore can only occur at very short intermolecular distances, typically less than 10 nm. However, by carefully selecting the FRET pair one can detect interactions over longer distances. There are several methods to visualize FRET, of which donor fluorescence lifetime imaging (FLIM) is the most straightforward one for estimating FRET efficiencies. The fluorescence lifetime is an intrinsic property of a fluorophore giving the advantage that measurements are independent of fluorophore concentration. Though, the fluorescence lifetime is sensitive to the immediate environment of the fluorophore, which is the basis for FRET–FLIM measurements. Typically, FRET–FLIM experiments consist of measuring donor fluorescence lifetimes in the absence (τ D) and presence (τ DA) of acceptor molecules resulting in spatially resolved, color-coded fluorescence lifetime images. Observation of a decreased donor fluorescence lifetime due to FRET is used as an indicator for molecular interactions [1].
Well-designed data analysis protocols are indispensable for accurate and quantitative analysis of FRET–FLIM data. Global analysis is a technique which offers significant advantages in terms of improved accuracy, decreased sensitivity to noise, and the possibility of combining fluorescence decay data from different measurements [2]. A fluorescence decay can often be described by single or multiple kinetic processes depending on the electronic configuration of the fluorophore and its immediate environment. With global analysis, the kinetic rate constants can be determined simultaneously for all pixels of an image, even though the relative intensity values may vary from pixel to pixel [3]. Global analysis can be used to accurately detect FRET phenomena by estimating the fluorescence lifetime of donor molecules in the absence and presence of acceptor molecules. A complicating issue is the fact that FRET systems in cell biology are not always purely homogeneous, since they can contain a population of donor molecules that cannot transfer their excitation energy, because of either unwanted photobleaching (photodestruction) of the acceptor molecules or incomplete maturation of the acceptor proteins (this is especially the case of genetically encoded visible fluorescent proteins) [4]. Therefore, average donor lifetimes do not reflect true FRET efficiencies, because they originate from a pool of interacting and noninteracting species [5, 6].
In this chapter, a step-by-step protocol is described for the procedure of analyzing FRET–FLIM data on live plant cells by means of global analysis. A complete procedure is described ranging from sample preparation to data acquisition and subsequent analysis of the acquired data. Data analysis is carried out using the open-source and freely available software program Glotaran [7]. The data analysis protocol is illustrated using a case study, for which plant protoplasts were transiently transfected with two different plasmids: one expressing the mTurquoise1 fluorescent protein only and the second expressing a mTurquoise1–mVenus fusion protein connected by a two amino acid linker. The latter is a FRET pair, where mTurquoise1 is serving as a donor and mVenus as an acceptor with a Förster radius (see below) of 5.4 nm. Descriptive screenshots at different steps of the global analysis procedure are included as a visual guide. Finally, essential parameters resulting from the analysis, as well as the final donor fluorescence lifetime images of mTurquoise1 in presence and absence of acceptor molecules, are presented.
2 Materials and Imaging Setup
2.1 Expression Vectors, Plant Protoplasts, Microscopy Features
1.
mTurquoise1 (kindly provided by Prof. Th. J. W. Gadella, University of Amsterdam) and mTurquoise1–Venus (two amino acid (LN) linker) constructs were cloned into pSAT-based vector harboring the Ubiquitin 10 promoter.
2.
Plant material: Rosette leaves of Arabidopsis thaliana plants (ecotype Columbia) grown for 4–5 weeks under long-day conditions (16 h light/8 h dark) at 22 °C.
4.
Coherent Ti:Sapphire laser (Coherent Mira D900) (Coherent Inc., Santa Clara, CA).
5.
Biorad Radiance 2100MP confocal system.
6.
Nikon TE 300 inverted microscope (Tokyo, Japan).
8.
B&H SPC 730 module (Becker & Hickl, Germany).
2.2 FRET–FLIM Data Acquisition
Spatially resolved fluorescence lifetime imaging is performed on a Biorad Radiance 2100 MP system in combination with a Nikon TE 300 inverted microscope as described in Russinova et al. [9]. Two-photon excitation pulses at 860 nm are generated by a Ti-Sapphire Laser model Mira 900 (Coherent Inc.), pumped by a 5 W continuous wave solid state laser (Coherent Verdi V5), resulting in excitation pulses of 200 fs at a repetition of 76 MHz. A 60×/1.2 water immersion objective is used (see Note 3). mTurquoise1 fluorescence emission is selected by a 480DF30 band pass filter and detected by a Becker & Hickl HPM-100-40 Hybrid detector with a time resolution of 120 ps. Fluorescence images of 64 × 64 pixel size are acquired using the B&H SPC 730 module. The resolution for the analog-to-digital (ADC) converter was set to 256 channels, resulting in a channel spacing of 48 ps/channel. The average photon count rate is around 104 photons per second for an acquisition time of 90 s for one measurement. Measurements of single transfected protoplasts expressing mTurquoise1 represent the reference. To elucidate FRET, donor fluorescence lifetimes of the mTurquoise1–Venus fusion are determined and compared to the mTurquoise1-only samples (see Note 4).
3 Methods
3.1 FLIM Data Analysis Summary
For each pixel in a FLIM image, the fluorescence intensity is measured as a function of time. Therefore, each pixel contains a recorded fluorescence-time trace that can be considered as a separate experiment. The time traces of all pixels are stored as a single matrix, in which each column represents the fluorescence intensity decay associated with a single pixel.
The fluorescence decay is typically well described by a sum of exponential decay components convolved with the instrumental response function (IRF), so that the time dependent fluorescence for a single pixel reads as
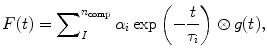
where the summation is over the number of exponential fluorescence decay components n comp, τ i is the lifetime of component i, α i is the fractional contribution of component i to the fluorescence decay, g(t) is the IRF, and ⊗ is the convolution operator.
(1)
The basis for global analysis is the superposition principle stating that the experimental decay is composed of a linear combination of n comp components. The fact that the fluorescence lifetime components are spatially invariant is crucial for global analysis of a FLIM image (see Note 9), which has been justified by Verveer and coworkers [10]. More details about global analysis on FLIM data can be found in [11].
3.2 Summary of FRET Theory
This section summarizes the concepts of fluorescence lifetimes and FRET, which can be found in textbooks on fluorescence spectroscopy [12, 13]. The fluorescence lifetime of a fluorophore τ is the average time that the molecule stays in the excited state after response to a very short excitation pulse and is given as a function of the radiative (k r) and non-radiative (k nr) rate constants: 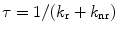 . Since the fluorescence lifetime of a fluorophore is sensitive to the local environment (e.g., pH, charge, presence of quenchers, refractive index, temperature), lifetime measurements under a microscope offer the important advantage of contrast by spatial variations of lifetimes [1]. FRET is a bimolecular process in which the excited-state energy of a donor fluorophore is non-radiatively transferred with rate constant (k T) to a ground-state acceptor molecule by very weak dipole–dipole coupling. The fluorescence lifetime of donor molecules that involves FRET becomes shorter compared to donor molecules in the absence of acceptor and can be calculated using
  . The transfer rate constant can be calculated knowing the fluorescence lifetime of the donor in presence and absence of acceptor as
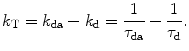
. Since the fluorescence lifetime of a fluorophore is sensitive to the local environment (e.g., pH, charge, presence of quenchers, refractive index, temperature), lifetime measurements under a microscope offer the important advantage of contrast by spatial variations of lifetimes [1]. FRET is a bimolecular process in which the excited-state energy of a donor fluorophore is non-radiatively transferred with rate constant (k T) to a ground-state acceptor molecule by very weak dipole–dipole coupling. The fluorescence lifetime of donor molecules that involves FRET becomes shorter compared to donor molecules in the absence of acceptor and can be calculated using . The transfer rate constant can be calculated knowing the fluorescence lifetime of the donor in presence and absence of acceptor as(2)
The transfer rate (k T) is proportional to the inverse 6th power of the distance r between donor and acceptor molecules, which makes this technique an extremely sensitive parameter for obtaining distances as
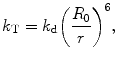
where r is the actual distance between donor, kd is equal to 1/τd and acceptor and R 0 is the so-called critical or Förster radius [14], defining the distance between donor and acceptor at which 50 % of the donor energy is transferred to the acceptor.
(3)
The efficiency of energy transfer (E) can be obtained as
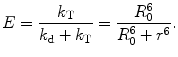
(4)
3.3 Software Installation and Compatibility
All experimental data described in this chapter are visualized and analyzed using the Glotaran software. Glotaran was designed to be cross-platform, so that it will run on a wide variety of different operating systems (Windows, Linux, Mac OS). Detailed system requirements, installation instructions, and installers for Glotaran can be obtained from http://www.glotaran.org (see Note 5). FLIM data need to be in the correct format before visualization or analysis. Glotaran accepts either raw data files obtained from B&H and PicoQuant photon counting cards or plain text data files that are formatted as described in [15].
3.4 Data Preprocessing
1.
Once Glotaran is installed and set up as described in Subheading 3.3, the analysis can be started by first creating a New Project (File—New Project), where project data such as raw data, models, and analysis results are stored (see Fig. 1).
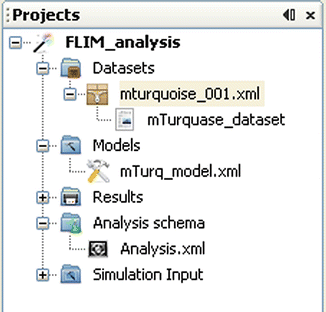
Fig. 1
Screenshot of the project manager in Glotaran. Here, “FLIM_analysis” is the opened project representing a Glotaran project folder on disk. Datasets, Models, Results, Analysis schema, and Simulation Input are the standard subfolders of any Glotaran project folder. The Datasets folder contains references to data files (here mturquoise_001.xml), and every data reference file can store datasets that can be used for analysis (here mTurquoise_dataset). The Models folder includes model files (mTurq_model.xml) that are used in the Analysis scheme (Analysis.xml), stored under the Analysis schema folder
2.
3.
After opening a data reference file or a dataset (double click on file in project explorer), the corresponding data displayer will show the content of the opened file. The first tab of the FLIM data displayer, labeled Data (Fig. 2), displays a fluorescence intensity image (see Note 7) (Fig. 2). The pixels that are selected for analysis are shown in green, and the corresponding fluorescence decay profile of the last selected pixel is displayed in the Selected trace panel (Fig. 2). The sum of the fluorescence decay profiles of all selected pixels is plotted in the Sum Trace panel (Fig. 2). The time window can be adjusted by changing the position of the sliders (indicated below the decay profile). The selected time window appears highlighted in the Sum Trace plot. Changes to the selected time window can be applied by clicking the “Select time” button in the toolbar at the top of the Data tab.
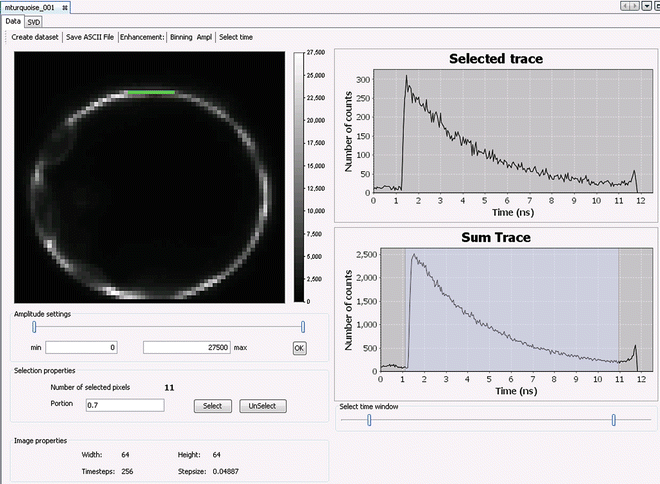
Fig. 2
Screenshot showing the Data tab of the FLIM data displayer displaying a data reference file or a dataset. Shown here is a fluorescence intensity image of a protoplast expressing mTurquoise1 acquired using the B&H 730 module. A description of the various components of the FLIM data displayer is given in Subheading 3.4, step 3
4.
For Glotaran data analysis, one should first create a new dataset from a data reference file (see Note 8). This can be done by clicking on the “create dataset” button in the toolbar of the data displayer and specify a name for the new dataset. The dataset will be created under the data reference file node (see Fig. 1). In principle it is possible to select all pixels and analyze the whole image, but in most cases, it is more appropriate to just select pixels of interest (see Note 9). Pixels can be selected by either clicking on the pixels in the fluorescence intensity image or by specifying a threshold value. If the photon counts per pixel are low, there is an option to perform pixel binning by pressing the button “Binning” (see Note 10).
3.5 Setting Up an Analysis Scheme
All information necessary for analysis (which datasets are selected, which model to use, etc.) is stored in the analysis scheme file, which is enclosed within the project’s “Analysis schema” folder (see Fig. 1). When a new project is created using the Empty Project template, it will already contain one empty analysis scheme in the “Analysis schema” folder as well as an empty model file in the folder “Models.”
The first step in performing global analysis on a new dataset is typically to make an estimate of the number n comp of distinct kinetic components underlying the data. In FLIM analysis this is estimating the number of unique fluorescence components present in the data. The singular value decomposition of the data matrix (SVD) can be a powerful tool to make the initial estimate (see Note 11) and is available directly from the data displayer window.
1.
Get Clinical Tree app for offline access

By clicking on “SVD” tab in the data displayer window (Fig. 2), the SVD of the corresponding dataset will be automatically calculated. Figure 3 shows the SVD of the mTurquoise1_001 dataset for the first three SVD components. In this example, we can observe two distinct fluorescence components: one relatively slow component with a high contribution (first singular vector) and one very fast component with a lower contribution (second singular vector). Both processes should be taken into account when defining the starting model for analysis. Note that the third singular vector cannot be distinguished from the noise.
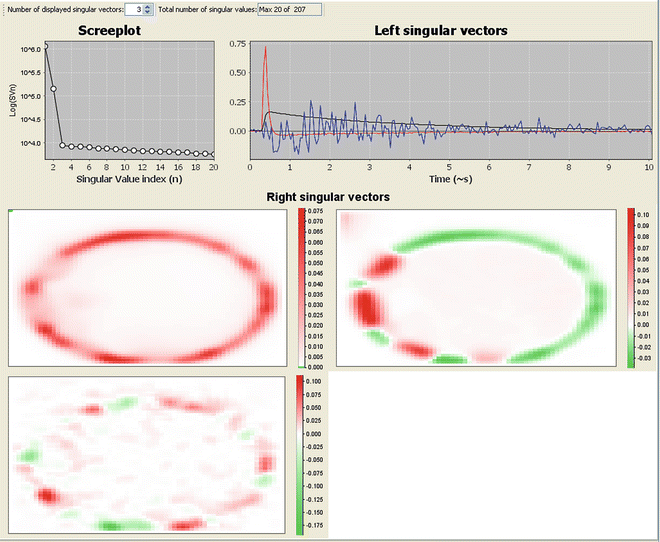
Fig. 3


SVD decomposition of a fluorescence intensity image of a protoplast expressing mTurquoise1. The top right panel shows the first three left singular vectors (LSV) (in time), the bottom panel shows the corresponding right singular vectors (RSV) (spatial), and, finally, the top left panel shows the screeplot of the first 20 singular values. Looking at the LSV suggests the presence of at least two linearly independent components (one slow, black line, and one fast, red line) significantly different from noise, whereas the third component (blue line) is likely due to noise. The RSV depicts the spatial distribution of independent components, showing a few regions with more pronounced fast component
Stay updated, free articles. Join our Telegram channel
Full access? Get Clinical Tree