Kocher Maneuver
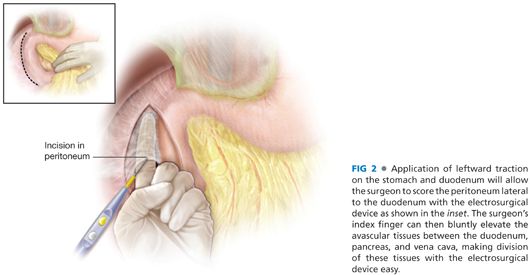
■ A Kocher maneuver is performed to facilitate exposure of the duodenum and pylorus and to eliminate tension on the suture line. A forceps is used to grasp the peritoneum lateral to the duodenum, which is then incised with scissors or the electrosurgical device. The surgeon then can insert an index finger behind the duodenum and head of the pancreas and sweep the finger to the right, elevating the lateral duodenal ligament and avascular retroperitoneal tissues, which can then be divided with the electrosurgical device (FIG 2). The plane of dissection should remain close to the duodenal wall to avoid injury to the gonadal vein on the anterior surface of the inferior vena cava. The duodenum and head of the pancreas should be mobilized from the junction of the duodenal bulb and second portion of the duodenum to just before the lateral aspect of the superior mesenteric vein. If the procedure is being performed for a bleeding duodenal ulcer, the Kocher maneuver step can be deferred until after control of the bleeding vessel has been achieved.
Pyloric Incision
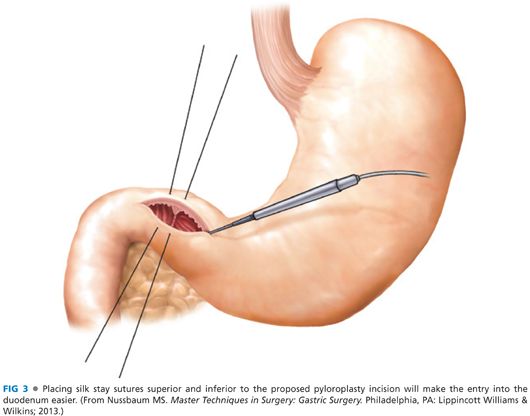
■ The pylorus is identified either visually or by palpation of the muscular ring with a finger inserted from the gastric side. Beginning roughly 2 cm proximal to the pylorus on the gastric antrum, incise the gastric wall, enter the lumen, and extend the incision distally parallel to the long axis of the bowel across the pylorus onto the duodenum to distance of roughly 5 cm using the electrosurgical device (FIG 3). This incision will provide reasonable exposure of the duodenal bulb. If the operation is being performed for ulcer bleeding, the incision can be extended further along the duodenum to expose the bleeding site. The pyloroplasty incision can be facilitated by placing a seromuscular stay stitch on the superior and inferior edge of the pylorus.
Bleeding Control
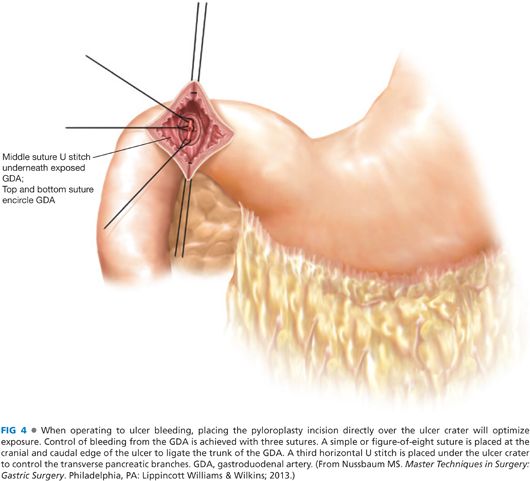
■ If the operation is being performed for a bleeding duodenal ulcer, the ulcer is identified on the posterior aspect of the duodenal bulb. Temporary hemostasis is achieved by digital pressure, and then definitive hemostasis is achieved by placing three 2-0 silk suture ligatures. The first suture is placed at the cranial margin of the ulcer, encircling the proximal gastroduodenal artery (GDA). The second suture is placed at the caudal edge of the duodenal ulcer encircling the distal GDA. The final suture is a U suture placed underneath the ulcer crater to control the posterior entry of the transverse pancreatic artery into the back wall of the GDA (FIG 4).
Closure of Pyloroplasty—Heineke-Mikulicz
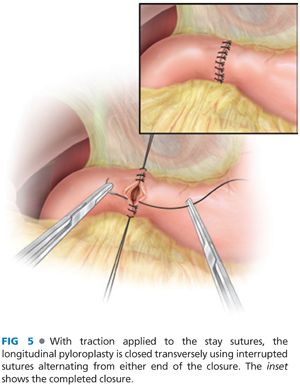
■ The most common closure of the pyloroplasty is the Heineke-Mikulicz approach, closing the longitudinal pyloroplasty with a single layer of sutures in a transverse fashion. This closure is appropriate when the duodenum is not distorted or scarred and the pyloroplasty incision is shorter than 6 to 7 cm. The closure is performed by applying superior and inferior traction on the stay sutures, converting the longitudinal gastroduodenal incision into a transverse incision. The incision is then closed with interrupted 3-0 silk sutures or 3-0 polyglycolic acid sutures with either a full-thickness simple stitch or a Gambee stitch. The closure is best performed by starting at the top corner of the incision and alternating from the top to the bottom proceeding toward the middle. The sutures may be tied as they are placed until the last three sutures, which should be left untied until all of the sutures are placed to ensure that the mucosal layer is included in all of the bites (FIG 5). A vascularized pedicle of omentum is then placed over the closure and the stay sutures tied over the omental pedicle to hold it in place in the fashion of a Graham patch.
Closure of Pyloroplasty—Finney
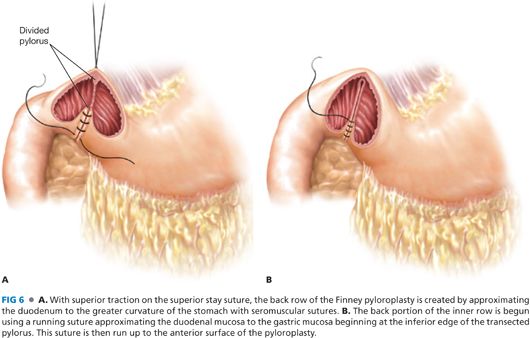
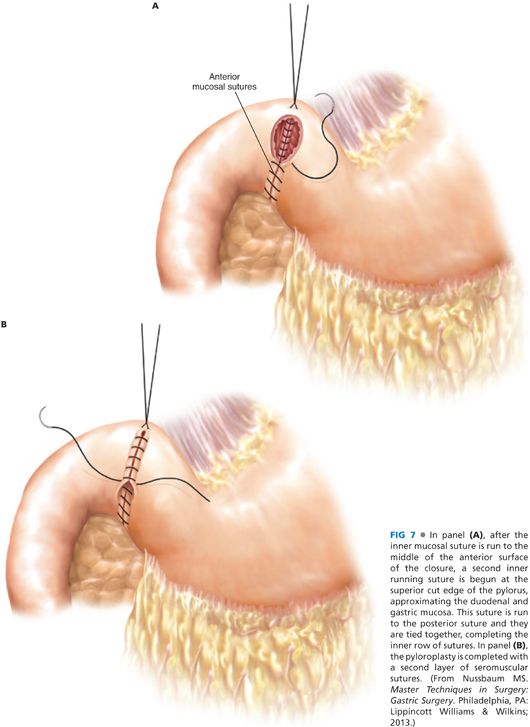
■ If the duodenum is significantly inflamed or scarred from chronic peptic ulceration or if a longer duodenotomy is required to obtain hemostasis on a bleeding source beyond the duodenal bulb, a Finney closure of the pylorus is appropriate to prevent tension on the closure and gastric outlet obstruction. The Finney closure is in essence a side-to-side gastroduodenostomy with the pylorus at the cranial apex of the anastomosis. The duodenum will need to be completely mobilized to allow this closure to be tension free. Remove the inferior stay suture and apply cranial tension on the superior stay suture to convert the longitudinal incision into an inverted U shape. The Finney closure is a standard two-layered anastomosis. A back row of interrupted 3-0 silk seromuscular (Lembert) sutures is placed between the inferior edge of the duodenum and the gastric wall (FIG 6A). These sutures should be placed 5 to 10 mm from the cut edge of the mucosa. It is often necessary to extend the incision on the gastric side of the pylorus to ensure that the lengths of the two arms of the incision are equal. When extending the pyloroplasty in this fashion, it is advisable to cheat toward the greater curvature of the stomach. Next, begin the inner layer of the closure using a 3-0 polyglycolic acid running suture beginning at the divided pylorus muscle, suturing the inferior edge of the duodenum to the inferior edge of the stomach (FIG 6B). Run this suture around the inferior edge of the closure onto the anterior edge of the gastroduodenal anastomosis. Next, begin a second running 3-0 polyglycolic acid at the superior edge of the cut pylorus, suturing the superior edge of the duodenum to the stomach and running toward the other suture (FIG 7A). Many surgeons prefer to use a Connell suture on the anterior wall to achieve better mucosal inversion. Tie the two sutures and then complete the pyloroplasty closure with an anterior layer of interrupted 3-0 silk seromuscular sutures (FIG 7B).
OPEN PYLOROMYOTOMY
Incision and Identification of the Pylorus
■ An upper midline incision and fixed retractor is used as described previously for pyloroplasty (FIG 1). The pylorus is identified either visually or by palpation of the muscular ring with a finger inserted from the gastric side.
Serosal Incision and Division of Muscular Fibers
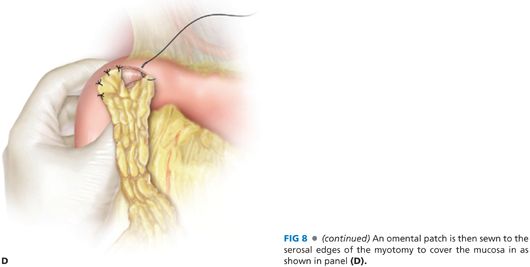
■ A 3-cm long longitudinal serosal incision is made across the pylorus, beginning 1 to 2 cm proximal to the pylorus on the gastric side and extending 1 cm distal to the pylorus. This serosal incision can be performed either with a knife or an electrosurgical device (FIG 8A). If the electrosurgical device is used, care should be exercised to avoid deep penetration into the muscularis and thermal injury to the mucosa. Beginning on the gastric side of the incision, use a fine tipped hemostat to dissect the muscular fibers off of the submucosa and divide the circular muscular fibers with a knife (FIG 8B). Muscular bleeders can usually be controlled with pressure, and there is a very limited role for cautery at this point of the operation. Great care should be taken to avoid mucosal injury especially on the duodenal side, as the submucosa is thinner and more fragile. When properly performed, the mucosa and submucosa will bulge out of the incision (FIG 8C).
Stay updated, free articles. Join our Telegram channel

Full access? Get Clinical Tree


