Kay A. Ball
Surgical Modalities
Surgery continues to evolve as less-invasive procedures and instrumentation are adopted. Modalities have been developed that enhance and advance surgical procedures. This chapter provides information about the evolution of some widely used surgical modalities, including laparoscopy (sometimes referred to as endoscopy), other minimally invasive surgery (MIS) technologies, video technology, and energies used during surgical intervention.
Minimally Invasive Surgery Overview
In the late 1980s the “laparoscopy revolution” began in the United States. General surgeons developed techniques to perform procedures using the laparoscope, eliminating the need for a large incision. As surgeons and perioperative nurses accessed evolving knowledge and information, the surgical industry worked to accommodate a rapid change from open surgical procedures to newer techniques of MIS. Perioperative nurses and surgical technologists experienced the opportunity to acquire new competencies. Since the 1990s, equipment, instrumentation, surgical skills, and perioperative nursing knowledge have markedly expanded as MIS has become a safe approach for many surgical interventions. Ongoing changes in surgery that aim to incorporate MIS procedures present complex challenges for the surgical team while offering patients potentially shorter hospital stays (Sajid et al, 2009), reduced postoperative pain, lower rates of surgical site infections (Poon et al, 2009), and faster recuperation (Schmock, 2009) (Table 8-1). A keen understanding of the goals of endoscopic MIS, clinical competence, and preoperative patient assessment establish the basis for the perioperative plan of care.
TABLE 8-1
Advantages of Minimally Invasive Surgery Over Open Surgery
| Minimally Invasive | Open |
| Ambulatory or shortened length of stay (LOS) | Hospital admission |
| Short postoperative recuperation | 4- to 6-week recuperation |
| Decreased postoperative pain; decreased need for pain medications | Postoperative pain related to surgical site; more analgesics required |
| Earlier return to normal activities and lifestyle | Return to normal activities and lifestyle varies with recuperation period |
Endoscopes
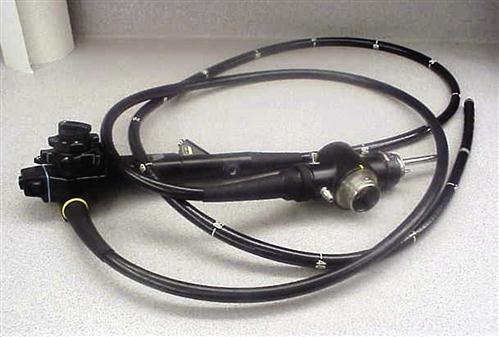
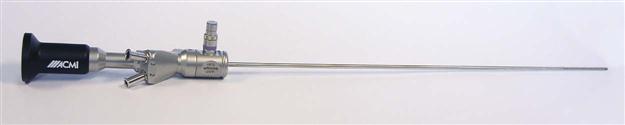
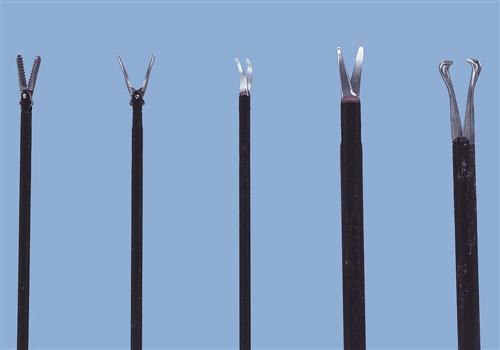
An endoscope is a tube inserted into a natural body orifice or through a small incision to access internal organs or structures. Endoscopes are flexible, rigid, or semirigid. Flexible endoscopes include angioscopes, bronchoscopes, choledochoscopes, colonoscopes (Figure 8-1), cystonephroscopes, hysteroscopes, mediastinoscopes, ureteroscopes, and ureteropyeloscopes. Rigid endoscopes include cystoscopes, laparoscopes, sinuscopes, arthroscopes, bronchoscopes, laryngoscopes, and hysteroscopes (Figure 8-2). Some endoscopes are manufactured in flexible and rigid forms. A semirigid endoscope, such as the deflectable-tip video laparoscope, allows movement through a deflectable tip to provide a complete field of view from different angles (Figure 8-3).

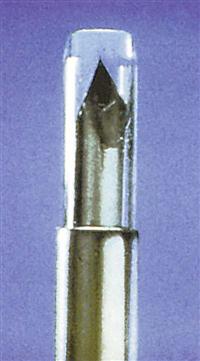
Endoscopes are diagnostic or operative. Diagnostic scopes are for observation only and have no operating channels. The system is sealed at both ends. A diagnostic scope can be used, however, when multiple access sites are planned for the introduction of other instrumentation to perform a surgical procedure. Operative endoscopes are channeled to irrigate, suction, insert, and connect accessory instrumentation (Figure 8-4). For example, when a potassium titanyl phosphate (KTP) laser is used, the laser fiber is inserted into the operating port of the laparoscope. Advanced laparoscopic techniques may include the use of a flexible endoscope to check for anastomotic leaks, identify bleeding sites, or detect other problems before, during, or immediately after the laparoscopic procedure.

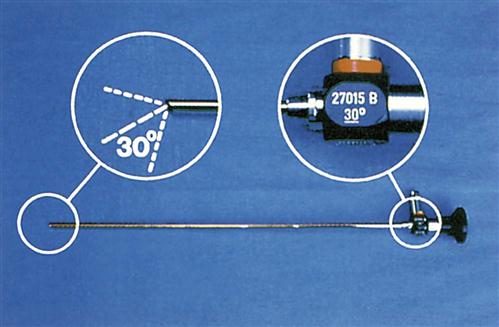
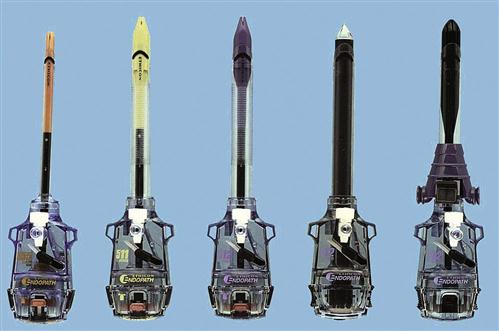
Endoscopes are available in various diameters and lengths, depending on access to the area being visualized and the requirements of the procedure. Optical capability through a rigid scope is controlled by a lens system and can be direct (0-degree angle) or angled (e.g., 30, 70, 120 degrees) (Figure 8-5). Some rigid endoscopes integrate a distally mounted camera chip inside the scope with a rotation dial for proper orientation of the target site. Because flexible scopes are able to be angulated, they allow for a more panoramic view.
There are two types of flexible endoscopes: fiberoptic endoscopes and videoscopes. Fiberoptic endoscopes have an eyepiece with a lens for visualization; the image is carried through the endoscope via a bundle of tiny glass fibers. Videoscopes have, at their distal end, a video chip that provides an image that is directly viewed on a monitor; a videoscope does not have an eyepiece for direct viewing.
Flexible endoscopes have four distinct components:
Flexible endoscopes also have three different systems that include some of the various components within the endoscope:
1. Mechanical system (provides ports to introduce accessories to perform treatments and procedures)
2. Angulation system (allows the endoscope’s distal tip to be moved in different directions)
3. Illumination system (provides light to view internal structures)
Rigid endoscopes also have four distinct components:
1. Eyepiece (e.g., ocular lenses; rigid videoscopes are also available without an eyepiece)
2. Body (e.g., light-guide connector, valves)
3. Shaft (e.g., rod lenses, spacers)
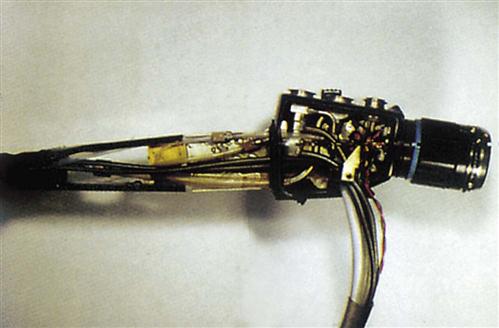
Understanding the parts of an endoscope can help assess technical problems that can occur during any endoscopic procedure. Internal components are complex, sophisticated, and sometimes delicate (Figure 8-6) and the endoscope must be treated with care.
Light Sources and Fiberoptic Cables
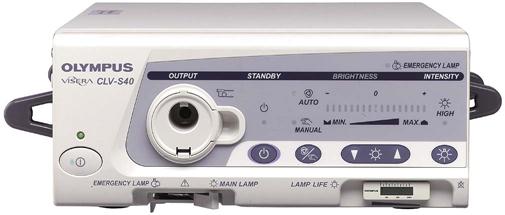
Endoscopic light is often referred to as cold light, meaning that the heat from the light source is not transmitted through the length of the scope. Therefore, tissue damage from heat at the distal tip of the endoscope is minimized. When the ends of the fiberoptic cables are disconnected from the scope, however, they may be very hot. The surgical team uses extreme caution to ensure the ends of the cables do not contact the patient’s skin or any flammable materials or liquids. If the fiberoptic cable is disconnected from the endoscope during surgery, the scrub person ensures that the cable end is held away from drapes or placed on a moist towel to prevent burns and fires. Ideally the light should be turned off whenever disconnected from the endoscope. ECRI Institute (formerly, the Emergency Care Research Institute) recommends labeling all fiberoptic light sources with a warning to prevent fires from the hot light source energy. High-intensity fiberoptic light sources and cables can ignite drapes and other materials. To prevent a fire, all cable connections must be completed before activating the light source. The light source must be placed on standby when the cables are disconnected.
Light sources should have adjustable manual and automatic brightness modes. The automatic mode adjusts brightness according to the video image. When the light source is set in this mode, the circulating nurse need not constantly make adjustments.
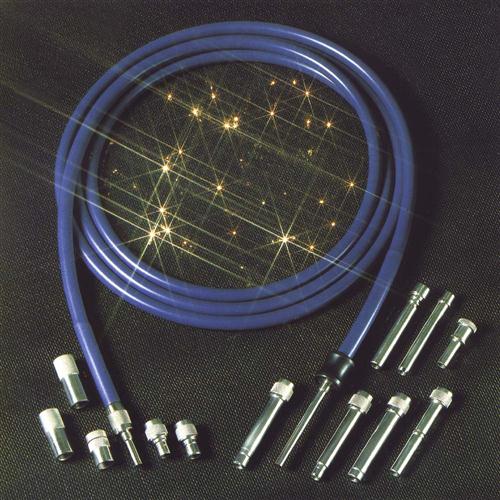
When selecting a light source, certain options are considered. A light source that can adapt to several rigid endoscopic systems is desirable, such as one with a universal light cable adapter, which enhances flexibility and usage (Figure 8-7). If a previously purchased unit does not provide this feature, universal light cables with connectors to an interchangeable light source and endoscope adapters are available (Figure 8-8). A generic cord can be used with most scopes and light sources, but some light cables can only be used with specific sizes of endoscopes. For example, a 2.5-mm cable is used with a scope less than 4 mm and a 4.5-mm cable is used with a 10-mm scope. Using the incorrect light cable with an endoscope may overheat or damage the optics. Color-coding different cable sizes helps differentiate them. Light sources also must have connection capability with different camera units.
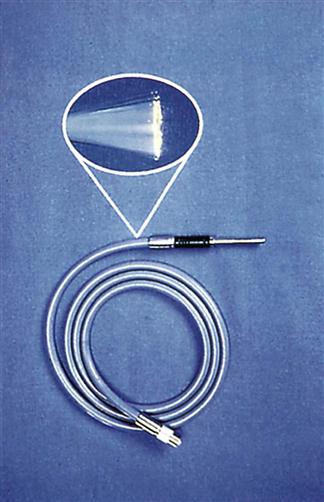
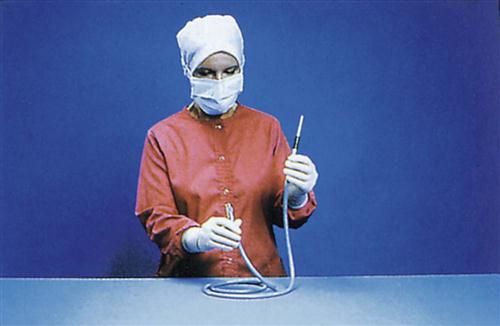
Handle fiberoptic light cables with extreme care. They consist of hundreds of glass fibers that transmit light (Figure 8-9) and the tiny fibers can be broken easily if kinked or dropped. Cables are loosely coiled, never bent, when not in use. After multiple uses, fibers can break. Cables must therefore be checked after each use. To do this, hold one end of the cable pointing toward a bright light while the opposite end is observed for light transmission (Figure 8-10). Do not test the cable by looking into the end while it is attached to the light source. The visible light and ultraviolet light produced by the light source may harm the eye if directly viewed for extended periods. “Peppering” on the light cable end indicates broken fibers. When approximately 20% of the fibers are broken, the cable is replaced because adequate light for visualization cannot be transmitted through fractured fibers.
Bulbs within the light source usually are easy to replace. Extra bulbs are stored in lamp-assembly drawers, which are readily accessible. The bulb itself is not touched because (1) it may be very hot and (2) the oils on an individual’s hands and fingers can adhere to the bulb, causing the bulb to burn out more quickly. Nonmetal handles usually are built into the light source for bulb removal and replacement.
Three popular types of light sources are available today: xenon, metal halide, and halogen. Advantages and disadvantages are associated with each. Xenon bulbs are more expensive, but last longer. Xenon light is better for smaller-diameter endoscopes (≤2 mm) because the light can be focused to a smaller spot size. Xenon light also is a preferred light for video or picture taking. Metal halide bulbs have a shorter life span (about 250 hours) and are less expensive. These bulbs are easier than others to handle and replace, and do not require large fans for cooling. Halogen light sources are used for office and some hospital applications. They do not, however, offer the light intensity required for many endoscopic and video applications. Personal preference and conditions for use are two key factors in choosing an appropriate light source for endoscopy. A light source that incorporates a lamp-life status–testing mode is desirable so that bulb replacement can be anticipated.
Given that light sources produce different colors of light whenever a camera is used, white balancing must be performed during each procedure. White balancing adjusts the camera to all other optical components (endocoupler, light cable, laparoscope). This method enables the camera to reference white so that it can identify all primary colors properly. White balancing is performed once the scope and light cable are connected, the light source turned on, and the lens held close to a white gauze or white drape (for white color referencing).
Endoscopic Minimally Invasive Surgery Instrumentation
Endoscopic MIS instrumentation is designed to correspond with the surgical site and the technique used while functioning as an extension of the surgeon’s hand. The length and working end of the instrument must be adequate to perform surgery at the target site. The hand control is ergonomically designed for the operator’s maximum comfort and reduced fatigue. Graspers and other instrumentation used by the assistant in surgery often are built for a shorter hand span because many women function in this role.
Because endoscopic MIS and robotic approaches differ from traditional open equivalents, modifications of existing instruments have been made. Some basic patterns have been used for years and continue to be popular, whereas others have been designed to accommodate newer MIS and robotic approaches. This new era in surgery began in the 1990s, and some instrument designs are now in their sixth and seventh generations. As surgery becomes ever more sophisticated, so do the instruments required for successful, less-invasive techniques (Figure 8-11). MIS instrumentation is discussed in more detail in the next sections, and insufflation safety and MIS complications and considerations are addressed in Practices and Potential Risks During MIS.
Trocar System.
When a natural orifice does not exist for diagnostic or operative procedures, one or several orifices are created. To do so, a trocar system is used, consisting of an obturator and a sleeve (also known as a cannula or sheath). The trocar system provides a mechanism to insert and remove instruments while MIS is performed. The obturator and sleeve are inserted to access the operative site. When the port of entry has been made, the obturator is removed, and the sleeve is left in place. More complex laparoscopic procedures may require a greater number of trocar systems and puncture sites.
If a reusable trocar system is used, the obturator tip must be sharpened routinely. The stopcock and trumpet valves are inspected before and after each use to ensure proper functioning. Internal gaskets may need occasional replacement. The obturator and sleeve must fit properly and may not always be interchangeable. Component parts are kept together, but are disassembled completely for cleaning and sterilization.
Disposable trocar systems offer several advantages (Figure 8-12). One is that the obturator is always sharp. When multiple ports of the same size are used, the same obturator is reused on the same patient. Some manufacturers also package one obturator and two or more sleeves of the same size. The same obturator is used to establish multiple access ports. Disposable units also may provide siliconized obturator tips and safety features when entry has been made. Systems are available that both engage a safety shield to advance automatically over the obturator tip (Figure 8-13) and provide retraction of the obturator tip when entry is made.
Many disposable sleeves have gripping devices that can reduce the risk of accidental sleeve removal during repeated advancement and withdrawal of the instruments. Grippers are incorporated into the sleeve or as separate entities. Grippers can be used with reusable sleeves as long as the fit is appropriate.
Disposable sleeves have a stopcock assembly for insufflation gas, similar to the reusable system. One-way flapper valves in disposables provide leakproof protection and operate automatically for instrument insertion, specimen removal, or rapid desufflation. Because instrument diameters vary with design and use, different sizes of obturator and sleeve units may be required for one procedure. Reusable and disposable trocar systems are available in a variety of diameters and lengths. To increase flexibility, converters and reducers are used to adapt the size of the instrument. Converters can be separate or built into the sleeve as a diaphragm seal. Both systems are designed to reduce the chance of carbon dioxide (CO2) leaks so that the pneumoperitoneum can be maintained. Radiolucent disposable sleeves offer the ability to visualize tissue and lesions without obstruction. This feature may be crucial during an endoscopic cholangiogram to avoid obstructing the view during fluoroscopy. During other procedures this design may not be necessary.
Radially expanding dilator systems, consisting of a cannula with blunt obturator and an insufflation/access needle with a radially expandable sleeve, have been shown to cause less traumatic abdominal wall entry and yield smaller fascial defects. Intra-abdominal entry is accomplished using an access needle with a radially expandable sleeve. When insufflation is achieved, the needle is withdrawn, leaving the expandable sleeve in place. While the sleeve and tissue are expanded, a tapered, blunt-tipped dilator is inserted, providing a large working channel for an access port. Because a sharp-tipped obturator is not used, the muscles are spread, not cut, and the risk of abdominal wall or vascular damage is minimized. Bladeless obturators, which separate tissue in a sequential fashion rather than cut or stretch tissue, also are available in an optical version that allows the surgeon to visualize all tissue layers being separated.
Occasionally a procedure is scheduled as an open laparoscopy. Patients who have had multiple surgeries or who have developed adhesions, and pediatric patients, can present an added risk and may be candidates for open laparoscopy. A small paraumbilical incision is made and tissues dissected. The peritoneum is opened and a large blunt-tipped obturator-sleeve assembly is inserted (Figure 8-14). The sleeve is designed to fit snugly against the peritoneum from underneath and against the skin from above. Stay sutures are used to close any excess incision. Wafer seals reduce further loss of CO2 gas. Pneumoperitoneum is then created and maintained. If a reusable system is used, stay sutures also are used to stabilize the system. Sealed system devices have been developed to introduce not only instrumentation but also the surgeon’s hand when direct surgical approaches are necessary during laparoscopy.
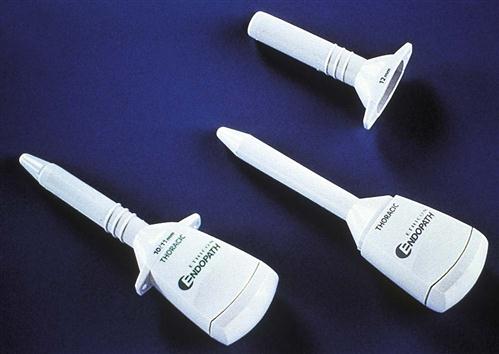
When extracorporeal surgery is performed during laparoscopy (i.e., when tissue undergoing surgery is brought outside the body through a small hole), a larger diameter port is used. During certain bowel resections, loops of bowel are brought through a larger port to be resected or sutured. When the chest is entered, shorter blunt obturators are used with grippers that provide stabilization while in the pleural cavity. This type of obturator does not have insufflation ports (Figure 8-15). If insufflation is required to assist the anesthesia provider in collapsing the lung, regular obturators with insufflation ports are used.
Single-incision laparoscopic surgery (SILS), in which the surgeon operates through a single entry port, usually the umbilical area, leaves only a single small scar (Patient-Centered Care). There are single port platforms that provide an airtight fulcrum that assists with access and the triangulation of standard or articulating instrumentation (Figure 8-16). Single port laparoscopy is associated with minimal postoperative pain and scarring. Advancements in this type of laparoscopic technique have been made not only in adult but also pediatric laparoscopy (Research Highlight).
Dissecting Instruments.
Dissecting instruments are used to cut, divide, or separate tissue. Scissors and dissectors that are similar to their open-procedure counterparts have been designed for use in MIS procedures.
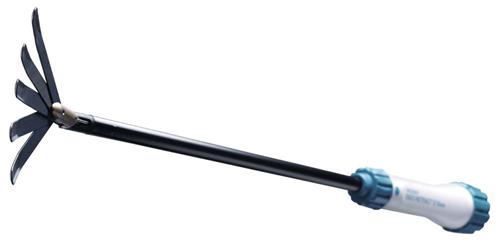
Scissors are available for blunt or sharp dissection. They can be straight or curved (including hook scissors), depending on the location of the target tissue and technique used (Figure 8-17). Scissors usually have a rounded tip when closed so that they also can be used to manipulate tissue without trauma. When open, both blades of the scissors should be visualized to prevent inadvertent injury. Some scissors are designed to be connected to an electrosurgical energy source so that coagulation can be provided during cutting.
Dissectors are used to separate or divide tissue. Many different tip shapes are available to dissect, spread, divide, grasp, retract, and coagulate structures (Figure 8-18). Other dissecting instruments, such as balloon dissectors, have been developed for blunt dissection or creation of a space so that surgery can be performed. A balloon dissector may be used to create a preperitoneal space during laparoscopic herniorrhaphy (Figure 8-19).
Clamping and Grasping Instruments.
Clamping instruments are used to grasp and hold tissue or other materials. Ratchets are used in the instrument design to allow the distal tip to be locked onto the tissue being grasped. Graspers, forceps, and biopsy forceps are classified as clamping instruments.
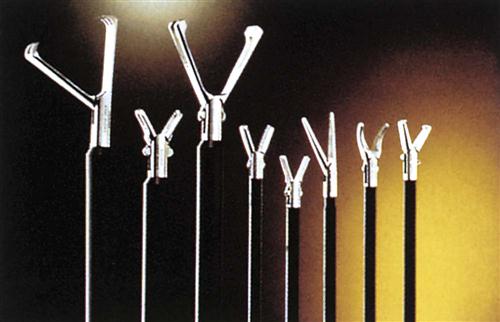
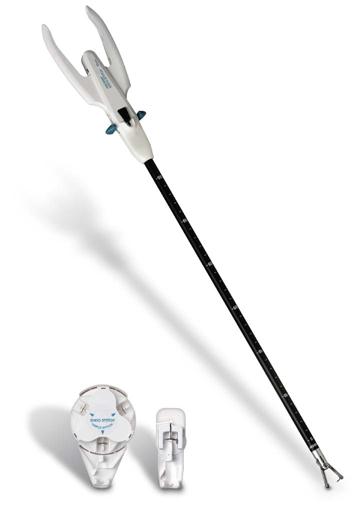
Graspers and forceps can be (1) traumatic, with sharp teeth, or (2) atraumatic, with a smooth, serrated jaw surface (Figure 8-20). Traumatic graspers and forceps customarily are used to hold tissue that will be excised, whereas the atraumatic versions are used to gently hold structures, such as the bowel or liver. Some clamping instruments are insulated so that electrosurgical energy can be transmitted to provide coagulation.
Suturing and Stapling Instruments.
Suturing or stapling instruments deliver sutures, staples, or clips to join, hold, and secure tissue. Needle holders, clip appliers, and staplers are in this category.
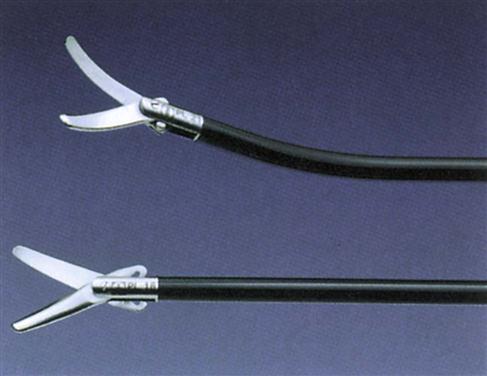
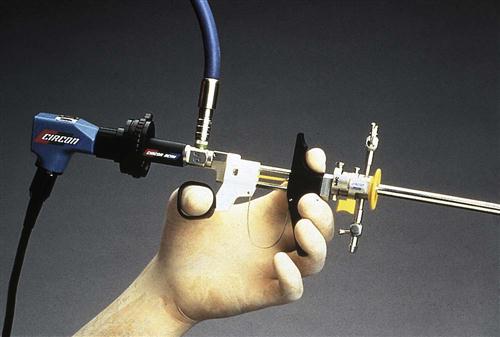
Needle holders are designed to deliver and place sutures within body cavities during MIS procedures. Tungsten carbide jaw inserts on needle holders are used to prevent rotation of the suture needle. These inserts can be replaced when they become worn. Some needle holders are designed to transfer the needle from one jaw to the other during suturing (Figure 8-21). Suture passers and curved needle holders also are available.
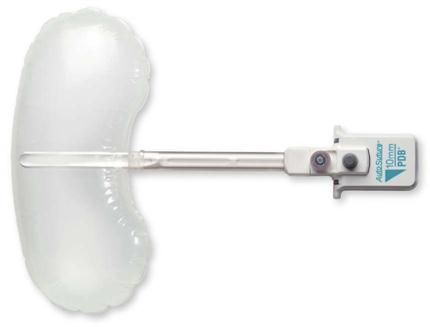
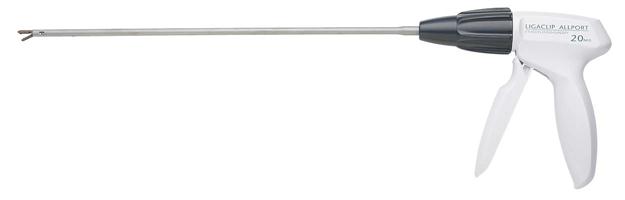
A clip applier is used to provide hemostasis and tissue security. Its use represents the safest, easiest, and quickest way to occlude small vessels and structures. Reusable appliers exist, but many must be removed from the cannula each time to be reloaded. This process adds time, contributes to loss of pneumoperitoneum (if used), and causes frustration when the clip is dislodged on reinsertion. For this reason, automatic-feed, reloadable, disposable versions are more desirable (Figure 8-22).
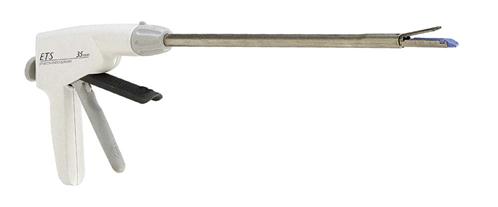
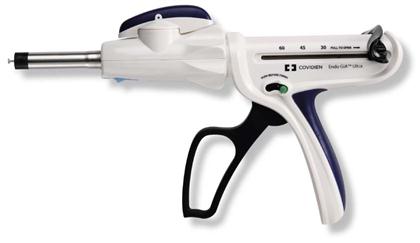
Staplers provide cutting and stapling during MIS resections (Figures 8-23 and 8-24). Certain structures can be easily resected intracorporeally (i.e., within the abdominal cavity), such as the ovary or appendix. Others may necessitate extracorporeal resection (outside the body) or reanastomosis; if this is necessary, traditional stapling devices are used.
The evolution of more complex MIS techniques has challenged traditional suturing and ligation methods. As a result, several devices and techniques have been developed for laparoscopic tissue suturing. When surgical clips and staples cannot be used, a laparoscopic suture may be substituted. Conditions that preclude the use of clips include large arteries and edematous or inflamed ducts. Most general surgeons prefer to use nonabsorbable sutures and ligation materials to prevent rapid absorption. Three basic types of laparoscopic suturing materials are loop ligatures, extracorporeal sutures, and intracorporeal sutures.
Loop Ligatures.
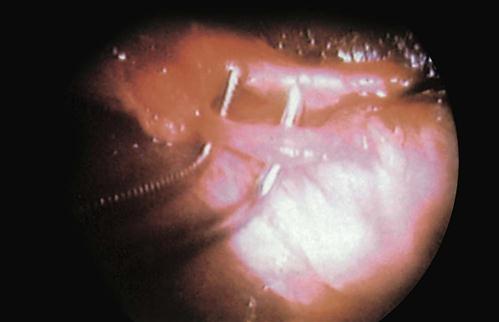
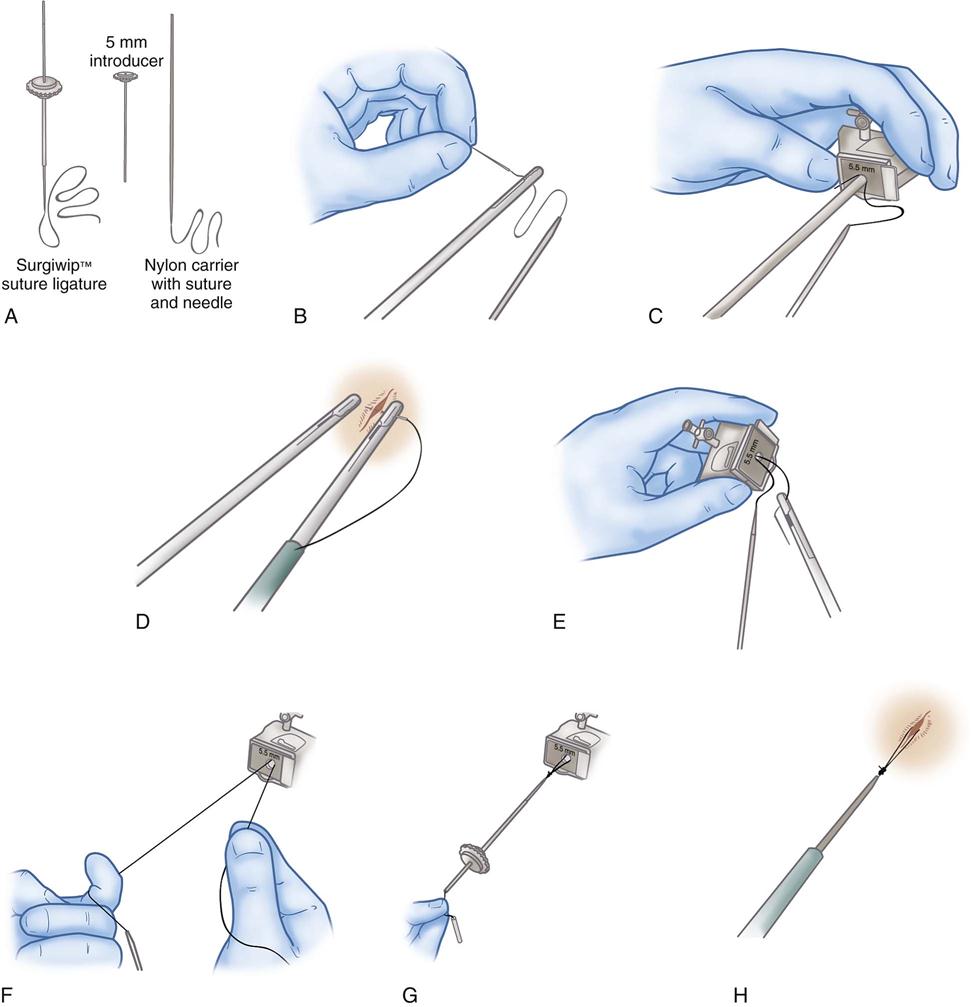
Preknotted suture loops (loop ligatures) are used to ligate pedicle tissues. The suture loop is packaged with an introducer sleeve, which is inserted through one of the obturator sheaths. The loop is passed over the target tissue or pedicle using a grasping forceps to assist. When the loop is in position, the existing suture knot is pushed down the introducer sleeve until it is cinched tightly around the tissue. The suture is cut with endoscopic scissors (Figure 8-25).
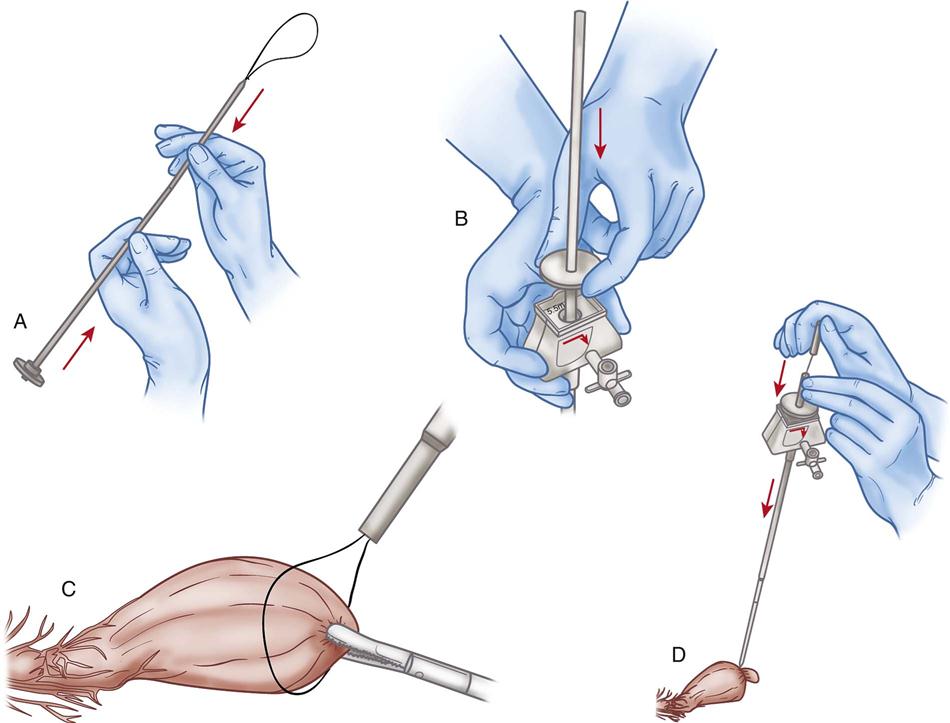
Extracorporeal Sutures.
Tissue can be approximated intra-abdominally when the knot is tied extracorporeally (i.e., outside the body). To accomplish this, endoscopic swaged sutures are used. The suture is grasped proximally to the needle, and both are inserted through one of the obturator sleeves into the abdomen. The needle is held with the grasper or laparoscopic needle holder and driven through the desired tissue. A second grasper or needle holder inserted through a second obturator sleeve is used to assist. The needled end of the suture is pulled through the tissue and out through the sleeve. The needle is removed, and a knot tied extracorporeally. The knot is advanced down the sleeve and onto the tissue. The suture is cut with laparoscopic scissors (Figure 8-26). The three types of knots tied extracorporeally are the slip knot, the fisherman’s knot, and the surgeon’s knot.
Intracorporeal Sutures.
A suture ligature also can be passed through the obturator sleeve to be tied while it is inside the body. The tissue is approximated in the same fashion but tied intracorporeally (i.e., inside the abdomen) using grasping forceps or laparoscopic needle holders.
Retractors and Accessory Instruments.
Retractors are used to hold tissue and expose the operative target site (Figure 8-27). Retractors can be traumatic to some structures, such as the bowel and liver, and are used with caution. Mini-retractors and balloon retractors have been designed for use on delicate structures. A miniature version of a surgical clamp with blades that splay the incision open beneath the tissue is available. Other accessory instruments have been designed to enhance the use of basic MIS instruments, provide exposure, and facilitate the procedure. Probes used to manipulate tissue are blunt to minimize tissue trauma. Some probes have centimeter gradations to measure structures within the body. Irrigation-aspirator probes enhance visualization of internal structures, and electrosurgical probes provide hemostasis. Endoscopic specimen bags contain specimens in order to minimize cross-contamination. Special accessory instruments are continually being designed to enhance MIS procedures.
Care and Handling of Endoscopes and Instrumentation.
Endoscopes and instruments must be clean and free from all bioburden (contaminating organisms) before sterilization or high-level disinfection. During routine use, bioburden accumulates in channels, ports, crevices, and other movable parts of scopes and instruments. Periodically throughout the procedure, gross blood and bioburden must be removed by flushing the channels and wiping the surfaces with sterile water. Saline is never used routinely to remove gross debris during the procedure because this salt solution can leave mineral deposits on or in the device. Keeping instruments and endoscopes relatively clean during the procedure helps prevent debris from drying, thus facilitating the cleaning process and protecting the instrument.
After each procedure all instruments and devices are decontaminated thoroughly. Immersible equipment is cleaned or flushed with an enzymatic or other appropriate detergent solution; this loosens organic material and makes it easier to remove. Instruments that can withstand cavitation or ultrasonic cleaning (processes whereby high-frequency energy causes microscopic bubbles to assist with debris removal) can be placed in an ultrasonic device. Fiberoptics and endoscopes usually cannot be placed in an ultrasonic machine because the vibratory motion can damage tiny fiberoptic bundles.
Selection of appropriate cleaning solution or detergent is critical. Detergents consist of various formulations that may include pH builders, buffers, surfactants, and chelants that provide the chemical compositions that clean devices. The amount of cleaning power within a solution is determined by the pH of the formulation. The “potential for hydrogen” is the meaning of pH, which represents the degree of acidity (more hydrogen ions present), neutrality (equal hydrogen and hydroxyl ions), and alkalinity (more hydroxyl ions present). A detergent with a very low pH can cause staining and pitting on the surfaces of stainless steel instruments because they are more susceptible to damage during prolonged exposure of acidic solutions. When detergents are combined with the mechanical or automatic force of a cleaning spray, removal of bioburden is easier.
A low-sudsing detergent is recommended so that the detergent can be completely removed. Cleaning solutions with surfactant are less desirable because they are more difficult to rinse. If surfactant is left on the surface, the device may feel sticky or gummy, which could affect the electrical conductivity of the instrument. Careful attention is paid to the solution used as well as the type of device being cleaned. Certain detergents are not appropriate for cleaning both endoscopes and endoscopic instruments.
Careful rinsing and flushing with copious amounts of water follows the cleaning process. Often deionized or demineralized water is recommended for the final rinse to minimize mineral buildup from tap water. The manufacturer’s written recommendations for cleaning and processing always should be followed. After the final rinse, instruments are be dried before disinfection or sterilization.
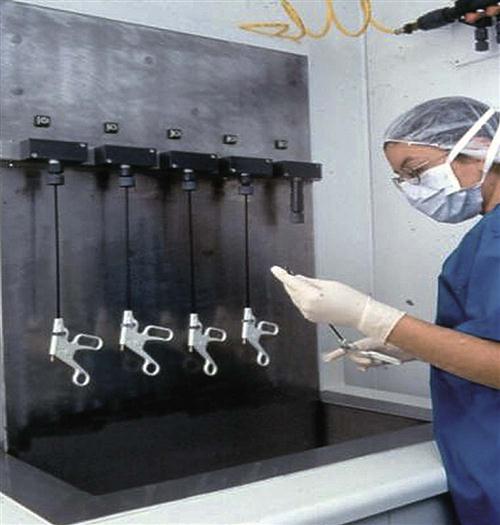
Automatic cleaning devices that flush the ports of instruments provide an economic and effective way to clean reusable channeled instruments (Figure 8-28). Although instruments have flush ports, debris can become lodged distally. Some automatic systems provide a means to flush in a retrograde fashion, forcing debris from the larger proximal port. Sealed instruments also can be tested for seal integrity using this system.
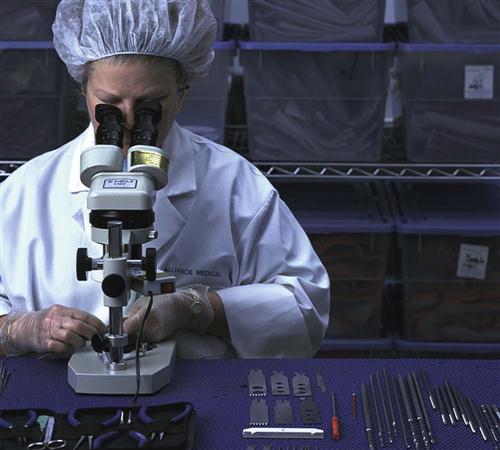
After the device has been thoroughly cleaned, rinsed, and dried, its integrity and functionality are assessed. Personnel involved with reprocessing MIS devices must be aware of instrument composition, design, and use. Any device with electrosurgical capabilities is checked to ensure that the length of the insulation sheath has not been compromised. Equipment is available that scans these instruments for electrical leakage through breaks in insulation.
Often new MIS accessories are purchased and used without educating the staff responsible for their reprocessing. Staff members cannot understand design and use of a device without proper instruction. The U.S. Food and Drug Administration (FDA) requires that any device purchased as reusable must have written instructions for reprocessing. Staff must understand how the instrument works to ensure that functionality of the device has not changed during reprocessing. Compliance with federal, professional, and regional standards for reprocessing is mandatory.
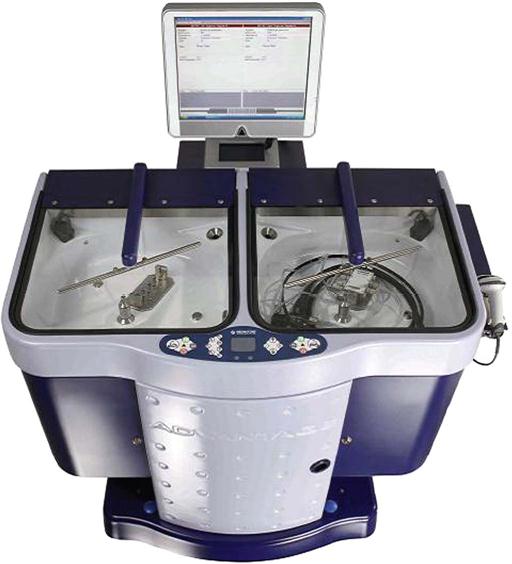
Instruments and devices that contact sterile tissues and the vascular system must be sterile. Instruments contacting intact mucous membranes can be processed using high-level disinfection (Figure 8-29). This means that sterility is required for all laparoscopy, angioscopy, thoracoscopy, and arthroscopy procedures. High-level (cold-soak) disinfection may be acceptable for colonoscopy, laryngoscopy, bronchoscopy, cystoscopy, and other diagnostic procedures in which surgical devices touch intact mucous membranes. Invasive procedures that access the vascular system (biopsies) are performed during many endoscopy procedures. The adequacy of high-level disinfection must be evaluated for these procedures. Viruses and microorganisms, such as human immunodeficiency virus (HIV), hepatitis B and C viruses, Mycobacterium (tuberculosis bacteria), and antibiotic-resistant organisms, are not easily destroyed during high-level disinfection. Even though high-level disinfection has been the accepted primary standard of reprocessing for some endoscopic instrumentation, the concern over viruses and microorganisms has caused debate about the adequacy of using high-level disinfection. Therefore, sterilization is quickly becoming the standard for reprocessing endoscopes and endoscopic instruments.
Thermal pasteurization, using a washer/pasteurizer, may be chosen for thermal high-level disinfection. An FDA-approved chemical germicide is selected for chemical high-level disinfection. Glutaraldehyde, used for many years, has hazards for staff that must be considered when this agent is selected for high-level disinfection. The maximum recommended exposure level of glutaraldehyde determined by the Occupational Safety and Health Administration (OSHA) is 0.2 parts per million (ppm). When solution is being poured after mixing or when devices are being submerged, the level rises to approximately 0.4 ppm, which is double the recommended maximum exposure level. The odor of glutaraldehyde becomes an irritant at 0.3 ppm, causing tearing, nausea, and other effects. Hooded systems to house glutaraldehyde solutions are designed to remove odor and fumes. When using this or any other chemical germicide, the device must be totally immersed and soaked for the specified contact time, following the manufacturer’s recommendations for cleaning protocols, preparing the solution, maintaining contact time, and calculating expiration dates. Other solutions are available for high-level disinfection without the hazards that glutaraldehyde presents.
Institutional policy sets the guidelines from which practitioners work. Insight and coordination are required to provide comparable levels of care when there are too few instruments for the number of scheduled procedures. If sterile instruments are required for a particular procedure, they should be used for all patients undergoing that procedure. Sufficient instruments, accessory items, and equipment must be purchased to accommodate patient volume, or other reprocessing measures must be implemented.
When sterile devices and instruments are needed, multiple options for sterilization include steam, ethylene oxide, gas-plasma, peracetic acid, and ozone sterilization methods (Association of periOperative Registered Nurses [AORN], 2013). Often steam cannot be used on delicate endoscopes, but accessory instruments may withstand the heat produced during steam sterilization. Some arthroscopes and laparoscopes have been designed to withstand high temperatures of steam sterilization. For items that cannot withstand high temperatures, options include the following (see Chapter 4 for a more thorough discussion):
Single-Use Versus Reusable Instrumentation.
Many facilities use a combination of reusable and single-use laparoscopic instruments. Advantages of single-use items include sharpness, reliability related to function, guaranteed sterility, and safety. Indirect advantages include no reprocessing, no repair costs, and comparable levels of patient care. Upgraded designs are more easily brought to market when the device is labeled for single use. Disadvantages include the need for increased storage space, budgetary implications, and environmental concerns related to disposal of biohazardous waste.
Advantages of reusable instruments include less storage space, reduced costs (except for initial purchase and repair), and minimal waste. With reusable instruments, decontamination and reprocessing systems must be reliable, compatible with the devices being processed, and monitored for effectiveness.
Above all, safe and effective patient outcomes should be the major criteria considered when comparing single-use with reusable instrumentation. Advantages and disadvantages of reusable versus single-use devices must be explored, using a risk-to-benefit analysis, before purchasing decisions can be made. Institutional policy may dictate whether reusable or single-use items are chosen. The choice between single-use and reusable instrumentation and equipment must be evaluated thoroughly in each individual practice setting and justified accordingly.
Reprocessing Single-Use Devices (SUDs).
Reprocessing SUDs is a practice that has grown in acceptance. In the United States the practice of reprocessing SUDs is highly regulated by the FDA. The first FDA guidance document was published in 2000. The document was updated and published in 2006, titled Guidance for Industry and FDA Staff: Medical Device User Fee and Modernization Act of 2002, Validation Data in Premarket Notification Submissions (510[k]s) for Reprocessed Single-use Medical Devices (FDA, 2006). The document outlines regulatory requirements, enforceable by the FDA, for reprocessing previously used SUDs. The FDA continues to provide prescriptive guidelines to control this industry. In 2008 the Government Accounting Office (GAO) published a document stating that there was no elevated risk with reprocessing SUDs (GAO, 2008).
A “reprocessor” is usually a third-party reprocessing company that reprocesses single-use devices. Hospitals rarely pursue the challenges of becoming listed as a reprocessor, given the expense involved with this activity. Reprocessing organizations are considered manufacturers, are subject to the same regulatory requirements as the original device manufacturer, and must comply with the original 2000 document guidelines (FDA, 2000):
Reprocessors also repackage and resterilize items with an expired shelf life date or when sterility of the outer packaging has been compromised. Single-use devices that are reprocessed are segregated into two categories for reprocessing: open/not used and open/used. The devices that have been used are grossly decontaminated before they are sent for reprocessing. If devices are not grossly decontaminated, they are collected in approved containers and transported by a licensed biohazardous material hauler using appropriate packaging materials and labeling.
Liability is an important concern for those engaged in reprocessing single-use items. A hospital or surgery center may be liable if reprocessing occurs within the confines of the facility. If a third-party company provides this service, it may likewise be liable and must document liability insurance coverage for this service. Although the original manufacturer of a device warrants a disposable product for one use, a reprocessing company also warrants the reprocessed device for one additional use.
Questions to ask when determining whether to reprocess SUDs include the following:
• Can the disposable device be adequately cleaned?
• Is the device tested and checked for proper form and function after cleaning has been completed?
• Can the device be returned to its original intended use (Figure 8-30)?
• Will cost savings be passed on to the patient, if appropriate?
No matter where reprocessing is performed, appropriate equipment must be available to ensure that the form and function of the device have not been compromised. Customers should inquire about reprocessing and quality assurance practices if dealing with a third-party reprocessor. Usually these companies have appropriate equipment to perform comprehensive device and validation testing. They must register with the FDA and comply with the QSR (FDA, 2000). Reprocessors should provide documentation of FDA registration, any reports of FDA inspection, such as an establishment inspection report (EIR), FDA warning letters, all-important 510(k) or PMA documentation, and the limited number of uses for each specific device.
The practice of reprocessing SUDs continues to grow in popularity as significant cost savings are realized by all sizes and types of healthcare facilities. Surgical team members must work closely with their purchasing agent, infection control officer, financial administrator, and others to decide if reprocessing SUDs is an appropriate option for their facility.
Video Technology
Evolution of Video Technology
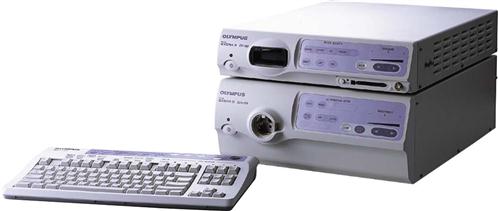
A basic standard medical video system includes the scope, light cable, light source, camera head, camera cord, camera-scope coupler, camera control unit, and video monitor. Additional peripheral equipment is necessary for specific surgical procedures and is discussed later. Given the complexity of video technology, a glossary of terms is provided in Box 8-1.
Setting up a video system in surgery begins with the image source—the camera. A camera control unit (CCU) is needed to convert the image signal from the camera into viewable format. The monitor is then connected as the display device that shows the image signal. Options can be added to this setup to record the surgical procedure or to take still images. The image recorder and/or printer is positioned before the display device.
Video systems use light energy from a source, convert it into electrical energy, and then convert it back into light energy to provide pictures. The camera head contains a sensor, which is light sensitive. The sensor may be a solid-state unit or chip, called a charge-coupled device (CCD), which produces the unprocessed video signal, or the sensor may be a high-definition (HD) system.
The CCD is composed of small picture elements called pixels, which in the presence of light are conductive and in the absence of light remain nonconductive. Each pixel can sense red, blue, or green light. The picture is transformed into a matrix made up of the conductive and nonconductive pixels. This matrix will scan at an extremely rapid rate that generates the signal frequency.
The National Television Standards Committee (NTSC) sets the standard analog video format in the United States, Canada, Japan, and most of South America and Asia. It was established for broadcast purposes. Even though the NTSC format has been used for more than 50 years, most transmissions in the United States were replaced with the Advanced Television Systems Committee (ATSC) format in 2009, and by August 31, 2011, the ATSC format began to be used in Canada.
The three most commonly used video formats are S-Video, HD-SDI, and Digital Visual Interface (DVI). S-Video is short for Super-Video and is a technology used for analog video signals. The information of S-Video is divided into two separate signals, one for color (chroma) and one for luminance (brightness), and carries standard definition video. Standard definition displays 720 lines vertically (side to side) and 480 lines horizontally (from top to bottom). This is usually designated as 720 × 480 resolution, which produces 345,600 pixels. An S-Video cable is needed to support this transmission.
For medical imaging, the two most widely used systems are High-Definition Serial Digital Interface (HD-SDI) and DVI. The HD-SDI system was engineered for the highest picture quality (and is most widely used for endoscopic systems), whereas DVI was engineered for copy-protected distribution.
HD systems that produce ultrasharp images with increased levels of contrast have replaced many standard analog video systems. HD systems offer picture quality almost equivalent to what one experiences with the naked eye.
An HD video system refers to a system that has higher resolution (greater numbers of lines of resolution) than with the standard-definition analog systems. The HD visual image is much sharper because gaps between the scan lines are either narrower or invisible to the naked eye. This improvement is most evident with larger screens, but on smaller screens there is no noticeable improvement in picture quality. With a higher number of pixels, as compared to the old standard analog video signal, HD results in a much clearer picture, with higher quality and greater detail.
Vertical lines are also described with a lowercase “i,” meaning interlaced, or lowercase “p,” meaning progressive (which also describes the picture refreshment rate). An interlaced scanning format divides the 1080 lines of resolution into pairs, with the first 540 alternate lines on one frame, then another 540 lines on a second frame. The progressive scanning method displays all 1080 lines simultaneously on every frame, which then requires a greater bandwidth. Today’s highest achievable resolution is 1920 × 1080p. HD video systems that use 1080i resolution are appropriate for endoscopy because this procedure targets small areas and uses slow-moving videos.
Visualization Systems
Endoscopes are used to offer visualization only to the operating physician. The introduction of the teaching arm provided direct visualization not only for the physician but also for the assistant, perioperative nurse, and other surgical team members. Often, however, images seen through the teaching arm were not identical to the images seen through the primary optics. The inability to interact effectively with the physician or to anticipate surgical needs was frustrating and time-consuming.
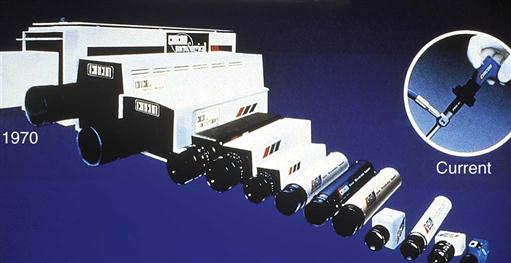
In the late 1960s and early 1970s, medical video and still cameras were continually being introduced to the marketplace; this allowed for still photography and video documentation of select surgical procedures. Tube-style cameras were large, bulky, and heavy—inadequately meeting the video needs of surgery. Video technology rapidly changed with the introduction of the chip TV camera. Its lightweight, low-profile design triggered the era of video-guided surgery. Cameras that previously weighed several pounds now weigh only a few ounces (Figure 8-31).
Rapid developments in video imaging resulted in higher-resolution monitors. Today’s integrated video systems provide increased visual capabilities. This leads to enhanced participation by assistants and promotes accurate assessment and planning by perioperative staff. Video technology has evolved to the point of being almost mandatory during MIS procedures. All surgical disciplines have been enhanced by the availability and capability of video systems.
Camera, Cable, and Control Unit.
The video camera represents the beginning of the optical-electronic chain of the video system. The camera cable transfers the signal frequency from the camera to a camera control unit (processor), which modifies the signal and then transmits the image to a video monitor, recorder, or hard copy picture, or all three. The camera, being the first in the video chain, is the most important component of the video system. Camera options vary widely according to available technology, specialty, and personal preference.
Cameras have either one or three CCD chips. Three-chip cameras provide enhanced color and image quality, but are larger, can cost three times that of a single-chip camera, and are not as light sensitive. Color and the resulting image are enhanced because each chip is dedicated to one of the primary colors—red, green, or blue. For this reason three-chip cameras are often used with microscopes when higher magnification requires increased resolution.
Newer single-chip cameras are available with digital processing in their control units, which boosts resolution. In essence, this technology incorporates three-chip quality in a single chip. Although signal processing in the control unit may be digital, the video output from most cameras is still an analog signal.
Digital processing refers to the way information is delivered through the various components of the control unit. This processing format allows for image enhancement and manipulation of the video image. It also allows multiple video signals to be shown on one monitor and has electronic zoom capability. Digital processing also provides the user with freeze-frame capability when using video printers and when using picture-in-picture systems.
Most cameras also feature the ability to adjust to changes in light intensity while in use. This adjustment is done by an automatic shutter (iris), which measures the availability of light and adjusts accordingly. Automatic shutter activation also helps reduce glare from light reflected off instruments and moist viscera. The ability for continuous variable shutter speeds (rather than discrete speeds) allows for instruments to be brought into the field without glare, while still maintaining adequate illumination of background objects. The shutter’s response should be rapid, without perceptible stepping of image intensity.
Camera heads have buttons to control certain functions, such as white balancing; light-sensitivity boosting (ability to provide a brighter picture when the image requires more light, especially when a scope less than 3 mm is used during sinusoscopy); starting and stopping the recorder; and taking hard copy prints. The surgeon controls these functions at the camera head instead of requesting the circulating nurse to do so each time at the recording device or with a remote; therefore, the surgeon also has the ability to capture events exactly as and when they occur (Figure 8-32).
White balancing is performed by turning on the light source, holding the camera about 2 inches away from a white surface, and pressing the white balance button, usually found on the camera head or camera control unit. By sensing pure white, the primary colors of red, green, and blue are controlled so that a white image is created without a visible tint or color cast.
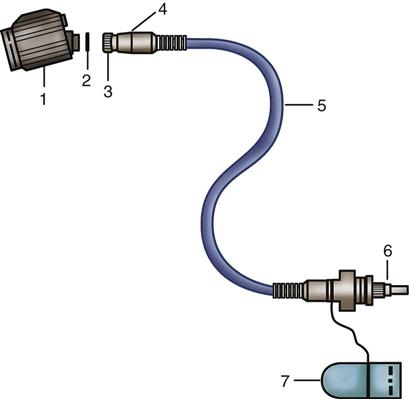
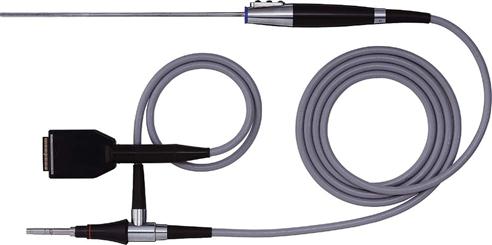
All cameras have focusing capability at the camera-coupler interface. Some also have zoom capability, allowing for closer visualization of specific structures or pathologic conditions. A camera cable connects the camera head to the camera control unit (Figure 8-33). Most camera malfunctions are cable related, not camera related. For this reason a system that provides field-replaceable cables is optimum (Figure 8-34). If wires in the cable break, a new cable can be quickly exchanged, reducing downtime from having to ship the camera and cable for repair. Because wires in the flexible cable can break, the cable must be handled with care. Cables should never be twisted, crimped, or kinked. They also must be long enough to allow sufficient space between the sterile field and the visualization system.
Couplers (Adapters).
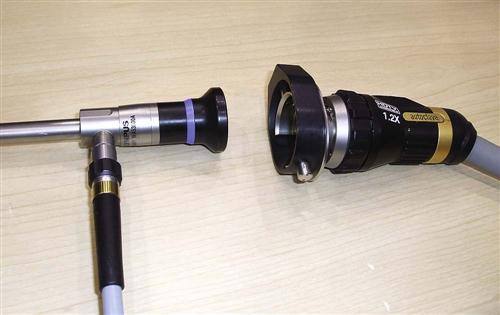
Endocouplers are optical coupling devices used to connect cameras to various endoscopes. They are usually available in 22- to 35-mm focal lengths, with different optical magnifications.
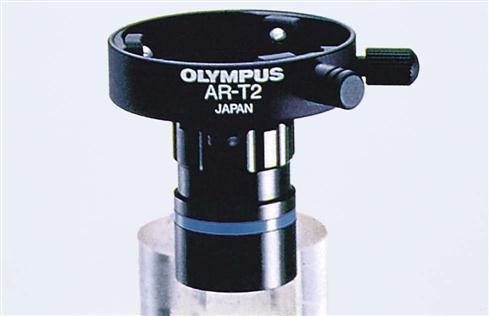
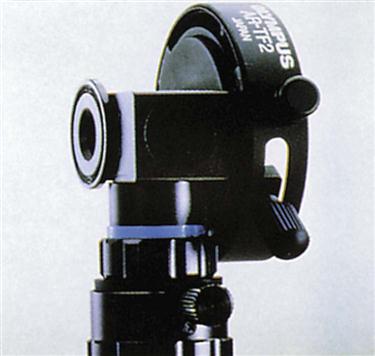
The specific coupler required depends on the surgery or diagnostic procedure to be performed and endoscope to be used. When the surgeon will view only on a monitor, a direct-link coupler between the telescope and camera head is required (Figures 8-35 and 8-36). For the surgeon to look directly through the endoscope and have monitor-viewing capability, a beam-splitter coupler is necessary (Figure 8-37). Beam splitters often are used with flexible endoscopes. There are rotating beam splitters designed for the surgeon who operates in a sitting position. Zoom couplers provide variable focal lengths, with ranges from 18 to 50 mm.
A videoscope is a camera-to-scope connection designed without using a coupler (Figure 8-38). As a coupler adds one more link to the chain, coupler connections can cause loss of light and lens fogging. Connecting the camera and scope with a screw-in design instead of a coupler clamp achieves a tighter fit. This design, however, requires that the camera and scope be purchased as a unit; there is no interchangeability between systems. It does not allow for sterile bagging of the camera because the camera is part of the endoscope.
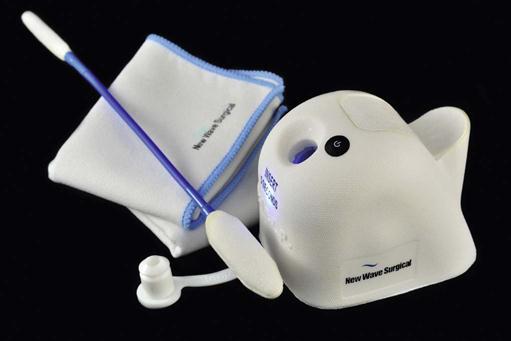
Lens fogging can be frustrating. It occurs because a cool metal scope is introduced into a warm body. There are several ways to address this problem. Elimination of a coupler has been discussed. Sterile defogging solutions can be applied to the endoscope and coupler lenses. These provide a coating and reduce the incidence of fogging. Other options on the market include O-ring seals at connections, sapphire lenses, and various water seals. Warming the endoscope before insertion also may reduce fogging. The endoscope can be warmed by wrapping it with lap sponges that have been soaked in warm, sterile water. Also available are scope warmers, such as wraps, sleeves, thermos jugs, and other devices that warm the scope while maintaining sterility (Figure 8-39).
Stay updated, free articles. Join our Telegram channel

Full access? Get Clinical Tree


