■ Dissection proceeds directly down to the hernia sac, being careful not to enter the sac. If the incision is longer than the hernia defect, only the skin and subcutaneous tissues that are chronically scarred with concerns for healing need be excised. This type of repair can be accomplished totally extraperitoneally. The lateral aspect of the hernia sac is mobilized medially back to the fascial defect. This maneuver may be accomplished purely by blunt dissection, but if the interface of sac and subcutaneous tissue is scarred, sharp dissection may be required (FIG 1B).
Creation of Space for Prosthesis
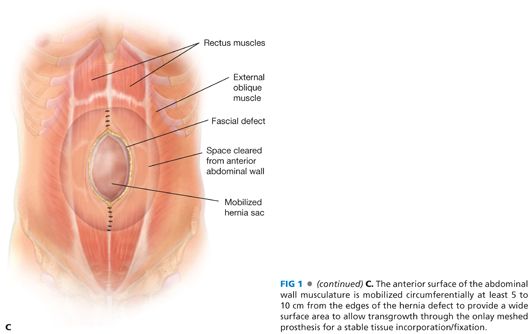
■ The skin and subcutaneous tissue flaps are mobilized for at least 5 to 7 cm lateral to the edge of the hernia defect. This plane is created just anterior to the abdominal wall fascia (anterior rectus fascia and possibly out to the external oblique fascia or aponeurosis more laterally) to allow a wide, lateral overlap of the prosthesis. A 5- to 7-cm skin and subcutaneous flap is mobilized off the midline fascia past the cranial and caudal extents of the hernia defect (FIG 1C).
Reapproximation of Fascia Edges
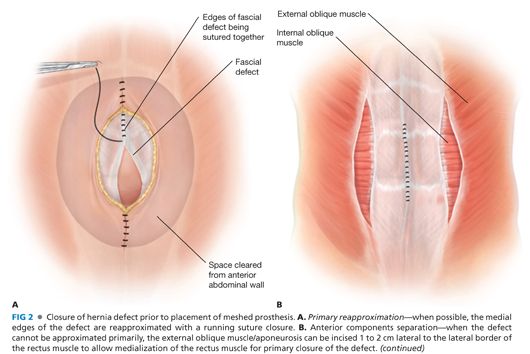
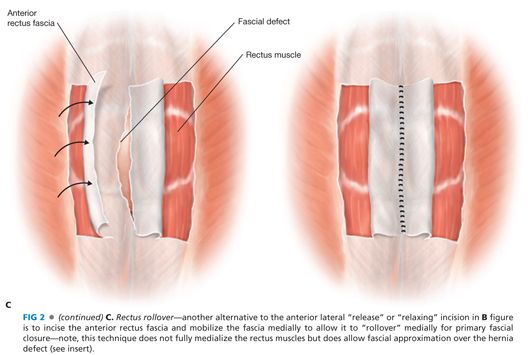
■ A decision needs to be made whether and how the fascial edges of the defect can be reapproximated (FIG 2A) or only bridged or “patched” by the prosthesis (FIG 2B) (see Chapter 37). If the fascial edges are to be sutured together, some dissection under the fascial edges may be necessary to place the fascial sutures safely. Most surgeons believe that reapproximation of the fascial edges reinforced by a prosthesis provides a superior outcome compared to a bridge or patch of a persistent fascial defect. If the defect is wide and would require a more complicated abdominal wall reconstruction, the advantages and disadvantages should be considered. In this situation, the skin flaps can be dissected further laterally beyond the lateral border of the rectus muscle; then the external oblique fascia and muscle can be transected being careful not to disrupt the internal oblique muscle/fascia—a form of anterior components separation—this maneuver allows the rectus muscle to be “medialized” and the medial edges of the fascia to be sewn together (FIG 2C) (see Chapter 37, for more in-depth description). This maneuver allows 4 to 6 cm of medialization of the rectus muscles on both sides. Another option to “approximate” the fascial edges of the defect is a rectus rollover technique (FIG 2C). With this technique, the anterior rectus fascia is incised just medial to its lateral border, mobilized off the underlying rectus muscle, and “rolled” medially. These edges of the rolled anterior rectus fascia can be sutured together in the midline. Note that the rectus muscles are not medialized with this technique.
Placement of Prosthetic Mesh
■ A large sheet of prosthetic mesh is then sized to cover the anterior abdominal wall hernia defect and to extend a further 5 to 7 cm from the hernia defect (so-called “wide onlay”) on all sides of the defect. The lateral edges of the prosthesis are sewn to the anterior abdominal wall fascia circumferentially with #0 or no. 1 suture material (e.g., 0 or no. 1 polydioxanone) (FIG 3). The use of absorbable versus permanent sutures is controversial. Proponents of permanent sutures believe that permanent sutures minimize the possibility of late migration or dislodgement of the prosthesis, whereas those surgeons favoring the longer lasting absorbable suture (such as polydioxanone) believe that permanent sutures can lead to suture granulomas and ultimately contamination and infection of the prosthesis. Although there is no good evidence supporting either argument, we prefer the absorbable suture provided there will be a large surface area for mesh transgrowth.

■ In progressively smaller concentric circles, one or two additional suture fixation of the prosthesis to the underlying anterior abdominal wall can also be placed (FIG 3A). If the repair is a bridge repair, these concentric circles should not extend medial to the edges of the fascial defect because the underlying hernia sac and viscera can be injured. A porous synthetic prosthetic and not a solid prosthetic (ePTFE) is used to achieve the goal to provide a wide surface area for transgrowth through the mesh for tissue fixation.
■ If an anterior components separation is performed, the prosthesis extends laterally to the lateral transected edge of the external oblique aponeurosis (a very wide onlay repair) or just 5 to 7 cm lateral to the medial edge of the hernia defect which is usually to the lateral edge of the rectus muscle.
■ If a rectus rollover is performed, the prosthesis should extend 5 cm lateral to the site of incision in the anterior rectus fascia to provide solid points of fascial fixation of the prosthesis.
■ For situations where there is bacterial contamination (clean–contaminated cases) or active infection, albeit treated, a synthetic mesh is contraindicated, and a bioprosthesis would be a better choice.
Wound Closure
■ Most surgeons place one or two closed suction drains in the large subcutaneous space to prevent a seroma. When the drains should be removed is controversial; for a bioprosthesis, drains are mandatory to prevent a seroma.
■ Prior to closing the skin, a pleating technique may be used, whereby the posterior adipose surface of the skin/subcutaneous flaps can be sewn to the anterior surface of the prosthesis in attempt to minimize the “dead space” and the possibility of seroma (FIG 3B).
RECTRORECTUS SUBLAY REPAIR: MODIFIED RIVES-STOPPA REPAIR
■ Many believe that this repair has the best results of all current incisional herniorrhaphies. Whether it is better than a wide, intraperitoneal sublay (IPOM) can be debated, but there are no studies comparing the two repairs. This modified Rives-Stoppa repair is based on the principle of wide surface area of a meshed synthetic prosthesis placed in a very vascular field—the retrorectus space (to allow a stable, reliable anterior and posterior transgrowth for mesh fixation). Importantly, the prosthesis is neither in the less vascular subcutaneous space where the risk of infection and seroma is greater nor is the prosthesis direct in contact with the intraperitoneal viscera. Moreover, in most patients, the repair can be accomplished extraperitoneally.
Placement of Incision
■ As with other repairs, the incision should be made directly over the hernia defect with resection of the skin incision and the underlying, poorly vascularized scar tissue. The skin incision preferably should not extend all the way up to the xiphoid or all the way down to the pubis but rather stay 5 to 8 cm away from xiphoid and pubis.
Mobilization of Retrorectus Space
■ As described in the first technique (wide onlay technique of incisional herniorrhaphy), the subcutaneous hernia sac is mobilized back to the hernia defect for the entire circumference of the defect. The hernia sac, though, is neither incised nor opened unless a concomitant, “clean” intraperitoneal procedure is planned—for example, adhesiolysis, insertion of an adjustable gastric band, and so forth. It could be argued that clean–contaminated procedures, such as an elective cholecystectomy or hysterectomy do not pose a clinically significant bacterial contamination load despite being clean–contaminated procedures, but considering the morbidity and requirement for at least one additional procedure in the event of mesh infection, the authors tend to refrain from performing even these minimally contaminating procedures concomitantly in most circumstances. Certainly, other “clean–contaminated” procedures such as gastrectomy, small or large bowel resections, appendectomy, biliary drainage procedures, or most bariatric operations other than a band would be considered by most to be an indication to use a bioprosthesis rather than a permanent synthetic mesh.
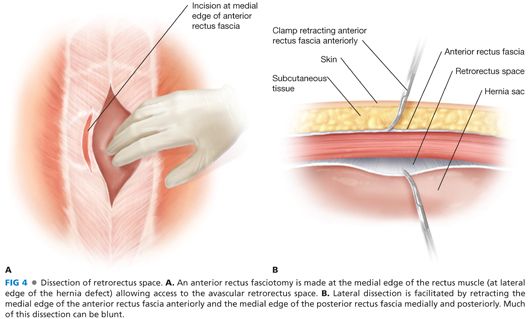
■ Next, the medial edge of the anterior rectus fascia is incised at the lateral edges of the hernia defect, thereby exposing the vertical fibers of the underlying rectus muscle (FIG 4A). The rectus muscle is dissected and retracted anterolaterally to expose the firm, white surface of the posterior rectus fascia (FIG 4B).
■ There are minimal, if any, adhesions between the posterior surface of the rectus muscle and the anterior surface of the posterior rectus fascia, except medially where the transfascial sutures from the originally fascial closure had been placed. The benefit of this retrorectus space is that it is virtually avascular to dissect and very easily mobilized.
■ Care must be taken to preserve the inferior epigastric vessels (artery and vein) cranially near the xiphoid where they will course from medially near the xiphoid to the midrectus muscle anterior to the posterior rectus fascia before entering the rectus muscle. Caudally, the deep inferior epigastric vessels arise from the external iliac vessels medial to the internal inguinal ring and course cranially in the preperitoneal space caudal to the semicircular line and then on the anterior surface of the posterior rectus fascia before entering the rectus muscle with one or more branches. This inferior epigastric arcade is important to preserve because it provides the blood supply to the rectus muscles and equally important from the rectus muscles to the overlying skin and subcutaneous tissue via the “perforator vessels.” One advantage of the rectorectus repair (in contrast to the wide onlay technique) is that mobilization of a lateral skin/subcutaneous flap (and the obligate transection of the important perforators) is not necessary, maximizing the blood supply to the skin edges and minimizing the subcutaneous “dead space.”
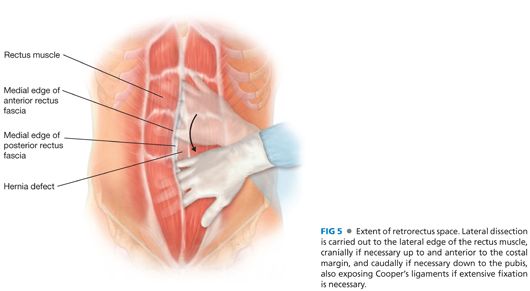
■ The retrorectus space should be mobilized to the lateral border of the rectus muscle, the cranial and caudal extent of the hernia defect/hernia sac (FIG 5). The anterior rectus fascia and the linea alba need to be preserved cranially and caudally to the hernia defect to allow for fixation of the prosthesis.
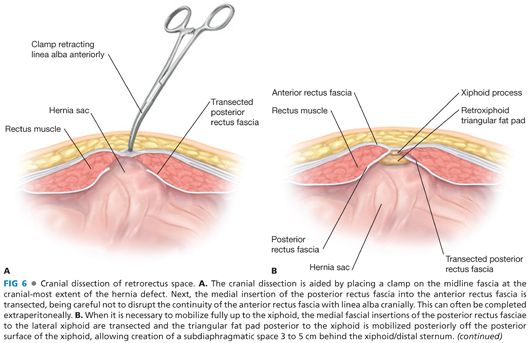
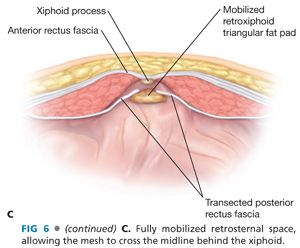
■ The cranial edge of the intact midline fascia is grasped with a Kocher clamp and retracted anteriorly to allow cranial mobilization of a space (if possible preperitoneally) for at least 7 cm or up to the xiphoid (FIG 6A). This requires transection of the insertion of the posterior rectus fascia at the medial edge of the rectus muscle bilaterally, being careful not to disrupt continuity of the anterior rectus fasciae with the linea alba; this maneuver may be performed totally in the preperitoneal space. If the prior celiotomy incision extends cranial to the edge of the hernia defect, the surgeon should palpate further cranially for areas of Swiss cheese defects or areas of fascial weakness; if found, then the retrorectus space needs to be extended beyond the upper most defect. This maneuver may require being intraperitoneal if the preperitoneal space was transgressed previously. If there is not, 7 cm of good, solid, anterior rectus/linea alba cranial to the defect or if the defect extends to the xiphoid, then the insertion of the posterior rectus fascia onto the anterior rectus fascia will have to be transected up to its junction with the xiphoid (FIG 6B). Also, the preperitoneal “triangular” fat pad posterior to the xiphoid needs to be mobilized posteriorly off the undersurface of the xiphoid for 5 cm cranially—this is easy and is an avascular plane; this maneuver will allow the prosthesis to extend under the xiphoid and distal sternum to maximize the cranial surface area for tissue ingrowth/fixation (FIG 6C).
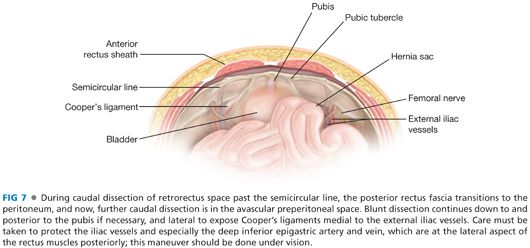
■ A similar maneuver is performed caudally (FIG 7). Caudal to the semicircular line, the posterior rectus fascia disappears, and further caudal mobilization of the retrorectus space now becomes preperitoneal. If the prior celiotomy incision did not extend caudal to the caudal extent of the hernia defect, then this entire maneuver can often be done extraperitoneally. If the prior fascial incision extends further caudally, the peritoneal cavity may need to be entered. Note, any redundant peritoneum and all the hernia sac should be preserved to allow the peritoneum to be closed deep to the prosthesis caudally. This space should be mobilized at least 7 cm, if not 10 cm, being certain again that the overlying fascia is neither weak nor has any Swiss cheese defects. If necessary, mobilize all the way to the pubis (and maybe even mobilize posterolaterally to Cooper’s ligaments for additional bony points of fixation of the prosthesis if the musculofascial tissue of the anterior abdominal wall is weak or attenuated. Note, as discussed previously, the lateral mobilization of the retrorectus space here should be accomplished fully under vision because it is here that the deep inferior epigastric vessels are most frequently injured.
■ Several caveats: First, the retrorectus space extends cranial and anterior to the costal margin; the rectus muscle does not insert on the costal margin but rather on the ribs 3 to 5 cm cranial to the costal margin. Second, the intercostal nerves that supply the rectus muscle and overlying skin course on/near the anterior surface of the internal oblique muscle lateral to the rectus muscle but perforate into the retrorectus space at the lateral-most border of the posterior rectus fascia—these nerves should be preserved. Third, if there has been loss of rectus muscle and the retrorectus space is narrow, the space can be extended to the space posterior to the internal oblique muscle but anterior to the transversus muscle. This will preserve the innervation of the rectus muscle by the intercostal nerves which run on/within the internal oblique muscle. A posterior component separation can be performed if necessary (see Chapter 37).
■ Full mobilization of the retrorectus space should extend 5 to 7 cm cranial to the hernia defect, 7 to 10 cm to the hernia defect, and to the lateral edge of the retrorectus space.
Reconstruction of the Continuity of the Posterior Rectus Fascia across the Midline
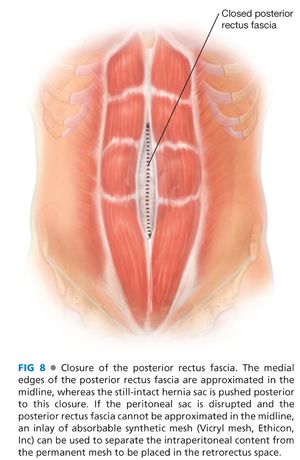
■ Every attempt should be made to reapproximate the posterior rectus fascia in the midline, not only to isolate the retrorectus space from the viscera but also to serve as the deep fascial layer “closing” the hernia defect (FIG 8). This maneuver may be difficult at the cranial and caudal extent of the retrorectus space or with very wide hernia defects. If not possible to reapproximate the posterior rectus fasciae or to cover the exposed intraabdominal visceral with autogenous tissue (redundant sac, peritoneum, or rarely omentum), then consideration should be given to bridging this defect with an absorbable prosthetic such as polyglycolic acid (Vicryl® mesh, Ethicon, Inc or Dexon® mesh, Covidien, Inc) posterior to the synthetic mesh. Use of the expensive bioprosthetics for this “bridge” is not indicated, because this bridge will not be the stable, durable part of the hernia repair.
Insertion of the Prosthesis
■ This repair is best accomplished with a meshed prosthesis. We prefer a large-pore, lightweight type, such as ULTRAPRO™ (polypropylene, Ethicon, Inc), unless the patient is a laborer or a high-performance athlete, in which case we choose a heavyweight mesh, such as Prolene® mesh (Ethicon, Inc). This repair is designed for a meshed prosthesis and, because the repair is fully extraperitoneal, there is no indication for ePTFE or a “coated” mesh—transgrowth from both the anterior and posterior surfaces of the retrorectus space is encouraged.
■ We position a 12 × 12–in sheet of meshed prosthesis diagonally—this increases the craniocaudal length available. This orientation allows a rapid and reliable fixation of each corner of the prosthesis to help in determining the appropriate sizing of the mesh.
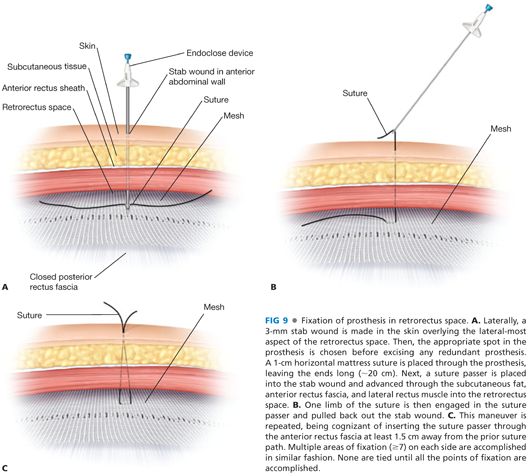
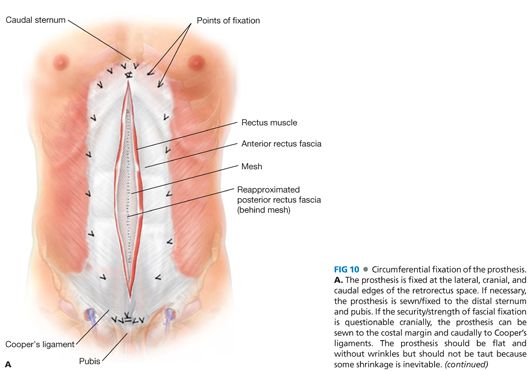
■ The mesh is fixed cranially and caudally. Cranially, a 1-cm horizontal mattress stitch is placed through the mesh just lateral to the midline after doubling back the corner of the mesh onto itself. We use a no. 1 polydioxanone suture for nonbony points of fixation. A suture passer is inserted through a stab wound in the skin into the retroxiphoid space (we prefer to use the more blunt, disposable Endo Close™ [Covidien, Inc] or the Reverdin needle rather than the non-disposable metal Carter-Thomason device). The surgeon’s hand is positioned between the entry site of the suture passer and the peritoneum to prevent inadvertent puncture into the peritoneal cavity (FIG 9A). One end of the suture previously placed in the mesh is grasped by the suture passer and pulled back out the stab wound (FIG 9B); this process is repeated to withdraw the other end of the suture (FIG 9C) being certain to insert the suture passer through the fascia about 1 cm from the first pass such that when tied together, there is at least a 1.5 cm area of fascia incorporated in the knot. An identical suture fixation is performed on the other side of the midline.
■ If the mesh extends posterior to the xiphoid, we use two permanent sutures (no. 1 polypropylene). After placing a horizontal stitch through the mesh, the suture passer is inserted through the most caudal part of the sternum rather than just through the cartilaginous xiphoid; this maneuver requires some force to push the suture passer through the bony sternum.
■ The mesh is fixed at the caudal end of the retrorectus space. The mesh should be minimally taut but not under tension because some amount of mesh shrinkage is expected—more if the heavyweight/small-pore mesh is used.
■ If the prosthesis extends to the pubis, a permanent suture is used for mesh fixation to the pubis, leaving about 3 cm of mesh that will extend posteriorly between the bladder and the pubis. A no. 1 polypropylene suture on a heavy needle is first passed through the mesh and then into the bone of the pubis and back out 1 to 2 cm from the insertion. This suture fixation is not to the periosteum but rather into the bony part of the pubis. The needle is then passed back through the mesh 1 cm from the other end to give 1 cm of mesh between the entry and exit points of the mesh. We use a minimum of four to five suture fixations through the pubis and pubic tubercle and, on occasion, two or three similar sutures to the medial aspect of Cooper’s ligaments bilaterally. As another alternative, Mitek bone anchors (DePuy, Norwood, MA) may be used or a small passage through the pubis can be created using a bone drill. Use of a laparoscopic tacker is not recommended and should be avoided—the fixation is not durable enough.
■ Once the prosthesis is sutured cranially and caudally, the fixation begins laterally. We place a Kocher clamp on the medial edges of the anterior rectus fascia and bring the two sides in opposition to allow an accurate measurement of the lateral distance from the midline for the lateral point of mesh fixation. The mesh should be flat, without wrinkles. Start with the middle of the retrorectus space. The corners of the mesh should be the middle of the distance from the cranial and caudal extent of the repair. A 3-mm stab wound is then made on the anterior abdominal wall about 2 or 3 cm lateral to the lateral edge of the retrorectus space—this provides a bit more “lateral” pull and is easier to pass the suture passer into the retrorectus space. The mesh is folded over on itself to provide a two-layer fixation point in the mesh, and a horizontal suture is placed. The two sutures are pulled out the stab wound individually being certain that the two insertions of the suture passer are at least 1 cm apart on the fascia. The insertion of the suture passer should be done fully under vision to be certain that the inferior epigastric artery/vein complex is not injured, that the suture passer does not go through the posterior rectus fascia, and that an exposed nerve is not incorporated in the horizontal suture.
■ Cranially and caudally, three additional transmural fixation sutures are placed per side.
■ Prior to tying down the transmural sutures, the excess prosthesis is excised. As the sutures are tied down, the knot is pushed through the subcutaneous tissue to lie on the anterior surface of the fascia. The surgeon’s hand should be placed in the retrorectus space to be certain that the mesh is pulled up firmly when the knot is tied.
■ Once the mesh is fixed in place (FIG 10A), we put one or two closed suction drains into the retrorectus space anterior to the mesh but posterior to the rectus muscle. The drains exit the abdominal wall cranially rather than caudally where there are more skin bacteria (FIG 10B). The drains are removed the next day and are there only to evacuate any blood or fluid that forms in the first 24 hours postoperatively. Because this retrorectus space is compressed both anteriorly and posteriorly, seroma formation is rare.
Stay updated, free articles. Join our Telegram channel

Full access? Get Clinical Tree


