Orthopedic Surgery
LEARNING OBJECTIVES
After studying this chapter the reader will be able to:
• Correlate physiologic conditions with the surgical interventions that treat them
• Discuss purposes and potential problems and risks associated with orthopedic surgery
• Demonstrate a working knowledge of perioperative considerations in orthopedic surgery
• Discuss diagnostic methods for determination of surgical interventions and approaches
• Identify specialized instruments, equipment, and supplies
• Differentiate among types of fracture fixations sets and traction devices for fractures beds
• List the pharmacologic and hemostatic agents used during orthopedic surgery
Overview
The word orthopédie is derived from the Greek orthos, meaning “straight,” and paideia, meaning “rearing of children.” It was first used by Nicholas Andry in 1741 in the title for a book addressing the prevention and correction of skeletal deformities in children. Orthopedic surgery has been defined by the American Association of Orthopaedic Surgeons’ Board of Orthopaedic Surgery as “a broad based medical and surgical specialty dedicated to the prevention, diagnosis, and treatment of diseases and injuries of the musculoskeletal system” (American Board of Orthopaedic Surgeons [ABOS], 2009).
Orthopedic surgery is an ever-changing field that is a challenge for the surgical technologist. Technologic advances in the multitude of systems and hardware used have resulted in improved treatment of orthopedic disorders. In addition to understanding anatomic and physiologic responses, the surgical technologist should have a general understanding of the concepts and purposes of these systems to provide the most safe and efficient care. Knowledge of the principles of bone fixation and healing and the relationship of bone and soft tissues will provide a strong basis to ensure continued understanding of the care required for the orthopedic patient.
Surgical Anatomy
Anatomic Structures
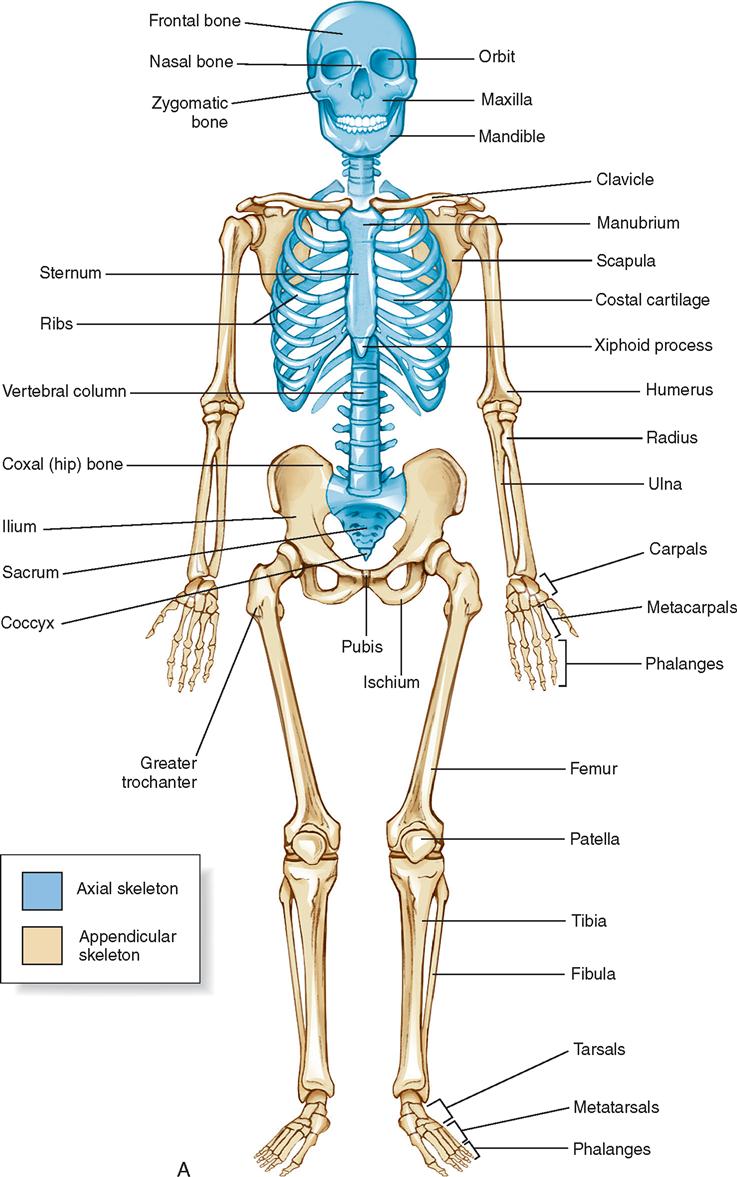
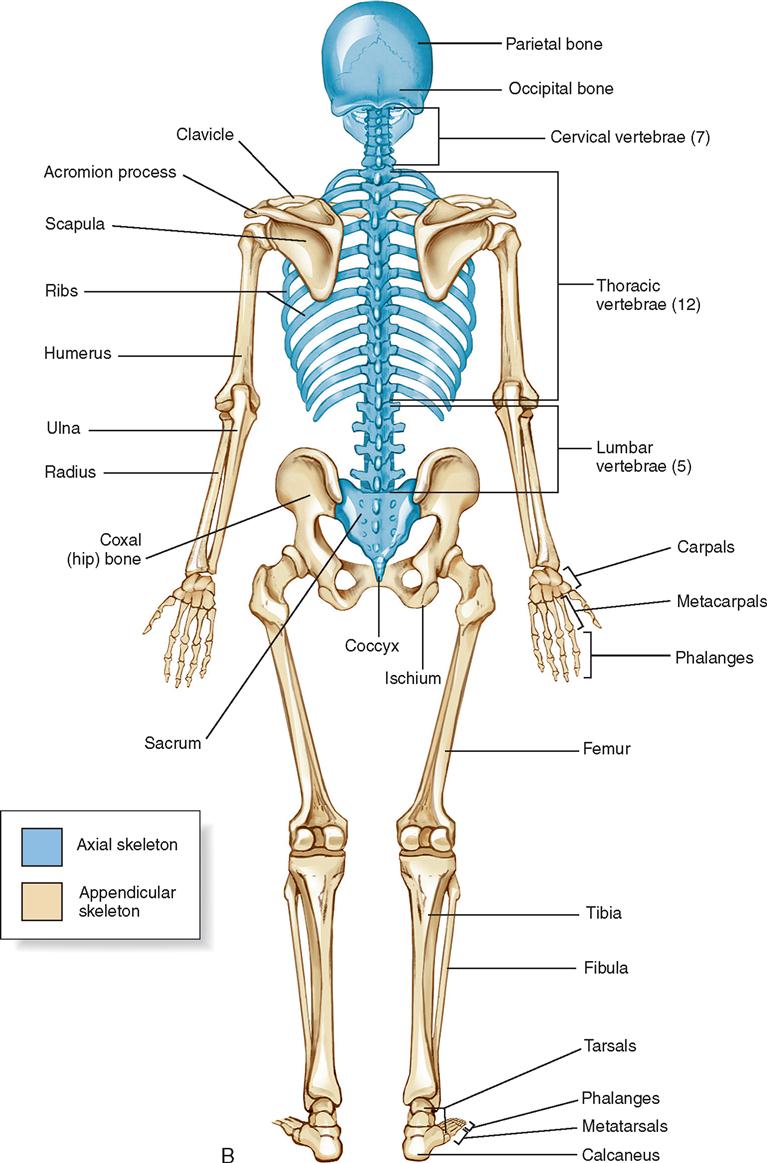
The 206 bones of the body form the appendicular or axial framework that supports soft tissues, provides storage areas and reservoirs for minerals, and serves as a site for formation of blood cells (Figure 11-1). The skeletal system is composed of varied elements, including bone, muscle, and associated structures.
Bone remains in a constant state of formation and resorption, preventing development of excessive thickness or thinness. These processes are related to individual metabolism and absorption of calcium, vitamin D, and phosphorus. Levels of minerals affect disease processes, causing bone changes. A layer of connective tissue called periosteum covers all bone.
Muscles are masses of tissue that cover bones and provide movement to the skeletal system. Muscles interact with nerves, minerals, skin, and other connective tissue to contract and extend. Individual muscles are short or long and vary in diameter, depending on their position on a specific bone.
Ligaments, tendons, and cartilage also form the skeletal structures. Ligaments are bands of dense connective tissue that hold bone to bone. They provide stability to a joint by encircling or holding ends of bone in place. Tendons are tough, long strands of fibers that form the ends of muscles. They transmit forces to bone or cartilage without being damaged. Cartilage is a layer of elastic, resilient supporting tissue found at the ends of the bones. It forms a cap over the bone end to protect and support the bone during weight-bearing activities and provides a smooth gliding surface for joint movement. Cartilage is aneural (without nerves), alymphatic (without lymph tissue), avascular (without blood vessels), and high in water content. The lack of vascularity and loss of water from cartilage during a lifetime are causes of resulting degenerative disease, such as arthritis. Weight bearing and joint movements keep cartilage from becoming thin or damaged and help prevent degenerative conditions.
Joints are articulations where bones are joined to one another or where two surfaces of bones unite. Joints are classified by the type of material between them or according to movement. Material between joints is fibrous, cartilaginous, or synovial. The type of movement is synarthrotic (immovable), amphiarthrotic (slightly movable), or diarthrotic (freely movable). Synarthrotic joints are connected by fibrous tissue or ligaments (e.g., the suture type of joints holding the bones of the skull; connections between two bones, such as the radius and ulna). Amphiarthrotic joints are connected by cartilage. Joints of this type include the symphysis pubis, intervertebral joints, and manubriosternal joint. The majority of joints are diarthrotic; these are the only joints with one or more ranges of motion. These joints are lined with a synovial membrane and are called synovial joints. Examples include the knee, cervical vertebrae 1 and 2 (C1 and C2), the radius articulating on the wrist bones, the hip, and the shoulder.
The two types of bone tissue are cortical and cancellous. Cortical bone is the hard bone forming the outer shell—the main supporting tissue. Cancellous bone is soft and spongy—located at the iliac crest, tibia, sternum, and ends of long bones. It contains the red bone marrow for hematopoiesis.
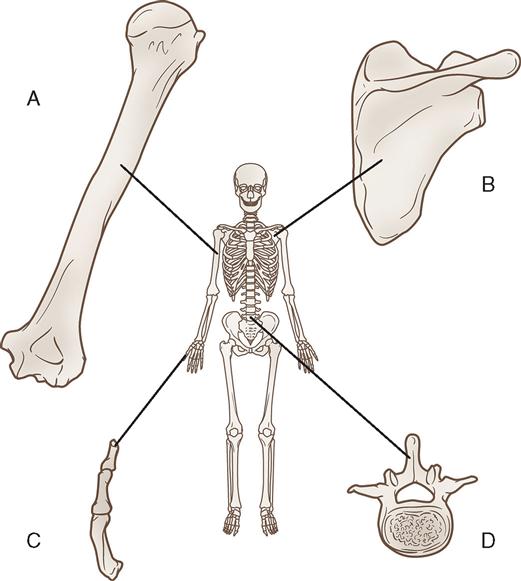
Bones are divided according to their shape: long, short, flat, irregular, and round (Figure 11-2). Long bones are present in the limbs and consist of a shaft and two ends; the ends generally flare out, are covered with articular cartilage, and provide a surface for articulation and musculotendinous attachment. Short bones, such as the carpals and tarsals (in the wrist and midfoot areas, respectively), are present where the structure is strong but limited movement is required. Flat bones are the scapula, the sternum, and the pelvic girdle. Irregular bones are found in the skull and vertebral column. Round bones, or sesamoid bones (resembling a sesame seed), are found within tendons. The patella is a large sesamoid bone; however, most are small, such as the two found on the head of the first metatarsal, which form the “ball” of the foot.
Long bones consist of a shaft (diaphysis) and two ends (epiphyses). The shaft is composed of compact bone. The epiphyses flare out and consist of cancellous bone. They are covered by cartilage, which provides a cushion and offers protection during weight bearing and movement. Until skeletal maturity, a line of cartilage called the epiphyseal plate separates the epiphysis from the diaphysis. Fractures in this region by children can be devastating because they often lead to malformation and permanent limb shortening.
Trabeculae are located within cancellous bone and consist of an interconnecting network of bone oriented along the lines of stress. These structures are important for weight bearing, providing strength to withstand stress placed on the bone. The periosteum is a thin, outer covering of bone containing nutrient arteries for nourishment of bone cells. Disruption of these periosteal vessels after bone trauma can influence the ability of bone to heal. The haversian system consists of thousands of microscopic units found in the cortical bone. These units of matrix cells, canals, and conduits allow flow of nutrients and facilitate calcium absorption.
Vertebrae
Vertebrae form the longitudinal axis of the skeleton. The vertebral bodies are connected by several cartilaginous joints, which enable the vertebrae to flex, extend, or rotate while being held together. Intervertebral discs and ligaments connect the bodies of adjacent vertebrae. The ligamenta flava bind the laminae of adjacent vertebrae together. Other ligaments connect the spinous processes and vertebral bodies.
Seven cervical vertebrae form the skeletal framework of the neck. Twelve thoracic vertebrae support the thoracic region, and five lumbar vertebrae support the small of the back. Below the lumbar vertebrae lie the sacrum and coccyx. Each of these bones is composed of fused vertebrae—five for the sacrum and four for the coccyx.
The vertebral column is curved. After birth, there is a continuous posterior convexity. As development occurs, secondary posterior concavities develop in the cervical and lumbar regions, resulting in improved balance.
Each area of the vertebral column has specific bony structures. General features include a body (except the first two cervical vertebrae) on the anterior part. The posterior portion of the vertebrae consists of a neural arch formed by pedicles and laminae and the spinous and transverse processes.
Shoulder and Upper Extremity
The clavicle, which is a long, doubly curved bone, serves as a prop for the shoulder and holds it away from the chest wall. The clavicle rests almost horizontally at the upper and anterior part of the thorax, above the first rib. It articulates medially with the manubrium of the sternum and laterally with the acromion of the scapula; it is tethered to the underlying coracoid process of the scapula by the coracoclavicular ligaments.
The scapula (shoulder blade) is a flat, triangular bone that forms the posterior part of the shoulder girdle, lying superior and posterior to the upper chest. The glenoid cavity on the lateral side of the scapula provides a socket for the humerus (the bone of the upper arm). The acromion process articulates with the clavicle medially. The scapula is attached to the thorax by muscles.
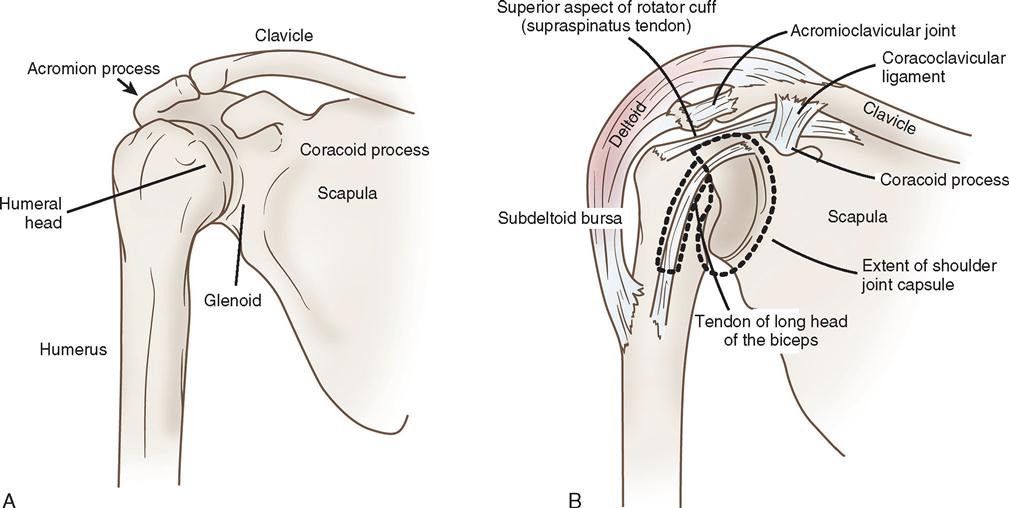
The shoulder (pectoral) girdle consists of the glenohumeral, sternoclavicular, and acromioclavicular (AC) joints (Figure 11-3). The glenohumeral joint has a multidirectional range of motion, whereas the latter two joints have limited motion. The AC joint, located at the top of the shoulder, is the articulation between the outer end of the clavicle and a flattened articular facet situated on the inner border of the acromion. The muscles immediately surrounding the shoulder joint are the supraspinatus, infraspinatus, teres minor, and subscapularis muscles; together they are referred to as the rotator cuff. These muscles stabilize the shoulder joint, whereas the powerful deltoid, pectoralis major, teres major, and latissimus dorsi muscles move the entire arm. Shoulder girdle strength and stability are maintained by the soft tissue integrity—not the bony structures. A pathologic condition in this area can be the result of bone, soft tissue, or combined injury.
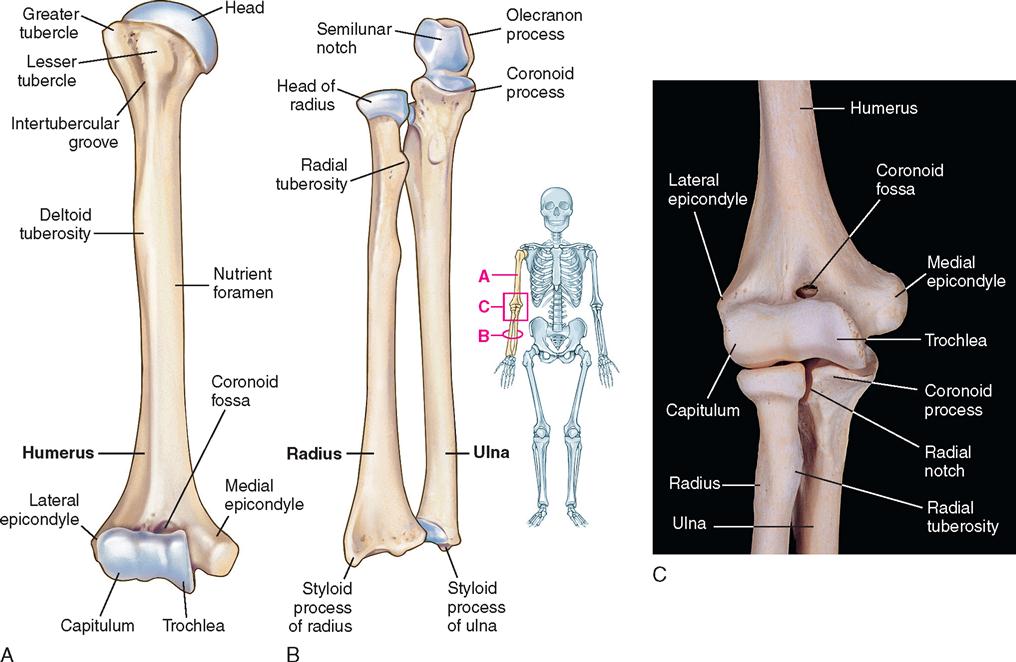
The humerus is the longest and largest bone of the upper extremity. It is composed of a shaft and two ends. The proximal end, or head, has two projections—the greater and lesser tuberosities (Figure 11-4). The circumference of the articular surface of the humerus is constricted and is termed the anatomic neck. The anatomic neck marks the attachment to the capsule of the shoulder joint. The constriction below the tuberosities is called the surgical neck and is the site of most fractures.
The greater tuberosity is situated at the lateral aspect of the humeral head. Its upper surface has three impressions where the supraspinous, infraspinous, and teres minor tendons insert. The lesser tuberosity is situated in the anterior neck and has an impression for the insertion of the tendon of the subscapular muscle. The attachment sites for the rotator cuff, the tuberosities, are separated from each other by a deep groove (bicipital groove), in which lies the tendon of the long head of the biceps muscle of the arm. The tendon of the pectoralis major inserts on the lateral margin of the bicipital groove, and the latissimus dorsi and teres major insert on the medial margin.
The distal humerus flattens and ends in a broad articular surface. The surface is divided into the medial and lateral condyles, which are separated by a slight ridge. On the lateral condyle, the rounded articular surface is called the capitulum, which articulates with the head of the radius. On the medial condyle, the articular surface is termed the trochlea, which articulates with the ulna.
The ulna is located medial to the radius. The proximal portion of the ulna, the olecranon, articulates with the trochlea of the humerus at the elbow. The radius rotates around the ulna. At the proximal end is the head, which articulates with the capitulum of the humerus and the radial notch of the ulna. The tendon of the biceps muscle is attached to the tuberosity just below the radial head. The distal end of the radius is divided into two articular surfaces. The distal surface articulates with the carpal bones of the wrist, and the surface on the medial side articulates with the distal end of the ulna.
Wrist and Hand
The skeletal bones of the wrist and hand consist of three distinct parts: (1) the carpals, or wrist bones; (2) the metacarpals, or bones of the palm; and (3) the phalanges, or bones of the digits (Figure 11-5).
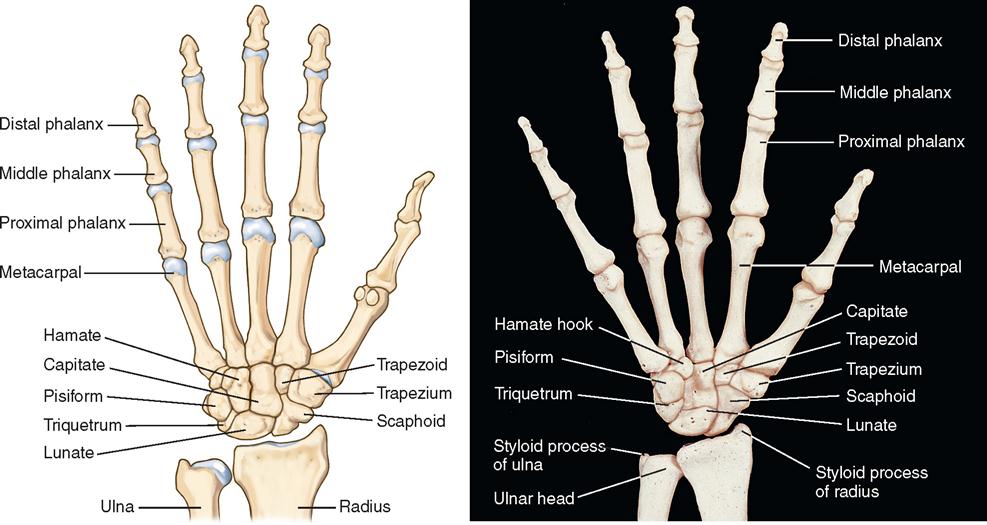
The eight carpal bones are arranged in two rows. The distal row, proceeding from the radial to the ulnar side, includes the trapezium, trapezoid, capitate, and hamate; the proximal row consists of the scaphoid (also called the navicular), lunate, triquetrum, and pisiform. Functionally, the scaphoid links the rows as it stabilizes and coordinates the movement of the proximal and distal rows. Each carpal bone consists of several smooth articular surfaces for contact with the adjacent bones, as well as rough surfaces for the attachment of ligaments. The five metacarpal bones (long bones) are situated in the palm. Proximally they articulate with the distal row of carpal bones, and distally the head of each metacarpal articulates with its proper phalanx. The heads of the metacarpals form the knuckles. The phalanges, or fingers, consist of 14 bones in each hand—2 in the thumb and 3 in each finger. Each phalanx consists of a shaft and two ends.
Pelvis, Hip, and Femur
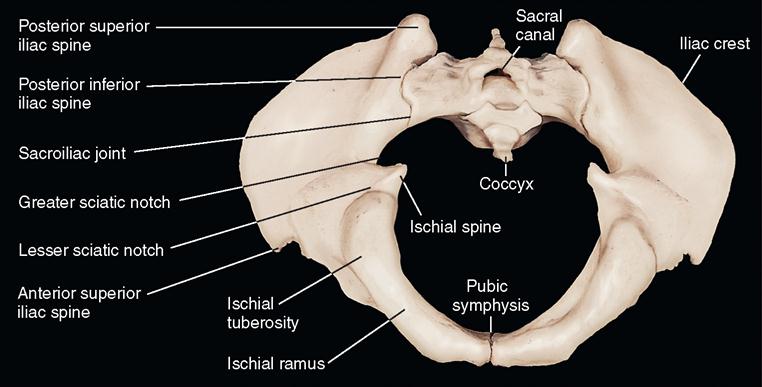
The pelvis (Figure 11-6) is a stable circular base that supports the trunk and forms an attachment for the lower extremities. It is a massive, irregular bone created by the fusion of three separate bones. The largest and uppermost of the three bones is the ilium, the strongest and lowermost is the ischium, and the anterior-most is the pubis. Together these are termed the os coxae, or innominate bone.
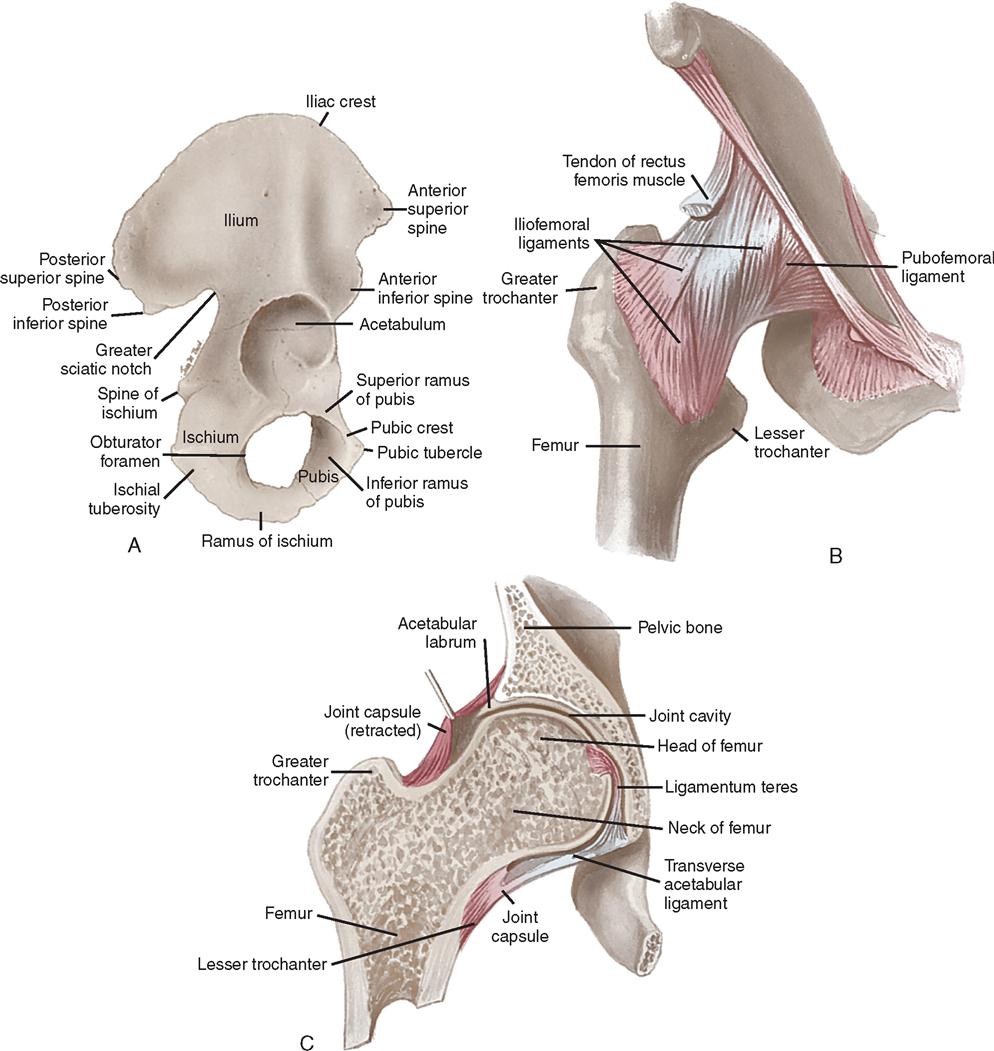
The acetabular portion of the innominate bone and the proximal end of the femur (Figure 11-7) form the hip, which is a ball-and-socket joint. The hip joint is surrounded by a capsule, ligaments, and muscles that provide stability. The iliofemoral ligament connects the ilium with the femur anteriorly and superiorly, and the ischiofemoral and pubofemoral ligaments attach the ischium and pubis to the femur, respectively. The acetabulum is a deep, round cavity that articulates with the head of the femur. The proximal end of the femur consists of the femoral head and neck, the upper portion of the shaft, and the greater and lesser trochanters (Figure 11-8).
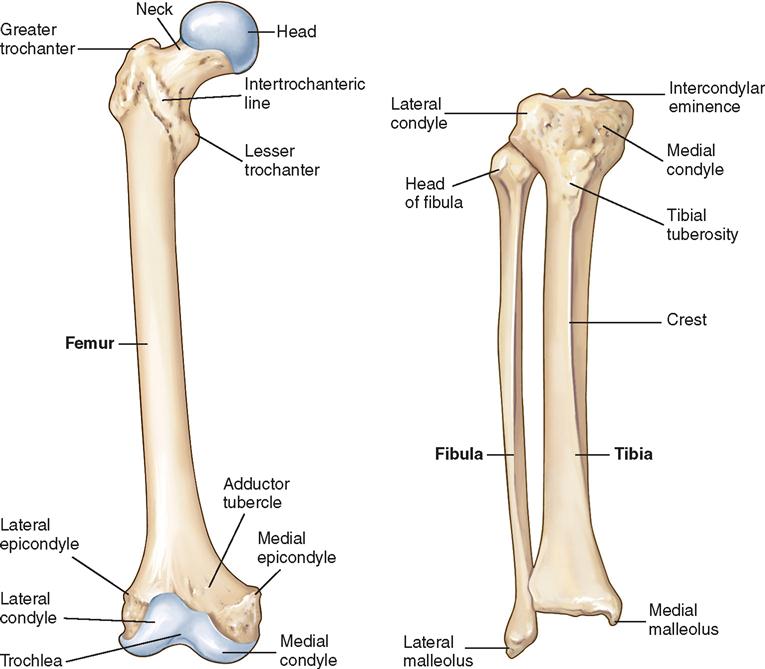
The greater trochanter is a broad process that protrudes from the outer, upper portion of the shaft and projects upward from the junction of the superior border of the neck with the outer surface of the shaft. It serves as a point of insertion for the abductor and short rotator muscles of the hip.
The lesser trochanter is a conical process projecting from the posterior and inferior portion of the base of the neck of the femur at its junction with the shaft. It serves as a point of insertion for the iliopsoas muscle. The lower end of the femur terminates in the two condyles. Anteriorly, the condyles are separated from one another by a smooth depression, called the intercondylar, or patellar, groove, forming an articulating surface for the patella. Posteriorly, they project slightly, and the space between them forms the intercondylar fossa—a supporting structure for neurovascular structures.
The upper or condylar end of the tibia presents an articular surface corresponding with those of the femoral condyles. The articular surface of the two tibial condyles forms two facets, which are deepened by the semilunar cartilage into fossae for the femoral condyles.
Knee, Tibia, and Fibula
The knee joint (Figure 11-9) consists of two articulations. One articulation is between each condyle of the femur and the tibial plateau; the other is between the patella and the femur. These areas are subject to degenerative changes, often requiring reconstructive surgery. The bones of the knee joint are connected by extraarticular and intraarticular structures. The extraarticular attachments consist of the joint capsule, multiple muscular attachments, and two collateral ligaments. The intraarticular ligaments consist of the two cruciate ligaments and the attachments of the menisci.
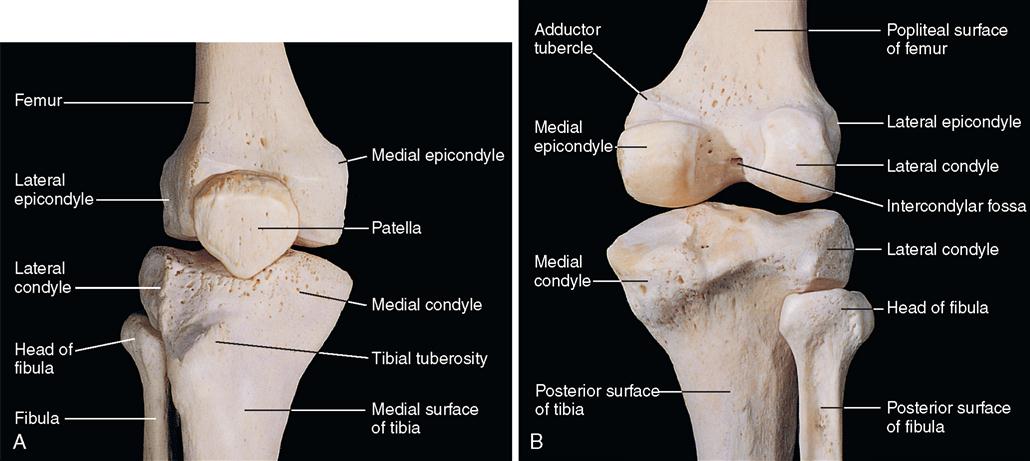
The patella, or kneecap, is anterior to the knee joint in the intercondylar groove, or trochlea, of the distal femur. It is a sesamoid bone contained within the quadriceps tendon. The anterior surface of the patella is united with the patellar tendon as the tendon originates and inserts above and below the knee joint. The posterior surface of the patella articulates with the femur.
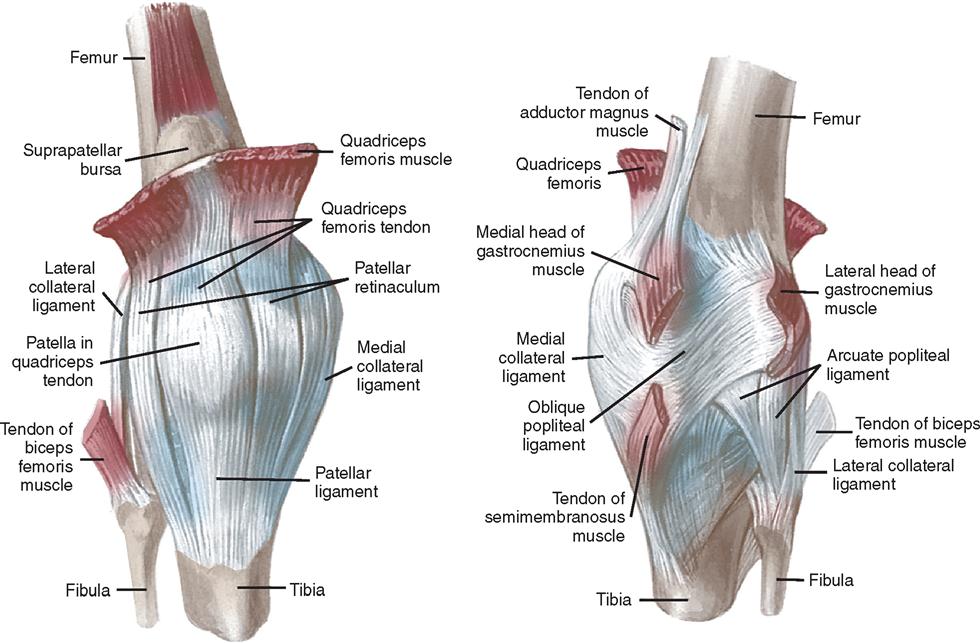
The capsule of the knee joint is attached proximally to the femoral condyles, and it is attached distally to the condyles of the tibia and to the upper end of the fibula. The capsule is reinforced anteriorly by the patellar and quadriceps tendon, on the sides by the medial and lateral collateral ligaments, and posteriorly by the popliteus and gastrocnemius muscles.
The cruciate ligaments (Figure 11-10), consisting of two fibrous bands, extend from the intercondylar fossa of the femur to attachments anterior and posterior on the intercondylar surface of the tibia.
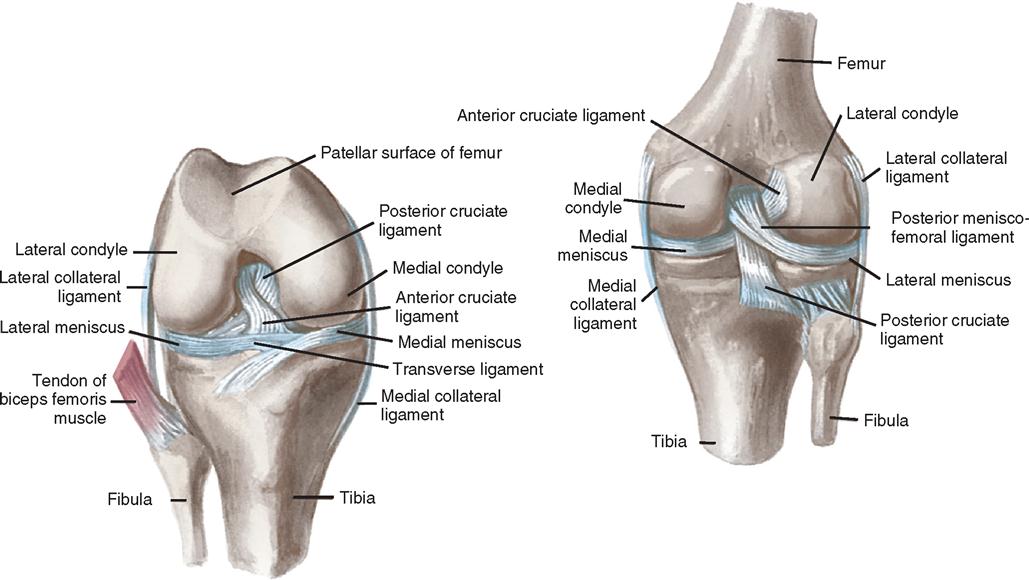
The menisci are interposed between the condyles of the femur and those of the tibia (see Figure 11-10). Each meniscus is attached to the joint capsule. The ends of the cartilage are attached to the tibia in the middle of its upper articular surface. These structures are almost totally avascular, and degenerative changes are usually permanent.
Synovial membrane lines the capsule of the joint and covers the infrapatellar fat pad, parts of the cruciate ligaments, and portions of the bone. The portion of the knee joint cavity that extends upward in front of the femur is called the suprapatellar pouch, or bursa (Figure 11-11).
The tibia is the larger and stronger of the lower leg bones. The fibula is smaller and located more laterally, articulating at the proximal end with the lateral condyle of the tibia. The proximal end of the tibia articulates with the femur to form the knee joint. Distally the tibia articulates with the fibula and with the talus, forming the ankle joint.
Ankle and Foot
The ankle is a hinge joint, formed by the distal end of the tibia and fibula and the proximal end of the talus. The tibia (medial and posterior malleoli) and fibula (lateral malleolus) form a mortise (notch) for the reception of the upper surface of the talus and its facets. The talus is an irregular bone consisting of a body, neck, and head. The bones are connected by ligaments, which spread out from the malleoli to attach to the talus, calcaneus, and navicular bones (Figure 11-12). A thin capsule surrounds the joint.
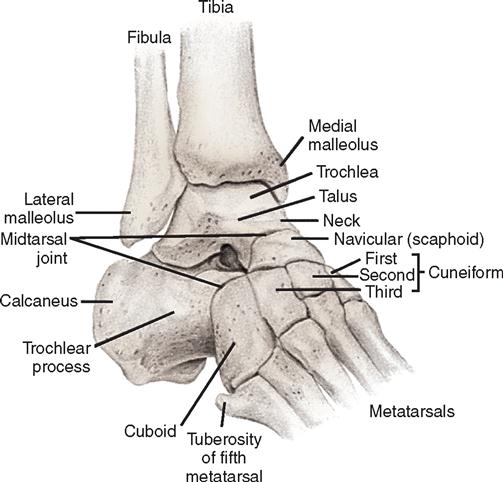
The bony framework of the foot (Figure 11-13) comprises 7 tarsal bones, 5 metatarsal bones, and 14 phalanges. The calcaneus forms the heel and gives support to the talus. The cuboid bone articulates proximally and posteriorly with the calcaneus and distally with the fourth and fifth metatarsals and the third cuneiform bones.
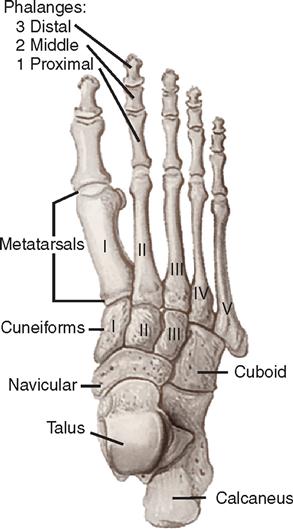
The navicular bone articulates with the cuneiform bones, which lie side by side just anterior to it. The metatarsal bones articulate proximally with the tarsal bones and distally with the bases of the first phalanges of the corresponding toes. There are two phalanges for the great toe and three for each of the other toes.
Surgical Technologist Considerations
Measures that should be undertaken to verify the correct operative side and site include marking the surgical site and having the patient verify the site with the surgeon during the marking process; using a verification checklist (which includes documents such as the medical record, x-ray films, imaging studies); using verbal verification by the patient of his or her identity, surgical site/side, and planned surgical procedure; confirming this information during the time-out by each member of the surgical team; and monitoring safe site protocol compliance with these procedures (Evidence for Practice).
Planning
The care of surgical patients undergoing any type of surgery requires planning for routine procedures that are always followed, as well as anticipating the unexpected. The surgical team should be consistent and systematic in the planning process to expedite actual steps required to facilitate the surgical procedure. Care of the orthopedic patient presents unique challenges because of the psychosocial, physical, and technical aspects of patient care. Planning includes attention to environmental factors, positioning, transfusion supplies, equipment, and instrument needs, in addition to practices that will prevent complications.
The optimal environment is comfortable for the patient and surgical team. The patient should feel relaxed and secure enough to allow the surgical team to become his or her advocates during the procedure. Physical preparation of the environment changes with individual patients. At the time the procedure is posted in the OR, traffic flow is considered to determine room location. The temperature is selected for the procedure with consideration given to the age and general health of the patient, attire worn by the operative personnel (body exhaust suits), or use of polymethylmethacrylate (PMMA) (bone cement). Temperature should be monitored for all but very brief surgical procedures, such as those lasting less than 30 minutes.
Equipment and instrumentation needed for the procedure are planned before the patient’s arrival in the OR; orthopedic procedures may vary significantly because of the patient’s physical condition or age. It may be necessary to communicate with the manufacturer’s representative to facilitate obtaining items needed for the procedure. It is common for healthcare industry representatives to bring requisite orthopedic instruments to the OR or to act as a product resource regarding new equipment. However, industry representatives must comply with all institutional policies and AORN standards defining requirements and procedures and restrictions that govern their presence in the OR (AORN, 2006).
Aseptic technique is essential in the perioperative environment and should be considered a priority when caring for the orthopedic patient. Osteomyelitis is an infection of the bone that can remain unrecognized for a long time and requires expensive, intensive treatment. Osteomyelitis can lead to severe bone loss and possible loss of a limb. Preventive measures, including administration of antibiotics within 60 minutes of the initial incision, have been demonstrated to be efficacious in preventing surgical site infection.
OR equipment such as defibrillators and resuscitative equipment must always be available, functional, and familiar to staff. This includes supplies needed for emergency treatment of a patient condition, such as malignant hyperthermia or unanticipated blood loss. All medications and solutions along with their containers should be labeled both on and off the surgical field. Equipment alarms should be activated with appropriate settings and should be sufficiently audible. Orthopedic procedures may also require a change in the plan of care in the event of a fracture, damage to vascular integrity, or changes in the patient’s condition, requiring an understanding of methods and equipment needed to manage these situations.
Implementation
Implementing care for the orthopedic surgical patient requires an understanding of anatomic, physiologic, psychologic, cultural, spiritual, and technical patient needs. Orthopedic surgical procedures demand special equipment, instruments, and psychomotor skills that differ from those required by other specialties. Implementation includes an understanding of the procedures, patient needs, and perioperative practices to protect the patient while delivering care.
An explanation should be provided to the patient about the intraoperative phase, including the anticipated sequence of events, personnel, environment, required positioning, and procedures such as administration of a regional anesthetic and application of a tourniquet. The patient may be alert during the procedure; therefore noise from power equipment and activities that will occur should be explained. Immobilization devices, such as splints, casts, braces, and drains, should also be explained.
Positioning and Positioning Aids.
The orthopedic patient requires proper positioning on the OR bed or specialty bed to provide adequate exposure of the operative area, maintain body alignment, minimize strain or pressure on nerves and muscles, allow for optimal respiratory and circulatory function, and provide adequate stabilization of the body. Selection of position depends on several factors, including the type of procedure, the location of the injury or lesion, and the preference of the surgeon. Guidelines for placing the patient in the supine or recumbent position are followed, with modifications to facilitate the specific orthopedic procedure.
Procedures performed in lateral, prone, or modified positions require use of positioning aids and devices to support these positions. Patients undergoing surgical procedures risk neuromuscular and skin injury. Preoperative assessment should be thorough to plan the position, taking into consideration the prevention of neurovascular compromise, the potential for impaired chest excursion, and the danger of falls. The safety strap does not always provide adequate security, and other methods of securing the patient on the OR bed may need to be implemented. The surgeon is responsible for selecting the position and ensuring that adequate exposure can be obtained. The perioperative staff must understand the meaning of terms such as flexion, extension, abduction, and adduction when positioning the patient. The staff must also be thoroughly familiar with the function of the orthopedic surgical bed and its various attachments (e.g., the leg attachment for arthroscopy, the three-point positioner for lateral position, and positioning devices for shoulder procedures).
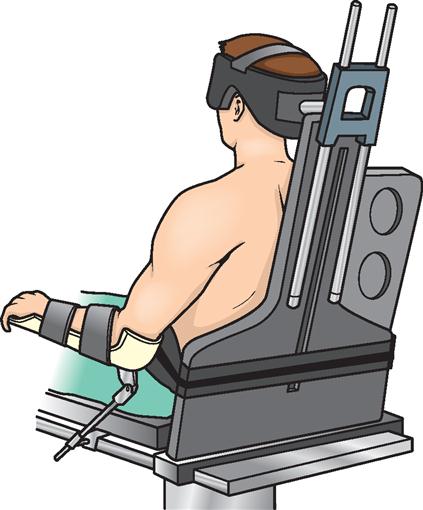
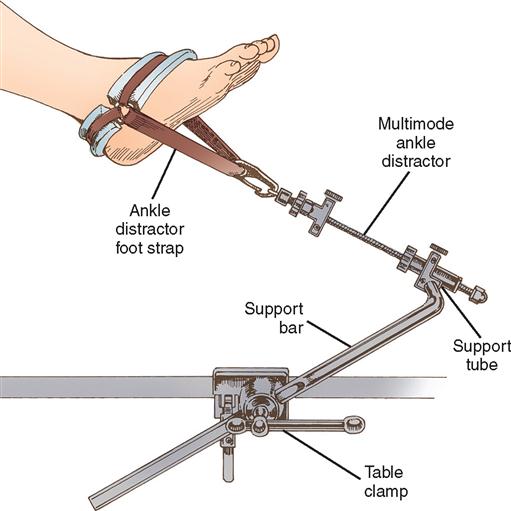
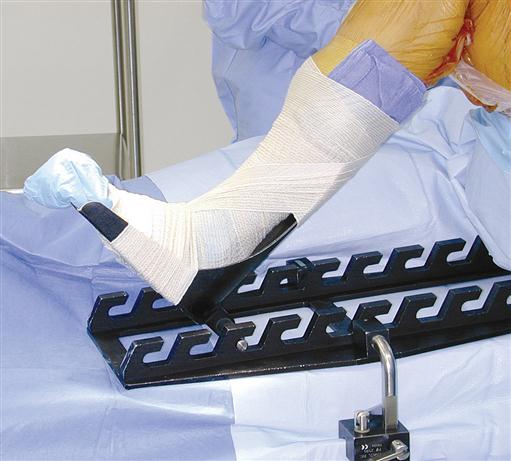
Many orthopedic operations require a device for holding the extremities. Various holders are available for both upper and lower extremities. Positioners used intraoperatively can be sterilized for the procedure, resulting in the ability to reposition as needed throughout the procedure. These types of positioners include the shoulder positioner (Figure 11-14), Alvarado foot holder (Figure 11-15), and ankle distractor (Figure 11-16). Many other orthopedic positioning devices are also available.
The lateral position is sometimes used for a total hip arthroplasty. Padded anterior and posterior supports may be positioned at the umbilicus and lumbar regions, respectively, to hold the patient in the lateral position. A vacuum beanbag can also achieve this position. Pressure points on the lateral area of the skull, ear, axilla, hip, knee, and ankle should be adequately padded. The feet are placed in the neutral position to prevent excessive plantar flexion or dorsiflexion. A conscientious effort should be made by the surgical team to avoid leaning on the patient during the procedure.
The patient is positioned prone for surgery on the posterior aspect of the body, including the back; posterior portion of the shoulder, arms, and legs; and Achilles tendon; and for posterior iliac bone graft harvesting. This position presents a challenge for the anesthesia team to monitor and manage the airway because of the potential for impaired chest excursion and gas exchange. Extremities need to be moved through a normal range of motion when transferring and positioning into the prone position. Vascular integrity is always assessed before the patient is moved into position and reassessed after the patient is positioned; the nurse should note the quality of pulses, extremity warmth, and capillary refill.
The prone position is often attained with the use of adjunctive frames, such as the Wilson, Hastings, Canadian, Relton-Hall, Cloward saddle, or Andrews, or with the Andrews bed (Figure 11-17). Each frame has qualities that meet the patient’s or physician’s needs. The Hastings and Andrews frames and the Andrews bed maintain the patient in a modified knee-chest position. The frames require assembly and are labor-intensive when positioning; some can be used only with certain beds. The Andrews bed is similar to the Andrews frame but has the attachments built in and is used exclusively for this position.
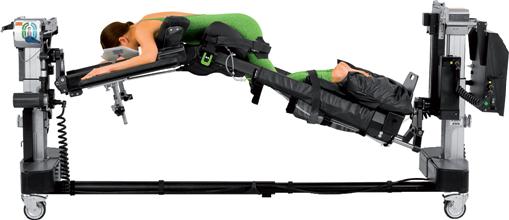
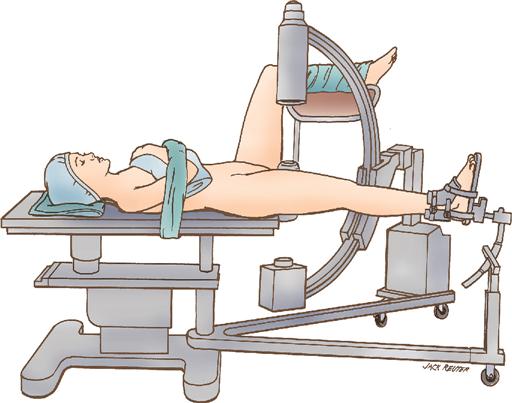
On an OR fracture bed (Figure 11-18), generally used for femoral neck and shaft fixation, the team places the patient in supine or lateral position to allow exposure of the surgical site while maintaining alignment. The patient’s legs are positioned on outriggers, allowing access by the image intensifier to obtain multiple radiographic views. Applying or releasing traction can be done to reduce the fracture or aid in intramedullary surgical techniques. Like all positioning devices, the fracture bed must be set up by experienced personnel and padded adequately. There are several moving parts, which can lead to injury if not operated properly.
If the patient is positioned supine, special attention must be paid to the arms. Arms are placed on padded armboards with the palms up and fingers extended. Armboards are maintained at less than a 90-degree angle to prevent brachial plexus stretch. If there are surgical reasons to tuck the arms at the side, the elbows are padded to protect the ulnar nerve, the palms face inward, and the wrist is maintained in a neutral position (Denholm, 2009). A drape secures the arms. It should be tucked snuggly under the patient, not under the mattress. This prevents the arm from shifting downward intraoperatively and resting against the OR bed rail.
Surgical Prep.
A primary concern in orthopedic surgery is the prevention of infection. The orthopedic surgical prep must be meticulously carried out using aseptic technique. Physicians often instruct patients to complete a scrub prep with an antimicrobial agent before arrival for surgery. The surgical prep for the orthopedic patient may include preoperative removal of hair from the surgical site. Surgical shave preps contribute to the possibility of infection caused by abrasion and cutting of the skin. If hair removal from the incisional site is ordered, it should occur immediately before surgery, using clippers or a depilatory. If a razor is required, the site should be lathered with soap before shaving. Trauma patients require precautions during the skin prep to prevent further injury caused by solution contact with membranes or injury to the bone and soft tissue from movement.
Skin preparation is performed to remove microorganisms from the operative site. The site should be prepped with a broad-spectrum antimicrobial agent. The prep proceeds from the incision site to the periphery. Pooling of the prep solution beneath the patient or tourniquet must be avoided. Prep solutions should be allowed to dry before draping; this is a fire safety precaution and may be included in the time-out. The groin and anal areas should be isolated when the surgical site is on the upper third of the leg.
Devices such as leg stirrups may help support an extremity to complete a circumferential prep. When multiple extremities or other areas, such as a bone graft site, are prepped, cross-contamination of previously prepped areas must be prevented. Knowledge of aseptic technique and the ability to organize the activity are important in proper preparation of the surgical site.
Draping.
Application of sterile drapes is the final step in preparing the patient for the operation. The surgeon and surgical technologist cover the patient’s extremities with a cloth or water-impervious stockinette—a cylindric drape that is rolled up the arm or leg. Impervious sheets are essential when large amounts of fluid are used, such as during arthroscopy and wound irrigation. Prefabricated disposable drapes with fenestrations for the upper and lower extremities are available.
Antimicrobial incise drapes can be used to isolate the surrounding area from the incisional site. Many of these drapes contain iodophor-impregnated adhesive, which slowly releases iodine during the procedure, inhibiting proliferation of organisms from the patient’s skin. They are contraindicated for patients with an allergy to iodophors. An alcohol skin wipe may be done before placement of the antimicrobial incise drape.
Equipment and Supplies.
Orthopedic ORs require a variety of special equipment and accessories in addition to routine OR equipment. Nitrogen-powered, battery-powered, and electrically powered equipment, video systems, pneumatic tourniquets, laminar airflow systems, x-ray equipment, lasers, and special orthopedic tables are included in the operative armamentarium. Manufacturers’ pamphlets with illustrations and directions on equipment use and sterilization should be readily available for reference.
RADIOGRAPHIC INTERVENTION.
Radiographic intervention is widely used in orthopedic surgery (History box). Many procedures require portable x-ray or fluoroscopy machines. Fluoroscopy, also known as image intensification or C-arm, allows the team to view the progression of the procedure, confirming fracture reduction or intramedullary reaming of the humerus, femur, or tibia. A radiologic technologist operates radiographic equipment. An understanding of equipment placement, function, and safety precautions is necessary. X-ray cassettes brought onto the sterile field are draped with a sterile plastic cover. Lead aprons and thyroid shields are to be worn by all personnel in proximity to the x-ray equipment, and personnel should be monitored for exposure to radiation. Measures should be taken to protect patients from direct and indirect radiation exposure.
PNEUMATIC TOURNIQUETS.
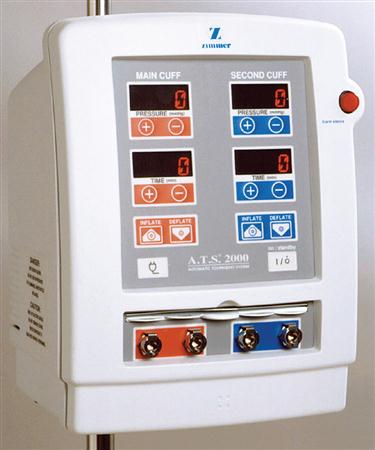
Pneumatic tourniquets are frequently used for procedures involving the extremities (Figure 11-19). A tourniquet is a fabric-covered cylindric bladder inflated by compressed gas or ambient air. It applies circumferential pressure on arterial and venous circulation, which results in a relatively bloodless surgical field; this promotes visualization of structures during the procedure. Limb exsanguination is achieved by elevating the limb or by wrapping it, distally to proximally, with an Ace or Esmarch rubber bandage before tourniquet inflation. The majority of tourniquets used today are run by a microprocessor for regulation of pressure and time setting, providing both auditory and visual feedback for the user.
Tourniquet safety should be a priority; the surgical team should understand recommended parameters and precautions. Safety guidelines for the use of tourniquets include preventive measures and evaluation (AORN, 2009). Preoperative assessment of the patient includes determining contraindications for use, including compartment syndrome, McArdle disease (e.g., glycogen storage disease), hypertension, or other vascular problems. If the tourniquet must be used for patients with these conditions, specific guidelines must be observed.
Before application, the tourniquet equipment should be checked for proper functioning. Inflation pressures are established based on the systolic blood pressure, age of the patient, and circumference of the extremity. Duration of tourniquet inflation should be kept to a minimum. It is recommended in the average, healthy 50-year-old person to apply continuous tourniquet pressure less than 1 hour on the upper extremity and less than 2 hours on the thigh. Tourniquet pressure should not exceed the recommended maximum cuff pressure limits of 300 to 350 mm Hg for the thigh and 250 to 300 mm Hg for the arm and the lower leg. Kleinert and colleagues (2007) notes the interval between inflation and deflation should be 5 minutes for every 30 minutes of tourniquet ischemia to minimize effects on muscle and nerves.
The tourniquet should be placed on the extremity without compression on bony structures and superficial neurovascular structures. The person placing the cuff should ensure it is positioned as high as possible without pinching skinfolds. Soft padding or stockinette is wrapped around the extremity and kept free of wrinkles and gatherings beneath the cuff. Cuffs should overlap a minimum of 3 inches and a maximum of 6 inches; excess overlap can pinch skinfolds. A tourniquet cuff that is too short can loosen after inflation. Care must be taken to ensure that the line from the air supply to the cuff is not kinked.
Tourniquet equipment should be checked periodically and serviced when problems arise. Injury from tourniquets may result from inadequate precautions, faulty preparation, or use of inaccurate equipment. The gauges and other related equipment should be checked with commercially available test equipment. Patient evaluation requires assessment of the extremity (skin color, temperature, pulses, movement, sensation) after removal of the tourniquet. Abnormal findings need to be reported to the surgeon and documented (Evidence for Practice).
TRACTION.
The surgeon uses traction preoperatively, intraoperatively, or postoperatively for prevention or reduction of muscle spasm, immobilization of a joint or body part, reduction of a fracture or dislocation, and treatment of a joint disorder. Traction alignment must be constant.
Various traction techniques can be used, including manual, skin, and skeletal (Figure 11-20). In manual traction, the hands provide the forces pulling on the bone being realigned. Skin traction uses strips of tape, digital straps, moleskin, or an elastic bandage applied directly to the skin. Common forms of skin traction are Buck’s extension and Russell traction. Skeletal traction applies forces directly to the bone, using pins. Manual and skin traction can be applied in the emergency department or patient room, whereas skeletal traction is applied preoperatively in the emergency department or in the OR.
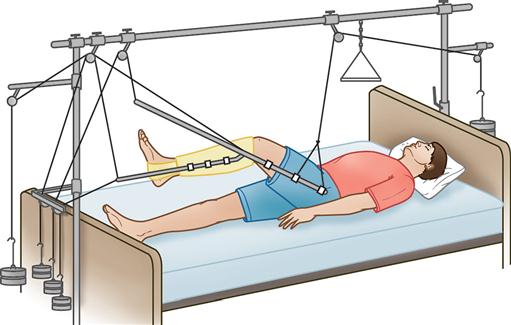
Skeletal traction is often used in conjunction with the OR fracture bed, using the traction attachment to aid in reduction of a long bone fracture. Postoperatively the patient may be confined to bed with balanced skeletal traction using a Thomas splint (Figure 11-21) and a Pearson attachment. Some cervical spine fractures or injuries may require Crutchfield or Gardner-Wells tongs or a cervical halo inserted directly into the skull to stabilize the vertebrae and reduce spinal cord damage or further injury. Application of skeletal traction requires the use of sterile supplies, including a traction bow, pins, and drill.
Stay updated, free articles. Join our Telegram channel

Full access? Get Clinical Tree


