Venous Access: The Subclavian Vein and the Cephalic Vein in the Deltopectoral Groove
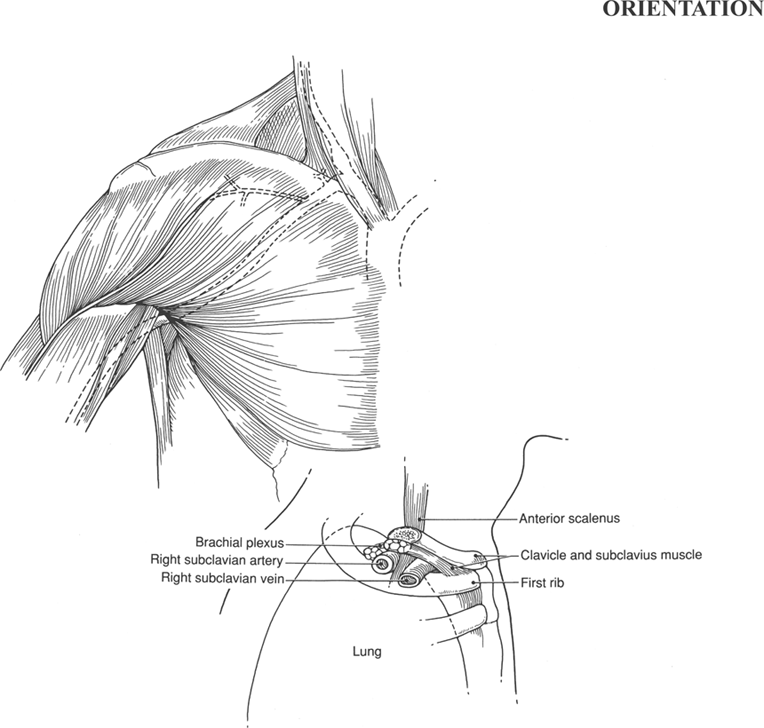
Percutaneous cannulation of the subclavian vein is frequently used for rapid access to the central venous circulation. Because of the relatively constant location of this vein and the bony landmarks that are readily palpable in most individuals, this is a convenient site for cannulation. However, this vein’s proximity to other major vascular structures and to the apex of the lung necessitates a thorough understanding of the anatomy so that complications may be avoided when performing this routine procedure. Two approaches to this procedure are described—first, cannulation by anatomic landmarks; second, cannulation under ultrasound guidance.
Performing a cutdown on the cephalic vein in the deltopectoral groove is an alternative means of achieving access to the central circulation. In selected patients, it may be easier or safer than percutaneous methods.
Steps in Procedure—Ultrasound-Guided Subclavian Venous Cannulation
Scan infraclavicular region with ultrasound and use this information to optimize patient position
Drape transducer into sterile field
Scan infraclavicular region and visualize subclavian vein
Holding transducer with your nondominant hand, anesthetize skin and subcutaneous tissues
Aspirate as You Walk the Needle under the Clavicle to Find the Vein (Maintain Needle in a Plane Parallel to the Floor)
Maintain transducer in plane of vein and plane of needle, visualize needle as it enters vein
Noting trajectory, remove smaller gauge needle and pass large gauge needle under ultrasound guidance
Needle will first tent the vein, then pierce it
When intraluminal position is confirmed by free aspiration of blood, proceed as outlined in Section 14.1
Steps in Procedure—Cutdown on The Cephalic Vein in The Deltopectoral Groove
Identify the deltopectoral groove by palpating head of humerus and muscular heads of deltoid muscle and pectoralis major muscle
Transverse skin crease incision about two fingerbreadths below lateral aspect of clavicle, just medial to head of humerus
Dissect to fascia overlying pectoralis major muscle
Follow this muscle laterally and identify a slight change in muscle fiber direction where the deltoid adjoins the pectoral muscle
Work in the fatty tissues in this groove to identify the cephalic vein
Elevate the vein and encircle it with two loops of 2-0 silk
Create a venotomy and pass the catheter
Confirm adequate position by fluoroscopy and tie silks
Close incision in layers
Secure catheter
List of Structures
Superior vena cava
Brachiocephalic (Innominate) Vein
Internal jugular vein
Subclavian vein
Vertebral vein
Inferior thyroid vein
Internal thoracic vein
Thymic vein
Left superior intercostal vein
Axillary vein
Cephalic vein
Aorta
Brachiocephalic artery
Subclavian artery
Thoracic Duct
Arch of thoracic duct
Cervical portion of thoracic duct
Thoracic portion of thoracic duct
Acromion process
Sternal notch
Clavicle
Sternoclavicular joints
Anterior scalene muscle
Sternohyoid muscle
Sternothyroid muscle
Pectoralis major muscle
Pectoralis minor muscle
Clavipectoral fascia
Prevertebral fascia
Deltopectoral groove
Deltopectoral triangle
Pleura
Thymus
Trachea
Phrenic nerve
Vagus nerve
 |
Percutaneous Cannulation of the Subclavian Vein by Landmarks
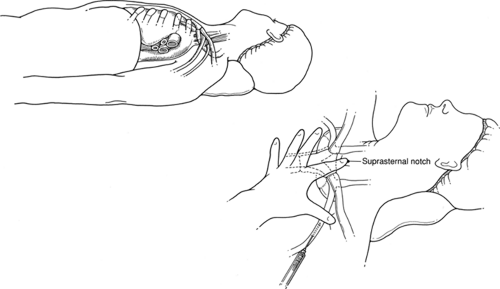
Cannulation by Landmarks—Positioning the Patient and Identifying Landmarks (Fig. 14.1)
Technical Points
Position the patient supine with arms at the side. Elevate the foot of the bed to a 5- or 10-degree Trendelenburg position. This will increase venous pressure in the central veins, distending the subclavian vein and rendering the possibility of venous air embolus less likely. Place a vertical roll under the thoracic spine to allow the shoulders to “fall back” slightly, thus opening the angle between the clavicle and the ribs. Inspect both infraclavicular regions for evidence of previous cannulation or local infections. In general, the left subclavian vein is somewhat easier to cannulate and will more reliably provide access to the central circulation than the right subclavian vein. Both, however, are usable.
Steps In Procedure—Percutaneous Subclavian Venous Cannulation
Position patient with ipsilateral arm at side and in slight Trendelenburg position
Place a roll under the thoracic spine to open up the infraclavicular space, if necessary
Identify the following bony landmarks: acromion process, sternal notch, and medial third of clavicle
Place Index Finger of Nondominant Hand in Sternal Notch and Hook the Thumb under the Clavicle
Usually one third of the distance from the acromion to the sternal notch
Infiltrate skin and subcutaneous tissues
Maintaining needle parallel to plane of floor, walk the needle under the clavicle and aspirate to find the vein
Pass larger needle supplied with the kit into the vein; confirm free flow of venous blood
Pass guidewire under fluoroscopic guidance
Make skin incision
Pass dilator and sheath
Pass catheter through sheath, peel away sheath and remove
Confirm catheter position
Secure catheter
Hallmark Anatomic Complications—Percutaneous Subclavian Cannulation
Pneumothorax
Subclavian artery cannulation
Mediastinal perforation
Catheter placed too far medial; pinched off by clavicle
 Figure 14-1 Positioning the Patient and Identifying Landmarks—Subclavian Venous Cannulation by Landmarks
Stay updated, free articles. Join our Telegram channel
Full access? Get Clinical Tree
 Get Clinical Tree app for offline access

|