Tube Thoracostomy, Thoracotomy, Partial Pulmonary (Wedge) Resection, and Pleural Abrasion
M. Victoria Gerken
Phillip C. Camp Jr.
In this chapter, the basic procedure of tube thoracostomy (chest tube placement) is used to introduce chest wall anatomy. A fundamental thoracic surgery incision—/posterolateral thoracotomy—is described in detail, as is a less-painful muscle-sparing approach. Two common, simple, open thoracic surgery procedures—wedge resection and pleural abrasion—are then described.
SCORE™, the Surgical Council on Resident Education, classified chest tube placement as an “ESSENTIAL COMMON” procedure. SCORE™ classified exploratory thoracotomy as an “ESSENTIAL UNCOMMON” procedure, and partial pulmonary resection as a “COMPLEX” procedure.
STEPS IN PROCEDURE
Tube Thoracostomy
Location (interspace) is determined by nature of material to be drained
Obtain adequate local anesthesia and widely prep and drape the area
Check equipment, including drainage device, to ensure everything is ready
Make an incision one interspace below the desired interspace
Gently spread the tissues cephalad until the top of the next rib is encountered
Spread the intercostal muscles just above the rib and control the clamp as you pop into the pleural space
Spread the opening until it is large enough to admit your finger
Digitally explore the space, break down any loculations or adhesions, and confirm intrathoracic placement by palpating diaphragm
Insert the chest tube into this interspace, passing it just far enough to place the last hole within the pleural space
Connect to the tubing of the drainage device and secure tube in position
Standard Posterolateral Thoracotomy
Carefully position patient in full lateral decubitus position, padding and securing patient with care
Prepare hemithorax and drape widely
Standing at patient’s back, draw an incision from anterior axillary line (inframammary fold, for a sixth interspace thoracotomy) to a point 2 to 3 cm inferior to the inferior angle of scapula, then angled gently cephalad to end midway between spine of scapula and thoracic vertebral column
Divide subcutaneous tissues to and through muscles, preserving the paraspinal muscles
Enter the chest through third, fourth, or fifth interspace depending on operation to be performed
Divide intercostals muscles and enter pleura
Extend intercostal incision and place rib spreader
At conclusion of procedure, check for air leaks and place chest tubes under direct vision
Remove rib spreader and approximate ribs with six to eight figure-of-eight pericostal sutures
Approximate muscles over chest wall
Close subcutaneous tissues and skin, secure chest tubes in place
Muscle-Sparing Thoracotomy
Same incision as above, but not so long posteriorly
Divide subcutaneous tissue and free it from fascia of latissimus dorsi muscle
Mobilize latissimus dorsi muscle and serratus anterior to allow retraction of both muscles
Enter pleural space
Use two small rib spreaders placed at right angles
Partial Pulmonary (Wedge) Resection
Identify the region to be resected
Tent up the lesion by elevating it with lung clamps
Fire stapler across region to be resected (generally two firings will be needed, at right angles to each other)
Pleural Abrasion
Resect blebs if present, using wedge resection technique, and check for air leaks
Abrade pleural surfaces briskly with dry laparotomy sponge
HALLMARK ANATOMIC COMPLICATIONS
Injury to lung or diaphragm (during tube thoracostomy)
Injury to intercostal neurovascular bundle
Creation of devitalized or nonaerated remnant during wedge resection
LIST OF STRUCTURES
Pleura
Pleural space
Intercostal space
External intercostal muscles
Internal intercostal muscles
Innermost intercostal muscles
Intercostal Neurovascular Bundle
Intercostal vein
Intercostal artery
Intercostal nerve
Diaphragm
Costal margin
Xiphoid process
Serratus anterior muscle
Endothoracic fascia
Latissimus dorsi muscle
Scapula
Trapezius muscle
Triangle of auscultation
Rhomboideus major muscle
Erector spinae muscles (paraspinous muscles)
Long thoracic nerve
Tube Thoracostomy
Placement of a Tube Thoracostomy (Fig. 26.2)
Technical Points
The relatively simple procedure of tube thoracostomy demands careful attention to detail. Poor performance will cause patient discomfort and underlying lung injury, and may even necessitate open thoracotomy or laparotomy for correction.
In the past, chest tubes placed for pneumothoraces were inserted in the anterior chest, causing much unnecessary discomfort for the patient and substantially increasing the risk for hemorrhage from the anterior chest wall. Current practice dictates that chest tubes for uncomplicated pleural effusions, hemothoraces, or pneumothoraces be placed between the anterior axillary line and the midaxillary line, resulting in best results and minimum pain to the patient. Loculated collections of fluid or air may often require variations in technique that will not be discussed in this chapter.
Adequate analgesia is the key to successful, uncomplicated tube thoracostomy. Create a 2- to 3-cm skin wheal with 0.5% to 1% lidocaine about one interspace width below the planned thoracic entrance site. Subsequent or serial injections of lidocaine (5 mg/kg maximum dose), including the rib periosteum, intercostal muscles, and chest wall pleura, will greatly improve the ease of the procedure and patient comfort.
Prepare the skin widely and drape the area. For most purposes, chest tube insertion at the sixth interspace is adequate and safe. To prevent pneumothorax at the time of tube removal, plan to make the skin incision a full interspace lower than where you intend to enter the chest. In this way, the tube will pass through a subcutaneous tunnel measuring 2 to 3 cm in length between the skin and the entry site between the ribs. Thus the skin incision should be made at the seventh interspace.
Incise the skin with the scalpel and then create the subcutaneous tunnel with a long curved clamp. Repetitive, gentle spreading to a width equal to your finger and the chest tube will allow adequate access. Identify the top of the rib with the clamp and spread the intercostal muscle just over it, carefully hugging the superior surface. Control the clamp carefully so that when you “pop” through the pleura, the tip of the clamp does not injure underlying tissue. While the clamp is still in, spread the tips to widen the intercostal defect. Place your index finger through this incision into the chest and “sweep” down any adhesions, feeling for rind on the lung, pleural implants, and blood clots. Confirm the intrathoracic placement of a low chest tube by palpating the superior surface of the diaphragm.
Grasp the tip of the chest tube with the tip of a curved clamp and introduce it into the chest as shown (Fig. 26.2A). Inset the tube just far enough so that the last drainage hole is well within the chest cavity. An alternative method is to leave your finger
in the tunnel and feed the tube next to it. The fingertip is blunt and allows the tube to be directed in a more specific direction. Either way, spinning the tube in a counterclockwise direction while advancing will help keep the tube from kinking and being misplaced into a fissure.
in the tunnel and feed the tube next to it. The fingertip is blunt and allows the tube to be directed in a more specific direction. Either way, spinning the tube in a counterclockwise direction while advancing will help keep the tube from kinking and being misplaced into a fissure.
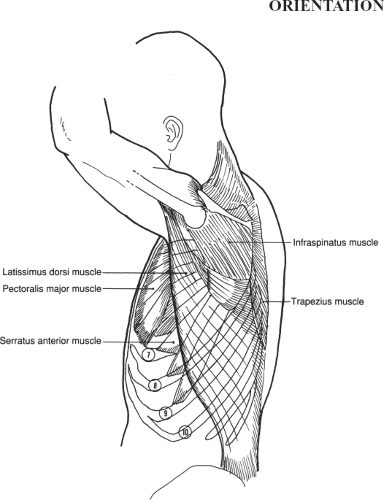 Figure 26.1 Regional anatomy, showing ribs 7–10 and the muscles of the lateral chest wall, as encountered from a lateral approach such as that used for chest tube placement and thoracotomy. |
Secure the tube at the skin level with a heavy silk suture. The suture should be a U stitch or a single horizontal mattress stitch, which will allow skin approximation at the time of closure (Fig. 26.2B). Connect it to a chest drainage and suction device, such as a Pleurovac. Dress the site appropriately.
Chest tube management is described in the references at the end, which also describe placement of small-bore catheters in lieu of chest tube in selected cases.
Removal of the tube is best accomplished by two people. Prepare an occlusive dressing by placing a petroleum jelly gauze on 4 × 4’s. Expose the chest tube site and mobilize the stitch. Ask the patient to hold his or her breath in full inspiration. Place the dressing over the site with petroleum jelly apposing the incision. Quickly withdraw the tube, secure the suture, and tape the dressing tightly down while holding it firmly to the chest wall.
Anatomic Points
One of the potential hazards of tube thoracostomy—inadvertent placement of the tube below the diaphragm—can be avoided by analyzing the structure and morphology of the diaphragm. This muscle has a circumferential origin and divides the thoracic cavity from the abdominal cavity. Posteriorly, the diaphragm takes its origin from the anterolateral surfaces of the upper two or three lumbar vertebrae. It has a costal origin
from the internal surfaces of the lower six ribs and costal cartilages at the costal margin; hence, as one progresses anteriorly, the origin of the diaphragm becomes progressively more cranial. Anteriorly, it has two small slips of origin from the deep surface of the xiphoid process. From this origin, the muscular fibers insert on the expansive, aponeurotic central tendon.
from the internal surfaces of the lower six ribs and costal cartilages at the costal margin; hence, as one progresses anteriorly, the origin of the diaphragm becomes progressively more cranial. Anteriorly, it has two small slips of origin from the deep surface of the xiphoid process. From this origin, the muscular fibers insert on the expansive, aponeurotic central tendon.
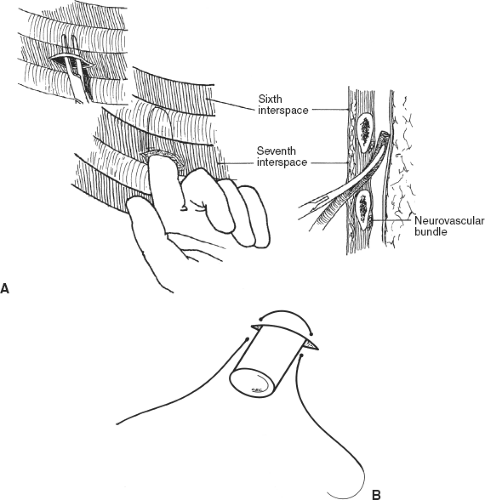 Figure 26.2 Placement of a tube thoracostomy. A: Insertion of thoracostomy tube. B: One method of securing tube. |
The upper limits of the diaphragm are at the level of the nipple, or fourth intercostal space, so that it is dome shaped. As a consequence, the peripheral part of the thoracic cavity becomes progressively attenuated inferiorly, resulting in a sharp, narrow costophrenic recess. In the midclavicular line, the reflection of parietal pleura from body wall to diaphragm is at the level of the eighth rib, whereas in the midaxillary line, this reflection is at the level of the tenth rib. Because of this reflection and the dome shape of the diaphragm, incisions below the level of the eighth rib may not enter the pleural cavity and can easily pass through the diaphragm into the abdominal cavity. The sharp costophrenic recess is precisely why excellent clamp control when popping into the chest is mandatory. Overly aggressive entry can easily continue on through the adjacent diaphragm and into the abdomen. The slippery dome has been known to be confused with the diaphragm. Digitally palpating the diaphragm and lung wall helps confirm accurate location.
Stay updated, free articles. Join our Telegram channel

Full access? Get Clinical Tree


