Total Abdominal Colectomy: Hand-Assisted Technique
Daniel Albo
DEFINITION
Total abdominal colectomy (TAC) is the removal of the abdominal colon, which extends from the cecum to the top of the rectum, following which the distal ileum is anastomosed to the rectum or an end ileostomy is created.
Hand-assisted laparoscopic surgery (HALS) is a minimally invasive surgical approach that uses conventional laparoscopic-assisted (LA) surgery techniques with the addition of a hand-assist device (placed in the projected specimen extraction site), which allows for the introduction of a hand into the surgical field. HALS in colorectal surgery retains all of the same advantages of conventional LA surgery over open surgery, including less pain, faster recovery, lower incidence of wound complications, and reduction of cardiopulmonary complications, especially in the obese and in the elderly.
Advantages of HALS over conventional LA colorectal surgery include the following:
Reintroduces tactile feedback into the field
Shorter learning curves; easier to teach
Shorter operative times and lower conversion to open rates
Higher usage rates of minimally invasive surgery
DIFFERENTIAL DIAGNOSIS
Indications for HALS TAC are as follows:
Inflammatory bowel disease (IBD)
Severe acute colitis (various etiologies)
Polyposis syndromes, including familial adenomatous polyposis (FAP) and hereditary nonpolyposis colorectal cancer (HNPCC)
Slow-transit constipation
Malignancy
PATIENT HISTORY AND PHYSICAL FINDINGS
Most patients with colon tumors generally present after an incidental finding during screening colonoscopy or with occult bleeding and iron deficiency anemia.
A thorough history and physical examination should include the following:
Previous surgeries (does not preclude a laparoscopic approach)
Presence of obstructive symptoms
A detailed personal and family history of colorectal cancer, polyps, and/or other malignancies
In IBD, the extent of previous medical management, including use of immunomodulators and steroids and response to therapy, is important.
Routine abdominal examination, noting any scars
IMAGING AND OTHER DIAGNOSTIC STUDIES
A colonoscopy with documentation of all polyps should be performed. Suspicious lesions should be tattooed to facilitate localization during surgery.
A computed tomography (CT) of the chest, abdomen, and pelvis evaluates for potential metastases in cancer patients. In IBD, a CT of the abdomen/pelvis allows evaluation for possible strictures, abscesses, fistulae, and/or active inflammation.
In IBD, CT or magnetic resonance (MR) enterography and push enteroscopy may help evaluate the extent of small bowel disease.
Patients with severe constipation require a colonic transit study to confirm functional colonic disease.
A preoperative carcinoembryonic antigen level should be obtained in cancer patients.
SURGICAL MANAGEMENT
Preoperative Preparation
Patients in which an ileostomy is possible should undergo stoma marking by an enterostomal therapist.
Clinical trials have shown no need for mechanical bowel preparation.
Intravenous cefoxitin is administered within 1 hour of skin incision.
Use hair clippers if needed and chlorhexidine gluconate skin preparation is used.
A preoperative time-out and briefing is performed.
Ultrasound-guided bilateral transversus abdominis plane (TAP) block reduces the need for postoperative narcotics.
Equipment and Instrumentation
5-mm camera with high-resolution monitors
5-mm and 12-mm clear ports with balloon tips—they hold ports in the abdomen and minimize their intraabdominal profile during surgery.
Laparoscopic endoscopic scissors and a blunt-tip 5-mm energy device
60-mm linear reticulating laparoscopic staplers with vascular and tan cartridges
We use the GelPort hand-assist device due to its versatility and ease of use. This device allows for the introduction/removal of the hand without losing pneumoperitoneum and allows for insertion of multiple ports through the hand-assist device if necessary. It also allows for the introduction of laparotomy pads into the field and is very useful in retracting bowel/omentum in obese patients.
Patient Positioning and Surgical Team Setup
Place the patient on a modified lithotomy position (FIG 1), with the arms tucked and padded (to avoid nerve/tendon
injuries). The patient is taped over a towel across the chest, without compromising chest expansion.
Place the legs on Allen stirrup with the heels firmly planted on the stirrups to avoid pressure on the calves and the lateral peroneal nerves.
Keep the thighs parallel to the ground to avoid conflict between the thighs and the surgeon’s arms/instruments.
The coccyx should be readily palpable off the edge of the table.
The surgeon starts at the patient’s right lower side, with the assistant to his or her left side and with the scrub nurse to his or her right or in between the patient’s legs (FIG 2).
Align the surgeon, ports, targets, and monitors in straight lines. Place monitors in front of the surgeon and at eye level to prevent lower neck stress injuries.
Avoid unnecessary restrictions to potential team movement around the table. All energy device cables exit by the patient’s upper left side. All laparoscopic (gas, light cord, and camera) elements exit by the patient’s upper right side.
The energy instruments are placed in a plastic pouch in front of the surgeon to avoid unnecessary instrument transfer during the operation (FIG 2).
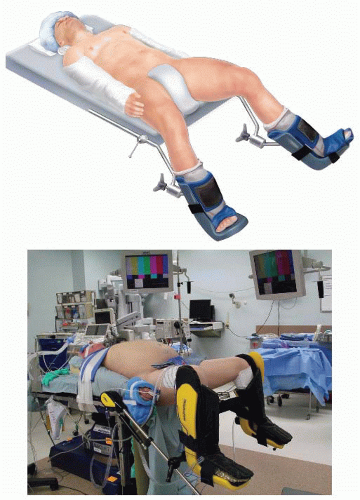 FIG 1 • Patient positioning. The patient is on a modified lithotomy position, with the thighs parallel to the ground to avoid conflict with the surgeon’s elbows/instruments. The arms are tucked. The patient is secured to the table by taping across the chest over a towel. All pressure points are padded to avoid neurovascular injuries. |
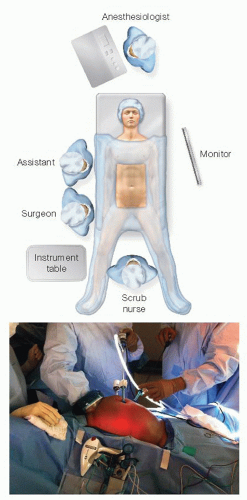 FIG 2 • Team setup. The surgeon stands to the patient’s right side, with the assistant to his or her left, and the scrub nurse to his or her right or in between the patient’s legs. The team, ports, targets, and monitors are aligned. Notice the energy devices placed in a pouch in front of the surgeon to minimize instrument transfer. |
TECHNIQUES
PORT PLACEMENT AND OPERATIVE FIELD SETUP
Insert the GelPort through a 5- to 6-cm Pfannenstiel incision (FIG 3). This incision will be also used for specimen extraction. It provides a better cosmetic result and lowers the incidence of wound infections and incisional hernias. It also allows for more working space between the hand and the instruments. Alternatively, the GelPort can also be inserted in the epigastrium, if access to the middle colic vessels is of concern.
Ports: Insert a 5-mm working port in the right upper quadrant (RUQ), a 12-mm working port in the right lower quadrant, and a 5-mm camera port above the umbilicus. These three ports are triangulated, with the camera port at the apex of the triangle. This setup avoids conflict between the instruments and the camera and prevents disorientation (avoids “working on a mirror”). A third 5-mm working port is inserted in the left anterior flank of the abdomen for the mobilization of the right colon; it can also be valuable for the mobilization of the splenic flexure in patients with deep left upper quadrants.
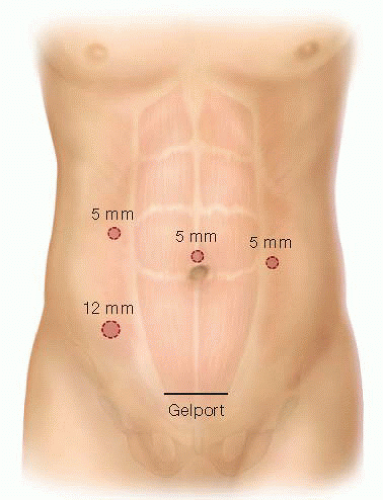 FIG 3 • Port placement. The GelPort is placed through a 5-to 6-cm Pfannenstiel incision. Alternatively, the GelPort can be placed on an epigastric location. A 5-mm periumbilical camera port site is inserted. Working ports are inserted in the RUQ, right lower quadrant (RLQ), and left anterior flank of the abdomen. All ports are triangulated. |
OPERATIVE STEPS
Our HALS TAC operation is highly standardized and consists of 13 steps. After the initial point of entry, every step will expose the necessary planes of dissection for the following steps, ensuring that no truly virgin tissue planes are encountered anymore, thus greatly reducing the complexity of this operation. These steps, in order, are as follows:
Transection of the inferior mesenteric vein (IMV)
Transection of the inferior mesenteric artery (IMA)
Medial to lateral dissection of the descending mesocolon
Lateral mobilization of the sigmoid and descending colon
Mobilization of the splenic flexure and transverse colon
Mobilization of the hepatic flexure
Supramesocolic transection of the middle colic vessels
Transection of the ileocolic pedicle
Medial to lateral mobilization of the ascending colon
Lateral mobilization of the ascending colon
Intracorporeal distal transection
Extracorporeal mobilization and proximal transection
Intracorporeal ileorectal anastomosis
Step 1. Transection of the Inferior Mesenteric Vein
This is the critical “point of entry” in this operation. We favor it over starting dissection at the IMA level due to the IMV’s constancy in location, the ease of its visualization by the ligament of Treitz, and the absence of structures that can be injured around it (no iliac vessels or left ureter nearby). This will be the only time during the operation when a virgin tissue plane is entered. Every step will set up the following ones, opening the tissue planes sequentially.
The patient is placed on a steep Trendelenburg position with the left side up. Using the right hand, move the small bowel into the RUQ and the transverse colon and omentum into the upper abdomen. If necessary, place a laparotomy pad to hold the bowel out of the field of view, especially in obese patients. This pad can also be used to dry up the field and to clean the scope tip intracorporeally. Make sure that the circulating nurse notes the laparotomy pad in the abdomen on the white board.
Identify the critical anatomy: IMV, ligament of Treitz, and left colic artery (FIG 4).
If there are attachments between the duodenum/root of mesentery and mesocolon, transect them with laparoscopic scissors. This will allow for adequate exposure of midline structures
Pick up the IMV with the right hand. Dissect under (dorsal) the IMV and in front of Gerota’s fascia with endoscopic scissors, starting at the level of the ligament of Treitz and proceeding with the dissection caudally toward the IMA. The assistant provides upward countertraction with a grasper.
Transect the IMV (FIG 5) cephalad of left colic artery, which moves away from the IMV and toward the splenic flexure of the colon, with the 5-mm energy device.
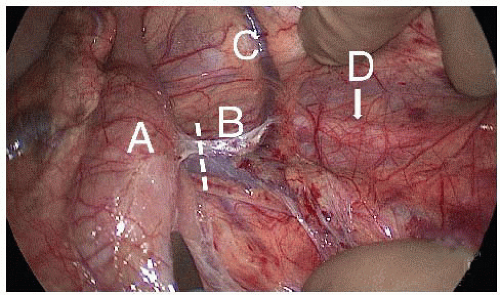 FIG 4 • Step 1: transection of the IMV. Key anatomy. Ligament of Treitz (A). IMV (B). Left colic artery (C) as it separates from the IMV and goes toward the splenic flexure of the colon. The left ureter (D) is located far from the IMV projected transection (dotted lines). |
Step 2. Transection of the Inferior Mesenteric Artery
Identify the critical anatomy: the “letter T” formed between the IMA and its left colic and superior hemorrhoidal artery (SHA) terminal branches (FIG 6).
Using the right hand, the aorta is identified and tracked down to the level of its bifurcation. The IMA will originate 1 to 2 cm proximal to this level.
Holding the SHA up with the right hand, dissect the plane along the palpable groove between the SHA and the left iliac artery using laparoscopic scissors. A wide incision is made in the peritoneum dorsal to the SHA; the wider the incision, the easier the SHA can be elevated to obtain better exposure. After scoring the peritoneum under the SHA, use a 5-mm energy device to dissect by gently pushing the retroperitoneal tissues downward (dorsally) along the avascular plane located between the mesodescending colon, anteriorly, and the retroperitoneum, posteriorly. This avascular plane can be identified by the transition between the two distinctive fat planes of the mesocolon and Gerota’s fascia.
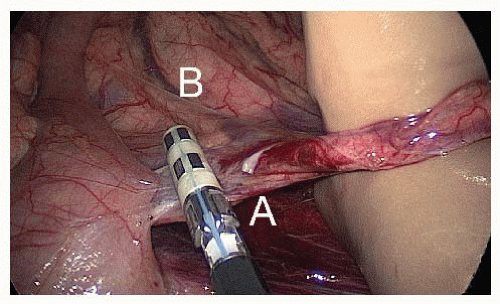
FIG 5 • Step 1: transection of the IMV. The surgeon holds the IMV (A) anteriorly with his or her right hand and transects it cephalad of the left colic artery (B) with a 5-mm energy device.
Preserve the sympathetic nerve trunk intact in the retroperitoneum. This avoids autonomic dysfunction postoperatively.
Identify the left ureter (FIG 7), located in front of the left iliac artery and psoas muscle and medial to the gonadal vessels, before transecting anything. If you are directly on the psoas muscle, chances are that you left the left ureter attached to the dorsal surface of the mesocolon; bring it down into the retroperitoneum gently using blunt dissection with the energy device.
If you cannot identify the ureter, try dissecting superior to inferior, starting from the IMV plane of dissection and moving caudally behind the IMA. If you still cannot find it, perform a lateral to medial mobilization of the sigmoid colon toward the midline. In this latter scenario, you will encounter the left gonadal vessels first, lateral to the left ureter.
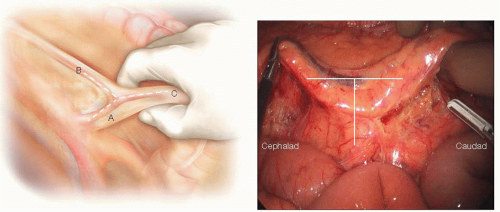
FIG 6 • Step 2: critical anatomy. Identify the “letter T” formed between the IMA (A) and its left colic artery (B) and SHA (C) terminal branches. The IMA takeoff is just cephalad from the aortic bifurcation. The thumb and index finger are lifting the SHA off the groove located anterior to the right common iliac artery.
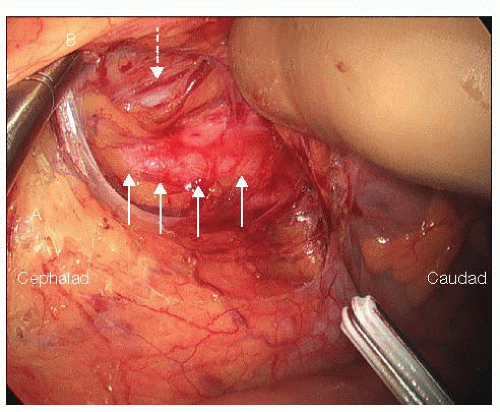
FIG 7 • Step 2: identification of the left ureter and gonadal vessels. After the IMA (A) and SHA (B) have been lifted off the retroperitoneum, the left ureter (solid arrows) can be identified and preserved intact. Identification of the left ureter at this stage is critical in order to avoid injuring it during the IMA transection. Distal to the takeoff of the IMA, the left gonadal vessels can be identified lateral to the left ureter (dotted arrow).
Stay updated, free articles. Join our Telegram channel

Full access? Get Clinical Tree

 Get Clinical Tree app for offline access
