New Techniques— Ultrasound-Guided Percutaneous Breast Interventions and Oncoplastic Techniques
This chapter summarizes new techniques in two separate areas—first, the use of ultrasound to guide percutaneous interventions; second, the emerging area of oncoplastics. Oncoplastics is a term used to describe the application of plastic surgical techniques to cancer surgery of the breast.
Steps in Procedure
Ultrasound-guided Aspiration
Visualize lesion and establish ergonomically sound and safe approach for needle
Prepare sterile field and anesthetize skin
Introduce needle under ultrasound guidance and record image
Aspirate fluid until structure collapses and record image
Ultrasound-guided Core Biopsy
Visualize lesion and prepare as noted above
Create skin nick with #11 blade
Introduce spring-loaded core biopsy needle so that it is just touching lesion (ultrasound guidance) and record image
Fire device and record image
Remove needle and retrieve core
Obtain six cores in this fashion
Place clip into biopsy site
Ultrasound-guided Lumpectomy
Use ultrasound to image lesion or biopsy cavity and clip (having previously confirmed ability to visualize in clinic)
Mark skin overlying lesion
Perform lumpectomy in usual fashion
Confirm presence of target lesion and adequacy of margins by ultrasound of specimen, x-ray of specimen, or immediate pathologic examination
Oncoplastic Lumpectomy through Batwing Incision
Outline incision along upper aspect of areola
Draw medial and lateral transverse extensions
Create upper incision in similar fashion so that “batwing” of skin is excised with specimen
Raise flaps and excise specimen in usual fashion
Optional—mobilize remaining breast tissue at level of pectoral fascia and reapproximate to eliminate dead space
Close incision in usual fashion
Skin-sparing Mastectomy
Incision may be circumareolar, have a keyhole extension, or be modified to incorporate prior biopsy site
Develop cone of skin and subcutaneous tissue by dissecting circumferentially
Mobilize breast from underlying pectoral fascia
Obtain hemostasis and allow plastic surgeon to complete procedure
Hallmark Anatomic Complications
Missed lesion (ultrasound)
Skin flap necrosis (skin-sparing mastectomy)
List of Structures
Areola
Internal thoracic (mammary) vessels
Pectoral fascia
Cooper’s ligaments
Ribs
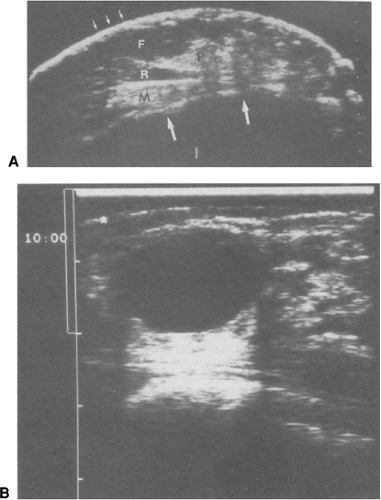
Ultrasound Landmarks (Fig. 15.1)
Technical and Anatomic Points
This section covers the basic ultrasound anatomy of the normal breast and describes how ultrasound may be used to guide various percutaneous interventions ranging from aspiration of breast cysts through core biopsy of lesions and drainage of seromas. References at the end of this chapter give additional information. Hands-on courses such as those offered by the American College of Surgeons or the American Society of Breast Surgeons are essential to the process of learning how to use ultrasound in this area.
The transducer generally used for breast ultrasound is a 7.5-MHz linear array transducer. Two standard orientations (transverse and vertical) are used and indicated on a diagram or pictogram on the image. A radial orientation for the transducer may be preferred, particularly when ducts near the nipple are scanned; in this case, the second image is taken at right angles to the first. Surgeons typically perform focused (as apposed to screening) ultrasound examinations. A focused examination places the transducer over a specific region of concern, such as a palpable abnormality.
The normal ultrasound anatomy of the breast (Fig. 15.1A) includes skin, subcutaneous fat, Cooper’s ligament, pectoralis major muscle and/or ribs, and pleura.
Place the transducer over the region of interest and scan slowly over the area. Realize that the transducer may slip rapidly off the surface of a mobile lesion such as a fibroadenoma, making it difficult to image the mass. In this case, “trap” the lesion between the fingers of your nondominant hand as you guide the transducer with your dominant hand.
After the abnormality is imaged, optimize the image using the time-gain, resolution, and depth controls. Record two orthogonal views for the medical record. For each view, place calipers to measure the lesion. By convention, the first caliper is placed along the greatest dimension and the second caliper is placed at right angles to the first.
Note the characteristics of the mass. Fluid-filled structures such as cysts or seromas are hypoechoic (black), clearly demarcated, and show posterior enhancement and some degree of edge enhancement (Fig. 15.1B). They are usually compressible and often wider than they are tall. Benign lesions in general tend to be very well demarcated and to displace rather than invade adjacent structures. In contrast, malignancies are irregular, sometimes speculated, and invade adjacent structures. They are frequently hypoechoic and exhibit posterior shadowing. An increase in vasculature may be seen with Doppler. They are generally not compressible and are frequently taller than they are wide. Note: Do not rely on your interpretation of the appearance a lesion to determine that it is benign—you are not a radiologist! Rather use the ultrasound to guide a diagnostic intervention such as aspiration or core biopsy.
Ultrasound-guided Aspiration (Fig. 15.2)
Technical and Anatomic Points
If an ultrasound-guided intervention is planned, take care to find an optimum transducer location and skin entry site. Take a few minutes to establish an ergonomically satisfactory layout. You should be able to stand or sit comfortably facing the screen. An assistant will manipulate the controls.
Stay updated, free articles. Join our Telegram channel

Full access? Get Clinical Tree


