Laparoscopic Splenectomy
Laparoscopic splenectomy is easiest for small spleens (e.g., the normal-sized spleen associated with idiopathic thrombocytopenic purpura [ITP]). Techniques have been developed for moderate- to large-sized spleens, but in general, the larger the spleen the more difficult the surgery. The first laparoscopic splenectomies were performed with the patient supine, in a manner similar to that used during open splenectomy. The technique described here, in which the patient is placed in the lateral position and the peritoneal attachments of the spleen are used to suspend it in place is sometimes termed the “hanging spleen” technique. References at the end give details of other techniques and modifications for large spleens, as well as techniques for partial splenectomy and excision of splenic cysts.
SCORE™, the Surgical Council on Resident Education, classified laparoscopic splenectomy as an “ESSENTIAL COMMON” procedure.
STEPS IN PROCEDURE
Place patient in lateral decubitus position, left side up
Obtain laparoscopic access and explore abdomen
Rotate colon medially and inferiorly out of field
Divide gastrocolic ligament and short gastric vessels
Rotate stomach medially out of field
Isolate and divide hilar vessels
Incise lateral peritoneal attachments and remove spleen
Check for accessory spleens
Close any trocar sites (or small incision for spleen removal) greater than 5 mm
HALLMARK ANATOMIC COMPLICATIONS
Injury to bowel or viscera
Injury to tail of pancreas
Injury to stomach
Injury to colon
Missed accessory spleens
LIST OF STRUCTURES
Spleen
Splenic artery
Superior polar artery
Inferior polar artery
Colon
Descending colon
Splenic flexure
Greater omentum
Splenocolic ligament
Phrenicocolic ligament
Splenophrenic ligament
Lesser sac
Stomach
Short gastric vessels
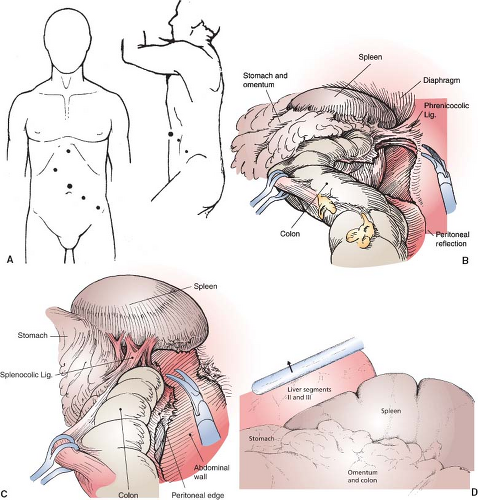
Initial Exposure (Fig. 71.1)
Technical Points
Place the patient in the full lateral decubitus position, with the left side up. The general trocar pattern is shown in Figure 71.1A. A 30- or 45-degree laparoscope gives optimum visualization. Place the laparoscope through an umbilical port. Operating trocars need to be large enough (generally 12 mm) to accommodate the endoscopic linear cutting stapler, if that is planned. Reverse Trendelenburg positioning allows gravity to assist in retraction.
Use the ultrasonic scalpel to mobilize and detach the splenic flexure of the colon from the spleen by first dividing the peritoneal reflection of the descending colon. Start inferiorly at a convenient point and progress cephalad (Fig. 71.1B). Fully divide the phrenicocolic ligament, and then the splenocolic ligament (Fig. 71.1C). Leave the splenophrenic ligament intact, to allow the spleen to “hang” from this ligament during subsequent dissection.
Rotate the colon medially and inferiorly out of the field. Then sequentially divide the anterior peritoneal folds and short gastric vessels (see Figure 47.2A,B in Chapter 47). This creates an opening into the lesser sac through which the splenic hilum should be visible. Mobilize and rotate the stomach medially out of the field.
Stay updated, free articles. Join our Telegram channel

Full access? Get Clinical Tree


