Laparoscopic Roux-en-Y Gastric Bypass
Christine J. Waller
Jessica K. Smith
Laparoscopic Roux-en-Y gastric bypass is one of the most technically demanding laparoscopic procedures and is the preferred method for treating morbid obesity when nonsurgical therapy has failed. As with all bariatric procedures, the surgery is only part of a comprehensive team effort that requires careful patient selection, preoperative preparation, and postoperative care for optimal results.
SCORE™, the Surgical Council on Resident Education, classified laparoscopic operation for morbid obesity as “COMPLEX” procedures.
STEPS IN PROCEDURE
Place patient in supine position.
Obtain laparoscopic access in the following way:
Grasp the umbilicus with two towel clamps and elevate the abdominal wall anteriorly. Introduce a Veress needle in Palmer’s point, and establish pneumoperitoneum to 15 mm Hg.
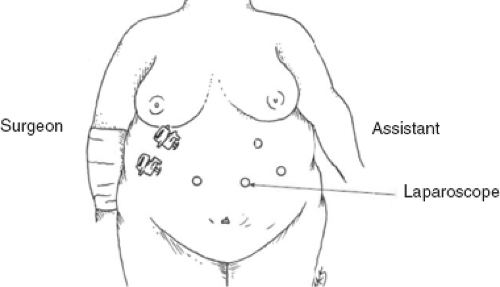
Place trocars as demonstrated in Figure 69.1.
Identify the omentum; retract it cephalad and tuck it under the liver.
Grasp the transverse colon by an epiploic appendage and retract it cephalad to expose the ligament of Treitz.
Divide the jejunum 30 cm distal to the ligament of Treitz with an endoscopic linear cutting stapler.
Mark the distal bowel with suture to avoid confusion.
Trace the jejunum for an additional 75 cm distal to the point of transaction and approximate antimesenteric border of proximal bowel to antimesenteric border of this region.
Anastomose with endoscopic cutting linear stapler, place additional antiobstruction suture, and close mesenteric defect.
Place patient in steep reverse Trendelenburg position.
Divide the omentum to allow passage of the antecolic Roux limb.
Divide the gastrohepatic ligament and enter the lesser sac.
Fashion a 30-cc gastric pouch with an endoscopic linear cutting stapler.
Anastomose the Roux limb to the gastric pouch with a double-layer stapled and hand-sewn anastomosis.
Place closed suction drain behind gastrojejunostomy, bringing it out through a lateral trocar site.
HALLMARK ANATOMIC COMPLICATIONS
Injury to bowel or viscera during laparoscopic access
Injury to esophagus
Injury to stomach
Injury to spleen
Confusion as to proximal or distal loop of jejunum
LIST OF STRUCTURES
Stomach
Fundus
Incisura
Cardial notch (angle of His)
Greater curvature
Lesser curvature
Esophagogastric Junction
Esophagus
Greater Omentum
Lesser (Gastrohepatic) Omentum
Jejunum
Suspensory Ligament of Duodenum (Ligament of Treitz)
Patient Position and Trocar Position (Fig. 69.1)
Technical and Anatomic Points
A Foley catheter is inserted into the bladder. A nasogastric tube is placed. Position the patient supine on the table with the right arm tucked to the side. Position the left arm on an arm board. Apply a footboard to the end of the table to facilitate placement of the patient in reverse Trendelenburg position to aid exposure in the upper abdomen.
The surgeon stands on the patient’s right, the assistant and scope holder on the patient’s left. Elevate the umbilical plate with two penetrating towel clamps and insert a Veress needle into the abdomen approximately 15 cm below the xiphoid and 2 to 3 cm to the left of the midline. Do not use the umbilicus as a landmark because it is displaced inferiorly in many morbidly obese patients. Insufflate the abdomen with a high-flow insufflator to an intra-abdominal pressure of 15 mm Hg.
The first 12-mm trocar, the camera port, is inserted 15 to 20 cm below the xiphoid process just to the left of midline using a Visiport technique. This trocar will be used for the 10-mm, 45-degree scope throughout the procedure. Insert a 12-mm port at the same level in the right epigastrium; this will serve as one of the surgeon’s operating ports. Take care not to place this port too inferior because this may compromise the ability of the instruments to reach the operating area. Next insert a 5-mm trocar in the left upper quadrant. The next trocar is a 5-mm trocar inserted in the right upper quadrant laterally to allow liver retraction. Next place the liver retractor. Retract the liver superiorly and fix the retractor to the table with a retractor holder to provide stable exposure. Insert another 5-mm trocar into the right upper quadrant as the second operating port. Take care to place this port below the liver retractor and free of the round ligament. Inserting a long needle through the abdominal wall in the proposed trocar site may help prevent misplacement of this trocar. Finally, place the fourth 5-mm trocar in the left upper quadrant as a second port for the assistant.
Identification of the Ligament of Treitz and Division of Jejunum (Fig. 69.2)
Technical Points
Retract omentum and transverse colon superiorly into the upper abdomen where it is held by the assistant.
Identify the suspensory ligament of duodenum (ligament of Treitz) (see Figure 63.1D). Next, trace the jejunum 30 cm
(Fig. 69.2A) distal to the suspensory ligament of duodenum (ligament of Treitz) and divide it with a linear cutting stapler. Use a second firing of the linear stapler to divide small bowel mesentery further if necessary (Fig. 69.2B,C). Mark the distal bowel with a stitch to avoid confusion with the proximal end of the bowel.
(Fig. 69.2A) distal to the suspensory ligament of duodenum (ligament of Treitz) and divide it with a linear cutting stapler. Use a second firing of the linear stapler to divide small bowel mesentery further if necessary (Fig. 69.2B,C). Mark the distal bowel with a stitch to avoid confusion with the proximal end of the bowel.
Stay updated, free articles. Join our Telegram channel

Full access? Get Clinical Tree


