Laparoscopic Donor Nephrectomy
Rajesh Shetty
Daniel A. Katz
An extensive predonation evaluation is performed encompassing medical, psychosocial, and financial issues. The donor is also screened by a donor advocate who is separate from the transplant team to ensure that nephrectomy is in the prospective donor’s best interest. A CT angiogram is done to make sure the donor is anatomically suitable, ensuring that there is no significant size discrepancy between the kidneys, and looking for renal vascular anomalies. The donor is typed and cross-matched for 2 units of packed red blood cells, and preoperative antibiotics are given. The patient is liberally hydrated throughout the procedure (about 4 to 6 L).
The left kidney is commonly selected because of the greater length of renal vein. A brief section at the end of this chapter describes the modifications necessary for the right kidney.
SCORE™, the Surgical Council on Resident Education, classified live donor nephrectomy as a “COMPLEX” procedure.
STEPS IN PROCEDURE
Right lateral decubitus position (for left donor nephrectomy)
Veress needle insertion just below the midleft subcostal margin
One 12-mm midclavicular port at about the level of the umbilicus
Insert camera, inspect abdomen for Veress needle trauma
12-mm camera port cephalad to the umbilicus in the midline or left lateral of the midline depending on patient size
Two 5-mm ports. One positioned near the Veress needle site and the other in the left anterior axillary line roughly opposite the camera port
Incise line of Toldt and mobilize left colon medially
Release splenocolic and splenorenal ligaments and mobilize spleen medially
Identify gonadal vein and trace it superiorly to the renal vein and expose the renal vein
Dissect along superior border of renal vein to identify and trace the adrenal vein
Clip and divide both the gonadal and adrenal veins
Identify and dissect the left ureter with periureteral tissues
Open Gerota fascia over the kidney
Clear adipose tissue from the anterior and posterior kidney surfaces
Dissect lumbar vein(s) if present and ligate and divide them
Dissect the anterior surface of the renal artery
Dissect adrenal gland from upper pole of kidney
Dissect posterior aspect of renal artery by rotating the kidney medially
Apply topical papaverine to vessels
Doubly clip and divide distal ureter
Make the Pfannenstiel incision and introduce assistant’s hand into the field
Retract the kidney laterally and superiorly by the assistant’s hand for hilar exposure
Divide renal artery followed by renal vein with vascular stapler
Extract the kidney through the Pfannenstiel incision by the assistant
Check for hemostasis
Close incision and trocar sites in usual fashion
HALLMARK ANATOMIC COMPLICATIONS
Ureteral devascularization
LIST OF STRUCTURES
Left Kidney
Gerota fascia
Ureter
Aorta
Positioning, Incision, and Placement of Trocars (Fig. 110.1)
Technical Points
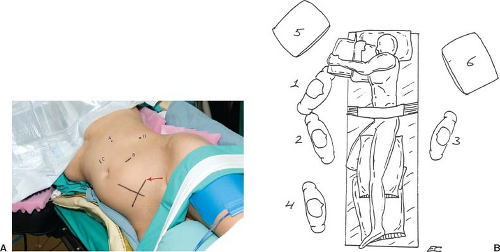
Place the patient on a padded operating table. Following induction of anesthesia and intubation, place a Foley catheter and an orogastric tube. Mark the lower midline and the planned Pfannenstiel incision line while the patient is supine. This will help keep the incision symmetric following placement of the patient in the lateral decubitus position (Fig. 110.1A, the arrow points to the line of the Pfannenstiel incision). Electrocautery pads are attached. Then position the donor in the right lateral decubitus position as shown (right side down). Place a right axillary roll. Hold patient in place with a bean bag or laminectomy gel rolls. Bend the bottom leg to a neutral position and pad the ankle. Drape the Foley posteriorly through the patient’s legs and place it where the anesthetist can see the filled container. Place pillows between the legs and slightly
flex the top (left) leg. Secure patient with a wide tape to the table at the hips and legs without direct contact of tape with the patient’s skin. Place the left arm in the Krause arm support in a neutral position pointing diagonally cephalad across the face so that it is well away from the operative field. The arm is generously padded and secured to the sling. Pad the area between the face and the sling. It is important for the anesthetist to protect the patient’s face and endotracheal tube during arm positioning.
flex the top (left) leg. Secure patient with a wide tape to the table at the hips and legs without direct contact of tape with the patient’s skin. Place the left arm in the Krause arm support in a neutral position pointing diagonally cephalad across the face so that it is well away from the operative field. The arm is generously padded and secured to the sling. Pad the area between the face and the sling. It is important for the anesthetist to protect the patient’s face and endotracheal tube during arm positioning.
Prep and drape the patient. A prefabricated laparoscopic drape is useful. Bring the camera, light source, insufflation tubing, and harmonic scalpel off the left side of the patient and cautery and irrigation equipment, off the right side. Place an additional pocket made from a pillowcase and x-ray cover off the left side below the operative field (Fig. 110.1B).
Perform a time out, including a check of the patient’s UNOS number, and blood type of the donor and the recipient. Insert the Veress needle below the left costal margin lateral to the edge of the rectus and insufflate after confirmation of Veress position with aspiration and saline drop test. Place the first 12-mm port about the level of the umbilicus in the midclavicular line. Introduce a 30-degree laparoscope and inspect the abdomen for Veress needle trauma or bleeding. Remove the Veress needle. Insert the second 12-mm port near the umbilicus. The position of this port site is variable and depends on the patient’s body habitus. It is helpful to position this port site more cephalad and medial in larger patients. Switch the camera to this port site where it remains for the rest of the case. Place the first 5-mm port near the Veress needle insertion site, although the port can often be placed several centimeters more cephalad once the abdomen is insufflated. Place the second 5-mm port in the left flank in the anterior axillary line after the colon is mobilized. Secure all ports to the skin with 2-0 silk suture. This is important to help prevent accidental port extraction later in the case when passing the stapling devices during the extraction phase of the nephrectomy.
Anatomic Points
The inferior epigastric artery runs in the lateral aspect of the rectus sheath and should be avoided when placing the trocars.
Exposure of the Kidney (Fig. 110.2)
Technical Points
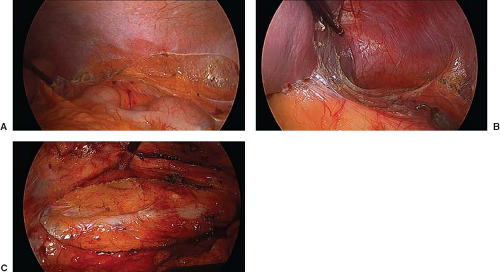
Incise the white line of Toldt superiorly from the descending colon to the sigmoid colon (Fig. 110.2A). Retract the colon medially (Mattox maneuver) taking care not to penetrate the mesocolon and making sure that all pulsatile vessels which are part of the colonic mesentery are swept medially. Mobilize the spleen medially by dividing the splenorenal ligament (Fig. 110.2B) and the splenocolic attachments with a hook cautery to provide maximal medial retraction of the descending colon. This will expose the Gerota fascia along with the gonadal vein (Fig. 110.2C) and ureter.
 Figure 110.2 A: Incision along the white line of Toldt. B: Release of splenocolic and splenorenal ligaments. C: Exposure of the left gonadal vein. |
Anatomic Points
The white line of Toldt is the peritoneal thickening where the visceral peritoneum of the colon meets the parietal peritoneum of the lateral abdominal wall. It is an avascular line for entrance into the retroperitoneum. Once entered, the colon can be dissected medially by dividing the alveolar tissue that secures it to the retroperitoneum.
Stay updated, free articles. Join our Telegram channel

Full access? Get Clinical Tree


