Exploratory Laparotomy
The choice of incision for laparotomy is influenced by the operation planned, the location of the probable pathology, the body habitus of the patient, and the presence or absence of previous scars. Choose an incision that will provide good exposure, can be extended if necessary, and will heal well. The vertical midline incision is discussed here as the prototype for an abdominal incision. The McBurney and Rockey-Davis incisions, Kocher incision, paramedian incision, and transverse and oblique incisions are discussed in conjunction with the operative procedures for which they are most frequently used.
Steps in Procedure
Vertical midline incision provides best access
Lift up when entering peritoneum, watch for bowel
Lyse any adhesions with care, use sharp dissection
Thorough exploration is mandatory
In trauma situation, consider damage control laparotomy
Place omentum under incision and around any anastomoses
Close fascia; consider retention sutures
When heavy contamination is encountered, pack skin open or use vacuum dressing
Hallmark Anatomic Complications
Missed pathology or injury
Injury to bowel during entry into peritoneal cavity
List of Structures
External oblique muscle and aponeurosis
Internal oblique muscle and aponeurosis
Transversus abdominis muscle
Preperitoneal fat
Peritoneum
Linea alba
Median umbilical fold (urachus)
Bladder
The vertical midline incision is rapidly made and affords equal access to all quadrants of the abdomen. Few vessels are encountered in the midline, and no nerves are sacrificed. It is the preferred incision in cases of traumatic injury in situations in which access to multiple areas is required and in any situation in which the nature of the pathology is in doubt. The potential disadvantages of the incision are that only one layer of fascia is present to be closed and that contraction of the abdominal wall muscles tends to pull the incision apart (in contrast to transverse or muscle-splitting incisions, in which the pull of the muscles does not act as a distracting force on the edges of the fascial incision). The vertical midline incision can be extended into the chest as a median sternotomy to improve exposure in the patient with traumatic injuries.
The Vertical Midline Incision (Fig. 41.1)
Technical Points
Cut cleanly through skin and subcutaneous tissue with a sharp knife, maintaining equal traction on both sides of the incision to ensure that the incision is straight. Make the incision in the upper midline or the lower midline, or extend it from xiphoid to pubis, depending on the expected findings. Curve the incision around to the left of the umbilicus to avoid dividing the ligamentum teres hepatis. As the incision deepens, place laparotomy pads on the subcutaneous fat and use strong traction and countertraction to assist in exposure. In massively obese patients, “pull” the fat apart by strong traction and countertraction. This seemingly brutal maneuver helps maintain orientation in the relatively avascular midline and leads directly to the linea alba.
Clean the linea alba of fat for a few millimeters on each side of the midline to help define the exact midline and to facilitate closure. Confirm the midline by the visible decussation of fibers at the linea alba. Check the wound for hemostasis and use electrocautery to coagulate any bleeding points.
Incise the linea alba for the length of the incision and pick up the peritoneum. (Often, a transparent area can be identified in the upper midline through which intraabdominal viscera can be seen.) It is helpful to lift up on the fascia as you incise it and
the peritoneum. This maneuver creates negative pressure in the abdomen. As you enter the peritoneum, air will enter and any underlying bowel has a better chance of falling away from the knife. Conversely, pushing down on the fascia as you enter will increase pressure in the abdomen and cause the bowel to push out through any small incision, increasing the probability of injury. The preperitoneal fat becomes thicker below the umbilicus and, as the pubic bone is reached, the urinary bladder may be encountered. Therefore the abdomen should be entered in the upper midline, where the risk for injury to the bladder is eliminated, preperitoneal fat is least prominent, and the left lobe of the liver protects underlying hollow viscera from injury. Open the incision for its entire length using electrocautery. If the incision extends to the lower midline, incise fascia first, bluntly pushing preperitoneal fat and bladder away from the fascia. After the fascia is opened, thin the preperitoneal fat by squeezing it between thumb and forefinger, feeling for the muscular wall of the bladder. If in doubt, feel for the balloon of the Foley catheter and pull it up to define the anterior extent of the bladder. Generally, the obliterated urachus will become visible as the fat is thinned out and a relatively free area lateral to the urachus can be identified.
the peritoneum. This maneuver creates negative pressure in the abdomen. As you enter the peritoneum, air will enter and any underlying bowel has a better chance of falling away from the knife. Conversely, pushing down on the fascia as you enter will increase pressure in the abdomen and cause the bowel to push out through any small incision, increasing the probability of injury. The preperitoneal fat becomes thicker below the umbilicus and, as the pubic bone is reached, the urinary bladder may be encountered. Therefore the abdomen should be entered in the upper midline, where the risk for injury to the bladder is eliminated, preperitoneal fat is least prominent, and the left lobe of the liver protects underlying hollow viscera from injury. Open the incision for its entire length using electrocautery. If the incision extends to the lower midline, incise fascia first, bluntly pushing preperitoneal fat and bladder away from the fascia. After the fascia is opened, thin the preperitoneal fat by squeezing it between thumb and forefinger, feeling for the muscular wall of the bladder. If in doubt, feel for the balloon of the Foley catheter and pull it up to define the anterior extent of the bladder. Generally, the obliterated urachus will become visible as the fat is thinned out and a relatively free area lateral to the urachus can be identified.
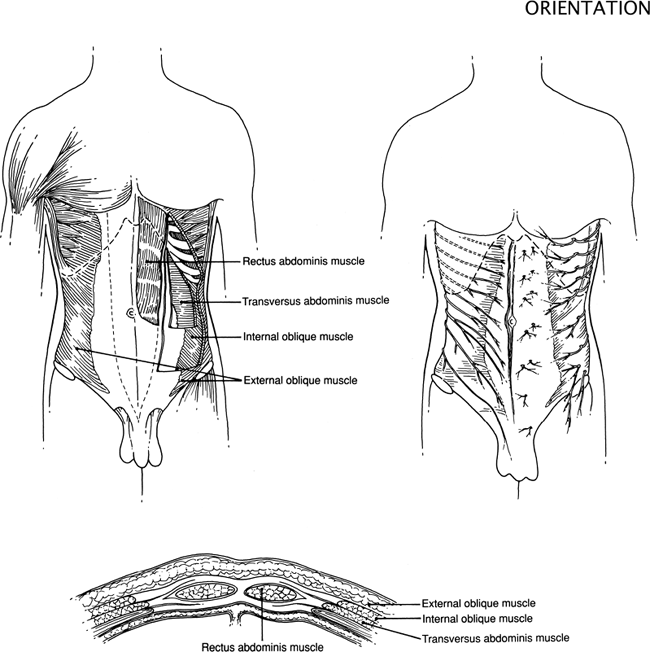 |
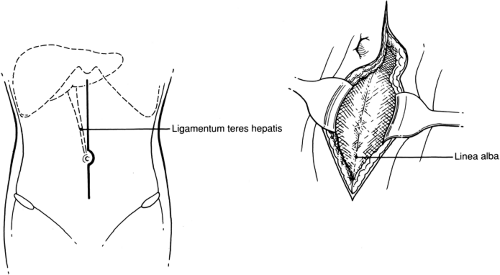 Figure 41-1 The Vertical Midline Incision |
Anatomic Points
Key dermatomes of the anterior abdominal wall include T-5 and T-6 (xiphoid), T-9 and T-l0 (umbilicus), and L-1 (pubis). Each dermatome receives supplemental innervation from the contiguous spinal nerves, both superiorly and inferiorly. Thus, an incision that results in a zone of denervated skin must section branches from at least two consecutive spinal nerves.
If a true midline incision is made, only minor nerves and arteries will be encountered. No named arteries or nerves occupy the midline because they enter the anterior abdominal wall laterally (in the case of spinal nerves and the intersegmental arteries) or are lateral to the midline (as is true of the superior and inferior epigastric arteries). Superficial veins are minimal, although one should expect a greater number as the umbilicus is approached. As usual, these vessels can be ligated or cauterized with impunity.
Deep to the linea alba and attached to the anterior body wall are remnants of two embryologically important structures. Superior to the umbilicus, the ligamentum teres hepatis, or round ligament of the liver, which is the obliterated left umbilical vein, passes in the free edge of the falciform ligament from the umbilicus to the fissure separating the left and right hepatic lobes. Because this fissure lies to the right of midline, the round ligament deviates to the right. The falciform ligament is attached along its base to the midline, but it lies to the right. Thus, its left surface is in contact with the left lobe of the liver and its right side is in contact with the abdominal wall. Inferior to the umbilicus, the median umbilical ligament—the obliterated urachus—passes from the umbilicus to the vertex of the bladder. The urachus is a narrow canal, originating from the vesicourethral portion of the hindgut, which connects developing urinary bladder to allantois. Distally, the urachus is continuous, through the umbilical cord, with the entirely extraembryonic allantois.
Finally, one should be aware of abdominopelvic organs just deep to the linea alba from xiphoid to pubis. Most superiorly, and for a variable distance inferiorly, is the left lobe of the liver. Immediately inferior to the liver is the antrum of the stomach, to which is attached the thin gastrocolic ligament, through which the transverse colon is usually visible. From the inferior edge of the transverse colon (roughly midway between xiphoid and umbilicus, but quite variable in location), the greater omentum, which varies in both thickness and length, lies between the parietal peritoneum anteriorly and loops of small bowel, which should extend inferiorly to, or almost to, the pelvic brim. As the pelvic brim is approached, the extraperitoneal urinary bladder will be encountered. When the bladder is empty, its vertex typically is still superior to the pubis; thus, it may be encountered even if the urinary bladder is adequately drained.
Opening the Abdomen in the Case of Previous Abdominal Surgery (Fig. 41.2)
Technical and Anatomic Points
Adhesions are generally most prominent where there is foreign material (sutures, lint, talc) or at areas of injury or ischemia. Generally, there will be adhesions from any old incision to the underlying viscera or omentum. If possible, enter the abdomen through a virgin area, above or below the old incision. If this is not possible, it is generally advisable to enter the upper pole of the incision where the underlying left lobe of the liver, rather than the colon or small bowel, is likely to be encountered first.
After you have made an opening into the peritoneal cavity, place Kocher clamps on the fascia and lift up. Use a laparotomy pad in your nondominant hand to pull down and provide countertraction. Lyse adhesions between loops of bowel or omentum
and abdominal wall using Metzenbaum scissors or a knife. Do not cut fascia, dense fibrous adhesions, or old suture material with the Metzenbaum scissors; rather, reserve these scissors for cutting soft tissue to avoid dulling the blades. As you free up bowel and omentum from the underside of the incision, extend the peritoneal incision until more adhesions are encountered.
and abdominal wall using Metzenbaum scissors or a knife. Do not cut fascia, dense fibrous adhesions, or old suture material with the Metzenbaum scissors; rather, reserve these scissors for cutting soft tissue to avoid dulling the blades. As you free up bowel and omentum from the underside of the incision, extend the peritoneal incision until more adhesions are encountered.
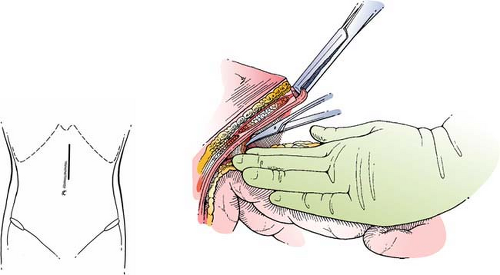 Figure 41-2 Opening the Abdomen in the Case of Previous Abdominal Surgery |
When you have opened the entire incision, place Kocher clamps on the fascia of one side and have your assistant pull up on the fascia. Apply downward countertraction with a laparotomy pad on bowel and omentum adherent to the underside of the abdominal wall. Sharply lyse adhesions; if necessary, take a small amount of peritoneum with a loop of bowel to avoid inadvertent injury. Generally, the adhesions will become less dense as you progress laterally away from the incision, and it may be possible to pass the fingers of the left hand behind adherent bowel to define the anatomy more clearly and to provide exposure. Adhesions are usually relatively avascular (in the absence of portal hypertension); bleeding from the serosal surface of the bowel can often be stopped with pressure from a laparotomy pad and bleeding from the abdominal wall can be controlled with electrocautery.
Alternatives to the Vertical Midline Incision (Fig. 41.3)
Technical Points
Alternative incisions are discussed in detail with the operations for which they are most commonly used. The following is simply a list of commonly used incisions, along with the advantages and disadvantages of each. All share the potential advantage of creating an incision directly over the pathology to be dealt with and the potential disadvantage of accordingly limiting exposure of other areas.
Kocher Incision
The Kocher incision is an oblique right upper quadrant incision made about 4 cm below and parallel to the costal margin. It provides excellent exposure for surgery of the liver and biliary tract (see Chapter 63), and it can be extended partially or completely across the midline, as a chevron, and used for surgery of the pancreas (Fig. 41.3A).
Disadvantages of this incision include pain (because muscles are cut) and the potential for inducing muscular weakness of the abdominal wall if several segmental nerves are cut in a long Kocher incision.
A left-sided Kocher-type incision provides excellent exposure for elective splenectomy of the small or only moderately enlarged spleen (see Chapter 61).
Stay updated, free articles. Join our Telegram channel

Full access? Get Clinical Tree


