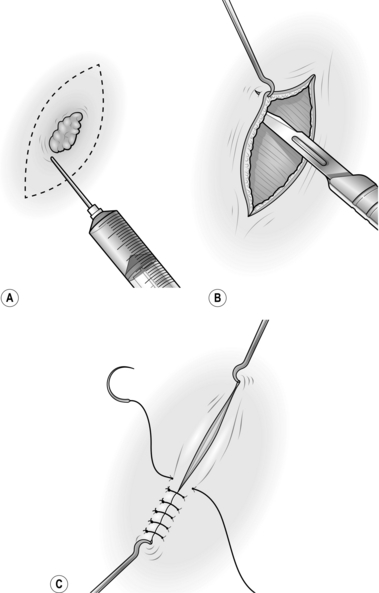
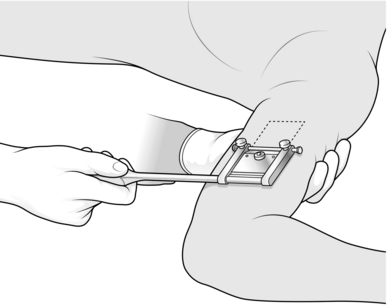
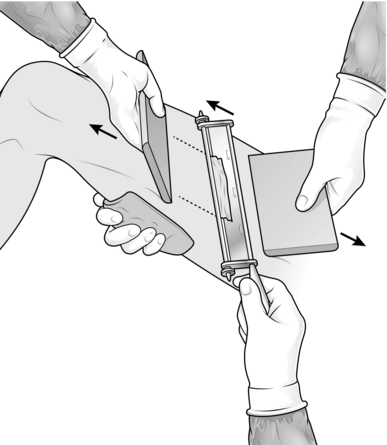
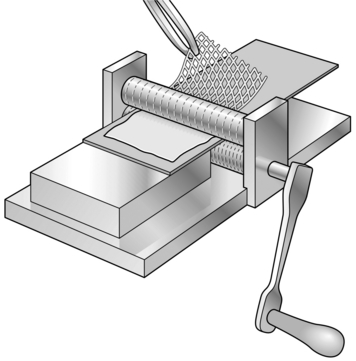
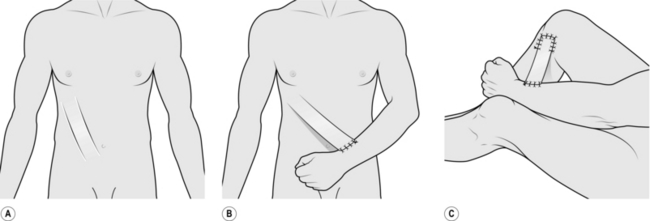
33 1. In the region of the proposed operation, identify the lines of tension within the skin described by the Professor of Anatomy in Vienna, Carl Ritter von Langer (1819–1887). Try to make all incisions parallel to these lines. When this is not possible, consider using a Z-plasty or local flap in closing the wound to help prevent the formation of scar contracture postoperatively. 2. When planning a large flap or a sophisticated reconstruction, mark out a plan of the flap on the patient with a skin marker the day before operation. For smaller flaps and simple incisions, mark out the area of incision on the patient after preparing the area, before incising the skin. Use a fine pen and ink for marking out the lines of incisions on the face. Use a broad proprietary marking pen in other areas. Try to follow these lines, as they provide a useful guide once the skin has been incised and tension in the surrounding skin has changed. Be prepared, however, to make adjustments on occasions according to the circumstances. 3. While general anaesthesia is now very safe, do not forget that many operations can be carried out under regional anaesthesia or local anaesthesia (see Chapter 2), especially on the hand, including cases of replantation. Large areas of split skin graft can be taken from the lateral aspect of the thigh by infiltrating the lateral cutaneous nerve of the thigh in the region of the inguinal ligament with local anaesthetic. Many other procedures can be carried out under regional anaesthesia, if necessary with the assistance of a sedative. Many simple skin lesions can be excised under local anaesthesia with 1% lidocaine. To excise small lesions in the head and neck region, where the skin is highly vascular, use 2% lidocaine with 1:80 000 adrenaline (epinephrine). Wait 5 minutes after injecting the mixture, to provide a relatively avascular field as well as anaesthesia. When carrying out extensive excisions of the face or scalp under general anaesthesia, inject a dilute solution of 0.5% lidocaine with 1:200 000 adrenaline (epinephrine). 1. On the face, approximate the deep dermis of the skin edges with interrupted 5/0 polyglactin sutures. Accurately appose the skin edges with 6/0 interrupted nylon sutures. Remove them on the third or fourth postoperative day. If they remain longer, suture marks form, which are unsightly and may prove impossible to remove. 2. Elsewhere on the body, approximate the deep dermis of the wound edges with 3/0 polyglactin sutures and use subcuticular polypropylene sutures whenever possible, tying a knot at either end to prevent slipping. Leave these sutures in for 10 days, or longer if there is a tendency for the scar to stretch because of its site. 1. Respect tissues and their viability by handling them with care and using the appropriate instruments. Control and steady the skin with skin hooks or fine-toothed forceps. Do not crush it by grasping it with non-toothed forceps. 2. For accurate suturing, use a fine needle-holder with a clasp that feels comfortable. Practise using needle-holders with their own cutting edges for cutting sutures so you can use them effectively. They are particularly useful when you are inserting many interrupted sutures, the accuracy of which is not crucial to the overall result. 1. Close skin wounds primarily to provide ideal skin cover following incisions of the skin, excisions of skin lesions and simple lacerations. 2. Use split skin grafts to repair wounds with significant skin loss, to avoid skin closure with tension, or following trauma with an appreciable degree of crush injury to the local tissues. Skin graft survival depends on adequate vascularity of the base of the wound. 3. Use skin flaps, which carry their own blood supply and are temporarily self-sufficient, in primary or secondary repair or reconstruction. Use them as primary cover for vital structures such as exposed neurovascular bundles or for structures that have an inadequate blood supply to support a graft, such as bare bone, bare cartilage, bare tendons and exposed joints. 1. Whenever possible, make incisions following the direction of the tension lines, particularly on the face. 2. For excisions, mark the skin in ink, planning to excise the minimal necessary amount of tissue. Draw an ellipse with pointed ends around this mark, parallel to the tension lines (Fig. 33.1A). 3. On the face, inject the surrounding tissue with 2% lidocaine and 1:80 000 adrenaline (epinephrine) and wait 5 minutes for both components to take effect. 4. Make a vertical cut through the skin along the lines of the ellipse. Ensure that you adequately clear the lesion in depth. 5. Undermine the skin edges beneath the layer of subcutaneous fat to facilitate approximating the edges without tension (Fig. 33.1B). KEY POINTS Skin viable? 6. Place a skin hook in each end of the wound and ask your assistant to draw them apart. This manoeuvre approximates the edges (Fig. 33.1C). 8. Apply a small dressing, or use no dressing at all if practical. 1. A skin graft (Greek: graphion = a style; something inserted) is a piece of skin detached from its donor site and transferred to a recipient site. It may contain part of the thickness of the skin (a split skin graft, described by the German surgeon Karl Thiersch in 1874) or the full-thickness graft of skin, described in 1874 by the Austrian ophthalmologist John Wolfe, who settled in Glasgow. 2. A skin graft depends for its survival on receiving adequate nutrition from the recipient bed. Thus, thin split skin grafts survive more readily than thick split skin grafts or full-thickness grafts. 3. If there is a poor vascular bed, or infection, no graft will survive. In these cases prepare the graft bed appropriately with dressings (see below), or consider using a flap. 4. Choose an appropriate donor site for each individual patient. 1. A split skin graft is a sheet of tissue containing epidermis and some dermis taken from a donor site. It is obtained by shaving the skin with an appropriate knife or blade. A layer of deep dermis is preserved at the donor site and, when dressed appropriately, this is re-epithelialized from residual skin adnexae. 2. Use a small split skin graft to repair traumatic loss of small areas of skin from the hand or fingers, and occasionally in other parts of the body. Avoid using them on the tips of the thumb and index fingers since they tend to become hyperaesthetic. 3. Choose the donor site carefully. On the upper limb prefer skin from the medial aspect of the arm where the donor site is inconspicuous; on the forearm an ugly resultant scar may be visible. 1. Mark out on the medial aspect of the arm an area of skin which is more than sufficient to cover the recipient site. 2. Inject 2% lidocaine and 1:80 000 adrenaline (epinephrine) intradermally into and beyond the marked area and wait for 5 minutes. 3. Lubricate the marked area with liquid paraffin. 4. Grip the arm on the lateral aspect with your left hand so that the skin which is marked out becomes tense, with a convex surface. 5. Cut the graft from the marked area using a Da Silva knife (Fig. 33.2). 6. Dress the donor site with a calcium alginate dressing, one layer of paraffin gauze, several layers of dressing gauze and a crepe bandage. 7. Apply the split skin graft directly on to the recipient site, spread it and anchor it using a minimal number of sutures. 8. Apply paraffin gauze, dressing gauze and a crepe bandage. 9. Re-dress the graft at 5 days. 1. Use these grafts following extensive skin loss from burns, trauma or radical excisional surgery. 2. Adequately prepare the recipient site to ensure a good ‘take’ of the graft. Grafts take best on exposed muscle or well-prepared granulation tissue. They do not reliably survive on exposed fat where there is a poor vascular supply. 3. The take of a graft can be improved in certain circumstances by meshing it, quilting it, or by delaying its application and then exposing it. These are described below. 4. Use an electric dermatome, if available, to harvest the graft using the same principles outlined below. 1. Following ‘cold’ surgical excisions apply pressure to obtain haemostasis. Avoid diathermy if possible since skin grafts do not take over diathermy burns. 2. Where subcutaneous fat is exposed, suture the overlying skin down to the muscle or deep fascia to cover it. 3. For infected wounds, take swabs for bacterial culture and prepare the recipient site with dressings of Eusol (Edinburgh University solution of lime) and paraffin. Change them 3–4 times a day. The recipient site is ready to receive a graft when it appears healthy and compact and has red granulation tissue with minimal exudates. 4. Choose the donor site most readily available to provide a large area of skin graft; this is usually the thigh. In young people, use the inner aspect of the thigh, where the donor site will be hidden. In elderly people, use the outer aspect of the thigh, where the skin is slightly thicker, so that if healing is delayed the wound is accessible and is easily managed. 1. Prepare both recipient and donor sites by applying skin antiseptic. 2. Have your assistant spread a large swab on the side of the thigh opposite to the proposed donor site. With a hand on the swab it is possible to support the thigh and tense the skin at the donor site by gripping the skin firmly with the swab. 3. Set the blade on the Watson knife to take the appropriate thickness of skin graft. Use a medium setting at first and then adjust it accordingly. 4. Apply liquid paraffin on a swab to the donor site and along the knife blade. 5. Ask your assistant to hold the edge of a graft board at the starting point with the other hand (Fig. 33.3). 6. Cut a skin graft with the Watson knife, holding a board in your non-cutting hand and advancing this a few centimetres in front of the knife. Start with the knife at 45° to the skin and once the blade has entered the dermis rotate it axially so that it runs just parallel with the skin surface. Use a ‘sawing’ action with the knife, advancing the blade only a few millimetres at a time. When you have harvested an adequate length of skin, turn the blade upwards and cut the graft off with one firm movement. If the graft is not detached with this movement, cut along its base with a pair of scissors. 7. Place the skin graft, outer surface downwards, on a damp saline swab and make sure that you have obtained sufficient skin; in case of doubt, take another strip of split skin. 8. Dress the donor site with calcium alginate dressing, one layer of paraffin gauze, dressing gauze, cotton wool and a crepe bandage. 9. Apply the skin graft to the recipient defect, ensuring that it is placed with its cut surface applied to the wound. The outer surface is opaque, the inner surface is shiny. Spread it, using two pairs of closed non-toothed forceps. 10. Cut off the surplus skin at the wound edge, leaving a margin of 3 mm around the periphery. 11. If the skin has been applied on a site to which you can apply a satisfactory compression dressing, do not use sutures. 12. Dress with several layers of paraffin gauze, dressing gauze, wool and crepe bandage, immobilizing the joints above and below the graft with a bulky dressing. 13. In areas where it is difficult to apply a compression dressing, immobilize the graft with interrupted sutures at the edge or insert a circumferential continuous suture around the graft. 14. Dress with paraffin gauze, dressing gauze, wool and strips of adhesive dressing. 15. Keep the graft site elevated postoperatively. 16. For grafts on the lower limb below the knee, do not allow the grafted area to be dependent for 7 days; fluid will collect between the graft and the base unless the graft is meshed. Then arrange progressive mobilization with compression support to the leg and foot, including the graft. 1. Use a delayed graft when the graft in its recipient site can be exposed indefinitely by the patient without being disturbed. 2. Apply a delayed graft to surgical wounds when haemostasis is difficult to establish perioperatively. Since the graft is exposed, it can be monitored regularly to ensure that it has taken. 1. Prepare the recipient site during the operation to excise all dead or doubtful tissue and any foreign material, after achieving haemostasis. 2. Dress with several layers of paraffin gauze, dressing gauze, wool and a crepe bandage. 3. Harvest large split skin grafts adequate to cover the defect and dress the donor site (see below). 4. Spread the split skin graft on paraffin gauze with the external opaque surface on the gauze. Fold and wrap this in a saline-soaked swab and place it in a sterile jar to be stored in a refrigerator at 4 °C. 5. On the following day, remove the dressing from the recipient site. 6. Apply the skin graft to the defect and spread it to cover all areas. Trim and store any excess skin at the margin. 7. Remove the paraffin gauze and leave the skin graft exposed. 8. Observe the graft at regular intervals. If serum collects beneath it, roll this out with cotton wool budded sticks soaked in saline, either to the edge or through a small incision made in the graft. 9. Be sure that the exposed area is well protected from any injury, particularly while the patient is asleep. 1. Meshed grafts are useful for providing skin cover to large areas, particularly when there is limited availability of donor skin, as often occurs in extensive burns. 2. They survive more reliably, as any underlying seroma that collects escapes through the interstices of the graft, leaving the graft elements intact. 3. They are effective in covering irregular surfaces as they can be moulded to these. 4. Unfortunately the resultant appearance is less satisfactory than a sheet graft. 1. Prepare the donor site in the usual way. 2. Harvest long, thin strips of split skin graft, as described above. 4. Pass the skin graft through the skin mesher. It may need to be placed on a carrier for this, depending on the type of instrument (Fig. 33.4). 5. Apply the mesh graft directly on to the recipient site using two pairs of non-toothed forceps. 6. Spread the skin out appropriately to cover all suitable recipient areas. 7. Suture the graft with continuous sutures at the periphery only if the area is difficult to dress. 8. Dress the area with a calcium alginate dressing, one layer of paraffin gauze, dressing gauze, cotton wool and crepe bandage. 10. Continue to re-dress at approximately 3-day intervals until the interstices have epithelialized. 3. Put two large sutures in the anterior aspect of the tongue and pull it forwards. 4. Apply the skin graft to the tongue and trim the excess at the edges. 5. Place multiple 3/0 absorbable sutures at the edge of the graft and throughout its surface (Fig. 33.5). Fig. 33.5 Quilted graft. The graft is fixed to a defect on the dorsum of the tongue with multiple sutures. 1. These give better cosmetic results than split-thickness grafts as they contract less. The quality of the skin is better but they need a very good vascular bed in order to survive. 2. Their most common application is on the face following excision of small lesions, and the best results are achieved in the eyelid region and around the medial canthus. 3. They can occasionally be used on the hand, but are not generally used elsewhere, as large grafts leave a large primary defect. 4. The best donor sites are those with surplus skin so that the skin can be closed primarily with an insignificant scar. The most common donor areas are post-auricular, pre-auricular, upper eyelid, nasolabial and supraclavicular skin. 1. Mark the area of skin to be removed and measure it. 2. Mark out a similar area in the donor site, allowing an extra 2.5 mm or more at each margin for the contour difference that will be present at the recipient site. 3. Plan an ellipse at the donor site around the proposed graft to allow primary closure. 4. Inject local anaesthetic at the excision and donor sites. 5. Create the defect at the recipient site. 6. With a size 15 blade, cut around the margins of the planned donor skin. 7. Raise the full ellipse of skin and subcutaneous tissue. 8. Undermine the skin edges at the donor defect and close this primarily. 9. Place the skin graft on to a wet saline swab, skin surface down. 10. Using small, curved scissors cut the subcutaneous fat off the skin graft and excise the redundant skin. 11. Place the skin graft into the defect and suture the edges at the periphery. Leave the suture ends long. 12. Use tie-over sutures to fix the dressing of paraffin gauze and proflavine wool. 13. Apply a pressure dressing for 24 hours, if possible. 1. Mark out the defect that will be left after excision of diseased or damaged skin, with excision of traumatized or contaminated wound edges, if necessary. 2. Identify a site on either pinna that corresponds in both size and shape to the planned defect. 3. Mark out this area with ink. 5. Plan the reconstruction of the donor defect. 6. Inject 0.5% lidocaine and 1:200 000 adrenaline (epinephrine) into both sites and wait for 5 minutes. 1. Skin flaps are used to repair or reconstruct defects where there is an inadequate blood supply to support a skin graft. They survive on their own blood supply, which they bring with them, and this may be beneficial to the recipient site. It may help by introducing a new blood supply to an avascular area following irradiation, or to a fracture site where there is delayed union. 2. The quality of the skin in a skin flap is almost normal and its texture and cosmetic appearance are much better than a graft. A skin flap may, however, lose its nerve supply and have its vascular supply and lymphatic drainage partly compromised in the transfer. 3. Until relatively recently, all skin flaps were based on a random vascular pattern. It was recognized that flaps with a length greater than their base would survive in certain areas. It is now realized that the reason for this survival is that these flaps had, unknowingly, been based on an axial pattern basis. If a flap is designed around a recognized artery and vein, with these vessels passing down its central axis, it may be safely transferred with a very large length-to-breadth ratio. Indeed, the breadth need be the artery and vein alone, providing they remain patent. 4. Many of the superficial muscles of the body have one principal vascular hilum, and these muscles can be rotated about the hilum on a single pedicle. It has further been realized that the skin overlying these superficial muscles receives its vascular supply from them. Consequently, the muscle with its overlying skin can be transposed as a single unit, forming a myocutaneous flap. A large number of these flaps have been described, but the more commonly used ones alone will be described below. 5. Special terms are traditionally used in relation to flaps. Delay indicates partial division of a flap at its base and re-suturing. This procedure encourages an improved blood supply to the flap from the opposite attachment. Complete division at the base carried out a few days later is then usually safe. After a flap has been transferred safely, the bridging portion may be divided. The two ends are trimmed and one is sutured into the new recipient area while the other is replaced in the donor site. This is referred to as in-setting. 6. When planning a flap, it is useful to employ a sheet of sterile paper or other similar material to act as a template. This can be cut to shape and used as a trial flap. 1. Z-plasties are used for releasing linear contractions. These usually develop along linear scars that traverse Langer’s lines. 2. These linear contractions are often most evident when crossing the concavity of the flexor aspect of a joint, but they can occur on extensor surfaces and in other areas unrelated to joints. 1. Draw a line along the full extent of the contracture (Fig. 33.6). 2. From one end, draw a line at 60° to the first line and of the same length. 3. From the opposite end, draw a line at 60° on the opposite side of the line for the same length. 4. Incise along the central line and excise any scar tissue. 5. Incise along the two lateral lines through the full thickness of skin and subcutaneous tissue. 6. Raise the flaps so formed, lifting the skin and subcutaneous tissue as one, holding the tip of each flap with a skin hook. 7. Interchange the two skin flaps. 8. If the flaps do not meet comfortably, undermine the skin and subcutaneous tissue around the periphery of the wound to allow them to lie correctly. 9. Suture the tips of the two flaps into place first. 10. Suture the remaining edges of the flaps. 1. The angle of the Z-plasty can be varied according to circumstances. 2. If the scar contracture is particularly long, use two or more Z-plasties, either in series or at intervals along the length of the contracture. 3. For scar contractures across a web space, use a W-plasty (Fig. 33.7). This consists of two Z-plasties, placed in reverse direction to each other, meeting at the base of the web space. 1. Small transposition flaps on the face have long been used. It is well recognized, that in this region, because of the vascularity of the skin, flaps with a large length-to-breadth ratio can be used safely. 2. Transposition flaps allow skin from an area of abundance to be moved to a defect where primary closure is inappropriate. 3. On the face, there is an abundance of skin appropriate for transposition flaps in the nasolabial area, the glabellar area and the upper eyelid. 4. In other parts of the body, many axial pattern flaps are used as transposition flaps. 1. Mark out the defect in ink. 2. Plan the transposition flap in an adjacent area with superfluous skin and mark this out (Fig. 33.8). 3. Check that the margin of the flap most distal from the defect is long enough from the fulcrum at its base to reach the most distal part of the defect. This is the limiting factor of the flap. 4. Excise the lesion to create the defect. 5. Raise the flap, including skin and subcutaneous tissue, and support the tip of the flap on a skin hook. 6. Transpose the flap into the defect and check that it fits. 7. Undermine the edges of the donor site defect and also the edges of the excision area to allow the flap to sit more comfortably in the defect. 8. Close the donor defect in layers. 10. Leave the flap exposed if possible, so you can monitor it. 1. A rhomboid flap is, as its name suggests, a flap with the shape of an equilateral parallelogram – a lozenge shape. 2. The rhomboid flap is most useful when the appropriate ellipse for excision of a defect is at right-angles to Langer’s lines. It has a similar effect to a transposition flap carried through 90°. 1. These are large flaps used to close relatively small defects. 2. They use excess skin at a distance from the defect and borrow small amounts of skin from a large area. 3. They are principally used to borrow skin from the neck to take up to the face. They can be used on the scalp and for treating sacral pressure sores. 2. Draw an isosceles triangle around the defect, with the apex of the triangle at or pointing towards the centre of the arc of rotation of the flap (Fig. 33.10). 3. Draw the arc of the rotation flap. 4. Raise the skin and subcutaneous tissue of the flap. 5. Undermine the skin at the edge of the defect and along the skin margin opposite the flap. 6. Rotate the flap into the defect. 8. If necessary, excise a wedge of tissue along the skin edge opposite the flap to assist rotation. If necessary, ‘cut-back’ into the flap at the opposite end of the arc of the flap from the defect, to create a better fit. 2. Mark out the smallest possible square or rectangle enclosing this defect, with lines parallel and at right-angles to Langer’s lines. 3. Extend the marks of the sides running parallel to Langer’s lines in each direction from the defect, thus delineating two flaps (Fig. 33.11). 5. Elevate the flaps and advance them towards each other. 1. These flaps are used specifically for repairing and reconstructing defects of the scalp. 2. Flaps on the scalp are notorious for their inability to stretch because of the inelasticity of the galea (Latin: = a helmet). 3. Division of the galea allows some stretching of the skin to take place, especially in younger patients. 1. Pay particular attention to the preoperative planning of the flap. Remember that the scalp flap will move in three dimensions. 2. Shave the patient’s hair over the whole scalp to a length of 1 cm. Leave long locks of hair only if you can confidently cope with these during the operation. 3. Make a careful plan of the flap to be used, and mark the outline of this. 4. Completely shave the hair for 1 cm on either side of this line and for 1 cm around the outline of the defect. 5. Wash the hair thoroughly to remove all cut and shaved hairs. 1. Place the patient, face downwards, on the operating table. Use a neurosurgical head-rest to support the head, if this is available. 2. Mark out the defect on the scalp. 3. Mark out the flap as previously planned. The flap may be of transposition, rotational or advancement design. 4. Plan a wide base to the flap around the periphery of the scalp to ensure that at least one principal vascular system enters its base. 5. Inject the planned outline of the flap with 0.5% lidocaine and 1:200 000 adrenaline (epinephrine) and wait at least for 5 minutes. 6. Excise the lesion and create the defect. 7. Incise along the margins of the flap to elevate it with the underlying galea so that this is included with the flap. 8. Reflect the flap backwards, exposing the galea. 9. Support the flap on the palm of the hand and make multiple incisions just through the galea with a no. 15 blade, across the full width of the flap (Fig. 33.12). 10. Identify the principal vessels beneath the surface of the galea and avoid dividing them. 11. Make multiple transverse incisions at right-angles to the first set, along the whole length of the flap. 12. Reflect the flap back into the defect. 13. Suture the flap into place with one layer of 3/0 non-absorbable sutures. 14. Always insert suction drains under the flap. 15. Dress with paraffin gauze, dressing gauze, cotton wool and crepe bandages. 16. Re-dress after 48 hours and, if possible, leave exposed. 1. This used to be the most commonly used flap to cover open (compound) fractures of the tibia and fibula with extensive soft tissue loss. 2. There are now many fascio-cutaneous and free flaps described that are more suitable but, on rare occasions, cross-leg flaps may be useful. 3. Cross-arm flaps and cross-thigh flaps can be created using the same principle. 1. Mark out the minimal defect on the leg. 2. Plan a flap from the calf of the donor leg, based medially, preserving the long saphenous vein superiorly. Do not exceed a 1:1 length-to-breadth ratio. 3. Enlarge the defect to a size that will receive a safe flap; that is, make the defect fit the flap. 4. Using tapes, ensure that with the legs kept closely together, the flap when hinged on its medial axis will stretch to the distal part of the defect, allowing enough tissue to create a bridge between the two legs. 5. Place the patient’s legs on top of a bead bag and apply vacuum so the patient’s legs are fixed in what will be their postoperative position. 6. Maintain the patient’s legs in this bead bag for as much of the next 24 hours as is practical so that he becomes used to the position preoperatively. 1. With the patient under general anaesthesia, apply a tourniquet to reduce bleeding. 2. Create the planned defect, obtain haemostasis, then remove the tourniquet from the leg. 3. Elevate the planned flap from the opposite leg, raising the deep fascia with the flap. 4. Check that with the legs in the appropriate position, the flap fits the defect. 5. Take a split skin graft from the thigh of the recipient leg and dress the donor area. 6. Apply and suture the split skin graft to the flap donor site and to the back of that part of the flap which will form a skin bridge between the two legs (Fig. 33.13). 7. Suture the four corners of the flap into place and subsequently suture the edges. 8. Dress the skin graft at the flap donor site and use minimal other dressings. 9. Splint the two legs in the bead bag and apply vacuum. 10. Ensure that there is no tension or torsion on the flap and that it is viable. 1. Perform a ‘delay’ procedure after 2 weeks using local anaesthesia only, partially dividing the base and then re-suturing this wound. 2. Take the patient back to the operating theatre after the third week and divide the flap completely under general anaesthesia, allowing a generous portion to be in-set at the recipient site. 3. Suture the flap into place avoiding tension. 1. Mark out the defect on the flexor aspect of the finger. 2. Apply a tourniquet and create the defect. 3. Mark out a flap on the dorsum of the adjacent finger opposite the defect, or as near as possible, avoiding the skin over the joints. 4. Elevate the rectangular flap with its base adjacent to the injured finger. 5. Place the flap over the defect (Fig. 33.14). 6. Increase the size of the defect to fit the flap. 7. Remove the tourniquet and achieve haemostasis. 8. Take a small split skin graft with a Da Silva knife. 9. Apply the skin graft to the donor defect. 10. Suture the flap into the defect. 11. Dress the wounds and splint the two fingers together after inserting some dressing gauze between the fingers. 12. Plan to divide the flap at 2 weeks, in-setting the skin bridge at both recipient and donor sites, and re-dress the wounds. 2. Use a tourniquet to control bleeding and create the defect. 3. Mark out an appropriate flap on the dorsum of an adjacent finger, as with a cross-finger flap. 4. Shave the planned flap with a Da Silva knife, removing a thin sheet of epidermis and superficial dermis. 5. Elevate the rectangular flap with subcutaneous tissue, leaving it attached at its base adjacent to the finger with the defect. 6. Increase the size of the defect to fit the flap. 7. Remove the tourniquet and achieve haemostasis. 9. Take a small split skin graft and apply this to the donor site and the flap. 10. Splint the two fingers together with some gauze dressing between the fingers. 11. Plan to divide the flap at 2 weeks, and in-set the bridge portion of the flap at both donor and recipient sites. 1. These flaps were formerly used as the standard technique for transferring a large amount of skin and subcutaneous tissue from the abdomen to a distant site such as the foot, the face, or elsewhere where there was extensive loss of tissue. They have been superseded almost totally by the introduction of axial pattern flaps, applied either as pedicle flaps or transferred as free flaps using microvascular surgical techniques. However, they may be useful in a few isolated situations. 2. Raise a planned rectangular area of abdominal skin and subcutaneous tissue by dividing along each side and, while still attached at each end, form the middle part into a tube. After a delay procedure, detach one end and transfer it to a wrist. When it has established a local blood supply, detach the other end and transfer it to the side of the defect. In further stages the whole flap is transferred to the defect and spread over it. 3. The patient requires approximately 5 months of hospitalization, with many operations, and failure is not uncommon at some stage. 4. Tube pedicle flaps can be raised from other sites, including the back and thigh. 1. Mark out a rectangular area 20 cm x 8 cm obliquely on the lower abdomen. 2. Incise along the long edges down to the deep fascia. 3. Dissect along the deep fascia between the two edges to elevate a bridge of skin and subcutaneous tissue. 4. Approximate the two skin edges of the bridge beneath the subcutaneous tissue to form a tube and suture as far as possible in each direction. 5. At either end suture the skin down to the base to create a closed tube (Fig. 33.15A). 6. Apply a large split skin graft to the residual raw area beneath the skin tube if this defect cannot be closed primarily. 1. Three weeks after raising the tube, divide the base of the tube completely, passing through the delay incision. 2. Close the residual defect on the abdomen using a split skin graft if necessary. 3. Place the patient’s contralateral arm on to the abdominal wall and find a suitable recipient site at the level of the wrist to insert the tube pedicle. 4. Mark out an appropriate sized circle on the wrist. 5. Elevate the skin and subcutaneous tissue from half of this circle and reflect it backwards as a flap. This produces a circular defect. 6. Suture the free end of the abdominal tube pedicle to the circular defect (Fig. 33.15B). 7. Splint the arm to the chest wall after applying plenty of padding beneath the axilla. 1. Free the abdominal tube flap from the abdominal wall by dividing the tube at its residual attachment to the abdomen, passing through the delaying incision. 2. Close the donor defect with a split skin graft if necessary, and dress the wound. 3. Transfer the arm with its attached pedicle to the site of the defect. 4. Mark out a recipient site for the tube pedicle, preferably on the distal side of the defect, so that the seam of the flap overlies the defect. 5. Create a circular defect with a healthy skin margin at the edge of the main defect. 6. Excise any scar tissue from the end of the tube pedicle, and insert the tube pedicle into the skin defect (Fig. 33.15C). Carry out a delay of the tube pedicle at the wrist end using the same technique as before. 1. Divide the flap from the wrist, incising through the site of the delay incision. 2. Return the original skin flap from the wrist to its former site, thus leaving a residual semicircular wound, and suture this. 3. Mark out a circular area on the opposite side of the defect from the initial attachment of the tube pedicle. 4. Create a circular defect with healthy skin margins at this site. 5. Insert the free end of the tube pedicle into this defect, keeping the seam over the defect. 1. Allow the flap to ‘soften’ before in-setting. This may involve waiting for 4 or 5 weeks or more. 2. Excise any doubtful tissue in the base to ensure that it is healthy. 3. Excise the seam of the tube pedicle and spread the skin of the tube pedicle over the defect. 4. Suture the edges into the edge of the defect. 5. Do not carry out any further revisions of the flap until it has been allowed to settle for at least several weeks and preferably for several months. 1. Scalp flaps are most commonly used for reconstructing defects of the hair-bearing skin on the face. They are usually used for reconstructing the upper lip, lower lip and chin areas in males, but there are many other occasional applications. 2. The flap is based on the posterior branch of the superficial temporal artery. 1. Plan the flap on the day before operation. 2. Cut all the hair in the area of the operation to less than 1 cm in length. 3. Shave the hair completely in the area of the planned incisions. 4. Check that the posterior branch of the superficial temporal artery is palpable and that there are no significant scars on the scalp, suggesting previous damage to this vessel. 5. Wash the head thoroughly to remove all cut and shaved hair. 2. If appropriate, increase the defect to the shape of a whole cosmetic unit. 3. If appropriate, increase the defect to make it symmetrical on either side of the midline. 4. Make a template of the defect with sterile paper. 5. With one end of a tape attached to the template, and a second fixed on the zygomatic arch below the point where the artery was palpated, swing the template up on to the vertex of the scalp using the point on the zygomatic arch as the pivot. 6. Mark out an appropriate area on the scalp behind the anterior hairline around the template. 7. Infiltrate the scalp along the marked line with 0.5% lidocaine and 1:200 000 adrenaline (epinephrine), and wait for 5 minutes. 8. Elevate the flap together with the underlying galea, starting at its distal extremity. 9. Identify the posterior branch of the superficial temporal vessels in the pedicle of the flap as it is raised, and adjust the shape of the pedicle if necessary to include these vessels (Fig. 33.16). 10. Taper the pedicle to 2 cm at its base, so that it can be rotated. 11. Transpose the flap into the defect, and in-set. 12. Cover the posterior aspect of the flap with paraffin gauze. 13. Close the donor defect primarily if possible. If it is too large, cover it with a split skin graft. 14. Plan to divide the flap at 2 weeks, providing there is a large inset. If you are in doubt, divide the flap at 3 weeks and return the pedicle. 1. The forehead flap has been used extensively in the past to provide lining of the oral cavity after major resections for tumour. It is occasionally used for resurfacing defects of the scalp and of the cheek. It is the best flap available for total nasal reconstruction. 2. It has been largely superseded by other myocutaneous and free flaps in its use for oral lining, but it remains an easy, safe and reliable flap to use, especially in the elderly and debilitated patient. 3. Its main disadvantage is the relatively poor cosmetic defect of its donor site. 4. It is not a true axial pattern flap, but it simulates one, surviving on the anterior branch of one superficial temporal artery and its accompanying vein. The distal part of the flap normally acquires its vascular supply from the opposite anterior branch of the superficial temporal artery and the supraorbital and supratrochlear vessels. When these vessels to the flap are divided, the vascular network between the branches of the various vessels is adequate to allow the flap to survive on the supply from the single vascular pedicle. 1. Create the defect and measure its dimensions. 2. Mark out the flap on the forehead, making this symmetrical and preferably including the whole of the forehead skin as a cosmetic unit. 3. Increase the defect to accommodate the flap. 4. If the flap is to be used for intraoral lining, excise the coronoid process of the mandible to allow the flap to pass inside the zygomatic arch. 5. Elevate the flap, commencing at the margin distal to the flap pedicle. 6. Identify and ligate the anterior branch of the contralateral superficial temporal artery and the supraorbital and supratrochlear vessels on both sides. 7. Lift the flap in the plane beneath the frontalis muscle. 8. Identify the anterior branch of the superficial temporal artery and its accompanying veins on the undersurface of the flap, and taper the pedicle to a 2-cm margin, including these vessels (Fig. 33.17). 9. If the flap is to be used intraorally, pass this through to the mouth beneath the zygoma. 10. If there is inadequate space to carry this out, excise a segment of the zygomatic arch. 11. To avoid a further operation some 2 weeks later, shave the epidermis and superficial dermis from that part of the pedicle that will remain buried between the skin surface and the intraoral surface. 13. Use 3/0 polyglactin sutures to elevate the skin of the eyebrows on either side symmetrically. 14. Lay several layers of paraffin gauze on the donor site. 15. Harvest a large split skin graft to cover the defect in one sheet. In a young person, use the inner aspect of the arm in preference to the thigh as this gives a better colour match. 17. Apply this skin as a delayed graft 24 hours later. 18. After 2 weeks, divide the pedicle and return it, to provide symmetry to the face.
Plastic surgery
GENERAL PRINCIPLES
Prepare
Technique
Sutures
Instruments
SKIN COVER
SKIN CLOSURE
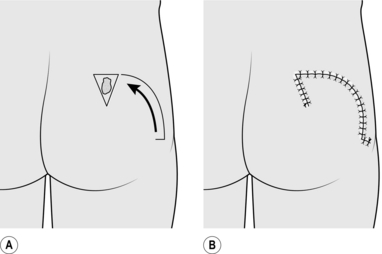
Action
SKIN GRAFTS
Appraise
SMALL SPLIT SKIN GRAFT
Appraise
Action
LARGE SPLIT SKIN GRAFT
Appraise
Prepare
Action
DELAYED EXPOSED GRAFTS
Appraise
Action
MESHED GRAFTS
Appraise
Action
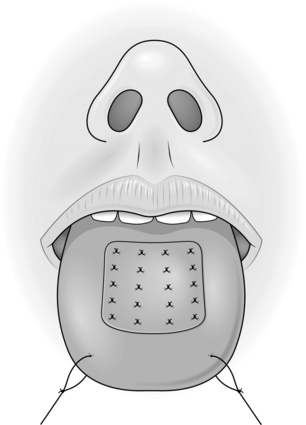
QUILTED GRAFTS
Action
FULL-THICKNESS GRAFTS
Appraise
Action
COMPOSITE GRAFTS
Action
RANDOM PATTERN SKIN FLAPS
Introduction
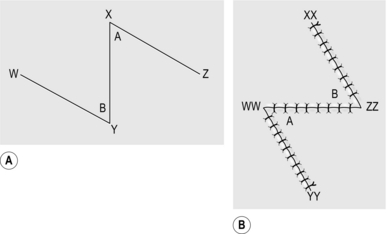
Z-PLASTY
Appraise
Action
Technical points
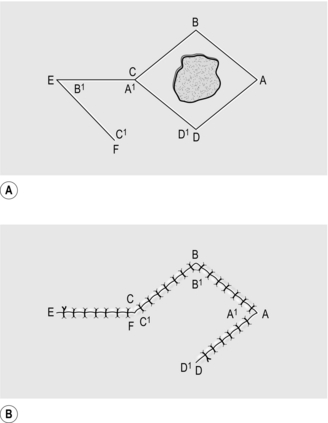
TRANSPOSITION FLAP
Appraise
Action
RHOMBOID FLAP
Appraise
ROTATION FLAP
Appraise
Action
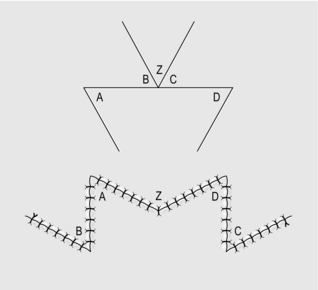
ADVANCEMENT FLAP
Action
EXPANSION FLAP
Appraise
Prepare
Action
CROSS-LEG FLAP
Appraise
Prepare
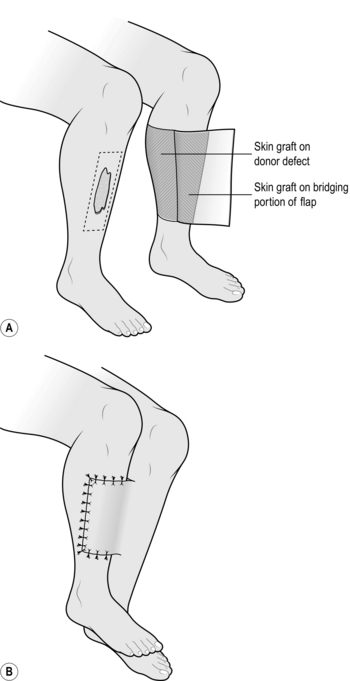
Action
Complete
CROSS-FINGER FLAP
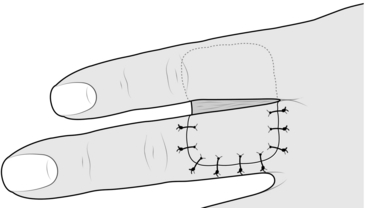
Action
REVERSE DERMIS FLAP
Action
ABDOMINAL TUBE PEDICLE FLAP
Appraise
ACTION
Raising the tube pedicle
Division of the tube
Transfer of flap to defect
Delay of tube pedicle
Transfer of whole flap to defect
Insert the flap
AXIAL PATTERN SKIN FLAPS
SCALP FLAP
Appraise
Prepare
Action
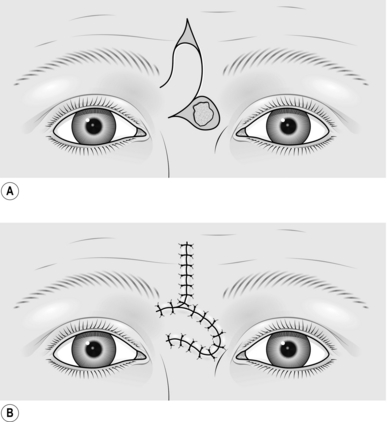
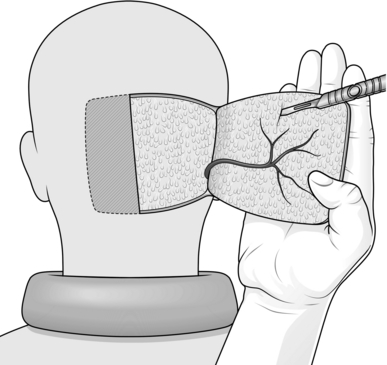
FOREHEAD FLAP
Appraise
Action
![]()
Stay updated, free articles. Join our Telegram channel

Full access? Get Clinical Tree


Plastic surgery