19 1. Management of breast disease involves a multidisciplinary team approach. Interact with and use the expertise of the different members of the team to deliver the best results. 2. Breast pain, lumps, lumpiness, deformity and nipple changes including inversion, bleeding and discharge are the common symptoms that are seen in a breast clinic. Ideally, manage all patients in a triple assessment clinic with facilities for concurrent radiological and cytopathological investigations. 3. Offer all patients with palpable breast lumps and asymmetrical nodularity ‘triple assessment’. 4. Triple assessment includes history and clinical examination, breast imaging – mammography, ultrasound or magnetic resonance imaging (MRI), and tissue diagnosis (core biopsy/cytology). Order mammography and/or ultrasound to complement clinical examination for women over the age of 35 years. Order ultrasound examination as the first choice of imaging investigation for women aged below 35 years. 5. Consider MRI scans for patients with lobular carcinoma, young women and those with dense breast tissue, to assess the size and extent of malignant lesions and assessment of the contralateral breast. MRI scans are used as a screening tool in patients who fall in the high risk category for family history of breast cancer in the age groups of 30–40. 6. For discrete breast lumps, ultrasound is useful to differentiate cystic from solid lesions. Obtain a needle biopsy, preferably under image guidance, from all solid lumps. The advantage of core biopsy is that you obtain a definite tissue diagnosis. In malignant lesions it establishes whether the lesion is invasive or non-invasive and determines receptor status. Fine needle aspiration cytology (FNAC) of breast lesions is now used less frequently than formerly. Reserve it for younger patients with clinically benign breast disease and for the assessment of axillary lymph node abnormalities. 7. Breast cysts are common findings, appear suddenly and are of concern to the patient. They are most common before and around the menopause but can occur at any age. Assess and confirm all cysts which appear as a lump with ultrasound. Aspirate and drain the cyst, establishing the diagnosis and ‘curing’ the condition so you can immediately reassure the patient. 8. You can leave alone lumps that prove to be benign on core biopsy or cytology. You can offer excision if the woman is above the age of 35, if the lump increases in size or is associated with pain, if the histology is equivocal or if the patient is anxious and requests an excision. As an alternative to observation or excision you can offer a younger patient with a confirmed fibroadenoma a variety of percutaneous methods such as vacuum-assisted Mammotome excision, laser ablation, microwave or cryo-ablation. 9. Obtain a core biopsy on all lesions that have indeterminate cytology (C3, C4), or inadequate cells (C1). For lesions with core biopsies reported to be equivocal, repeat the core biopsy or undertake formal excision. If a core biopsy/excision biopsy is performed for microcalcification or abnormal calcification a specimen radiograph must be obtained to confirm the presence of calcification and this should also be confirmed on histology, otherwise repeat biopsy must be considered. 10. Frozen section is no longer considered an investigation of choice in breast surgery. 11. Assess patients with a family history of breast cancer and stratify their risks based on published guidelines; in the United Kingdom refer to National Institute for Clinical Excellence (NICE) guidelines for Family History of Breast Cancer. Arrange regular follow-up including appropriate surveillance investigations based on local guidelines. Organize for all patients who fall in the high-risk category to have risk assessment and genetic counselling. 12. Arrange for patients who fall into a high-risk category for developing familial breast cancer, with BRCA1, BRCA2, CDH1, PTEN, STK11, and TP53 genetic defects to be appropriately counselled for genetic testing. If they prove to be a gene carrier, you can offer a risk-reducing mastectomy with immediate breast reconstruction. 13. A small group of patients present to you with problems related to the breast size and symmetry, including large or small breasts or asymmetry. They are best managed by a trained breast oncoplastic surgeon or in conjunction with a plastic surgeon. 14. You will also be referred male patients with breast symptoms including breast lumps and gynaecomastia (Greek: gynaikos = woman + mastos = breast). Treat male breast cancer like a female breast cancer, except that there is no role for breast conservation surgery. 15. Breast surgery for cancer is based on two important values: careful attention to oncological principles and consideration of the aesthetic and cosmetic outcome. 16. Surgical management of breast cancer has become less radical (Latin: radix = root; by the roots) over the years without compromising the local control or long-term survival. 17. Multimodality treatments of breast cancer, using new generations of drugs, have made a significant impact in improving survival. 1. This procedure is performed in the outpatient clinic and involves insertion of a fine needle (21–23 G) into the lesion and aspiration of cells which are spread on glass slides and stained. This has the advantage of being fast and applicable for all breast lumps and requiring the minimum of special equipment. 2. It has the disadvantage of requiring the special skills of an experienced cytologist and the quality of the aspirate is operator-dependent, demanding experience and skill. Moreover, it is not possible to differentiate between invasive and non-invasive cancer. 3. The cytological aspirate is usually reported as containing no cells (C0), blood and debris or inadequate cells for reporting (C1), benign epithelial cells (C2), atypical cells, probably benign (C3), cells suspicious of carcinoma (C4) or diagnostic of carcinoma (C5). 1. After obtaining verbal consent, attach a 21G (green) or 23G (blue) needle to a 10-ml syringe with or without an extractor gun. 2. Clean the overlying skin then fix the lump between thumb and index finger of the non-dominant hand. If necessary, use ultrasound localization as an aid while performing a FNA. 3. Warn the patient. Insert the needle into the middle of the lump and apply suction to the syringe plunger. Move the needle in several different directions through the lump while maintaining negative pressure. Do not allow the needle point to leave the skin or air enters the needle and the aspirated material is drawn into the syringe. 4. Release the pressure and then withdraw the needle. Ask the patient or your assistant to apply pressure to the breast for 2 minutes to avoid haematoma formation. 5. Eject a drop of aspirate onto the end of a dry and clean microscope slide. Gently spread this out with another slide to create a thin smear. 6. Immediately label the slide and ensure that no material falls onto the table, which could then be picked up onto the back of the next set of slides. Spray the slide with, or immerse it in, a fixative. Send the slide for reporting. 7. If you do not succeed in aspirating any cells, repeat the procedure. 1. Ideally, remove a core biopsy from every lump. Even if the lump is clinically palpable, where possible employ ultrasound guidance. 2. Core biopsy is a more accurate method of tissue diagnosis, allowing for a definite diagnosis to be based on the results of core biopsy. 3. The receptor status can be performed on core biopsy and decision for hormonal therapy can be made based on that. 4. Drag cytology (touch preparation cytology) obtained from the core samples can be used to give an immediate report similar to cytology. 5. Ductal carcinoma in situ (DCIS) can be diagnosed only on core biopsy. 6. Core biopsy can be performed clinically, under US guidance or under stereotactic control 1. Infiltrate the skin over the lump with 1% lidocaine. Introduce the needle into the skin and superficial tissue to inject the local anaesthetic. Deep infiltration with local anaesthetic can obscure a small lump. Preferably perform this procedure under US guidance. 2. Wait 2 minutes for the anaesthetic to work. 3. Make a small nick in the skin with the tip of a sharp-pointed scalpel (no. 11 blade). 4. Fix the tumour within the breast between finger and thumb, to provide a static target. 5. Prefer to approach the lump from the side to avoid firing the needle backwards and penetrating the chest wall. 6. Insert the core biopsy needle, in its closed position, through the skin incision until you reach the edge of the tumour. 7. A spring-driven automatic biopsy needle can obtain a sample more rapidly than the one obtained by the manual hand driven one and it causes less discomfort for the patient. 8. Warn the patient about the clicking sound before firing the automatic device. 9. If microcalcification is a dominant feature, perform the biopsy under stereotactic mammographic control. X-ray the specimen to ensure you have obtained the correct specimen. 10. Obtain at least three samples in different directions from the lesion and transfer the specimens into small bottles containing formalin and label them appropriately. 11. Dispose sharp objects into appropriate containers. 12. Vacuum-assisted Mammotome biopsy is being used for obtaining cores of tissue from impalpable lesions, or for completely excising small impalpable lesions. Insert a small metallic marker clip if all the microcalcifications have been removed to allow subsequent localization of an abnormal area. 1. Discuss the imaging (mammograms/ultrasound scans) with the radiologist who inserts the localization needle and wire. 2. Discuss the needle-insertion site, direction and depth with the radiologist, and the type of wire used, such as simple hook, Reidy or Nottingham needle. It is helpful if the distance between the needle entry site and the lesion is as short as possible. 3. Ensure that the mammograms are taken in two planes (cranio-caudal and medio-lateral oblique) following wire insertion. Check that the images are available in the operating theatre. 4. Frozen section has no role in assessment of biopsy specimen. Plan a cosmetically satisfactory incision (Fig. 19.3) and estimate the likely surface marking of the lesion from the preoperative mammograms. The incision need not be placed at the point of wire entry. It is useful to measure the length of the wire that is outside. This helps to determine the length of wire inside and helps guide your excision. 1. Raise a skin flap between the chosen site of incision and the needle entry site until you reach the wire in the subcutaneous plane. Grasp the wire with an artery forceps and cut off the excess wire. 2. Follow the wire down towards the site of the lesion by sharp dissection or use the diathermy. Use a scalpel instead of heavy scissors as the latter can bend or inadvertently cut the wire. When using the diathermy for excision, be careful not to activate diathermy whilst it is in contact with the wire, to avoid burning the skin. 3. Once you reach the point of the wire at least 2 cm above the tip (site of the suspected lesion) excise the lesion with an appropriate radial margin (depending on whether the excision is diagnostic or therapeutic). Mark the specimen with metal clips to facilitate orientation and obtain the specimen that was identified by radiography. 4. Achieve haemostasis, and check the cavity for any residual suspicious tissue. 5. Check the radiograph of the specimen to confirm that it contains the mammographic abnormality. If the lesion is close to a specific margin, excise that specific margin. If the lesion is not visible, you need to re-excise and repeat the specimen radiography until you find it. 6. Close the wound as for excision biopsy. 7. Take extra care to avoid needle-stick injury from the wire. Label the specimen container clearly and warn the pathology staff about the wire and the risk of needle-stick injury. 8. Localization of lesions with radioactive injection (ROLL, radioactive occult lesion localization) is another approach currently used in many centres. Results from a recent study on the use of radioactive seed localization also show significant promise. 1. Reserve punch biopsy of the skin for nipple biopsy suspected of Paget’s disease, recurrence in the skin following surgery for breast cancer, or in suspected inflammatory cancer (where dermal lymphatics are involved with cancer, giving an appearance of inflammation). 2. Paget’s disease starts in the nipple and then moves on to the areola and underlying breast ducts. 3. Always perform a mammogram in Paget’s disease to rule out underlying malignancy or DCIS. 2. Infiltrate with 2 ml of 1% lidocaine using a blue needle (size 23 G). 3. Use a 3.5- or 4-mm size punch for performing the biopsy. 4. Use the punch to press on the area where you wish to obtain the biopsy. 5. Hold the obtained tissue with forceps and use scissors or a blade to cut the tissue from the underlying breast. 6. Send the obtained sample to the pathology laboratory in formalin. 7. Compress the area of biopsy for 5 minutes to stop the bleeding. 8. You can apply Steristrips to close the defect left by the punch. 1. This develops most commonly during lactation. Empty the affected breast by manual pressure, but encourage the mother to continue breast feeding. 2. Treat early infection with antibiotics alone but do not wait for fluctuation, or widespread destruction of the underlying breast tissue may have developed by then. Start co-amoxiclav early. If an abscess is present clinically or on ultrasound, aspirate it using a wide-bore needle under US guidance and repeat aspiration as necessary. 3. If the skin over the abscess has become thin, drain it under general anaesthesia. 1. Site the incision over the point of skin thinning, but if it is near the nipple use a peri-areolar incision. 2. Send pus for culture and antibiotic sensitivities. If necessary, change to the appropriate antibiotic. 3. Introduce a gloved finger into the abscess cavity and rotate it to break down all loculi in a potentially multiloculated cavity. 4. If the cavity allows, introduce a retractor and examine the walls. Stop any bleeding using diathermy. 5. If this is a lactational abscess cavity it is not necessary to obtain biopsy specimens. Otherwise remove a specimen from the cavity to exclude a carcinoma. 6. Ensure that the incision is sufficiently long to allow the wound to heal from the deepest parts upwards, in order to prevent the development of a chronic abscess. 7. Insert a drain if you observe a large residual cavity. Alternatively, loosely pack the cavity. 8. Apply a non-adhesive dressing. 9. Advise the patient to wear a supportive brassiere to diminish the risk of developing a haematoma. 10. Allow bilateral breastfeeding to recommence as soon as it is comfortable. 1. Duct ectasia (Greek: ex = out + tenein = to stretch; dilatation), is widening of the breast lactiferous ducts and is often related to breast inflammation. It is a benign condition characterized by nipple discharge, swelling, retraction of the nipple or a lump that can be felt. 2. Occasionally, a fistula develops between a duct and the skin at the areolar margin. This discharges pus, and often heals spontaneously before breaking down again. As it is related to smoking, advise abstention. 3. If a mammary duct fistula does not heal, you may need to excise it under antibiotic cover (see below). 1. If there is a fistula, insert a probe through the external opening and hook it up though the nipple. Cut around the areola, extending to no more than a quarter of the nipple and excise the fistulous track to the back of the nipple. 2. Obtain perfect haemostasis. 3. Close the wound with interrupted absorbable sutures. 4. If you are operating to excise the major ducts (Hadfield’s operation), you need a longer periareolar incision – but no more than half the circumference of the areola. 5. Ensure that you are beneath the subareolar plexus. Cut the subcutaneous tissue down to the duct system. 6. Use blunt and sharp dissection to reach the plane, circumferentially around the terminal lactiferous ducts, just deep to the areola and nipple. Preferably, use bipolar diathermy. If you are using monopolar diathermy, do so cautiously to avoid nipple necrosis. 7. Divide the ducts close to the nipple and remove them with a conical wedge of tissue including the distal 1–2 cm of the subareolar tissue, as well as the major lactiferous ducts and sinuses. 8. If there is a fistulous tract, ensure that you excise it in its entirety with all the granulation tissue. 9. Send all tissue for histological examination. 10. Insert a small vacuum drain and close the wound with 3/0 subcuticular absorbable sutures or interrupted 4/0 polypropylene. 1. If the nipple discharge is serous (watery), serosanguinous, or frank blood arises from a solitary duct, then manage it as for nipple bleeding (below). 2. Test for blood. This is usually done using Dip-Stix. Nipple discharge can be sent for cytological examination. Intraductal papilloma is the commonest cause of bloody nipple discharge. 3. If one duct is associated with blood-stained discharge and imaging is negative, then a microdochectomy (Greek: small duct cutting out) (Fig. 19.4) may be required. 4. If embarrassing nipple discharge occurs in patients above the age of 45, prefer Hadfield’s procedure (excision of major ducts). 5. Multiduct multicolour nipple discharge is often physiological and does not need intervention. 1. Determine from which duct the blood is coming. 2. Arrange an ultrasound scan and a mammogram to exclude underlying malignancy. 3. Send the material for cytology; it may yield papillary cells or, very occasionally, carcinoma cells. 4. Consider ductoscopy when this available 5. Surgically explore the breast unless the bleeding occurs during pregnancy, in which case it is frequently bilateral and stops spontaneously after parturition, or in a patient who is taking anticoagulants. 1. Perform the procedure either under a local or general anaesthetic. 2. Infiltrate the area with bupivacaine 0.5% and adrenaline (epinephrine) 1: 200 000 to minimize bleeding and postoperative pain. 3. When you pick up the nipple between finger and thumb, you may feel thickening along one duct, or feel the probe within the duct. 1. Make a circumareolar incision and dissect down to expose the duct. 2. Excise the duct with a small amount of surrounding breast tissue and send it for histology. 1. Make a peri-areolar incision (but no more than three-fifths of the circumference of the areola). 2. Cut the subcutaneous tissue down to the duct system. 3. Use blunt and sharp dissection to reach the plane circumferentially around the terminal lactiferous ducts, just deep to the areola and nipple. 4. Divide the ducts close to the nipple and remove them with a conical wedge of tissue including the distal 1–2 cm of the subareolar tissue, including the major lactiferous ducts and sinuses. Orientate the specimen with marking suture for the pathologist. 5. Take a purse-string suture around the subcutaneous tissue where you have removed a wedge of retroareolar tissue, to prevent sinking of the nipple. 6. You may insert an inverted suture with vicryl from inside the nipple to prevent it from inverting. 7. Close the subcutaneous layer with absorbable sutures and skin with a non-absorbable suture such as prolene or ethilon.
Breast
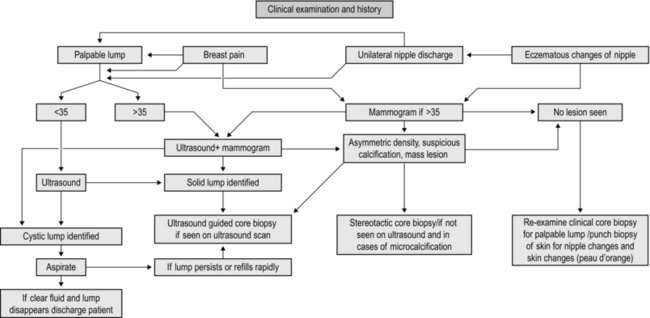
MANAGEMENT OF BREAST SYMPTOMS (Fig. 19.1)
Assessment
BREAST BIOPSY
FINE NEEDLE ASPIRATION CYTOLOGY
Action
CORE-CUT OR ‘TRU-CUT’ NEEDLE BIOPSY(Fig. 19.2)
Appraise
Action
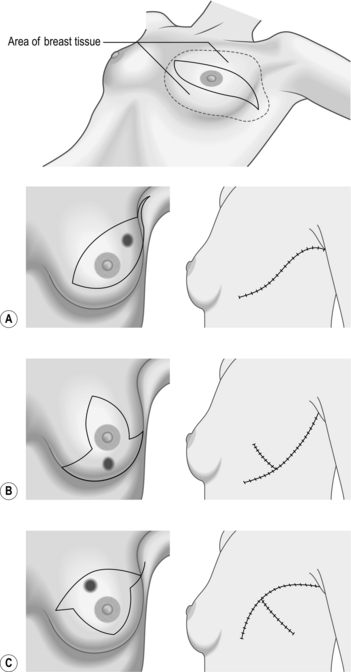
NEEDLE-LOCALIZATION BIOPSY
Prepare
Access
Action
PUNCH BIOPSY
Appraise
Action
BREAST ABSCESS
Appraise
Action
DUCT ECTASIA AND MAMMARY DUCT FISTULA
Appraise
Action
NIPPLE DISCHARGE AND BLEEDING
Appraise
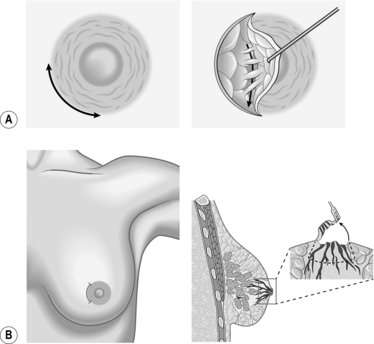
NIPPLE BLEEDING
Appraise
Access
Action
Total duct excison (Hadfield’s procedure)
![]()
Stay updated, free articles. Join our Telegram channel

Full access? Get Clinical Tree